Press "Enter" to skip to content

Category: acquired things

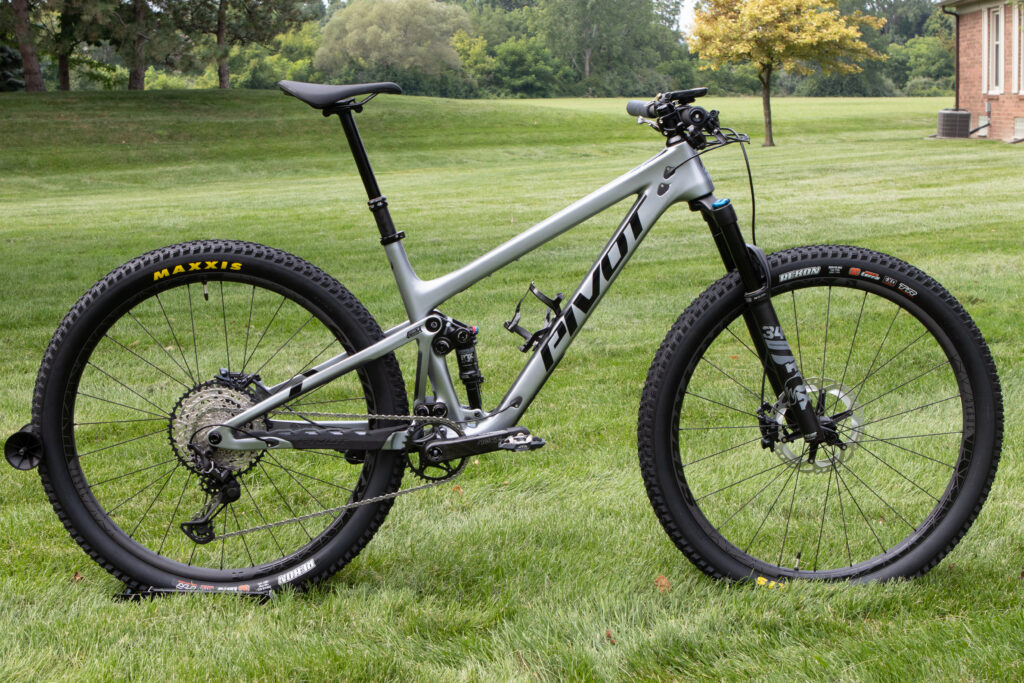
New XC Bike: Pivot Mach 4 SL v3

I never really thought I’d have a fast XC bike again, but, I was wrong. And I’m glad. And impressed at just how capable a “modern” XC race bike is.

For almost three years I’ve had the amazing Pivot Trail 429 (v3) as my main mountain bike. It’s an incredibly capable trail bike that I’ve ridden all over the midwest, from Arkansas to Copper Harbor to Tennessee, and it’s been wonderful. But, being a longer, slacker bike the one place I wasn’t super-keen on it was our standard Lower Peninsula classic XC trails, especially those with fast, tight, twisty sections. It’s fun, but just not ideal for that stuff and felt like I had to dump the front end into the really tight corners.

In late 2022 I unexpectedly found myself buying a used-but-like-new super-well-equipped Pivot LES hardtail from a buddy (price I couldn’t pass up) which once again gave me a taste of a proper XC bike. While I used it for lots of local rides, and both Ore to Shore, and Lumberjack 100 in 2023, it never quite clicked. I had an absolute blast riding it, especially on the smooth sandy trails in the northern LP, but maybe due to the lack of dropper or the 100mm fork or my weird body proportions, it was fun and fast but never quite felt like mine. I liked having it around, and it was fun, but I was routinely eyeing other XC bikes.

When Pivot announced the v3 of the Mach 4 SL in 2023 it looked really appealing, but I couldn’t justify it. I put thoughts of a new bike aside… Until now. After a lot of thinking and basically coinciding with my birthday, a brand new Pivot Mach 4 SL v3, Pro XT/XTR build with carbon wheels, in the eye-catching Seafoam Green, found it’s way home. (And away went the LES, passing on the good deal to a buddy who was looking for a superlight XC race bike.)

Unlike normal for me, the build is almost completely stock. It’s incredibly well equipped as shipped, so outside of contact points (saddle, grips) the only changes I made were for fit, swapping in a shorter crank and a lower-rise bar.

The bike shipped with a really nice Race Face Aeffect crankset and a 34t ring, but had 175mm arms. I’ve been riding 170mm cranks on the Trail 429 for years, rather liking it, and wanted the same on here. Pleasantly surprised to see the frame fitted with a Shimano bottom bracket, I was able to swap in an XT crankset with no extra work. After confirming with Pivot that the bike is spec’d with a 53mm chainline crank I ended up going with the 52mm FC-M8100-1 which Shimano spec’s for both Boost (148mm) and standard (142mm) rear ends. The other option was the Boost-only 55mm FC-M8120-1, but sticking with the narrower chainline improves big-cog performance, so it’s preferable if possible. The narrower FC-M8100-1 fits the Mach 4 SL v3 perfectly, with plenty of clearance around the ring and arms, works wonderfully, and was a great choice.

Shimano XT FC-M8100 crankset with 34t ring fits very nicely with plenty of clearance.

Chainring-wise I wanted to stay with a 34t, but being (weirdly) cheap I opted for the SLX-level SM-CRM75. It’s only ~10 grams more than the XT-level SM-CRM85 but can be found for around half the price ($33 vs. $59). Both have steel teeth and an aluminum carrier, and upgrading to the XT only gets an anodized spider (vs. painted) and carbon fiber (vs. glass fiber) non-load-bearing plastic bits. Thus, performance is effectively identical. Due to series colors the center spider is a little bit of a blueish grey and doesn’t match the other parts, but in the overall scheme of the bike it looks fine, and even the smallest amount of dust obscures the variance.

Where I didn’t go cheap was on the pedals… My go-to pedals are typically XT-level PD-M8100 (regular) or PD-M8120 (trail), but finding XTR PD-M9100 on sale at the price XTs would normally sell for I figured I’d give them a go. They are only marginally lighter (28g/pair), but have a smaller center that should clear dirt and debris better, and a slightly shorter stack height. But mostly, I liked how they looked, wanted to see how they felt, and wanted new pedals for a new bike. Thus far they seem good, and I don’t regret purchasing them.

Grip-wise I put aside the stock Pivot Phoenix Factory Lock-On Grips and fitted ESI Extra Chunky grips in black with generic BMX-ish screw-in bar plugs. The narrow bar plugs are only slightly larger than the bar diameter, meaning they don’t press on my hand when my hand sits at the outer edge of the bar. While the Pivot grips are excellent I prefer foam ESIs on my mountain bikes. Kristen really likes the Pivot grips, so these’ll end up set aside for her.

The stock saddle is a fairly narrow Pivot-branded WTB which just doesn’t work for me, so the 143mm-wide Specialized Power saddle (conveniently with titanium rails) from the LES is now on the Mach 4 SL.

The bike also originally shipped with a 760mm wide, 20mm rise, 5° upsweep, and 9° backsweep bar. I swapped this out for another Pivot-branded bar I’d bought from a friend earlier in the year. After cutting 5mm off of each end it’s now 750mm wide, 6mm of rise, no upsweep, and 9° of backsweep. This is in line with what I have on my trail bike and so far feels good, although I may go down to 740mm or maybe even 730mm after I ride it more.

Fitted with everything including a bell (but no bike computer), the bike is a smidge over 26 pounds. While I wasn’t focused on weight with this build, I did pay attention as this level of bike implies it’ll be fairly light, and this impresses me. While it’s obstensibly an XC bike, and my previous (the LES) was under 21 pounds, this is far more capable: 120mm / 105mm of travel, dw-link suspension, 51t cassette, dropper, etc. Not long ago this would have been called a trail bike, and I think I’d ride it on anything that I personally am willing to do.

My first ride was at Stony Creek and thus far I’m incredibly happy. The redeveloped trails here have everything from lumpy rocks to smooth trails, small drops and wood features to semi-steep rock rolls, perfect for a bike shakedown and demo. The Mach 4 SL felt amazingly fast and comfortable on everything without really trying; just simply composed. It handles the tight/twisty stuff the way I was looking for, yet still feels really good on technical features and small drops. It’s clearly not as burly and squishy as the Trail 429, but that’s the point.

Pedaling firms up the rear end while still absorbing little bumps and keeping the tire in contact with the ground. Rolling over rough spots or dropping off things just feels right. The factory tire choice of a Rekon in the front and Rekon Race in the rear is a good one, as it both rolls nicely yet still has plenty of traction to handle aggressive steering. I also think a 34t ring coupled with the 10-51 cassette will be right. (On the LES I had a 34t, but with the 46t cassette it was a bit too tall for longer climbs. This should be much better.)

I have a bit more suspension setup to do, as in the factory-recommended settings the fork’s damper is a bit noisy and feeling not-quite-right, but dialing that in will just take a bit of time. I may toss the ShockWiz on there as I typically do to try and dial things in further. But, one thing at a time.

Initial build details are as follows:

Frame: Pivot Mach 4 SL v3 (Large, Seafoam Green)
Fork: Fox 34 Factory Step-Cast GRIP SL (2025, 34, K, FLOAT SC, 29in, F-S SC, 120, Grip SL, 3Pos-Adj, Matte Blk, No Logo, Kabolt 110, BLK, 1.5 T, 44mm Rake, N/M OE – Part: 910-31-870)
Fork Axle: Fox Kabolt
Rear Shock: Fox Float Factory (2025_24, FLOAT, F-S, K, 2pos-Adj, Evol LV, Pivot, Mach 4 SL MD-XL, 190, 45, 0.5 Spacer, CM, RM, CMM, No Logo, OE – Part: 972-05-949)
Headset: Pivot Integrated Race Headset
Crankset: Shimano XT FC-M8100-1
Crank Arm Protectors: PRO Crank Protector (PRAC0144)
Bottom Bracket: Shimano BB-MT800-PA
Chainring: Shimano SLX SM-CRM75 (34t)
Chain: Shimano CN-M8100
Derailleur: Shimano XTR RD-M9100-SGS
Shifter: Shimano XT SL-M8100-IR
Shift Cables / Housing: Jagwire / Shimano OE
Cassette: Shimano XT CS-M8100-12 (10-51)
Brakes Calipers: Shimano XT BR-M8100
Brake Levers: Shimano XT BL-M8100
Brake Pads: Shimano J04C-MF (Metal w/ Fin)
Brake Rotors: Shimano RT-MT800-S (160mm)
Stem: Pivot OE Aluminum (60mm x -6°)
Bar: Pivot OE Carbon (Diameter 35mm, Width 760mm, Rise 6mm, Sweep 9° – Cut to 750mm)
Wheels: Reynolds Blacklabel 309/289 XC
Tires: Front: Maxxis Rekon 29 x 2.4WT 3C/EXO/TR (TB00017500), Rear: Maxxis Rekon Race 29 x 2.40WT EXO/TR (TB00211100)
Seatpost: Fox Transfer (31.6mm x 150mm, Original Version)
Dropper Lever: Fox Transfer Post Lever (I-SPEC EV Mount)
Seatpost Collar: Pivot OE
Saddle: Specialized Power Expert (143mm)
Pedals: Shimano XTR PD-M9100
Grips: ESI Extra Chunky (Black)
Bar End Plugs: Generic Aluminum BMX-Type (Black)
Bottle Cages:Specialized Zee Cage II (Black Gloss, 1x Left)
Computer: Garmin Edge 840
Speed/Cadence Sensors: Garmin Bike Speed and Cadence Sensor
Computer Mount: Best Tek Garmin Stem Mount, Stem Mount for Garmin Computer, Adjustable Black
Bell: ROCKBROS Bike Classic Bicycle Bell (Black)
Derailleur Hanger: SRAM Universal Derailleur Hanger
Frame Protection Tape: McMaster-Carr UHMW PE

Comments closed

Surprise New Bike Day: 2023 Salsa Warbird C GRX 600 1x

It’s been no secret that for years my favorite drop bar bike was my beloved 2019 Salsa Warbird Carbon 105 700. This bike has been with me on some of my most memorable rides, from remote parts of the UP and Canadian wilderness to silly northern LP bike path routes, from single track where it didn’t quite belong to long summertime wanders on dirt roads.

For years, and especially in 2023 after switching it to 1x, I’ve told numerous folks that there’s nothing I’d change on it and no reason to get anything new; it’s simply excellent. But then in late November while cleaning it up for winter I found a bit of a shock: a small starburst crack in the frame at the top tube/seat tube junction and a couple other hairline cracks on the seat tube. As things wear out and everything eventually fails I can’t say I was devastated, but I really was disappointed. I loved riding that bike and did not want to change anything. I even came to really like the white color.

After finding the crack I rode it a couple more times and things seemed fine. I have a long seatpost which extended well below the crack area, and I didn’t feel or hear anything when riding, but like any crack it’s best to be safe. The warranty for a carbon frame is five years, which was coming up, so I sent photos of the crack to the folks over at the venerable Tree Fort Bikes and Salsa to get things rolling. I wasn’t sure if it was problematic, and — honestly — I really didn’t want to replace the frame if it wasn’t needed, but I wanted to ask. I love how my Warbird looks with the white frame and reflective black vinyl that I added, and I wasn’t exactly keen on a matte black replacement, re-running brake lines, etc. And, it rode great!

After just a handful of questions Craig emailed me with a massive surprise: Salsa is replacing my 2019 Warbird (v4) frame with a complete 2023 Warbird C GRX 1x bike, and instead of being a simple black warranty replacement it’s a nice clay-ish grey color! This was better than I could have possibly hoped for, because not only did it replace the problematic frame, it moved me to Shimano’s GRX drivetrain! And I also wouldn’t have to cut and re-run the brake lines, etc.

Back when my Warbird came out GRX wasn’t available, so it came with the (very good) 105 R7000 road groupset. This is an amazingly good drivetrain, but for rougher roads I switched to the Ultegra RD-RX800 derailleur, which was basically a high-end road derailleur with a clutch, originally intended for cyclocross use. Then in late 2022 I used a few Wolf Tooth Components parts and made it a sorta-hacky yet very functional 1x drivetrain because I wanted to get away from the problems inherent with 2x and riding in poor conditions, notably gunking up a front derailleur.

This setup worked great, but I felt a bit limited by maximum cassette size (40t) and my left brifter had a disconnected shift lever, which would rattle around on chattery roads. Minor, I know, and while I was proud of the semi-hacky drivetrain, improvements such as a full GRX drivetrain would have been nice, but I couldn’t justify it when things worked so well. But suddenly now I had it!

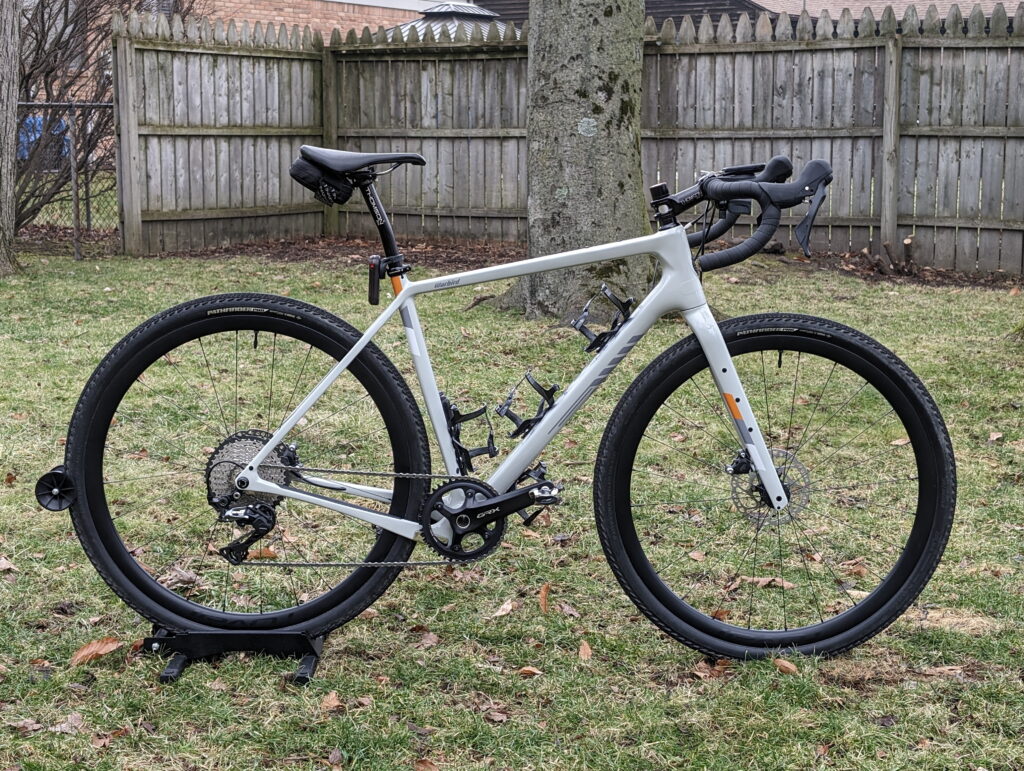
Last week I picked up the bike from Tree Fort, and over some unseasonably rainy, cold, and blah afternoons I shuffled parts around and now it’s ready. My new gravel bike, a 2023 Salsa Warbird C GRX 1x with a few upgrades!

Build

Frame / Fork: 2023 Salsa Warbird Carbon / Salsa Waxwing (Light Grey)
Wheelset: Specialized Roval Terra C
Ratchets: DT Swiss HWTXXX00NSK54S (54T)
Tires: Specialized Pathfinder Pro 2Bliss Ready (700×42, Black Sidewall)
Crank: Shimano FC-RX810-1 (42T, 172.5mm)
Bottom Bracket: Shimano SM-BB72-41B
Cassette:
 Shimano CS-M8000 (11-42)
Right Shift/Brake Levers:
Shimano ST-RX600-R
Left Shift/Brake Levers:
Shimano BL-RX600-L
Brake Calipers:
Shimano BR-RX400
Brake Rotors: Shimano SM-RT64 (160mm)
Brake Pads:
Shimano K05S-RX (Resin)
Chain:
Shimano CN-HG601-11
Rear Derailleur:
Shimano RD-RX812
Bar Tape:
MSW HBT-300 Anti-Slip Gel+ (Black)
Handlebar: Salsa Cowbell Deluxe (44cm)
Headset: Cane Creek Hellbender 70 (IS41/28.6/H9 | IS52/40)
Stem: Thomson Elite X4 (SM-E139 10° X 100mm X 31.8 1-1/8 X4 Black)
Spacers: Generic Aluminum
Stem Cap: MASH Donut 2.0
Seatpost: Thomson Elite (SP-E113SB 27.2 X 410 Setback, Black)
Seatpost Clamp: Salsa Lip Lock
Saddle: Specialized Power Expert (143mm, Black)
Pedals: Shimano PD-M8100
Bottle Cages: Specialized Zee Cage II (2x Left, 2x Right)
Bottle Cage Screws: McMaster-Carr 94500A233 (316 Stainless, M5 x 0.8mm, 20mm)
Front Light: Outbound Lighting Detour
Rear Light: Garmin Varia RTL515
Rear Light Mount: Garmin Varia Seat-post Quarter Turn Mount
Bell: RockBros Bell (Black)
Computer: Garmin Edge 840
Computer Mount: SRAM Quickview Computer Mount
Sensors: Garmin Bike Speed Sensor (Front Wheel), Garmin Cadence Sensor 2 (Crank)
Anti-Rub Tape: McMaster-Carr 76445A764 (Low-Friction UHMW Tape, 0.0115″ Thick, 2″ Wide)
Mounting Hole Plugs: Heyco 2590
Top Tube Bag: Revelate Designs Mag-Tank Bolt-On
Saddle Bag: Lezyne Road Caddy
Frame Pump: Lezyne Sport Drive HP
Derailleur Hanger: 465 / QBP FS2322

Weight

Total weight for the bike, with everything but bottles (including lights, pump, saddle bag+tools, and computer), is 22.54 pounds. Removing the computer/lights/saddle bag/pump brings it down to 20.78 pounds, so I expect that without pedals, cages, or mounts (the usual way of weighing a bike) it’d be in the 19-pound range.

Build Choices:

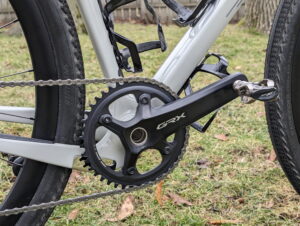
Crank/Cassette Upgrade: After moving my previous Warbird to 1x a year ago I realized that I like having a 42t front ring. Since the bike came with a 40t ring I wanted to upgrade that, but it turned out that I could get a complete FC-RX810 crankset with a 42t ring for not much more than a stand-alone ring. Swapping from the stock FC-RX610 swap saved 84g while increasing the chainring size, makes mounting a cadence sensor easier, and opens up the possibility of getting a power meter on the bike.

At the same time I ordered an CS-M8000 cassette to replace the stock CS-M5100, which saved another 114g. While I originally was going to get an 11-40 to match my previous Warbird, my friend Ray convinced me that a 42, ending up with an even 1:1 in the lowest gear would be good, and I agreed. Between the two sizes the seven lowest cogs are the same, so typical flat/rolling stuff would feel the same with either, but when I do need a climbing/trail gear it’ll be there.

Chain Drop Protection: I was originally going to fit some chain drop protection, like the Wolf Tooth LoneWolf, but after thinking about how many times I’ve dropped a chain in the past, I opted against it. Mounting this would also require fitting a front derailleur mount which makes bottle cage mounting more fiddly and makes the bike harder to clean. I may still fit this later on, but for now I’m content continuing without.

Rotors: I am generally very fond of Shimano rotors with solid aluminum center carriers as they seem to be harder to bend and have an aluminum core (Ice Technologies) to help with heat dissipation. The bike came with some SM-RT64, and while they are a bit heavier per-rotor (~25g) than others, and just steel, it would have cost a fair bit (~$100) to replace them. I have similar rotors on my fatbike and they’ve been working well, so for now I’m going to stick with these rotors and see how it goes. They can always be upgraded later.

Frame Pump/Saddle Bag: On the previous Warbird I used a somewhat large Specialized saddle bag with a tiny 4″ pump tucked inside next to the tube. This worked well, but I began having problems with the pack Velcro no longer holding, so I also had a releasable cable tie holding it to the saddle.

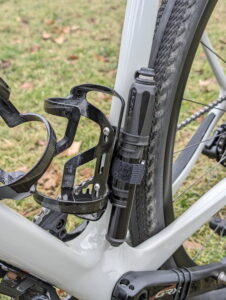
I’d also never needed — that is tested — the tiny pump in the field, so out of an abundance of caution (and some paranoia) I’d often tuck a second, larger pump in my jersey pocket for long rides. This other pump had been used a few times, so with the bike swap I’ve moved to mounting the beloved (and cheap) Lezyne Sport Drive HP to the frame behind the seat tube bottle cage. I’m wary of road spray causing problems with the pump, but if it does I’ll just start carrying it in my pocket.

By no longer needing room for a pump in the bag I was able to swap to the Lezyne Road Caddy, a small and elegant seat bag that I’ve had on my road bike for a couple years.

Bike Fit: This and my road bike, a custom built Salsa Warroad, are very very similar in geometry, but I’ve had it set up with the bars slightly lower than on the Warbird. Using my favorite stem comparison tool I found that by removing 10mm of spacers below the stem I can get the bar clamp to a nearly identical position on both bikes, so as a bit of an experiment I’m giving this a go, leaving the steerer tube uncut so I can go back if desired.

I’m slightly concerned about the fit when riding more technical trails, and I may have a harder time keeping my forearms near level while on rough surface, but it’s plenty easy to go back if needed.

Bottle Cage Screws: When using Specialized Zee Cages it’s important to have a low profile screw head, else they’ll rub on the bottle and make it hard to insert. The screws which come with the cages are a nice shape, but are a chromed steel that seems to corrode with sweat, sports drink, and road treatment chloride, so I prefer something else. I prefer something like 316 stainless, and I had some 20mm of these laying around from a previous project. For just-bottle-cages this is longer than the needed ~15mm, but the additional mass is across the three standard cages is only 6x 1/4 of the mass of a single screw (1.5x a single screw), or ~5g. It wasn’t worth spending $11+shipping to save that little mass.

Anti-Rub Tape on Head Tube: On my previous Warbird, and on the Warroad, I shortened the front brake hose so it’d take a clean path from the fork to the bar, not touching the head tube. This works, but also gets it the way of the light mount, and makes adjusting spacers difficult because I have to remove the bar from the stem to slide things upward.

The stock hose length on this model rubs the front of the head tube, but I’m not sure I want to shorten it yet. For now I simply put a strip of UHMW PE tape along the front of the head tube, below the Salsa logo, so the hose won’t rub on the frame/paint/carbon. Once I settle on spacers and work a bit more on accessory mounting I may shorten the hose, or I may just leave this alone.

Comments closed

New Trail Bike: Pivot Trail 429 v3

For years the Pivot Trail 429 series of bikes have been a sort-of Holy Grail bike for me. The ultimate aggressive cross country / trail mountain bike, and something I really wanted to try. In August of 2020 I was able to spend a few hours riding v2 of the bike around some of my favorite Marquette and RAMBA trails and fell in love. Something about the bike and I clicked, and I came away wanting one. After that trip I sold my beloved Specialized Camber and got ready to buy a new bike.

With the COVID-19 related bike industry shortages it took a lot longer than I’d hoped, but almost a year after that demo — in August of 2021 — I made a quick trip up to Bellaire (three hours each way) and picked my new bike from Patrick at Paddles & Pedals: a Pivot Trail 429, v3, Race XT build, with the crank and wheels upgraded to high end carbon bits.

While I hadn’t ridden this new v3 of the Trail 429, and it’s a much longer reach bike than v2, I’d stared at geometry numbers for hours, comparing it to my current bikes, and figured that a size large in this model would also be right for me. After getting the bike and swapping the usual contact points, fitting the larger rotors that I wanted, and some other little bits, it was all ready to ride.

Using the Low bottom bracket setting (the higher of the two), a 35mm stem, an upper stack height of 30mm (headset upper cover + 15mm spacer) and the 11° sweep Salsa Salt Flat Carbon bar the RAD ended up just 5mm shorter of the Timberjack and feels pretty good on its first ride.

I may experiment with the Lower setting, which’d slacken the head tube and seat tube angle by 0.5°, bring the reach in and increase the stack, but this’ll likely require a 50mm stem to get the fit where I want it. At the same time, it’d bring the bottom bracket height closer to that of the Camber’s, which might be really nice. Between suspension setup and such, I’ve got a lot of experimenting to do.

Current build details are as follows:

Frame: Pivot Trail 429 v3, Large, Silver Metallic
Fork: Fox 2021 Performance Series 34 FLOAT 29 130 (Short ID: D4SW / 2021, 34, A, FLOAT, 29in, P-S, 130, Grip, 3Pos, Matte Blk, No Logo, 15QRx110, 1.5 T, 51mm Rake, OE)
Fork TA Parts: QR15 Geared Cam and Hardware
Rear Shock: Fox 2021 Series FLOAT (Short ID: D9N4 / 2022_21, FLOAT DPS, P-S, A, 3pos, Trunnion, Evol LV, Pivot, Trail 429, 165, 45, 0.9 Spacer, LCM, LRM, CML, No Logo)
Headset: Pivot Precision Sealed Cartridge (OE)
Crankset: RaceFace Next SL (170mm)
Bottom Bracket: RaceFace BB92 Cinch 30
Chainring: RaceFace 1x Chainring, Cinch Direct Mount- SHI 12 (32t)
Chain: Shimano CN-M7100
Derailleur: Shimano XT RD-M8100-SGS
Shifter: Shimano XT SL-M8100-IR
Shift Cables / Housing: Jagwire LEX-SL
Cassette: Shimano SLX CS-M7100-12
Brakes: Shimano SLX, Rotor: BL-M7100 / Caliper, BR-M7120
Brake Pads: Shimano N04C
Front Rotor: Shimano RT-MT800 M
Rear Rotor: Shimano RT-MT800 L
Front Brake Adapter: Shimano SM-MA-F203P/P (160mm Post to 203mm Post)
Stem: ENVE Alloy Mountain Stem (31.8mm clamp, 35mm length)
Bar: Salsa Salt Flat Carbon (750mm)
Wheels: Reynolds Black Label 309/289 XC
Tires: Maxxis Rekon (29 x 2.6″, 3C/EXO/TR)
Seatpost: Fox Transfer Performance Elite (175mm, 31.6mm)
Dropper Lever:Wolf Tooth ReMote Light Action (Black, 22.2mm Clamp)
Seatpost Collar: Pivot OE
Saddle:Specialized Power Expert (143mm)
Pedals: Shimano XTR PD-M985
Grips:ESI Extra Chunky (Black)
Bottle Cages:Specialized Zee Cage II (Black Gloss, 1x Left)
Computer:Garmin Edge 530, Garmin Speed and Cadence Sensors (v1), Best Tek Garmin Stem Mount
Bell: RockBros Handlebar Stainless Steel Bell (Black)
Derailleur Hanger: SRAM Universal Derailleur Hanger
Frame Protection Tape: McMaster-Carr UHMW PE

Comments closed

SharkTapUSB Gen2 Review and PCB Details

For years I’ve used an eBay-purchased Net Optics TP-CU3 (now called Ixia TP-CU3-ST) copper 10/100/1000 Ethernet tap along with a StarTech USB 3.0 to Dual Gigabit NIC for getting external network captures from client computers [1]. The fan in the tap is dying and making a lot of noise. While not just irritating, I believe this is causing the tap to overheat resulting in occasional weirdness in the data [2].

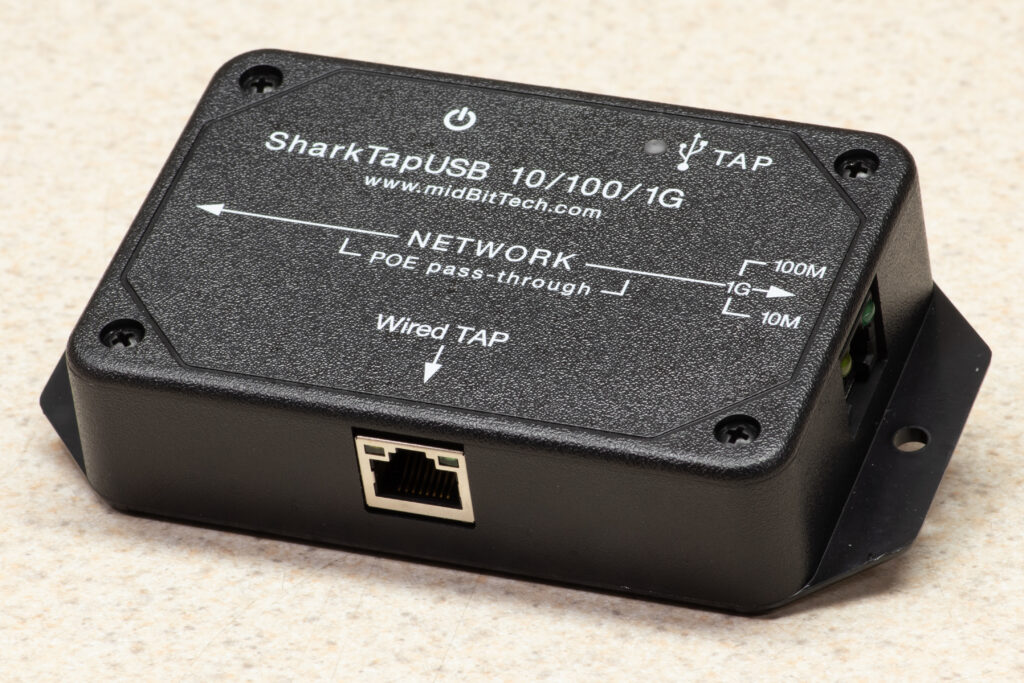
As a replacement I now have a SharkTapUSB Gen2 from midBit Technologies, LLC, and so far it’s working great. Being a simpler device, with a USB NIC built in, it’s much more appropriate my needs. Smaller, simpler to connect, quieter (no fans), and easier to teach coworkers to use. At $249.95 (sold solely via Amazon) it’s also priced fairly.

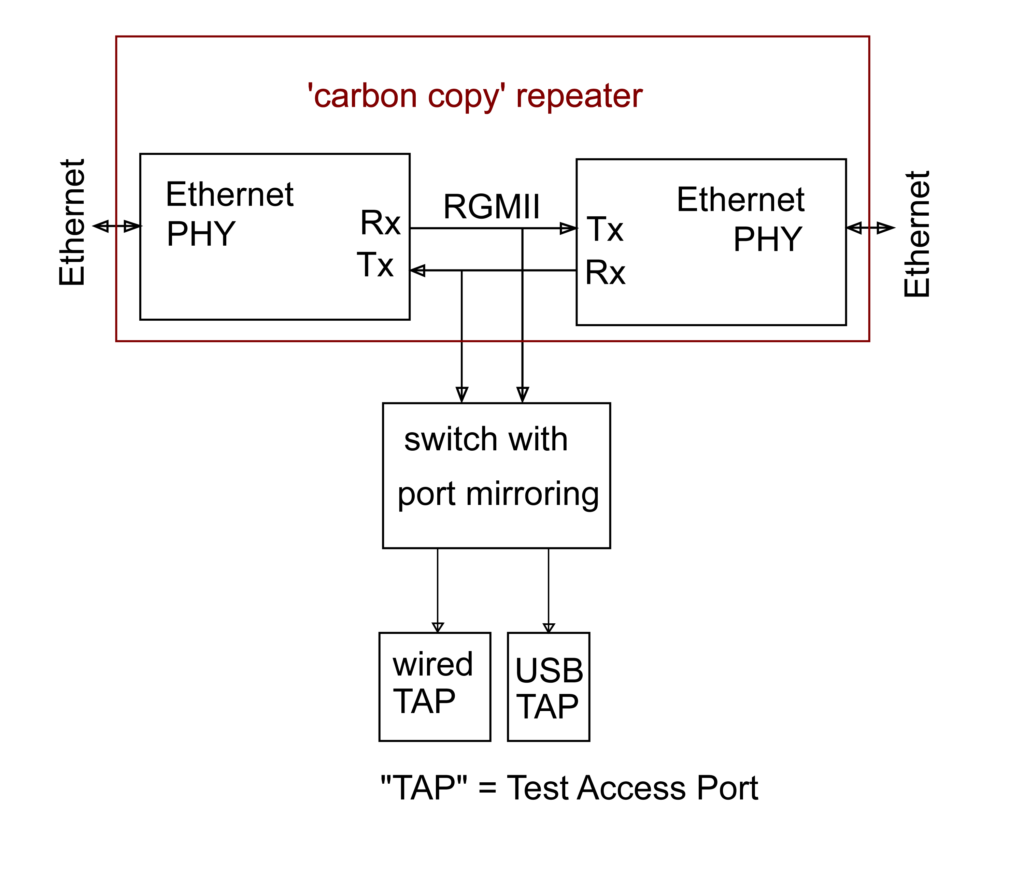
The SharkTapUSB is a single unit about the size of a deck of cards that is inserted between two Ethernet devices and outputs the captured data to either an Ethernet connection or it’s built-in USB 3.0 gigabit NIC. It also gets power from USB 3.0, eliminating an external power supply. This is perfect for what I’m usually doing, which needing to watch data going in and out of a computer and analyze it in Wireshark.

While the TP-CU3 is excellent and served me well, it also was overkill. It has a bunch of features intended for permanent install / data center use, such as bypass relays to maintain connectivity during power failures, forced air cooling, redundant power supplies, and dual gigabit egress links to support monitoring saturated full duplex connections. Even when the built-in cooling fans are working properly, it’s loud enough to be irritating in a normal office (the SharkTap USB is silent).

Compared to the TP-CU3 there are three downsides to the SharkTapUSB, but for my needs I don’t see them being a problem:

  • Cannot Capture Sustained Full Duplex Traffic: The SharkTapUSB merges the network traffic between two ports and outputs it to a single gigabit NIC. If the traffic being captured is a sustained, full-duplex gigabit flow, this is too much for the capture interface and data will be lost. For me this amount of traffic is rare in practice, especially in situations where I need an external tap. (The SharkTapUSB has a 256KB buffer to accommodate short bursts of high bandwidth traffic.)
  • Link Electrical Status Not Propagated Between Ports: The TP-CU3 uses relays so that when one of the network ports is disconnected electrically the other one is shut down. For example, when the client PC is disconnected, the TP-CU3 drops the electrical link to the switch, so the switch sees the disconnect. The SharkTapUSB does not do this, and keeps the electrical link up on one side when the other is disconnected. Should this be a problem, such as when working with a switch that takes action on link state change, this can be sidestepped by unplugging cables.
  • Link Speed Autodetection: The SharkTapUSB cannot be forced to a particular port speed. However, it does set both ports to the lowest autodetected speed, so port speed can be controlled via settings on a connected device.

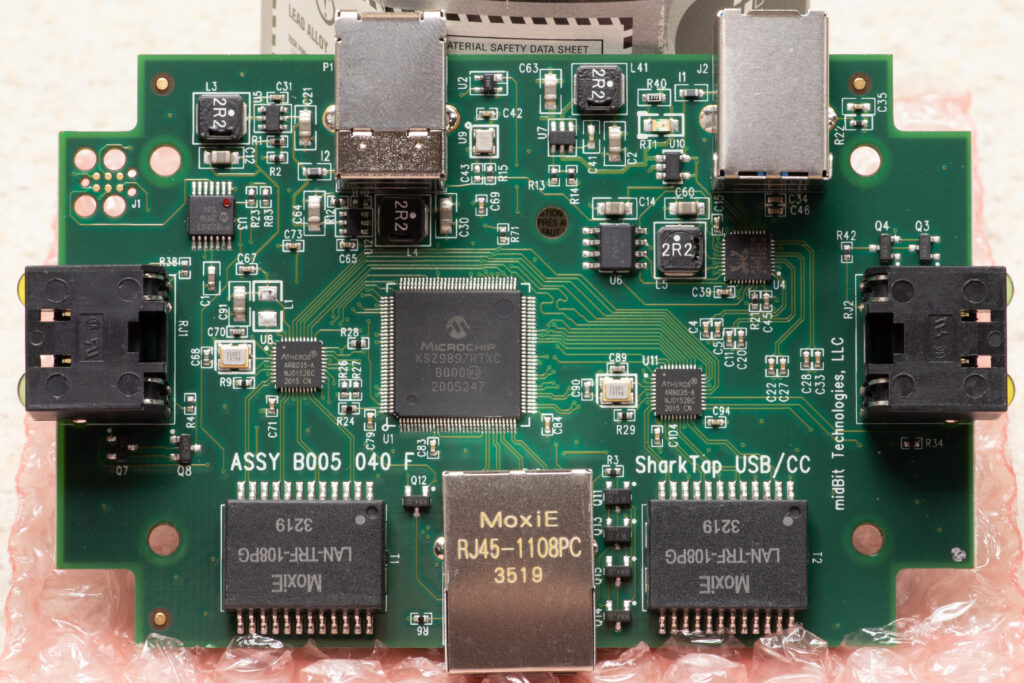
After looking at the SharkTapUSB’s block diagram I got curious how it’s actually implemented, so I opened it up to see and grabbed some photos of the Rev F PCB (top, bottom, jumper wires on bottom).

Here’s the notable components:


[1] While captures can be done locally (from within the OS), using tools like Packet Monitor or Wireshark or tcpdump, there are times when an external capture is more useful or the only option, such as:

  • Troubleshooting Intel AMT related issues, as AMT sits between the normal NIC and the external port.
  • Monitoring PXE.
  • OS’ where getting a local capture is complicated, such as Windows PE, embedded stuff in televisions, or mobile OS’ (eg: Android, iOS).
  • Investigating hardware offloads, as a local capture will show invalid data for things like TCP checksum as it’s not calculated before reaching the NIC.

[2] I looked into replacing the fan, but this doesn’t seem practical. The fan is a Sunon GB0535AEV1-8.B2445.GN, which is a combination heatsink and fan, and appears to be epoxied in place. While I can get one via eBay sent from China, I’m unsure if I’ll be able to remove the fan without damaging the chip. Instead I’ll keep the mostly-working tap around for rare occasions when full-duplex monitoring is needed, using the SharkTapUSB for day-to-day use. Perhaps in the future I’ll give a heatsink/fan swap a go…

Comments closed

Torklift EcoHitch 2″ Hitch for my 2015 Outback

IMG_0249.jpg

Back in 2015 when I purchased a Subaru Outback, I ordered it with a OE hitch. At the time it was the best (and thanks to IMBA discount the cheapest) option for mounting a bike rack on the back of the car. Due to load limits on what the vehicle can tow there was only a 1-1/4″ receiver available, and while this fit the 1Up USA rack previously used on my Civic it just didn’t provide the stability of a 2″ receiver.

Fast forward to late 2018 and, out of the blue, I was contacted by Torklift, via Reddit, where they offered to send me their Torklift EcoHitch 2″ receiver hitch in exchange for providing feedback to their designers and engineers. After some email back and forth this was all set up, and a few days ago I received the rack: Torklift 2015-2018 Subaru Outback EcoHitch, part number x7266.

Beyond the 2″ receiver, the biggest difference between the EcoHitch and OE hitches is how they mount. While the EcoHitch sandwiches between the bumper beam and the chassis, held in place by the bumper’s eight fasteners (photo 1, 2), the OE hitch both replaces the bumper beam and mounts inside of the frame rails (photo). While it appears that the OE hitch may be a bit more resistant to very high tongue weights, the Torklift seems plenty solid and is made of thicker material, so I’ve got no concerns with the differences. The other significant difference is that the Torklift EcoHitch doesn’t come with a wiring harness, but only ever having bike racks on my car this doesn’t really affect my usage. When the OE hitch was installed on my Outback this included a wiring harness along with a nifty mount to hold it next to the receiver (photo). I considered adapting this mount to the EcoHitch, but instead took some inspiration from Torklift Central’s (frankly overpriced) Eclipse 4-Flat Plug and fit a neodymium magnet to the cable (photo), then stuck the magnet to the back side of the receiver.

Needing to remove the OE hitch my install was bound to be a bit more complicated than someone who is putting the EcoHitch on a new vehicle, but even this ended up being pretty straightforward.

Whole rack, rear view, with installation instructions and parts bundled to the center.

Whole rack, rear view, with installation instructions and parts bundled to the center.

Unboxing the rack revealed a well-packed (photo), nicely powder coated (photo), solid rack that ships with an instruction manual, the eight nuts (for attaching it to the bumper mount bolts), and a piece of rubber trim gasket to cover the cut edges on the underside of the bumper cover (photo).

Besides the printed instructions (which I wish Torklift posted as a PDF on their website), there are two instructional videos (1, 2) which show the installation on everything from 2015 to 2018 models of the vehicle. These do a good job of showing the basics of the installation, but they gloss over what I think is the most difficult part; removing the bumper cover:

  1. Removing the bumper cover itself works best if you push up on the sides from the bottom, then pull out the at top. Going off of just Torklift’s instruction I first thought to pull straight outward, but this wasn’t working well and — per Subaru — can risk breaking retention clips. Thankfully I have access to Subaru’s service manual which described pushing up from the bottom, and with this technique the cover came off easily.
  2. My vehicle has splash guards installed, which had to be removed before all the bumper clips could be accessed. These guards came off via six screws and four push-lock plastic clips, but I had to use a right-angle screwdriver to fit around the tires. (There is a note in the Torklift instructions mentioning these may need to be removed.)
  3. Three out of the myriad push lock clips used to hold the bumper and splash guards on broke during removal. This is likely due to my Outback being nearly four years old. Thankfully replacements are readily available online and at dealerships and can easily be identified via Subaru Parts Online.

For this installation Torklift instructs that the hitch be fitted, then the bumper beam reinstalled. However, during the install of the OE hitch, the bumper beam and foam energy absorber is removed and discarded. Since my Outback came with the OE hitch installed, I didn’t have these pieces. After consulting with both Torklift and some auto engineer friends we concluded that the Torklift hitch will be fine without the bumper beam.

Despite this, I contacted my local dealer (Sellers Subaru) and to my surprise they gave me discarded/scrap bumper beam from an Outback where they’d recently installed a hitch. It’s maroon, but being hidden the color doesn’t matter. With the purchase of a replacement foam energy absorber ($79.95 MSRP) I was all set part-wise to remove the OE hitch and install the EcoHitch to spec. While this likely wasn’t needed, it makes me feel better about the overall install. (Photos 1, 2)

Removing the OE hitch was a bit of a hassle, as getting to two of the hitch bolts required removing the muffler and heat shield. (Another plus for the EcoHitch.) Thankfully none of the bolts were seized and removal this went smoothly. Before long I also had the OE rack completely removed, exhaust re-fitted, and it was time to install the EcoHitch.

Foam cushion over the bumper beam, and hitch installed.

Foam cushion over the bumper beam, and hitch installed.

At this point — just after bumper cover removal on a normal install — installation is very straightforward: folding a thin metal bumper cover mounting tab up against the body, bolting the hitch and bumper back on, torquing some nuts, and cutting a notch out of the bumper cover. After this it’s just a matter of putting the the bumper cover, tail lights, splash guards, and some plastic covers back in place.

From the OE hitch I already had a notch cut in my bumper cover, but it was pretty easy to cut the wider notch required by the EcoHitch. The OE hitch uses a longer notch than the EcoHitch, and thankfully Torklift provides enough trim to cover the extra-large notch present after a bumper’s been cut for both (photo). The cutting itself went easily, as the plastic is pretty soft and can either be scored and folded or cut with anything from a rotary cutter to a jigsaw.

During installation one of the bumper cover mounting tabs is folded out of the way and the mounting hole cut out of the bumper cover during the notching, which eliminates one of the points where the bumper mounts to the chassis. While initially concerning, this part of the cover rests on the top of the receiver after everything’s put back together, so this lack of retention point isn’t a problem.

With everything put back together I’m currently quite happy. The TorkLift EcoHitch looks good and sits nice and close to the underside of the bumper; I don’t think it could go much higher. While the OE hitch had 14.5″ of ground clearance, this drops to 13.5″ with the EcoHitch, an acceptable change for adding 0.75″ to the receiver’s height. This hitch is a great choice for either new installs on an Outback or retrofitting an OE hitch to a 2″ receiver.

I particularly like how the powder coating has a thick, textured look to it, and the end of the receiver has a nice TORKLIFT logo. The whole unit looks like it’ll hold up nicely to Michigan winters (and road salt). Now to wait for a new, matching black 1UP USA 2″ Super Duty Single rack to arrive!

Click here or on the large photo above to see a complete album of photos from the install.

Leave a Comment

New Gravel Bike Day: 2019 Salsa Warbird Carbon 105 700

It feels like only yesterday, but five years ago I got my hands on a Salsa Vaya 2 which had an unexpected, but significant, impact on how I ride bikes. Prior to this (and despite brief flirtations with a CX bike that didn’t fit me well) whenever I would set out to do longer rides it’d be on a mountain bike. On dirt roads or local neighborhood streets, gravel road races or the Macomb Orchard Trail, I’d be on an MTB. This… worked… but after getting the Vaya things clicked and I found myself routinely doing things like 50+ mile paved rides after work in springtime, gravel road centuries, and fast-paced road rides with buddies. It really showed me how much fun a drop bar, skinnier tire bike—but one still with enough tire to ride off road—can be. By late 2018 I’d racked up over 10,000 miles on the Vaya.

As new gravel-optimized frames came about and components on the Vaya started to wear, I kept looking around for something new. Despite flirting with ideas for everything from a Trek Checkpoint to an ALLIED ALFA ALLROAD, from the Specialized Diverge to the Canyon Grail—all great bikes—nothing really clicked until Salsa announced the Warbird v4. Carbon and a very well designed dampening system, through axles, internal routing for everything, four bottle cage mounts, and overall standard parts it was just what I wanted. While I wasn’t too keen on the color patches on the white frame, the new R7000 105 group is perfect and I figured I could do something creative to change up the coloring.

After a boat load of geometry-checking, email back and forth with the ever-excellent Mike Wirth at Tree Fort Bikes, and some help and information from my friend and Salsa/QBP’s rep Jeff Buerman, a 2019 Warbird Carbon 105 700 was on order just for me. While driving up to Iceman this past weekend, where I raced my beloved Salsa El Mariachi Ti, I got an email notification that the Warbird was in, and I could pick it up! Kristen and I swung by Ypsilanti on the way home, and voilà, I’ve got a new gravel bike!

The stock build on the Warbird 105 is really well chosen, but like any bike there’s always some things to tweak or add. I added  the usuals like bottle cages, speed/cadence sensors, saddle, seatpost, and pedals, but I also had some spare parts sitting around home (eg: Thomson X4 stem, XT brake rotors) that were a bit nicer than stock so I swapped them on during the build.

I also unexpectedly got a too-good-to-pass-up deal on some DT Swiss wheels (CR 1600 SPLINE 23). While the CR 1600 wheelset has the same rims as the well-chosen stock C 1800 SPLINE 23 wheels, the CR 1600s have DT Swiss’ Star Ratchet in the hub. I prefer this freewheel design over all others, and switching to these wheels also let me upgrade to 54 points of engagement; right in line with all my other bikes. (High engagement is a luxury, sure, but this Warbird is a really nice bike already so why not.) It also doesn’t hurt that the silver and black hubs go wonderfully with the grey Salsa graphics on the frame. Finally, I’ve been wanting to try the well-regarded Panaracer GravelKing SK, so I set up a tubeless-ready 43mm pair of the blackwall tires on the new wheels.

As an experiment I covered the purple/blue/red patches on the seat tube and fork with self-adhesive, black reflective Scotchlite tape. This both serves as a reflector and brings almost the entire bike together in shades of grey. While I’m not completely happy with the tape job, it’s smoothly applied and covers the colors, bringing the entire frame to a very sharp black/white/grey color scheme. It looks good.

The four water bottle cages are all usable, with the super-common 24oz Specialized 1st Generation Big Mouth Water Bottles fitting in three of the cages with a 21oz in the upper downtube cage, giving 93oz of on-bike fluid storage. Without a bottle in the upper downtube cage I can fit an even larger bottle in the lower one, giving plenty of options. Mounting a Revelate Designs Mag-Tank Bolt-On top tube bag behind the stem provides ~65 in3 of storage for food, roughly equal to what I can fit in one jersey pocket. Coupled with or in place of jersey pockets this should be good for carrying food and drink for quite-long rides; a nice upgrade over the Vaya. It’s a tight fit to stand over the bike with this bag attached, but as an optional accessory for longer rides it could work out real well.

I’ve yet to figure how I’ll carry for tools, but with the relatively low pressure tires I’ll put together another Mobo Pocket Air Pump-based setup fit into the Specialized seat bag.

Weight was not a primary concern with this build, but I’m quite happy with 21.08 pounds for the completely bike as pictured above. This includes a Garmin Edge 130, sensors, pedals, rear light, empty saddle bag, and bottle cages. Not bad for a bike capable of everything from pavement to single track. Not bad at all.

Here’s the details of the complete build:

Frame / Fork: 2019 Salsa Warbird Carbon / Salsa Waxwing (White)
Wheelset: DT Swiss CR 1600 SPLINE 23
Ratchets: DT Swiss HWTXXX00NSK54S (54T)
Tires: Panaracer GravelKing SK (RF743-GKSK-B, 700x43c, Black Sidewall)
Group: Shimano 105 (R7000)
Crank:
 Shimano FC-R7000 (50-34T, 172.5mm)
Bottom Bracket: Shimano SM-BB72-41
Cassette:
 Shimano CS-R7000 (11-32)
Shift/Brake Levers:
Shimano ST-R7020 (Left, Right)
Brake Calipers:
Shimano BR-R7070 (Front, Rear)
Brake Rotors: Shimano SM-RT81-S (160mm)
Brake Pads:
Shimano K02S (Resin)
Chain:
Shimano CN-HG601-11
Front Derailleur:
Shimano FD-R7000-F
Rear Derailleur:
Shimano RD-R7000-GS
Bar Tape:
MSW HBT-210 Anti-Slip Gel (Black)
Handlebar: Salsa Cowbell Deluxe (42cm)
Headset: Cane Creek 40 (IS41/28.6/H9 | IS52/40)
Stem: Thomson Elite X4 (SM-E139 10° X 100mm X 31.8 1-1/8 X4 Black)
Spacers: Generic Aluminum
Stem Cap: MASH Donut 2.0
Seatpost: Thomson Elite (SP-E101 27.2 X 330 Black, Straight)
Seatpost Clamp: Salsa Lip Lock
Saddle: Specialized Power Expert (143mm, Black)
Pedals: Crank Brothers Candy 3 (rev. C, Black)
Bottle Cages: Specialized Zee Cage II (2x Left, 2x Right)
Rear Light: Planet Bike Superflash Turbo
Bell: RockBros Bell (Black)
Sensors: Garmin Bike Speed Sensor (Front Wheel), Wahoo RPM Cadence Sensor (Crank)
Reflective Tape: 3m / Scotchlite Black
Mastic Tape: 3M 2228
Mounting Hole Plugs: Heyco 2590
Top Tube Bag: Revelate Designs Mag-Tank Bolt-On
Saddle Bag: Specialized Seat Pack (Medium, Black)
Derailleur Hanger: 465 / QBP FS2322

During assembly I encountered three wrinkles, none of which affected the final build:

Seat Tube Bottle Mount: When using the bottle mount on the seat tube, spacers are needed otherwise the center of the bottle cage will bottom out on the front derailleur mount. Problem Solvers SpaceOut Spacers, left over from the downtube mount on my original Mukluk 2, solved this.

Cadence Sensor Fitment: A typical problem on modern gravel road bikes with large tire clearance and narrow Q factors; there is not much room between the crank arm and the chainstays. The Warbird v4 is no exception, and I was not able to fit the standard Garmin Cadence sensor safely. It fit, but left around 2mm of clearance. This tight clearance may also preclude the use of a Stages-type power meter on the Warbird.

To fit a cadence sensor on the bike I fashioned an aluminum plate which spans two chainring bolts opposite the crank arm, then sticking a self-adhesive Wahoo RPM Cadence Sensor to this plate. It has a look not unlike a power meter, allows for easy battery changes, and is tucked nicely out of the way. (Picture)

Fork Crown Light Mount Screw: I typically replace all unneeded mount screws on my bikes with Heyco 2590 plastic plugs. These small plastic plugs press snugly into M5 bottle/fender/accessory screw mounts, keeping out water and giving a smooth, finished look. At ~$0.10/each (via Mouser) they are much cheaper than bike-specific parts. Compared to aluminum screws this doesn’t save much weight, but I think it’s much more attractive and likely slightly safer than a protruding screw head.

When unscrewing the upper fork light mount screw the head came off, and the screw was stuck in the hole. As I was turning the screw it felt quite stiff, and I suspect it was either cross threaded, or the hole contaminated with paint which locked the soft aluminum screw in place. This was not an issue with any other screw on the bike.

I was unable to drill out the screw, so I carefully ground it flat and painted the remaining end black. I have no intention to use this light mount, but if this ever changes I’ll deal with the problem later. (Unfortunately while attempting to drill it out I slipped with a tool, bumped the fork crown, and put a small, 4mm chip in the paint. This got touched up with some white enamel paint and now blends in nicely, but it was a really frustrating way to get the first chip in the paint. Oops.)

UPDATE: Due to Tree Fort Bikes swapping the fork after a recall affecting a handful of the Waxwing forks, the problems with the crown light mount screw and the chipped paint are gone.

There’s still a few things left to do, and the inevitable tweaking of things like bar position, steerer length, and all those fun things. But after a lot of work to clone the Vaya’s fit I think it’s good, so hopefully not too much work be needed. That which is probably won’t happen until spring when the weather turns nice and is a bit more conducive to long rides… Exactly what this bike is made for.

Pictures from the unboxing, assembly, and of the complete bike can be found here in my photo gallery: Salsa Warbird 105 (2019)

4 Comments

Garmin Edge 130 (vs Edge 520) First Impressions

IMG_0027.jpg

Back in 2011, when I was thinking about trying Lumberjack 100 for the first time, I bought a Garmin Edge 500 so I could log data and use heart rate zones for training. This worked out very well, and over the years I’ve iterated through of other Garmin units, including the Edge 510, 520, and now the new Edge 130. After years of acquiring increasingly complex units I recently switched to the less-featured unit (the Edge 130), finding that it covers everything I need, with some nice upsides over the 520. It’s a great computer for my mixed mountain / gravel / dirt / road riding, including the same, basic, line-following breadcrump route support that’s gotten me through self-navigated events like Barry-Roubaix and Marji Gesick.

First, the upsides. This unit has a higher resolution black and white screen which looks remarkably good in direct sunlight; much better than the color 520. The unit itself is quite a bit smaller (41 x 63 x 16 mm) than the Edge 520 (49 x 73 x 21 mm) which fits better on my stem mounts. I think the all-dark-grey color of the housing blends in with a bike better. The unit also feels like it responds faster to button presses. While this may just be the faster-updating display, it’s nicer when flipping through data pages.

Now, the downsides. While there are fewer features (no base map, can’t have as many data fields on screen at once — all well covered elsewhere), none affect my general use of the unit, but are worth mentioning. All are as of v2.20 firmware, and the software quirks will be changed:

  1. Zones (heart rate and power) must be defined using Garmin Connect; they cannot be configured in the unit itself.
  2. It is not possible to rename sensors. This means I can’t name a bike’s speed/cadence senors after the bike, which can make things a bit confusing if I have multiple sensors active in an area and I want to be sure the unit is currently listening to the right one.
  3. The rubber cover for the microUSB connector feels a little flimsy. It effectively rotates on a small piece of rubber and as someone who plugs in my Garmin after every use I have concerns for how long it’ll last.
  4. Some of the fonts seem a bit small, leaving a bunch of extra white space (particularly Heading as seen above). They are still readable, just small.
  5. The unit prompts for ride type (Mountain, Road, etc) after each ride. You can’t select a ride type by default, although it does default to the last option. (Just something more to choose when saving.)

Outside of the display and size, the biggest difference between the 130 and 520 is the data fields each can display. While both units will record from the usual speed/power/heart rate sensors, they vary quite a bit in what each will display. Here are the data fields that the 130 and 520 will display (some names edited from official Edge 130 documentation so they’d align with the Edge 520 names):

Battery Level · Battery Status · Beam Angle Status · Cadence · Cadence – Avg. · Cadence – Lap · Calories · Dist. – Lap · Dist. to Dest. · Dist. to Next · Distance · ETA at Destination · ETA at Next · Elevation · Grade · HR – %Max. · HR – Avg. · HR – Lap · HR Zone · Heading · Heart Rate · Laps · Location at Dest. · Location at Next · Odometer · Power – 3s Avg. · Power – Avg. · Power – Lap · Power – Max. · Power – kJ · Power Zone · Speed · Speed – Avg. · Speed – Lap · Speed – Max. · Sunrise · Sunset · Time · Time – Avg. Lap · Time – Elapsed · Time – Lap · Time of Day · Time to Dest. · Time to Next · Total Ascent · Total Descent

Here’s the additional fields the Edge 520 will display:

Balance · Balance – 10s Avg. · Balance – 30s Avg. · Balance – 3s Avg. · Balance – Avg. · Balance – Lap · Course Pt. Dist. · Dist. – Last Lap · Dist. to Go · Front Gear · GPS Accuracy · GPS Signal Strength · Gear Battery · Gear Combo · Gear Ratio · Gears · HR – %HRR · HR – Last Lap · HR Graph · HR to Go · Light Mode · Lights Connected · PCO · PCO – Avg. · PCO – Lap · Pedal Smoothness · Power · Power – %FTP · Power – 10s Avg. · Power – 30s Avg. · Power – IF · Power – Last Lap · Power – NP · Power – NP Lap · Power – NP Last Lap · Power – TSS · Power – watts/kg · Power Phase – L. · Power Phase – L. Avg. · Power Phase – L. Lap · Power Phase – L. Peak · Power Phase – L. Peak Avg. · Power Phase – L. Peak Lap · Power Phase – R. · Power Phase – R. Avg. · Power Phase – R. Lap · Power Phase – R. Peak · Power Phase – R. Peak Avg. · Power Phase – R. Peak Lap · Rear Gear · Reps to Go · Target Power · Temperature · Torque Effectiveness · Trainer Resistance · VS – 30s Avg. · Workout Step

Most of these are around in-depth training with power, leg balance, support for electronic shifting, and other metrics that I don’t use. Therefore, nothing is lost moving away from the 520. Temperature — which is still recorded — is the only one that might be handy, but in my experience Garmin’s temperature readings seemed to be a bit off and didn’t really map to how it feels, and I definitely didn’t need it as an on-device data point during rides. (See the Edge 130 Manual Appendix and Edge 520 Manual Appendix for more information on what each field means.)

All said, I’ve had no problem configuring the Edge 130 to display the same screens as my Edge 520, resulting in the same functionality. Even nicer, on the 130 I can choose to not show the elevation chart; something that I’ve never found myself using and had to flip past on previous units. Here’s how I have the different display pages set up:

Page 1: / Six Fields: Timer, Speed, Distance, Time of Day, HR Zone, Heading

Page 2: / Four Fields: HR Zone, Cadence, Timer, Heading

Page 3 / Three Fields: Timer, Time of Day, Sunset

Page 4 / Map: No Fields (Map only, shows breadcrumb / loaded course.)

Thus far I’m happy with the unit; happy enough that I’ve sold my Edge 520.

For more specifics on the Edge 130, please check out both the excellent Garmin Edge 130 In-Depot Review by DC Rainmaker and the Garmin Edge 130 product page.

Leave a Comment

A Surprising Little Pump

Wanting to reduce the size of the tools carried on the Vaya I went looking for a new pump, and what I found surprised me: the diminutive Mobo Pocket Air Pump (4″). Despite being marketed by a company that seems otherwise known for low-cost and kid-branded recumbents, this seems to be a quality pump for MTB and gravel road emergency use.

Looking for a small emergency pump my primary requirements were functionality and size, followed by the amount of time it’d take to inflate a tire. I have tubeless setups on all my bikes, which tends to be pretty reliable. Flats are pretty rare, so when they do happen I’m okay with taking my time installing and inflating a tube. Being something that’ll be packed away for non-routine use I’d prefer the emergency gear to be small and reasonably light. The Mobo pump seemed like it might be too cheap to work well, but just about $20 (via Amazon) I figured I’d give it a go.

Ideally I’d like to be able to fit a tube, multi-tool (including chain tool), pump, and a car key inside of a small seat bag. With this pump I think I’m on the way, as it had no problems fitting into a slightly-older, small-sized Timbuk2 saddle bag along side a Crankbrothers M17 multi-tool, with plenty of room to spare. Along with a bottle cage mount it ships with a nice brass Presta to Schrader adapter and sports ball inflation needle. The inclusion of an adapter is good, because the pump itself is Schrader-only. Thankfully packing either the stock adapter or an aluminum one into the bag isn’t a big deal.

Inside the expectedly cheesy (but well packed) box is a solid-feeling pump that measures in at 3-7/8″ long, 7/8″ diameter at the body, and 1-1/2″ across the pump head. At 56g it’s lighter than a 16g CO2 cartridge, and right about the same size as a cartridge + valve head. Somewhat to my surprise it has a very nice, light, smooth pumping action and check valve sound. Basic tests in my basement showed to work reasonably well.

My first test was inflating a 700 x 35-43c Kenda tube from flat to shape, as one would do before fitting it into a tire. This took 42 pumps — none of which required any notable effort — and took well under a minute. The second test was inflating the front wheel from my Specialized Camber, a 30mm internal width rim fitted with a 29 x 2.3 Specialized Purgatory tire, from atmospheric pressure. After pumping for four minutes the tire had 22 PSI, which is my normal front tire pressure for rocky trails. Finally, the third test was re-inflating the Vaya’s front wheel — a WTB KOM i23 rim and 700 x 38c Specialized Trigger tire set up tubeless — from atmospheric pressure to 43 PSI. This took a total of around six minutes, with some pauses sprinkled in as my arm got tired. Nearing the final pressure the pump got fairly hard to press, leading me to believe that the claimed 100 PSI maximum is probably more a technical than functional limit. Getting a wheel to 100 PSI with this pump would be… a challenge.

Sure, four minutes for an MTB wheel and six minutes for my road bike is a while, and the low volume won’t be re-seating any tubeless tires, but as an emergency pump this should be fine to get one rolling again. While some folks prefer CO2, as a one-shot item I’d want to carry a pump as a backup… Being small enough to tuck in a saddle bag with other parts, and right about the same size and weight as a CO2 cartridge, but multi-use. It’s what I plan to pack into a seat bag on future rides. While I hope it works when I need it — and seems like it will — needing to use a pump in the middle of a ride is something no one wants.

1 Comment

2017-2018 Trainer Setup: CycleOps Hammer

For winter 2017-2018 I’ve put together a revamped, and much improved, trainer setup in my basement. Since the last setup with a Kurt Kinetic Road Machine things have been changed pretty significantly. I had previously set things up in front of a CRT HDTV which I’d previously used as a gaming / home theater setup but over the years I didn’t really use it for anything other than movies while on the trainer and basement music; just kind of a waste. This fall I sold the CRT HDTV and stands, picked up a cheap LCD TV (with built-in Netflix and Amazon apps), and put the whole setup on a metal stand in front of the trainer.

The result is a nice setup where a movie plays at eyes-on-the-road level and TrainerRoad is just a glance below. A CycleOps Hammer smart trainer provides resistance when riding, a nice step up from using a power meter, fluid trainer, and shifting to reach power targets. Four speakers (plus two over the workbench) are connected to a home theater receiver / amp, making for great audio from movies, or music via the AppleTV (and iTunes), although I tend to have subtitles on while watching movies to keep the audio at a reasonable level. A squirrel cage fan blows from a distance to keep me cool while riding. To ensure good ANT+ connectivity I’ve located the Garmin USB adaptor to a table next to the bike where it has a short path to the trainer, power meter, and my heart rate strap.

Since I have a Stages power meter on the Vaya, I have the option of using TrainerRoad’s PowerMatch. This uses the on-bike power meter and adjusts the smart trainer so that everything matches. I understand how this will benefit those wanting the same power numbers indoors and out (since no two units match exactly), but I’m still undecided if it’s a good setup for me. I’ll be working that out over the next few rides.

So far this setup is working out very nicely. While expensive initially (almost the cost of a bike) I vastly prefer the feel of a direct drive smart trainer to the fluid trainer with power meter. Both are effective, but I’m really enjoying not having to shift and chase power targets. Both Kristen (she also bought a Hammer) and I are following TrainerRoad plans over the winter, and as it moves into more over-under workouts, especially those with very short high intensity intervals, having a smart trainer is a huge bonus. It’s very difficult to effect radical changes in power and stay on target when shifting and matching speed to a power target. A smart trainer eliminates that need.

Leave a Comment

Wahoo KICKR Customer Service Disappointment

Planning to follow a TrainerRoad plan with Kristen all winter, and a little irked at the quirkyness of shifting to hit power targets on my current setup, I became interested in a smart trainer. My buddy Mike let me borrow his Wahoo KICKR, something I’d been itching to try after hearing so many good reviews of them. In short, I really liked the experience and was quite impressed by how much easier it made riding indoors. I focused more on putting out effort and selecting my cadence and less on staying on target, and large swings (say, over/unders) were MUCH easier to do when I didn’t have to seek the moving power target. I really wanted one. A few days later I noticed that Wahoo was selling NOS (new old stock) 2016 model for $899, which seemed perfect! The $1199 retail price is a bit more than I can afford, but this was doable for both Kristen and I. Orders were placed and we got ready to sell our fluid trainers.

Not hearing anything on the order after four days we sent notes to Wahoo’s customer service department. The responses indicated the units had accidentally been oversold, so we were offered refurbished 2016 units for $100 less. Having the same warranty and being even cheaper, that sounded great! We both accepted the offer and waited. A day later we were informed that the warehouse had found more stock of the new 2016 units and those were on the way, with the refurb offer rescinded. Not as good of a deal, but still, great! Because of this back and forth Melinda, the customer service person, tossed in a 142×12 Thru Axle Adapter for me and a TICKR X Heart Rate Monitor for Kristen; both things we could use and a really nice gesture.

Unfortunately, when the KICKRs arrived, we found that Wahoo had screwed up. These were not new units, nor refurbished, but instead returns which likely hadn’t been opened since the customers packed them up. Mine was scraped and the end caps were chewed up as if the previous owner didn’t clamp it down properly and had the bike come off while riding. The cassette was slightly greasy, it had a bunch of non-Wahoo stuff (Garmin manual and packaging, Monoprice packaging) in the box, and fine plastic dust from the expanded foam packaging was spread all over, including in the resistance unit. Kristen’s was arguably worse, with a heavily scuffed flywheel area (as if the owner had it resting against something), an empty through axle adapter box, and the previous owner’s personal info: the RMA from Clever Training and — inexplicably — a copy of his vehicle inspection report from Volkswagen Credit.

My KICKR:


Kristen’s KICKR:

IMG_4727.JPG IMG_4728.JPG IMG_4742.JPG
IMG_4730.JPG IMG_4743.JPG IMG_E4729.JPG

Separately we both immediately contacted Wahoo, but being Saturday didn’t hear back until Monday afternoon. (They’re open M-F, 10am – 7pm, and email responses seem to take about a day.) The first responses offered $100 refunds claiming the units were refurbished. After pushing back indicating that they are simply used and don’t seem like it’d be up to their standards, the refund offer was upped to $200 with the opportunity to test them out before accepting. While $699 is an even better price, neither of us were keen on paying so much for used trainers with plastic dust in sensitive electronics.

Since it’s often easier to work things out over the phone I decided to call Wahoo. I spoke with Micah, who explained that the original customer service person I’d contacted via email, Melinda, was best suited to help me. (I got the impression she’s a lead or manager.) Indicating that what I really wanted was a new trainer, and that I was hoping they could sort this all out, he informed me that the 2016 units are gone, so that’s no longer possible, but he’d get in touch with Melinda and let her know that we had talked. A short while later I heard back from Melinda, offering to return the used trainer and give a 10% discount on a new 2017 KICKR. I replied asking for the RMA, declining to purchase the 2017 model. (In the mean time Kristen had called and set up an RMA for hers, but did not receive a discount offer.)

I understand that things go wrong with warehousing and shipping, especially when winter (trainer time!) is coupled with the busy holiday season, but I can’t help but be left quite soured by this experience. Almost two weeks after making the purchase, with time sunk into a back and forth via email and visiting FedEx, we’re both back where we started… without smart trainers. And waiting on refunds.

Good thing we’ve still got fluid trainers to ride… Because the CycleOps Hammers that we ordered are still en route.

Leave a Comment