Press "Enter" to skip to content

nuxx.net Posts

Making an Online RAMBA Trails Map

RAMBA Trails Map v1.0 (Default View w/ Epic Loop Layer)

Introduction

Kristen and I have been spending a good deal of time in the Ishpeming and Negaunee area this year, and I’ve made it a personal goal to become more familiar the local trails — both RAMBA-supported and otherwise — and get them documented OpenStreetMap (OSM). Having these trails in OSM provides two big benefits: they appear in other mapping tools (such as OsmAnd, GaiaGPS, Strava, MapMyRide/MapMyRun) and the trail data can be freely used to build other tools.

Official RAMBA Map v6 from 2018

Over the years of making trail maps with OpenStreetMap I’ve mostly produced PDFs for printing, leaving mobile and online mapping to other apps. These work well, but have the big downside of rendering routes with their style. That is, online maps via these tools’ show the routes, but look quite different from print maps, even if all the data for them to display more data (such as colour=* tags on relations) is in OSM.

While these apps work pretty well, and I use them myself routinely for navigation, I got the itch to see if I could make a web-based map that looked more like locally produced print maps than app-based renderings. It seemed like a good project, a good way to learn some basics of modern web development, and maybe make something useful.

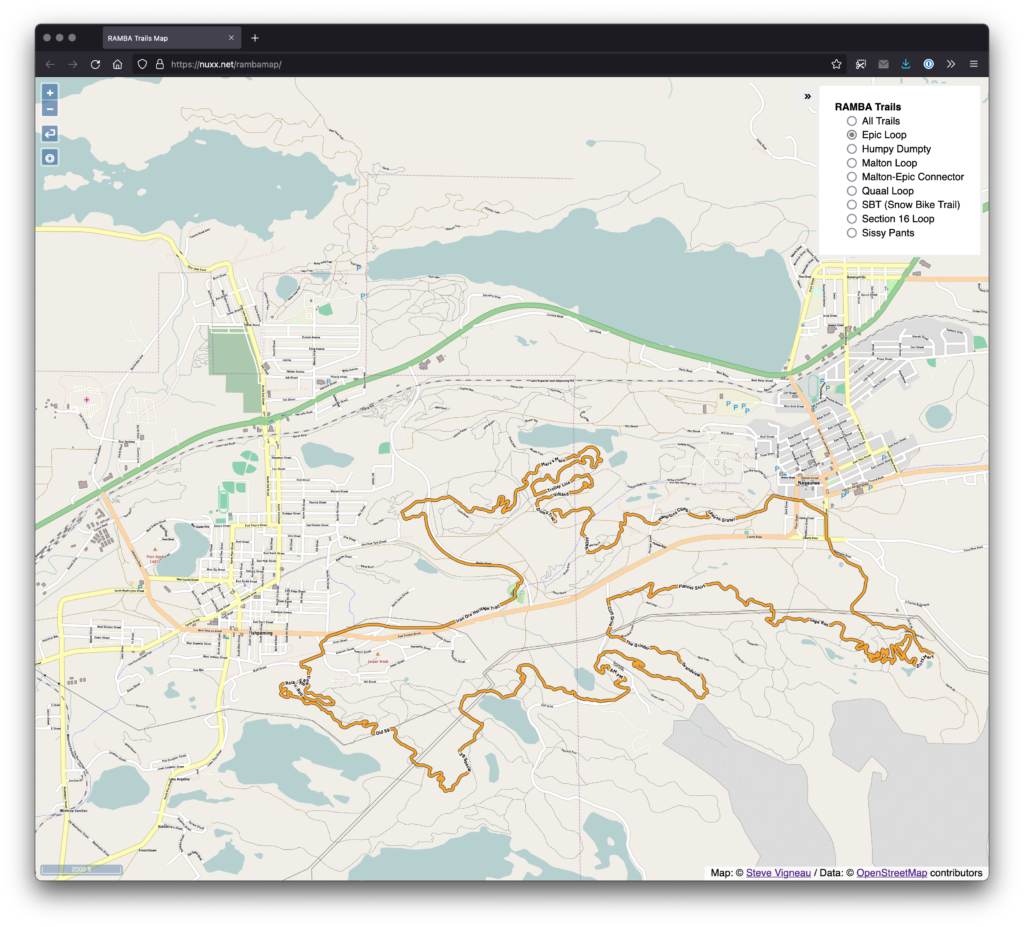
What I ended up with was a slippy map of showing the RAMBA trails that uses layers of pre-rendered tiles to show the different official trail routes, placed over a background map. The map viewer is client-side JavaScript that loads static tiles from a basic web server, making this a very simple app to host (just a bunch of static files on a site).

In this post I intend to document the major steps of how I made this map, why I used the tools I did, and share the code to reproduce (and update) this build. Hopefully this’ll allow others to get their head around these map presentation basics, perhaps even reusing this work to make and host another map.

Update OSM Data

Strava Global Heatmap in JOSM

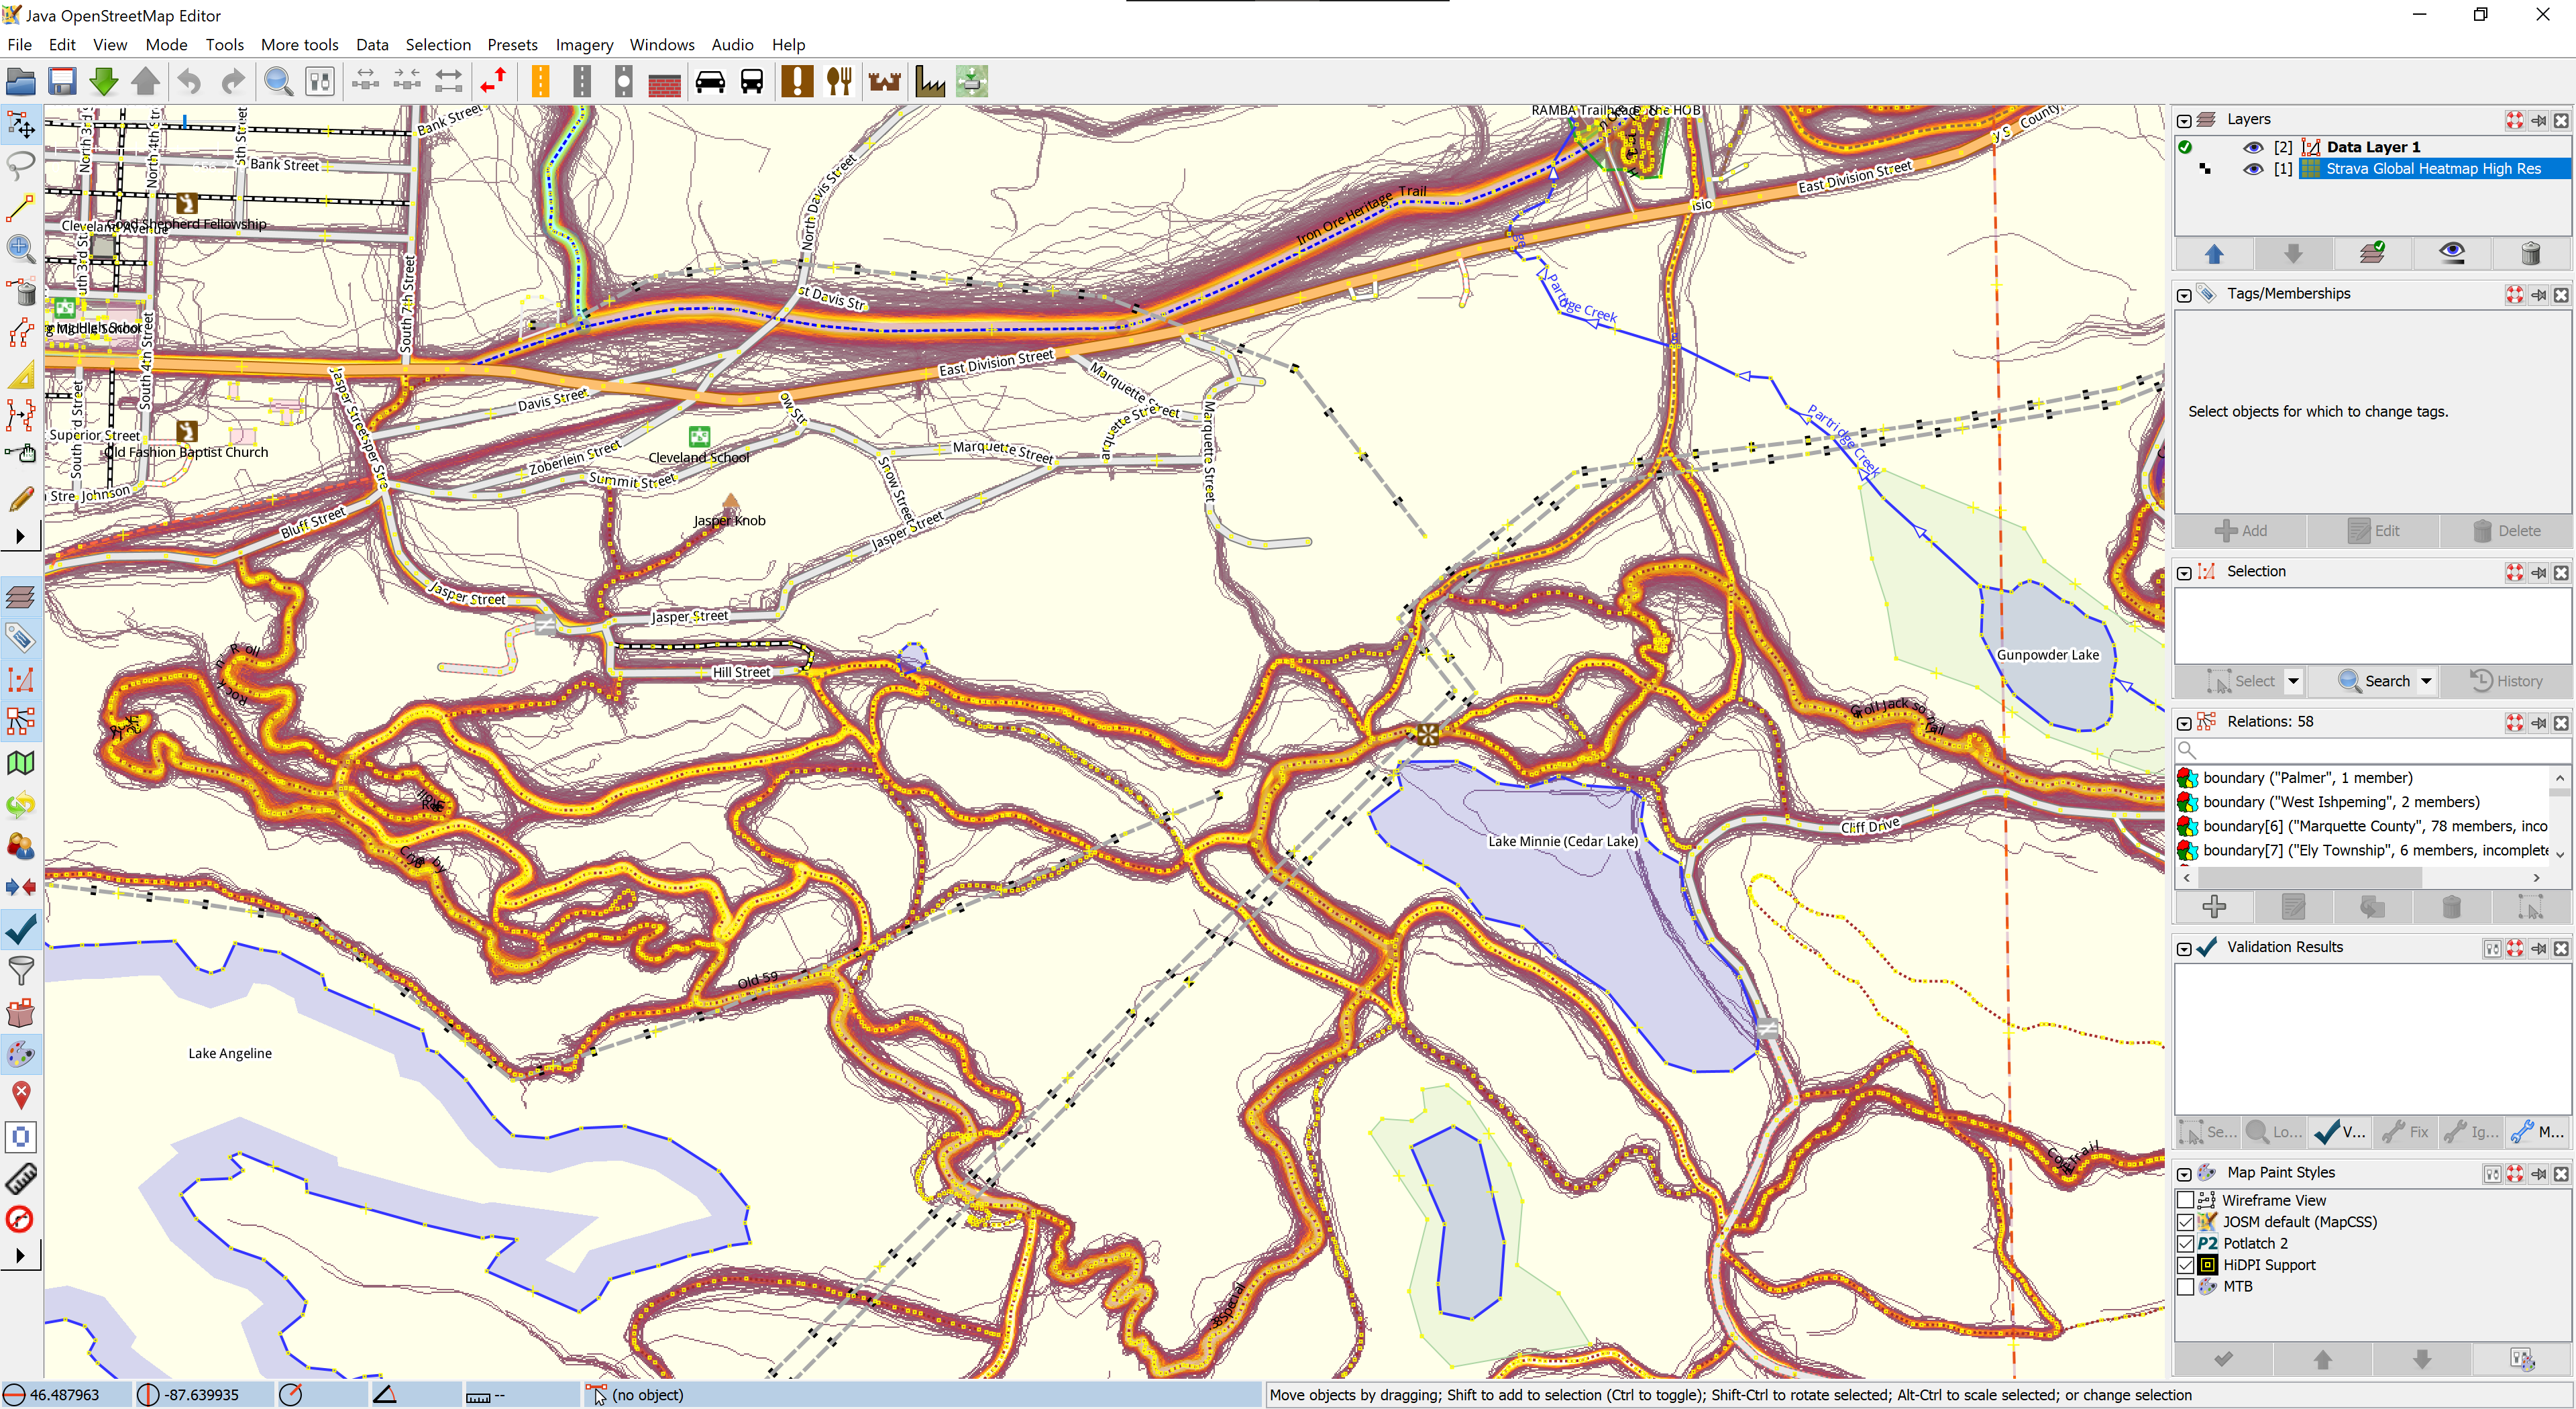
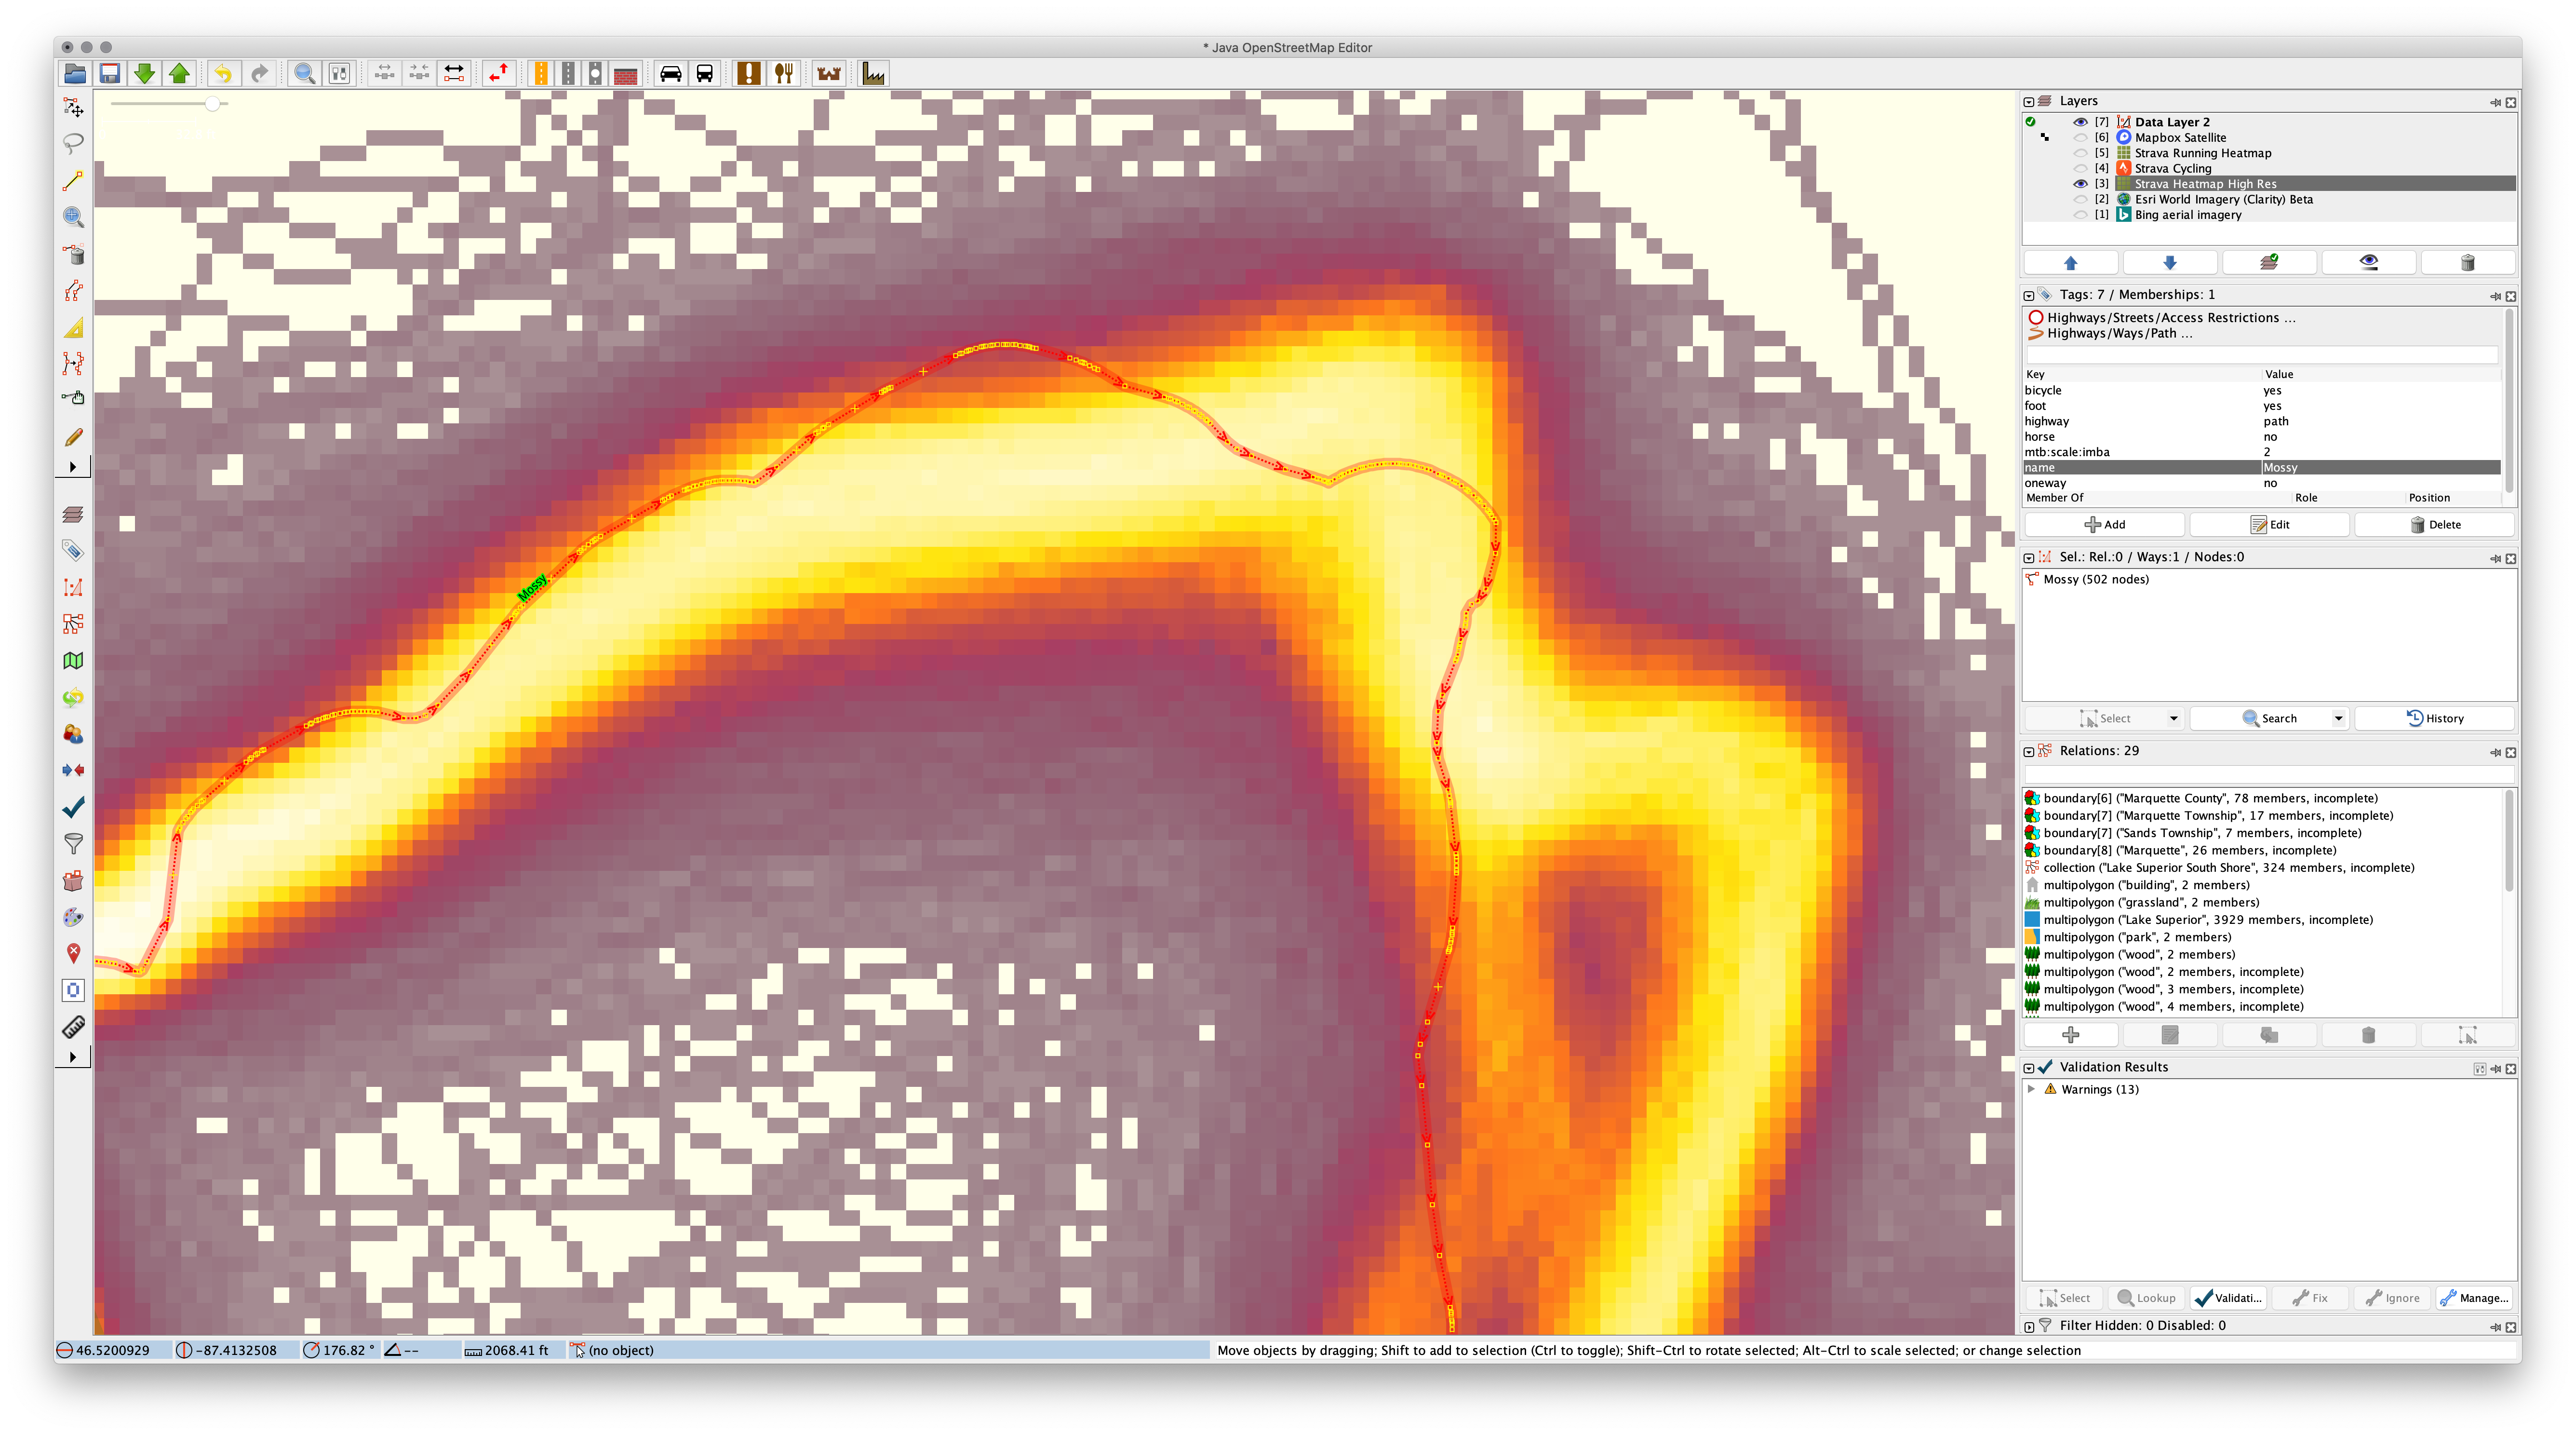
Mostly outside the scope of this article but worth a mention, a significant amount of time was spent ensuring that the RAMBA area trails are accurately listed in OSM. Without good data it would not be possible to go further, as the OSM data is the base data used to create other maps.

By combining information from a bunch of sources, and doing some personal surveying of trails while riding and hiking, I was able to get all of the official RAMBA trails documented, along with numerous other paths and tracks in the area. This building a complete picture of the usable trails in the area.

Information used to get the RAMBA trails in OSM included:

  • My own recorded ride/hiking data, notes, etc.
  • Strava Heatmap data.
  • Official route files (GPXs) from events such as Marji Gesick and Polar Roll.
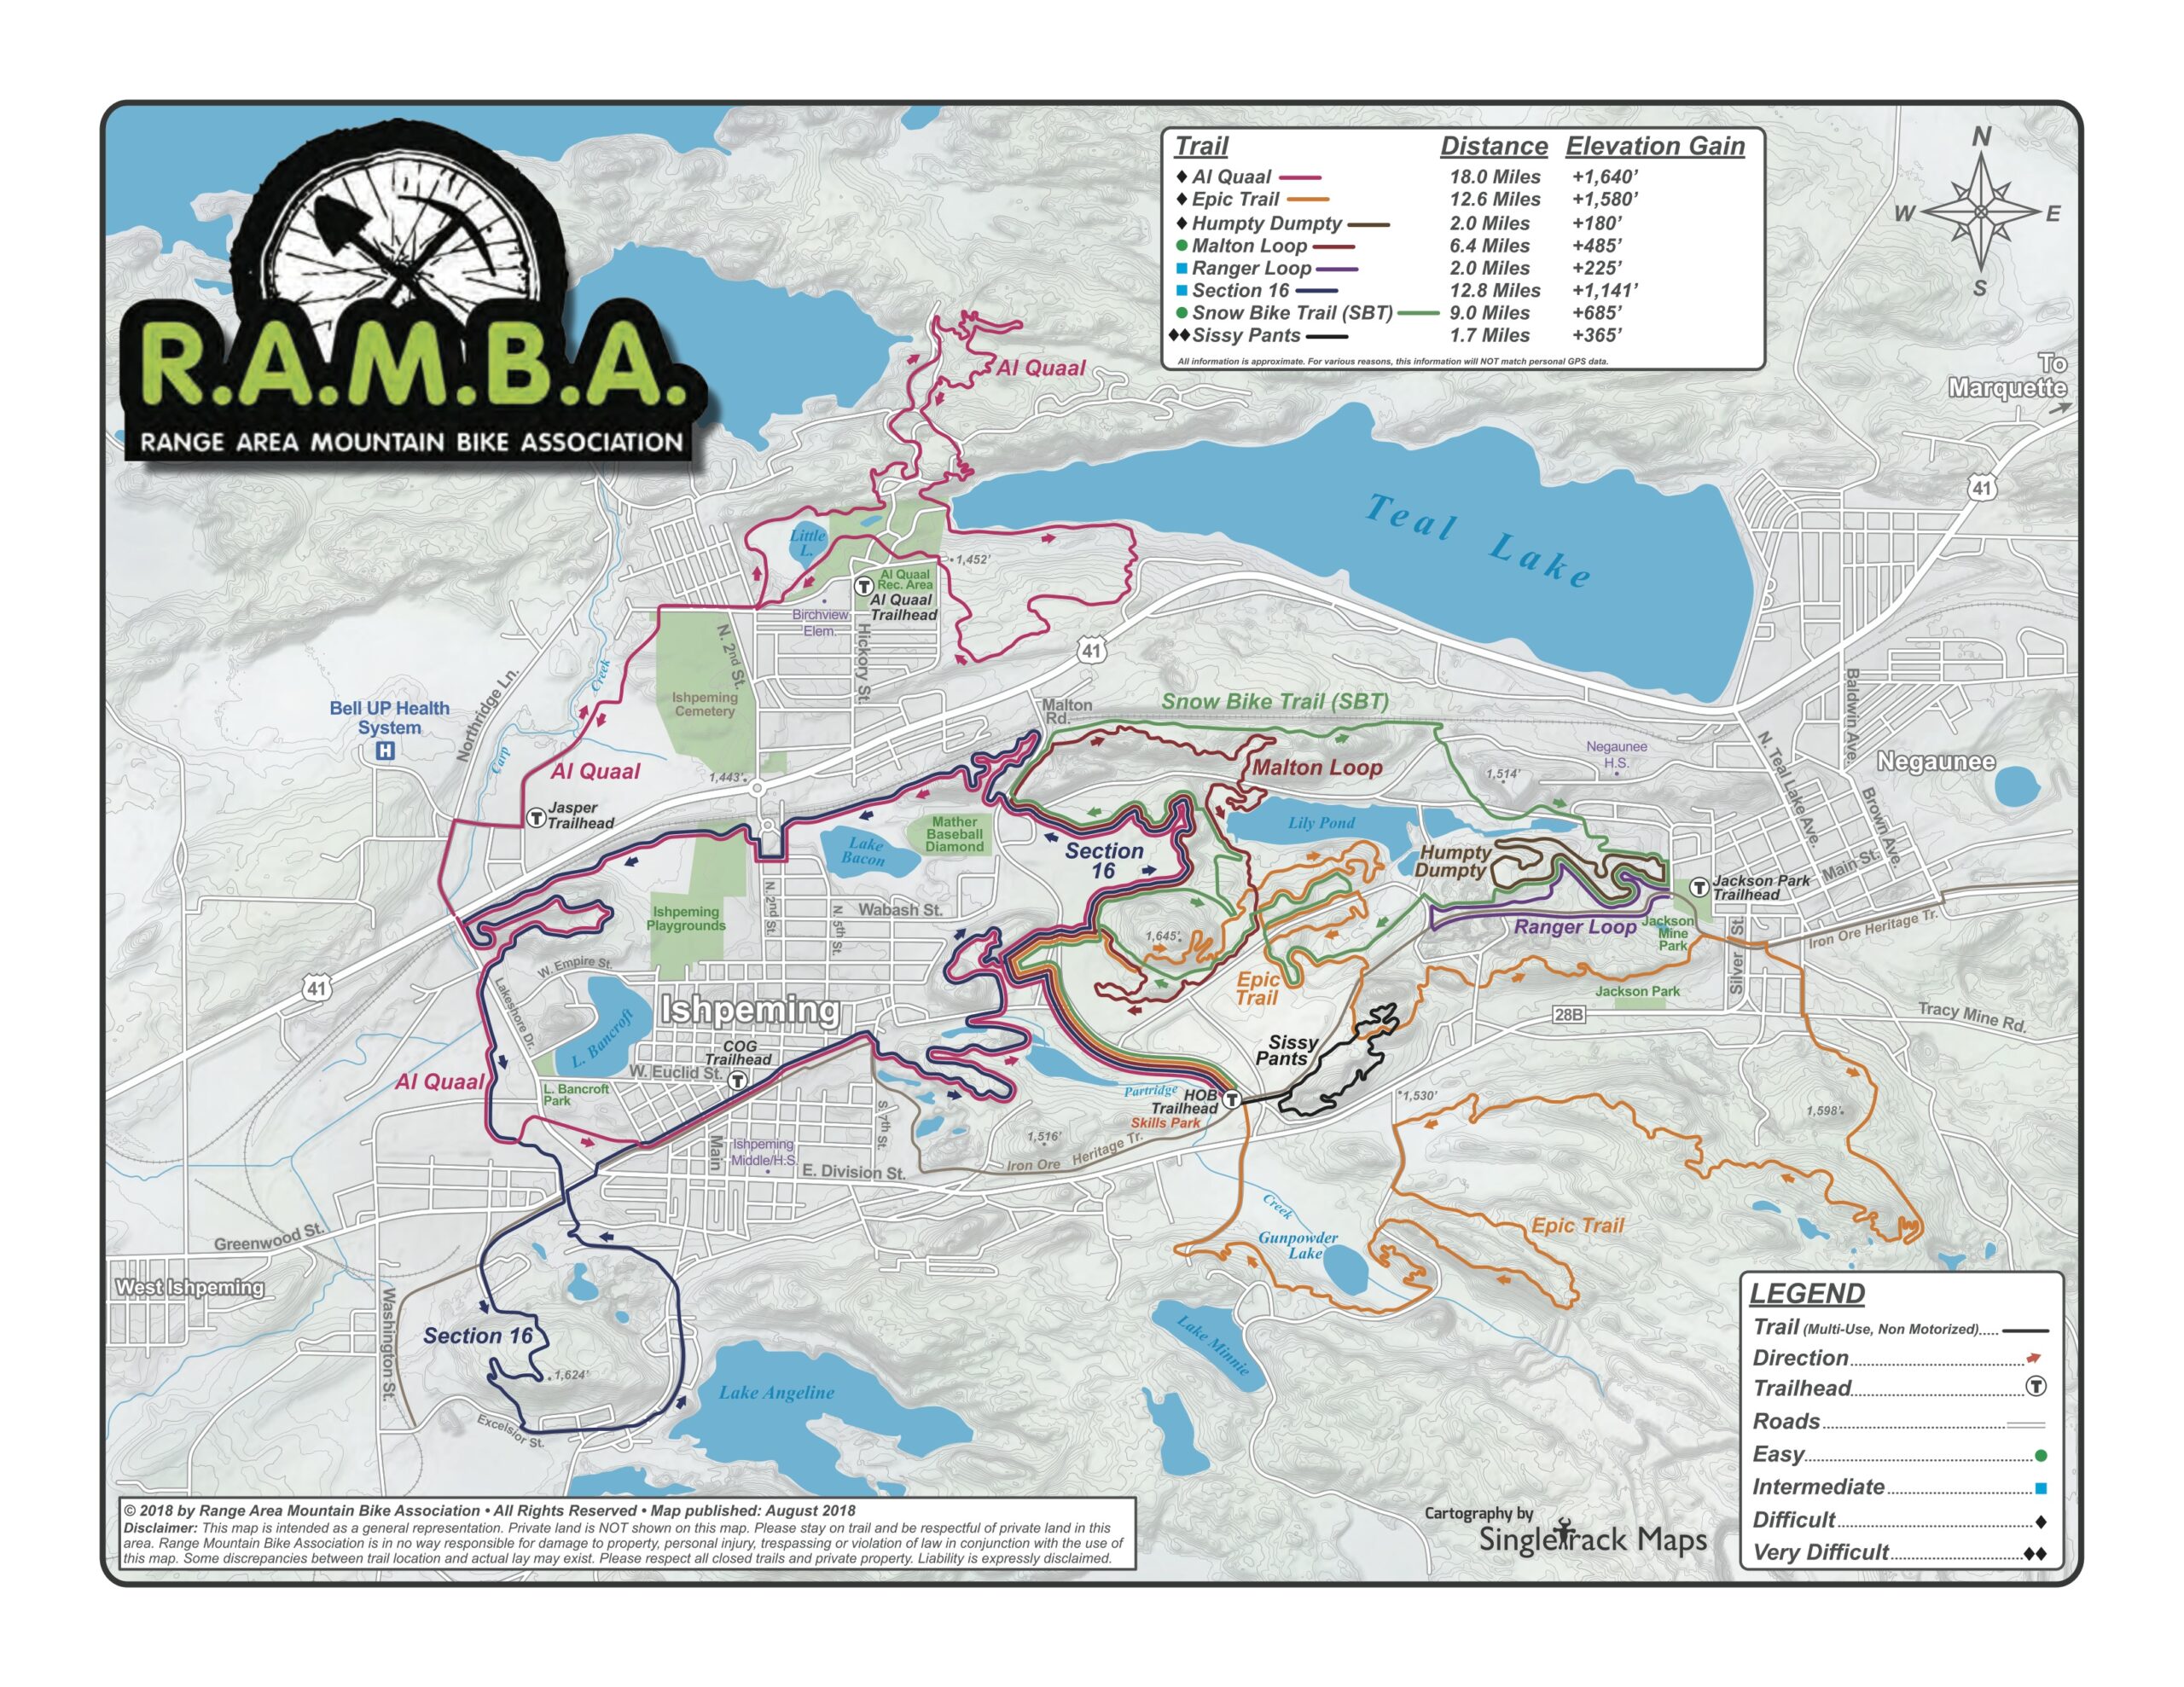
  • The official RAMBA map.
  • Hand-annotated map from Danny Hill listing local trail names.

These sources were combined in JOSM, cross-referenced, ways drawn and tagged, relations built out, and before long a complete picture of the RAMBA-area trails — official and otherwise — were in OpenStreetMap.

Most importantly, beyond documenting the trail locations, trails were grouped into route relations to show each official route, and then all the official routes were grouped into a superroute for all the RAMBA trails. As of time of writing, relation RAMBA Trails (12425503) is the superroute that aggregates the individual trail routes such as Epic Loop (8467869) and Malton Loop (8468010).

The result of this is accurate trail data that’s easy to query for and style using other tools.

Rendering Tiles with Maperitive

There are myriad ways to render tiles from OSM data, with most of these involving setting up a database server and a toolchain which’ll generate, cache, and serve tiles on demand. For most large data sets this makes a lot of sense, but for a small trail system I really wanted to use static tiles I could serve from a simple webserver.

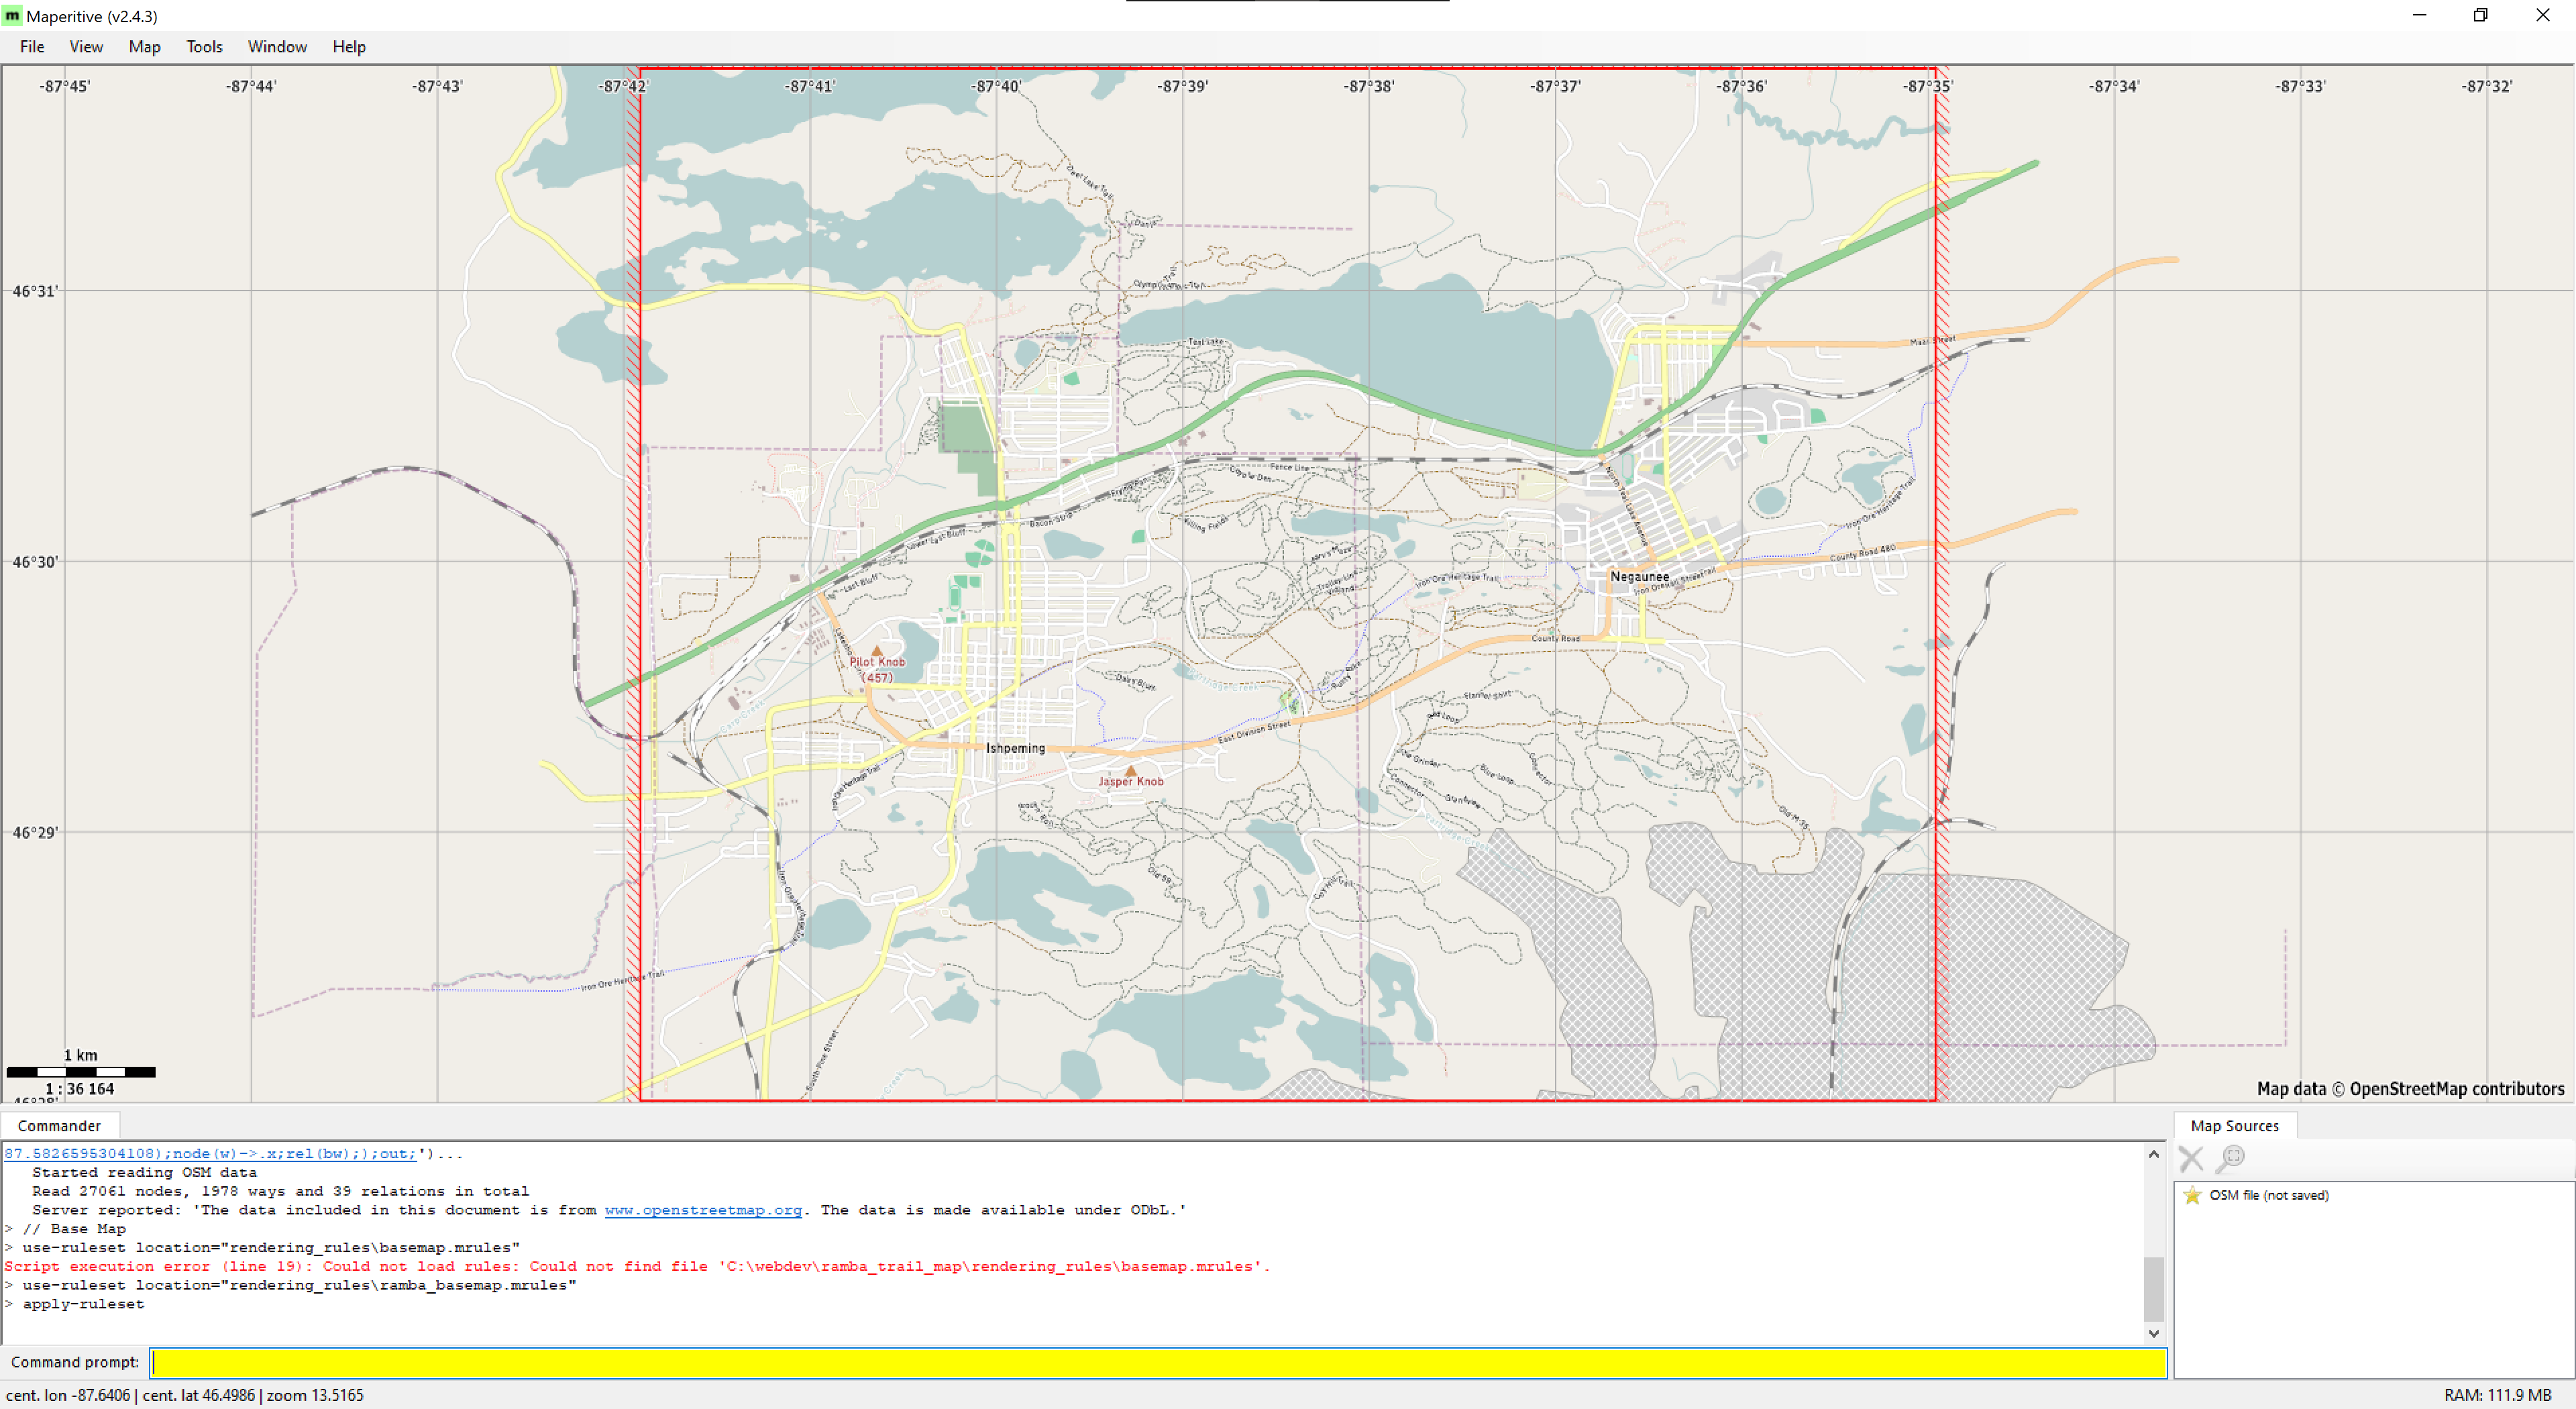
Eventually I came across Maperitive, a desktop application for Windows that takes GIS data (including OSM), stylizes it with a relatively simple ruleset, and can generate tiles in the standard XYZ format for use elsewhere. It can also be scripted, which meant I could use it as part of an automated workflow to generate new tiles as the OSM data changes. This seemed like a good solution, so I set about writing some rulesets that would reasonably show the RAMBA trail routes and some automation around it all.

After a lot of experimenting I settled on a having separate tile set for each of the official loops, an overview of all trails, and a base map. The base map would always be shown, and a user can toggle between layers which highlight all the trails or individual loops.

After a few iterations of custom rules, I settled on a simplified set based on the Default.mrules file which comes with Maperitive for rendering the base map. The only modification was changing the font to Michael Adams’ Roadgeek 2005 Transport Medium font, as it looks nicer than the default, Verdana. For the overview and route layers I created simple rules based on the the default rendering of highway=path, using the Heavy version of the font. The rule for each trail route (relation) selects the trails in a given relation then colors them accordingly.

Creating these rules took a bit of fiddling, as Maperitive is both a bit of a dead project, not completely documented, and (in the latest Beta) sort-of buggy where sometimes the map display would stop updating. Still, even though I’m not great at making attractive things, I was able to come up with something that worked well enough.

Conveniently, Maperitive also comes with a command line version (Maperitive.Console.exe). After settling on rendering rules and a tile generation script, I used this as part of an automated workflow which downloaded OSM data directly then rendered each of the tile sets.

After tile generation I used a Windows binary of OptiPNG to losslessly compress the tiles, resulting in a ~62% space savings (original: 746MB, optimized: 286MB) which’ll reduce storage and bandwidth overhead.

The Front End

Editing in VS Code

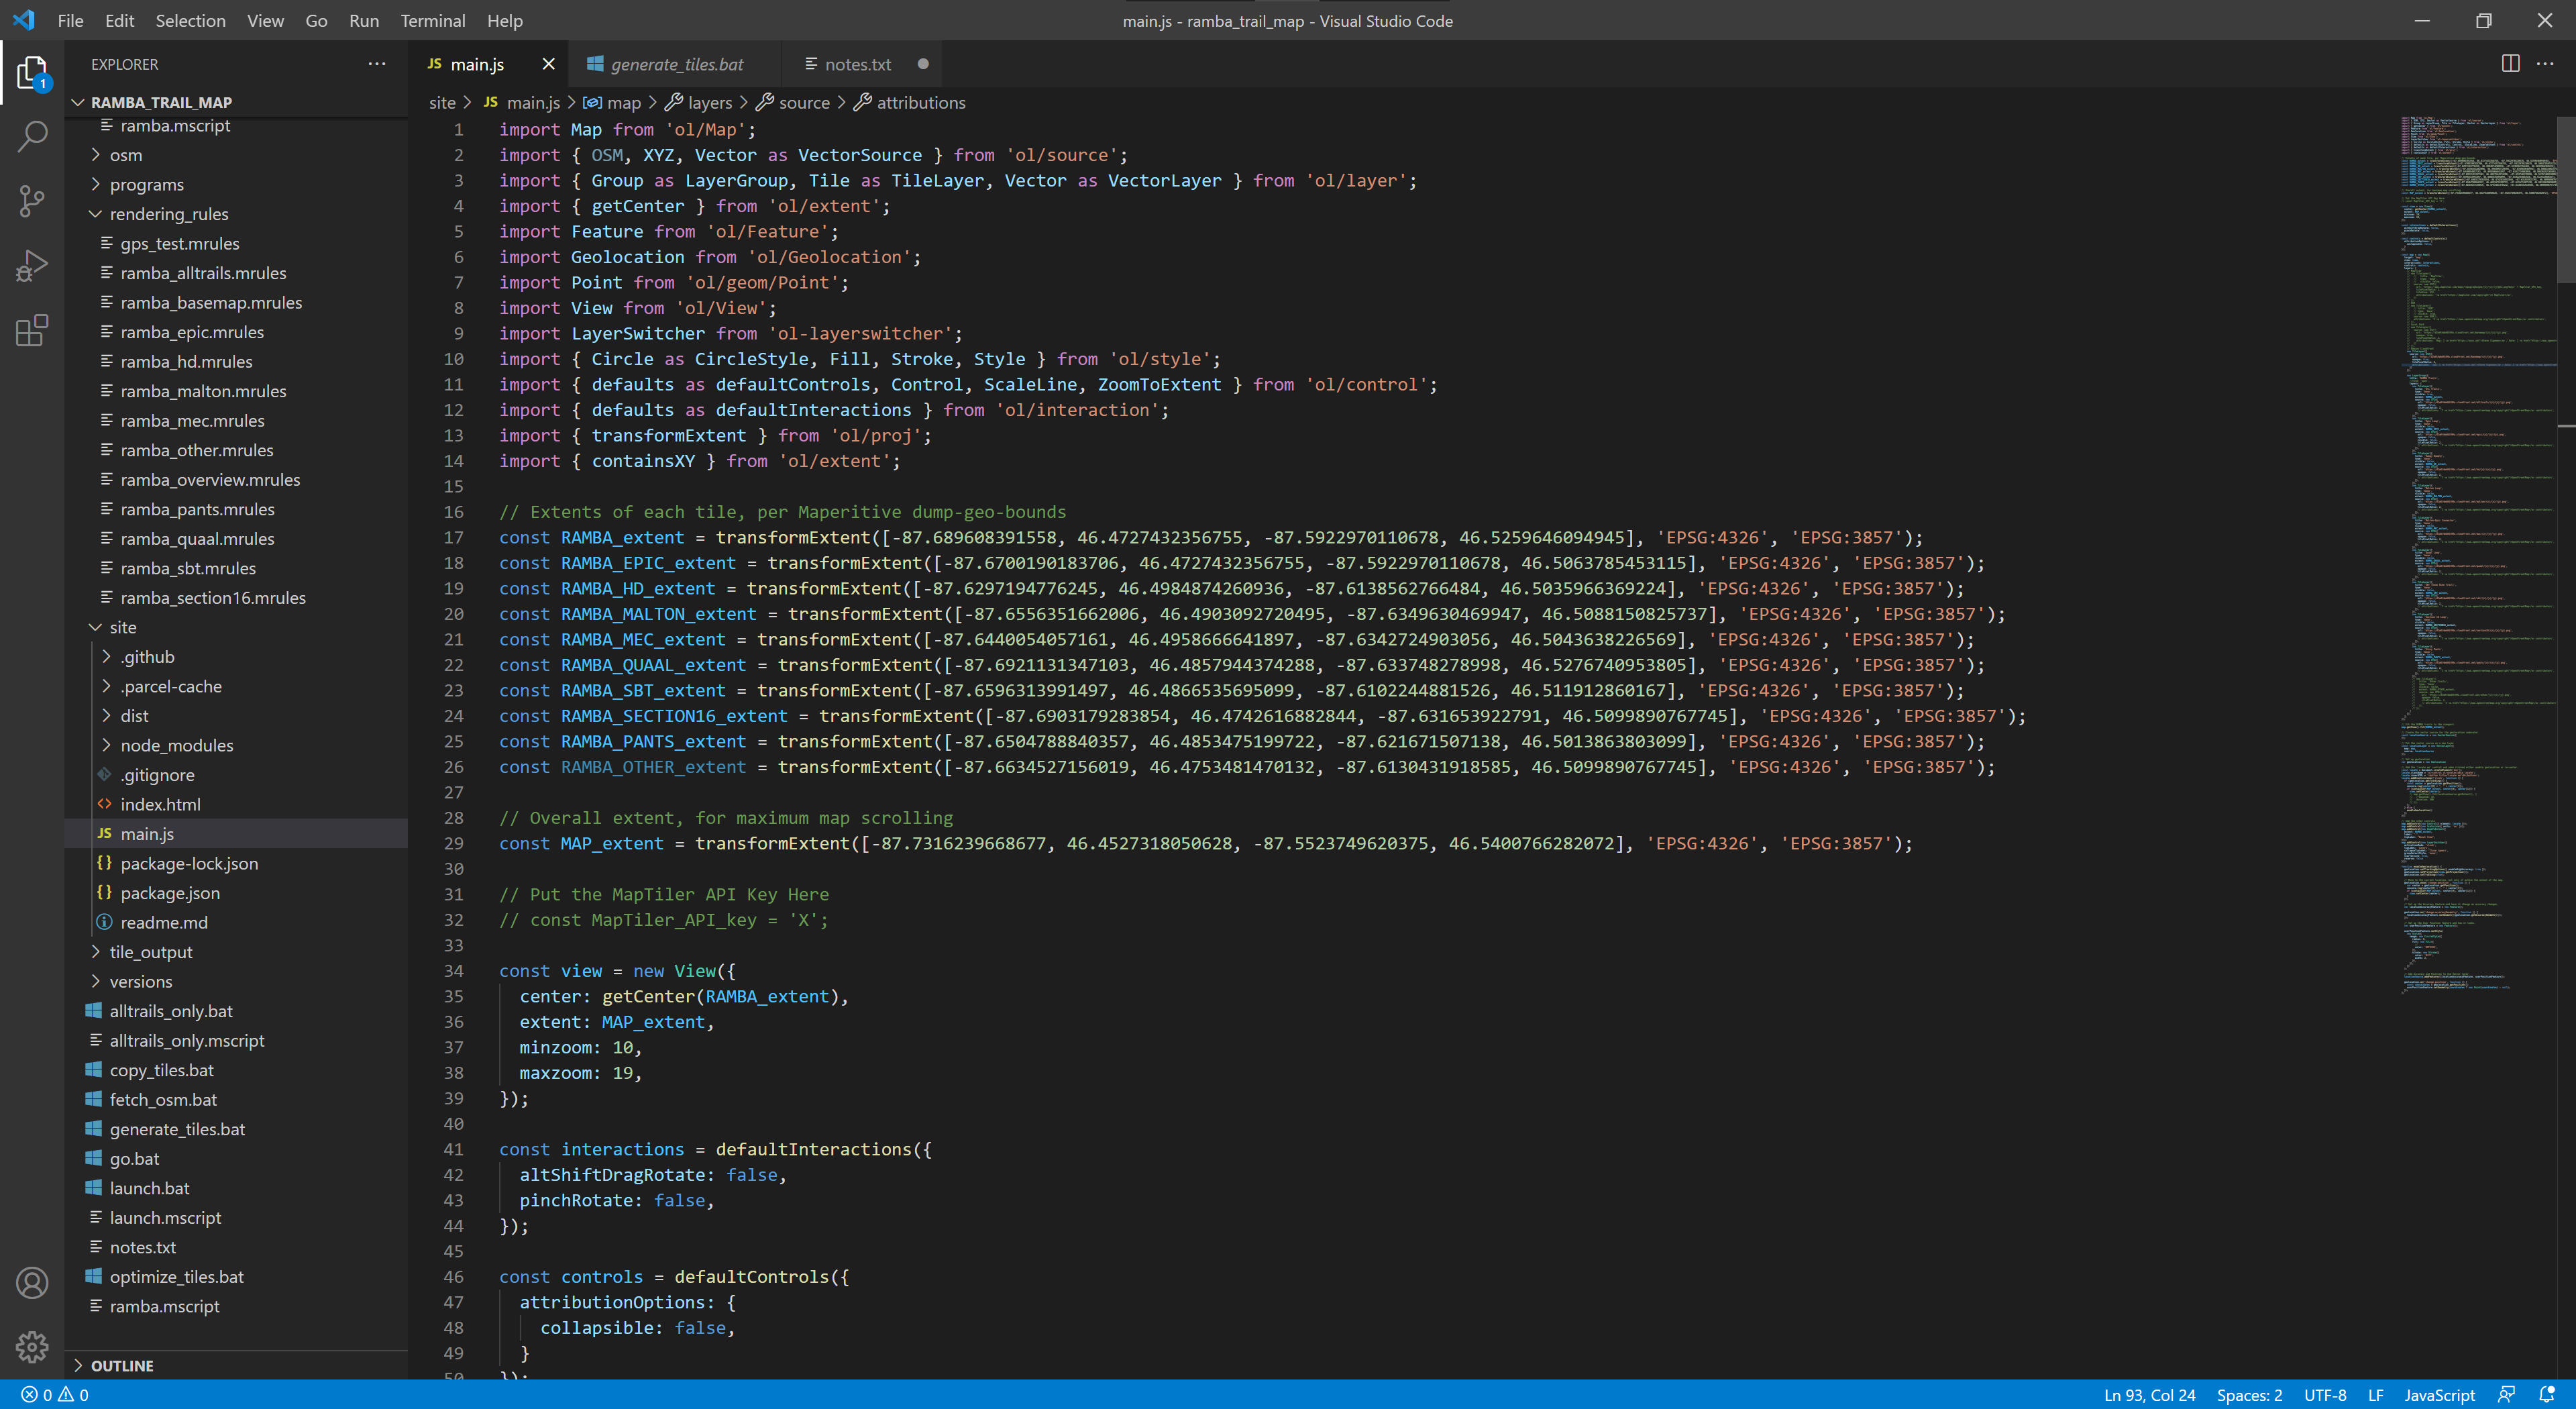
With tiles generated I needed a way to display them. It turns out that OpenLayers was easy to use and it all ran as simple client side application in a browser. By using npm and parcel, with Visual Studio Code for editing, it was quite easy to get the site developed, tested, and bundled up for deployment. The only component I had to add was ol-layerswitcher control, which provides an easy way to toggle between layers.

Prior to this I had very little experience with modern web development, with my exposure to JavaScript pretty much limited to reading others’ code to figure out what it’s doing. After a bit of confusion (and having to accept the hidden complexity of using an application bundler), I was able to focus solely on writing a single main.js file with a basic index.html that together do what I wanted:

  • Run full screen by default.
  • Show all trails by default, with toggles for the defined routes (layers of the map).
  • Show an attractive background map below the routes to show the rest of the area.
  • Offer controls to use geolocation to showing one’s location on the map and reset the view to the original map extents.
  • Look sane on desktop and mobile devices.

This ended up being much easier than I thought, and between the OpenLayers Examples and just some basic programming I was able to get something I’m happy with. Far more time was spent designing the tiles and thinking about what I wanted it to do than writing the code to display it all.

Tile Hosting

The actual map tiles are a number of small PNG files, and a typical session of viewing and panning around the map can result in hundreds of image loads. This was seeming a bit slow when being served from nuxx.net via HTTP/1.1, so I looked into using HTTP/2 to improve performance.

Unfortunately, it was not simple to turn on HTTP/2 here at nuxx.net as I’m using PHP for WordPress, which in turn requires MPM prefork, which precludes mod_http2. I could have set up another web server and such, but for now I’m hosting the tiles in AWS, with the tiles uploaded to an S3 bucket and served via CloudFront.

This should allow for better tile download performance than what I can do from my server. Despite potentially incurring a bit of a financial cost it is a good experiment in hosting tiles in the cloud. I may change this in the future, particularly if it becomes cost prohibitive, but for now it’s working well.

Follow Along At Home

If you would like to generate this same map, start by downloading this ZIP file: ramba_trails_map_code_1.0.zip. It contains the scripts and rules needed to generate the map tiles (ramba.mscript and the .mrules files), the index.html, main.js, and package.json for the OpenLayers-based front end, the .osm file used to generate the first release of the map, and a few batch files that tie it all together.

You will need to download Maperitive (latest beta: link — from this post / mirror), curl, OptiPNG, and the Roadgeek 2005 fonts to generate and optimize the tiles. These scripts may work fine with older/release versions of Maperitive, but betas incorporate a bit of collision detection for text, making things look nicer.

These batch files are included to will help you out, but may need some editing to fit on your environment:

  • fetch_osm.bat: Uses curl to download all OSM data within a bounding box that encompasses the Ishpeming/Negaunee area.
  • generate_tiles.bat: Runs ramba.mscript via Maperitive.Console.exe to generate the tiles.
  • optimize_tiles.bat: Copies the unoptimized tiles from the .../tile_output/raw output directory to the .../tile_output/optimized directory, then runs OptiPNG against the tiles to optimize them in place.

To build the web app you’ll need to install npm, parcel, create a new OpenLayers app as per the directions here. Then install ol-layerswitcher (npm install ol-layerswitcher), replace the default index.html, main.js, and package.json with the ones I provided, and you should be ready to go.

Updating the Map

As you can see, the map is two major pieces: the front end and the tiles. Whenever the map data changes in OSM the tiles can be regenerated to update those layers. The code for the front end web app only needs to change if the storage location changes, features are going to be added, etc.

Conclusion

This map has worked out rather well and I’m happy calling it v1.0. It’s been a great learning experience, and I’ve even managed to produce something useful that didn’t exist before: an interactive map of some of the most rugged single track trails in Michigan; one of my favorite places to ride mountain bikes.

It’s far from perfect, and there are some things I could do differently, but for now, I’m considering it a success. When in Negaunee for vacation last week I successfully used development versions of this map to find my way around, so I know it’s better than nothing.

If you find any quirks in the map data — such as trails with wrong names or in the wrong location — please take a screenshot and show me what’s wrong and email that to steve@nuxx.net. I’ve done my best to ensure the RAMBA trails are accurately mapped, but I’ve certainly missed some things.

Problems

  • No key or other ancillary information (such as logos) as are normally found on print maps.
  • No terrain. While 1m DEM elevation data is available from the USGS, I couldn’t figure out how to use it in Maperitive for generating hillshading.
  • No easy way to add clickable items to show additional info, link to external map apps (eg: for navigation).
  • Maperitive’s text rendering isn’t the best, resulting in goofy looking text at some zoom levels.
  • Long trails only have one label placed on the middle. Trails with one name broken into multiple ways will be labeled numerous times.
  • Due to being run in a browser it’s a sufficient, but not great, mobile experience. Specifically, selecting the geolocation, recenter, and layer controls can be fiddly because they are so small.
  • Does not work offline, but thankfully most of the RAMBA area now has good mobile data coverage.

Things To Investigate

  • Keep an eye on AWS cost and performance.
  • Look at Leaflet for the front end, as it seems a bit more modern.
  • Consider rendering map tiles with TileMill. This will add a lot of complexity both in setup and styling tiles, but once done should allow a lot more flexibility in styling and overcome most of Maperitive’s problems. mapbox/mbutil should work for getting XYZ PNGs out of MBTiles files.
  • Consider using a tile server if I don’t want to deal with discrete files.
  • Look more into using vector tiles with client-side styling. (I passed on this for now, as a GeoJSON file showing each of the route is a large download and had no benefit over raster tiles.)
  • Maperitive should run under Mono, and OptiPNG is available for many platforms, meaning it should be possible to reproduce this build under macOS or Linux. Note that the GUI for Maperitive will not currently run on macOS due to Windows.Forms currently being based on Carbon, which is not available for 64-bit macOS. So while the CLI should work, the GUI version isn’t currently compatible with macOS 11.5 (Big Sur) and higher.
Comments closed

New Trail Bike: Pivot Trail 429 v3

For years the Pivot Trail 429 series of bikes have been a sort-of Holy Grail bike for me. The ultimate aggressive cross country / trail mountain bike, and something I really wanted to try. In August of 2020 I was able to spend a few hours riding v2 of the bike around some of my favorite Marquette and RAMBA trails and fell in love. Something about the bike and I clicked, and I came away wanting one. After that trip I sold my beloved Specialized Camber and got ready to buy a new bike.

With the COVID-19 related bike industry shortages it took a lot longer than I’d hoped, but almost a year after that demo — in August of 2021 — I made a quick trip up to Bellaire (three hours each way) and picked my new bike from Patrick at Paddles & Pedals: a Pivot Trail 429, v3, Race XT build, with the crank and wheels upgraded to high end carbon bits.

While I hadn’t ridden this new v3 of the Trail 429, and it’s a much longer reach bike than v2, I’d stared at geometry numbers for hours, comparing it to my current bikes, and figured that a size large in this model would also be right for me. After getting the bike and swapping the usual contact points, fitting the larger rotors that I wanted, and some other little bits, it was all ready to ride.

Using the Low bottom bracket setting (the higher of the two), a 35mm stem, an upper stack height of 30mm (headset upper cover + 15mm spacer) and the 11° sweep Salsa Salt Flat Carbon bar the RAD ended up just 5mm shorter of the Timberjack and feels pretty good on its first ride.

I may experiment with the Lower setting, which’d slacken the head tube and seat tube angle by 0.5°, bring the reach in and increase the stack, but this’ll likely require a 50mm stem to get the fit where I want it. At the same time, it’d bring the bottom bracket height closer to that of the Camber’s, which might be really nice. Between suspension setup and such, I’ve got a lot of experimenting to do.

Current build details are as follows:

Frame: Pivot Trail 429 v3, Large, Silver Metallic
Fork: Fox 2021 Performance Series 34 FLOAT 29 130 (Short ID: D4SW / 2021, 34, A, FLOAT, 29in, P-S, 130, Grip, 3Pos, Matte Blk, No Logo, 15QRx110, 1.5 T, 51mm Rake, OE)
Fork TA Parts: QR15 Geared Cam and Hardware
Rear Shock: Fox 2021 Series FLOAT (Short ID: D9N4 / 2022_21, FLOAT DPS, P-S, A, 3pos, Trunnion, Evol LV, Pivot, Trail 429, 165, 45, 0.9 Spacer, LCM, LRM, CML, No Logo)
Headset: Pivot Precision Sealed Cartridge (OE)
Crankset: RaceFace Next SL (170mm)
Bottom Bracket: RaceFace BB92 Cinch 30
Chainring: RaceFace 1x Chainring, Cinch Direct Mount- SHI 12 (32t)
Chain: Shimano CN-M7100
Derailleur: Shimano XT RD-M8100-SGS
Shifter: Shimano XT SL-M8100-IR
Shift Cables / Housing: Jagwire LEX-SL
Cassette: Shimano SLX CS-M7100-12
Brakes: Shimano SLX, Rotor: BL-M7100 / Caliper, BR-M7120
Brake Pads: Shimano N04C
Front Rotor: Shimano RT-MT800 M
Rear Rotor: Shimano RT-MT800 L
Front Brake Adapter: Shimano SM-MA-F203P/P (160mm Post to 203mm Post)
Stem: ENVE Alloy Mountain Stem (31.8mm clamp, 35mm length)
Bar: Salsa Salt Flat Carbon (750mm)
Wheels: Reynolds Black Label 309/289 XC
Tires: Maxxis Rekon (29 x 2.6″, 3C/EXO/TR)
Seatpost: Fox Transfer Performance Elite (175mm, 31.6mm)
Dropper Lever:Wolf Tooth ReMote Light Action (Black, 22.2mm Clamp)
Seatpost Collar: Pivot OE
Saddle:Specialized Power Expert (143mm)
Pedals: Shimano XTR PD-M985
Grips:ESI Extra Chunky (Black)
Bottle Cages:Specialized Zee Cage II (Black Gloss, 1x Left)
Computer:Garmin Edge 530, Garmin Speed and Cadence Sensors (v1), Best Tek Garmin Stem Mount
Bell: RockBros Handlebar Stainless Steel Bell (Black)
Derailleur Hanger: SRAM Universal Derailleur Hanger
Frame Protection Tape: McMaster-Carr UHMW PE

Comments closed

HOSTS v3.5.3 and v3.6.0 Broke BackBlaze Backups in Arq

About a week back I did a round of updates at home, including updating the Pi-hole container (running in Docker on a Synology DS1019+) to the latest version, v4.2.2. Not long after this I noticed that backups to Backblaze, via Arq running on my main Mac, were stuck with a Caching existing backup metadata (this may take a while) message.

Since it said it might take a while I gave it a few days, but after a week it was likely something was wrong. Turns out it wasn’t caused by any of my updates, but instead by two versions of the the block list HOSTS (v3.5.3 and v3.6.0) — the default block list in Pi-hole — in turn caused by the Polish block list KAD.

How’d I figure it out? Here goes:

First, a wee bit of digging led to this Reddit thread on /r/Arqbackup, and a quick look at Pi-hole showed that yes, f000.backblazeb2.com is being blocked over and over.

Whitelisting this site allowed backups resume working. But… why?

I then disabled the whitelist entry and updated gravity in Pi-hole (pulling down and compiling a new copy of the blocklists) and everything kept working. So, this seems like a block list might have been the source of the problem.

I only use two block lists, one the Pi-hole default and the other from the COVID-19 Cyber Thread Coalition. Taking a quick look through the current versions (1 · 2) didn’t show anything blocking this site as of this morning, which seemed rational as the blocklist update fixed things. Local DNS for this client is via Pi-hole, which in turn points to my firewall, which is running Unbound to handle all resolution itself. So, it shouldn’t have been caused by a DNS provider blocking things.

Pi-hole automatically updates gravity every Sunday early in the morning, which would about correlate with the Arq problems starting. So maybe this is it? With the last Gravity updates happening on 2021-Apr-04 and 2021-Mar-28 we’ve got a window to look for f000.backblazeb2.com in blocklists.

The COVID-19 Cyber Threat Coalition domain blocklist was updated this morning, and doesn’t have any obvious version control, so I skipped over this one for now. The second, the Pi-hole default HOSTS, is hosted in GitHub and has regular releases. So let’s look through there…

Grabbing the last four, v3.5.2, v3.5.3, v3.6.0, and v3.6.1 spanned the last 18 days, which should cover the window during which this broke. A quick unzip and grep showed f000.backblazeb2.com and www.f000.backblazeb2.com in the fakenews, gambling + social, gambling + porn, and social categories in versions 3.5.3 and 3.6.0, but not anything before nor after.

There we go; the reason for the block and it’s all within the observed timeframe. This isn’t a hostname one would normally want to block, as it’s part of BackBlaze’s CDN (PDF). Sounds like an overzealous addition to a blocklist got sucked up into the HOSTS list.

Looking further through the grep output, this was part of the .../KADhosts/hosts file from the KAD list. It turns out that f000.backblazeb2.com was added to the KAD list on 2021-Mar-26 and then removed on 2021-Apr-01. HOSTS pulled from KAD for v3.5.3 on 2021-Mar-28 and v3.6.0 2021-Mar-31, which caused it to inherit the block in those versions.

Quite an interesting chain, eh? A Polish ad blocking group makes a change that ends up in the default list for one of the most common DIY adblockers, which in turn breaks access to a fairly common CDN, in turn breaking data backups. It’s dependencies all the way down…

It’s now fixed, and everything would have resolved itself had I waited until Sunday, but at least now I know why.

Comments closed

Industry Nine Hydra / Light Bicycle AM930 Wheel Build

Both the Electric Queen and Timberjack were fitted with the same Industry Nine Trail S Hydra 28H wheelset; a really nice value wheelset which mates the amazing Hydra hubs with aluminum rims. Despite slightly denting (and fixing) the rear rim, these have held up great and been wonderful to ride, but I still occasionally found myself missing the stiffness (and durability) of carbon rims.

As the bike sat over winter I figured it’d be a good time to upgrade to the carbon rims, so just before Thanksgiving when Light Bicycle was offering a bit of a sale I ordered a set of rims and got the process started. Between these value rims and (literally) slow-boat-from-China [1] shipping, eBay special spokes, and spare nipples from previous builds I was able to put together a nice, solid, carbon wheelset for about $550 less than if I’d bought a complete similar set from I9. And I’ll have some rims to sell (or reuse).

The Trail S Hydra rims come with straightpull hubs that I9 doesn’t sell separately, but they were nice enough to send me the specifications for them. With some forward/backward checking against the original rims and spokes (597mm ERD, 303mm spokes) I found the DT Swiss Spoke Calculator to work great for these hubs as well.

For rims I chose the Light Bicycle Recon Pro AM930 rim, which is their high end 30mm internal 29er rim with a nude unidirectional carbon finish. As options I chose 28h drilling, black logos, and black valve stems to match the hubs and any bike. (Silver logos would also have been fine to match the hub logos, but I really prefer plain looking rims.)

When shopping around for spokes a deal popped up on eBay offering a whole box of 298mm DT Swiss Competition straightpull spokes, which perfectly match Squorx nipples left over from previous wheel builds. I love working with nipples like these, because they are tightened with a T-handle tool from the back side, which makes building way more comfortable and faster than with a traditional spoke wrench. And it means no chance to mar the anodizing on the nipples.

The wheels were built up using Ultra Tef-Gel as thread prep, to a maximum tension of ~131kgf. Before starting the build I hadn’t realized that the inner and outer spokes on each side of the rim would be a different tension. As their flange offset is a bit different for each set of spokes on each side, necessary so the straight spokes don’t interfere with each other, the bracing angle is slightly different resulting in a different tension.

I did have a slight issue where, when bringing the front wheel to tension and trying to hit the Light Bicycle recommended tension of ~145kgf, the inner Squorx heads broke off three nipples. After this I detensioned the wheel and brought it back up to a lower, but still appropriate, spec. (In the process of figuring this out I ended up cutting two spokes as the nipples couldn’t easily be turned. After the third I detensioned the wheel and decided to build to a lower tension.)

Final tension for the wheels are as follows, with the small number the indicator on a Park Tool TM-1:

Front Wheel (NDS / L / Brake Side is Steeper Bracing Angle):

NDS (L) Inner: 22 (117 kgf)
NDS (L) Outer: 21 (105 kgf)
DS (R) Inner: 20 (94 kgf)
DS (R) Outer: 19 (85 kgf)

Rear Wheel (DS / R / Cassette Side is Steeper Bracing Angle):

NDS (L) Inner: 20 (20 kgf)
NDS (L) Outer: 19 (85 kgf)
DS (R) Inner: 23 (131 kgf)
DS (R) Outer: 22 (117 kgf)

Per usual with carbon rims building is a matter of centering the rim, eliminating runout, and detensioning the spokes. There’s really no truing (in the traditional sense) because single-spoke tension doesn’t really affect a stiff carbon rim.

Out of pocket cost was $651.13 on top of of the original wheelset, for a total of $1519.27 (excluding tires and sealant and whatever I can sell the old rims for):

Original Trail S Hydra 28H Wheelset: $868.14
LB AM930 Rims (w/ Valves + Tape): $563.14
DT Swiss Competition Spokes: $87.99
Total: $1519.27

A complete Industry Nine Hydra Trail S Carbon would cost about $2015 (with Shipping + Tax), about $500 more than the end cost of building these. While this set doesn’t have the US-made Reynolds Blacklabel rims, I’ve been happy with Light Bicycle rims on previous bikes and anticipate these’ll be just as good.

The final build, without tape/valves/tires/rotors/cassette, comes in at 794g for the front wheel and 917g for the rear wheel (1711g total). This is a 51g savings over the Trail S Hydra build when going to wider and stiffer rims. This isn’t enough weight savings to notice, but at least it didn’t add anything.

When putting the wheels back together I fitted the old tires as they still have a good bit of life left. I also used the original valve stems from Industry Nine as they are a bit shorter and I prefer the brass body versus the aluminum valves that came with the rims. It also turns out that Light Bicycle provided more than 2x as much tape as needed for the rims, which is great for future spare use. (The rims came with two rolls, one roll did both with plenty to spare.)


[1] The shipping notification states: “It is scheduled to board a Matson Liner’ ship for a sea journey of about 3-4 weeks before its arrival at Los Angeles port in the US. Then UPS will pick the package up to manage the local delivery for you. It is only when the pickup is made, the information at UPS website will be updated further as well as you could reach out to UPS by calling 800-742-5877 for quicker help then.”

Comments closed

A Home Network Troubleshooting Journey

This week I moved from UniFi to a new setup that included OPNsense on the edge to handle firewall, NAT, and other such tasks on the home network. Built in to OPNsense is a basic NetFlow traffic analyzer called Insight. Looking at this and turning on Reverse lookup something strange popped out: ~22% of the traffic coming in from the internet over the last two hours was from just two hosts: dynamic-75-76-44-147.knology.net and dynamic-75-76-44-149.knology.net.

While reverse DNS worked to resolve the IPs to hostnames (75.76.44.147 to dynamic-75-76-44-147.knology.net and 75.76.44.149 to dynamic-75-76-44-149.knology.net), forward lookup of those hostnames didn’t work. This didn’t really surprise me as the whole DNS situation on the WOW/Knowlogy network is poor, but it did make me more curious. Particularly strange was the IPs being are so close together.

To be sure this is Knology (ruling out intentionally-misleading reverse DNS) I used whois to confirm the addresses are owned by them:

NetRange: 75.76.0.0 - 75.76.46.255
CIDR: 75.76.46.0/24, 75.76.40.0/22, 75.76.0.0/19, 75.76.44.0/23, 75.76.32.0/21
NetName: WIDEOPENWEST
NetHandle: NET-75-76-0-0-1
Parent: NET75 (NET-75-0-0-0-0)
NetType: Direct Allocation
OriginAS: AS12083
Organization: WideOpenWest Finance LLC (WOPW)
RegDate: 2008-02-13
Updated: 2018-08-27
Ref: https://rdap.arin.net/registry/ip/75.76.0.0

My home ISP is Wide Open West (WOW), and Knology is an ISP that they bought in 2012. While I use my ISP directly for internet access (no VPN tunnel to elsewhere), I run my own DNS to avoid their service announcement redirections, so why would I be talking to something else on my ISP’s network?

Could this be someone doing a bunch of scanning of my house? Or just something really misconfigured doing a bunch of broadcasting? Let’s dig in and see…

First I used the Packet capture function in OPNsense to grab a capture on the WAN interface filtered to these two IPs. Looking at it in Wireshark showed it was all HTTPS. Hmm, that’s weird…

A couple coworkers and I have Plex libraries shared with each other, maybe that’s it? The port isn’t right (Plex usually uses 32400) but maybe one of them are running on it in 443 (HTTPS)… But why the two IPs so close to each other? Maybe one of them are getting multiple IPs from their cable modem, have dual WAN links configured on their firewall, and it’s bouncing between them… (This capture only showed the middle of a session, so there was no certificate exchange present to get any service information from.)

Next I did another packet capture on the LAN interface to see if it’s a computer on the network or OPNsense as the local endpoint. This showed it’s coming from my main personal computer, a 27″ iMac at 192.168.0.8 / myopia.--------.nuxx.net, so let’s look there. (Plex doesn’t run on the iMac, so that’s ruled out.)

Conveniently the -k argument to tcpdump on macOS adds packet metadata, such as process name, PID, etc. A basic capture/display on myopia with tcpdump -i en0 -k NP host 75.76.44.149 or 75.76.44.147 to show all traffic going to and from those hosts identified Firefox as the source:

07:39:57.873076 pid firefox.97353 svc BE pktflags 0x2 IP myopia.--------.nuxx.net.53515 > dynamic-75-76-44-147.knology.net.https: Flags [P.], seq 19657:19696, ack 20539524, win 10220, options [nop,nop,TS val 3278271236 ecr 1535621504], length 39
07:39:57.882070 IP dynamic-75-76-44-147.knology.net.https > myopia.--------.nuxx.net.53515: Flags [P.], seq 20539524:20539563, ack 19696, win 123, options [nop,nop,TS val 1535679857 ecr 3278271236], length 39

Well, okay… Odd that my browser would be talking so much HTTPS to my ISP directly. I double-checked that DNS-over-HTTPS was disabled, so it’s not that…

Maybe I can see what these servers are? Pointing curl at one of them to show the headers, the server header indicated proxygen-bolt which is a Facebook framework:

c0nsumer@myopia Desktop % curl --insecure -I https://75.76.44.147
HTTP/2 400
content-type: text/plain
content-length: 0
server: proxygen-bolt
date: Sat, 16 Jan 2021 13:22:57 GMT
c0nsumer@myopia Desktop %

Now we’re getting somewhere…

Finally I pointed openssl at the IP to see what certificate it’s presenting and it’s a wildcard cert for a portion of Facebook’s CDN:

c0nsumer@myopia Desktop % openssl s_client -showcerts -connect 75.76.44.149:443 </dev/null
CONNECTED(00000003)
depth=2 C = US, O = DigiCert Inc, OU = www.digicert.com, CN = DigiCert High Assurance EV Root CA
verify return:1
depth=1 C = US, O = DigiCert Inc, OU = www.digicert.com, CN = DigiCert SHA2 High Assurance Server CA
verify return:1
depth=0 C = US, ST = California, L = Menlo Park, O = "Facebook, Inc.", CN = *.fdet3-1.fna.fbcdn.net
verify return:1
[SNIP]

As a final test I restarted tcpdump on the iMac then closed the Facebook tab I had open in Firefox and the traffic stopped.

So there’s our answer. All this traffic is to Facebook CDN instances on the Wide Open West / Knology network. It sure seems like a lot for a tab just sitting open in the background, but hey… welcome to the modern internet.


I could have received more information from OPNsense’s Insight by clicking on the pie slice shown above to look at that host in the Details view, but it seems to have an odd quirk. When the Reverse lookup box is checked, clicking the pie slice to jump to the Details view automatically puts the hostname in the (src) Address field, which returns no results (it needs an IP address). I thought this was the tool failing, so I looked to captures for most of the info.

Later on I realized that filtering on the IP showed a bunch more useful information, including two other endpoints within the network talking to these servers (mobile phones), and that HTTPS was also running over UDP, indicating QUIC.

(Bug 4609 was submitted for this issue and AdSchellevis fixed it within a couple hours via commit c797bfd.)

Comments closed

Salsa Kingpin Deluxe Fork, DT Swiss 350 Big Ride Centerlock Hubs, 31mm Torque Cap Dropouts

For years I’ve been riding my beloved, custom-built, blue and black 2017 Salsa Mukluk with a set of DT Swiss 350 Big Ride-based wheels. This fall I noticed a very small crack in a non-critical part of the frame and Salsa quickly swapped me to a new 2019 Mukluk frame. Along with the new frame came a bit of an upgrade; Salsa’s Kingpin Deluxe fork.

31mm dropout for Torque Caps on the Salsa Kingpin Deluxe fork.

In looking at photos of the fork, test fitting with end caps, and as confirmed by Salsa directly, the Kingpin Deluxe has 31mm dropouts designed to fit the SRAM-developed Torque Cap end caps. Originally intended to make suspension forks less prone to twisting, the larger 31mm OD end caps, instead of the standard 21mm OD, strengthen the wheel/axle interface. This is well documented elsewhere, and end caps are available for most higher end wheel sets (I9, DT Swiss, etc), but it only appeared on non-fatbike RockShox suspension forks… until now.

It’s not clear to me why Salsa chose to put 31mm dropouts on the already-stiff, rigid, carbon Kingpin Deluxe fork, but they did. My guess is they saw potential for dynamo hubs — which generate power via forces between the still axle and moving hub shell — to use Torque Caps so they have a larger interface with the hub. After all, one of the new features of the Kingpin Deluxe fork is internal routing for dynamo hubs.

Parts from two DT Swiss HWGXXX0009100S kits for converting the 350 Big Ride hubs to Torque Caps.

The only downside to including 31mm dropouts is that without Torque Cap end caps on the hub the wheel won’t self-center on the axle making wheel installation a little bit fiddly. In practice this isn’t a problem, and Newmen made stick-on Torque Cap Fork Reducers to mitigate it, but I wanted to see if I could get some actual Torque Caps for my DT Swiss 350 Big Ride Center Lock hubs (H350DCIXR32SA6259S) to do it right.

After a bit of email with Logan, one of the ever-helpful folks at DT Swiss, I learned that unlike all their other hubs, these have equal-length end caps and until now there weren’t any fat bike forks with 31mm dropouts, so DT doesn’t have a Torque Cap kit for these hubs. Logan suggested that I pick up two of the HWGXXX0009100S kits for regular 350 hubs, then use the longer pieces on each side of the hub, figuring this should fit. While this was a bit pricey (~$65), it felt like the right choice so the wheel would match the fork.

Torque Cap end caps fitted to a DT Swiss 350 Big Ride front hub.

The kits arrived and just as Logan had calculated these caps dropped right in and now the end caps and fork match. Hopefully in the future DT Swiss will offer a kit that has just the necessary parts so others won’t have to buy two as well.

Comments closed

Pi-hole via Docker on Synology DSM with Bonded Network Interface

With consolidating and upgrading my home network I’m moving Pi-hole from a stand-alone Raspberry Pi to running under Docker on my Synology DS1019+ running DiskStation Manager (DSM) v6.2.3.

This was a little bit confusing at first as the web management UI would work, but DNS queries weren’t getting answered. This ended up being caused by the bonded network interface, which is ovs_bond0 instead of the normal default of eth0.

Using the official Pi-hole Docker image, set to run with Host networking (Use the same network as Docker host in the Synology UI), setting or changing the following variables will set up Pi-hole work from first boot, configured to:

  • Listen on ovs_bond0 (instead of the default eth0).
  • Answer DNS queries on the same IP as DSM (192.168.0.2).
  • Run the with the web-based management interface on port 8081 with password piholepassword.
  • Send internal name resolutions to the internal DNS/DHCP server at 192.168.0.1 for clients *.internal.example.com within 192.168.0.0/24.
  • Set the displayed temperature to Farenheit and time zone to America/Detroit.
  • Listen for HTTP requests on http://diskstation.internal.example.com:8081 along side the default pi.hole hostname.

DNS=127.0.0.1
INTERFACE=ovs_bond0
REV_SERVER=True
REV_SERVER_CIDR=192.168.0.0/24
REV_SERVER_DOMAIN=internal.example.com
REV_SERVER_TARGET=192.168.0.1
ServerIP: 192.168.0.2
TEMPERATUREUNIT=f
TZ: America/Detroit
VIRTUAL_HOST: diskstation.internal.example.com
WEB_PORT: 8081
WEBPASSWORD: piholepassword

Additionally, setting up volumes for /etc/dnsmasq.d/ and /etc/pihole/ will ensure changes to the UI persist across restarts and container upgrades. I do this as shown here:

Note: If you stop the Pi-hole container, clear out the contents of these directories, and then restart the container, Pi-hole will set itself up again from the environment variables. This allows tweaking the variables without recreating the container each time.

UPDATE: With the update to Synology DSM 7.0 the interface is now called bond0.

Comments closed

JOSM Tip: Simplify Way before Improve Way Accuracy

Consider the following: You are attempting to update OpenStreetMap (OSM) trail routes using JOSM and find that the previous way is very detailed, but fairly wrong, meaning that a lot of nodes will need to be moved.

Even with the Improve Way Accuracy tool this’ll be a pain. So what can you do? First decrease the number of nodes using Simplify Way and then move the remaining nodes, adding new ones as needed in the gaps. This will keep the original way intact, keep most of the route present, but allow for easy cleanup. It also reduces the number of nodes, making for simpler routes that take up less space on GPS devices. (I find that a maximum error setting of 0.5m or 1m works well.)

In 2016 I used the official GIS data from the Noquemanon Trails Network (NTN) to add the singletrack trails to OSM. This worked pretty well, but since then it’s become possible to trace the Strava Global Heatmap high-resolution data when mapping. When doing some routine updates and using this layer for assistance I noticed how many trails originally entered using the NTN’s official data aren’t quite correct. So along with adding changes, I’m tweaking the trail routes using the Strava data.

The primary issue is that the official data would often have a large number of points very close together — in some cases just inches apart — particularly around curves. These points were much closer than needed for accurate mapping, and yet these curves would be the main things that needed adjusting. Moving all of these points would be a hassle and the resolution wasn’t necessary, so by simplifying the route, correcting the nodes that remain, and adding in more as needed, cleanup of the route is much faster. It also reduces the number of nodes along each way, saving space.

The following images show a great example of this problem along Mossy (way 40781586), the last piece of single track in Pioneer Loop (relation 6109593) when ridden clockwise from the trailhead:

Detail of original data for Mossy in JOSM. Note the very detailed, yet inaccurate, curves.
Mossy after simplifying the way with 1m maximum error.
After manual cleanup of the simplified Mossy using the Improve Way Accuracy tool
Comments closed

CycleOps (Saris) Hammer Rattle: Belt Tension?

I’ve had a CycleOps (now Saris) Hammer smart trainer since late 2017 and it’s been working great, but lately has been making a slight rattling sound during post-ride spindown just before the flywheel stopped. It felt fine during use so I kept riding, but then when putting out a couple hard, short efforts during high resistance periods (in slope mode via Zwift) it made a loud clank/bang sound. I would also sometimes get a rumbling feeling as if the notches on the belt weren’t smoothly engaging with the notched pulleys. Various posts online attribute this to a worn belt, so I opened up the trainer to take a look.

What I found led me to believe the issue is with the belt tensioner coming loose, not a worn belt. I suspect for many the belt replacement fixes the problem because the replacement process includes re-tensioning the belt.

Inside the trainer there is an idler pully whose tension is adjusted via a threaded rod on a spring. This rod is turned via a 5mm hex head accessible from the bottom of the trainer (without opening it). The threads on this rod seemed a bit worn, it seemed loose, and shaking it made a similar metal-on-metal sound to the rattling and clank that I’ve been hearing.

As the belt is a motor-type timing belt, it’s pretty unlikely that human-level output in clean conditions will stretch it much. Removing and inspecting the belt and all pulleys showed that everything was clean and free of damage, so I reassembled it, tightened the tensioner to compress the spring a bit and tension the belt, and rode the trainer a few times. After this there was no more rattle and I was unable to reproduce the clank/bang during hard efforts.

It seems the cause of the noise was the lack of tension on the threaded rod, spring, and idler and it likely came loose over time. The rattle was from the tension rod rattling as the as the heavy flywheel and main fan wheel and belt came to rest. The bang noise was from the sudden heavy pedal load vs. the strong resistance unit removing all belt pressure on the idler and it all slamming back together when my pedal stroke dropped off.

So, if you’re hearing this same sort of noise and rumbling, try using a long 5mm wrench to tighten up the tensioner a couple turns. If this works for you it’s much quicker (and cheaper) than replacing a belt.


This trainer is an original CycleOps Hammer, sometimes referred to as the H1, and the whole Hammer/H2/H3 family of trainers is now sold under the Saris name. (The CycleOps brand has been owned by Saris for years, but now all products are sold under the Saris name.)

To open a Hammer (H1) trainer you need a 1/18″ hex tool for the small screws, a T-30 Torx for the large screws. The cassette must first be removed, and after removing the screws the snug-fitting side panel pulls away. Belt tension can be adjusted with a 5mm hex and the fastener is accessible without opening the trainer. The stock belt is an MBL 150S5M930 and available for under $10 online. (Saris sells the replacement belt with the three required tools for $59.99 + shipping.)

Comments closed

Presta O-Ring for Lezyne ABS-1 PRO HV Flip Chuck

I have an older Lezyne Digital Overdrive floor pump which has generally worked great, except when the original slide-lock chuck failed. Nicely, Lezyne sent me a new chuck — ABS-1 PRO HV — and this worked great until earlier this year when the Presta side began leaking unless I held the hose just-right.

It turns out the o-ring on the presta valve side of the flip chuck, which seals against the valve body, had worn to the point where it no longer sealed well. The photo above shows the worn o-ring on the left and a new one on the right.

I emailed Lezyne asking for the o-ring spec so I could get some, and they instead sent me two of the parts. Popping out the old o-ring and fitting in a new one sorted everything out.

When fitting the o-ring I measured it, figuring it’d be nice to know the size in case I want a quicker replacement of this wear part next time:

ID: 5.2mm
OD: 9mm
Profile: 1.9mm

This is the kind of customer service I really like. Getting exactly the small part that I needed to fix the pump is perfect. Repairing something is always better than replacing, and this was a very simple repair.

Comments closed