Press "Enter" to skip to content

Month: December 2020

JOSM Tip: Simplify Way before Improve Way Accuracy

Consider the following: You are attempting to update OpenStreetMap (OSM) trail routes using JOSM and find that the previous way is very detailed, but fairly wrong, meaning that a lot of nodes will need to be moved.

Even with the Improve Way Accuracy tool this’ll be a pain. So what can you do? First decrease the number of nodes using Simplify Way and then move the remaining nodes, adding new ones as needed in the gaps. This will keep the original way intact, keep most of the route present, but allow for easy cleanup. It also reduces the number of nodes, making for simpler routes that take up less space on GPS devices. (I find that a maximum error setting of 0.5m or 1m works well.)

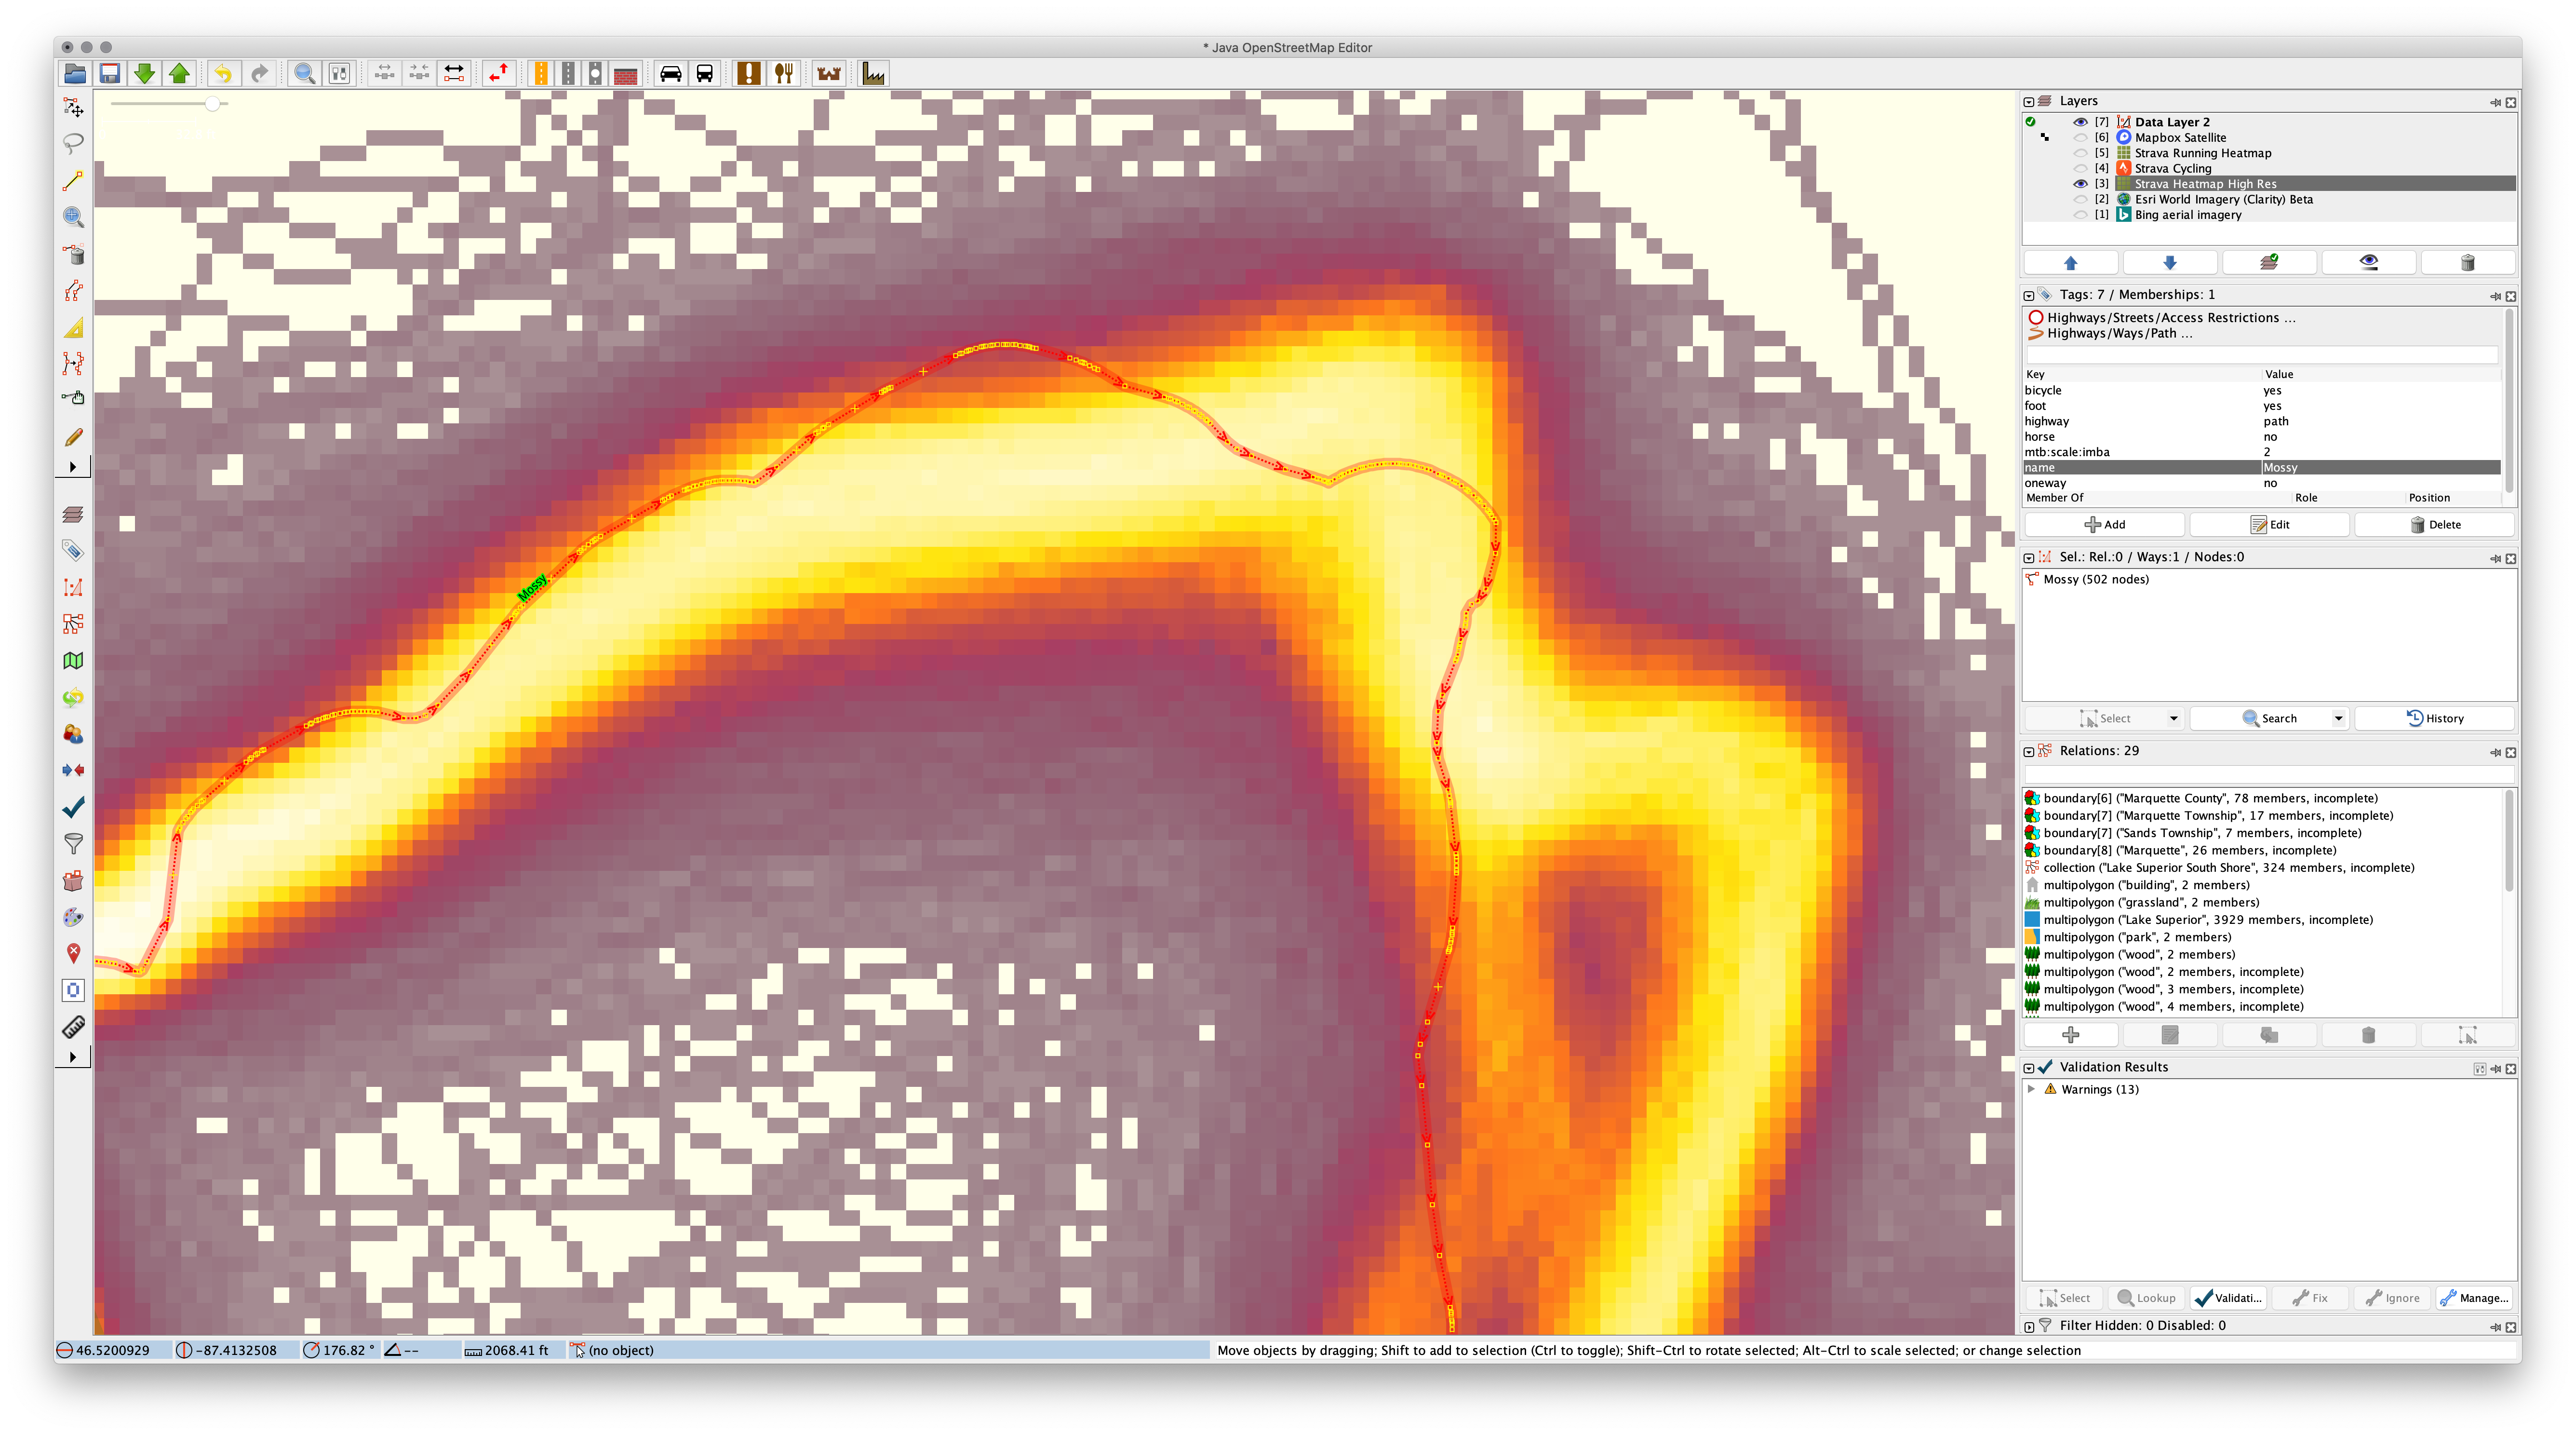
In 2016 I used the official GIS data from the Noquemanon Trails Network (NTN) to add the singletrack trails to OSM. This worked pretty well, but since then it’s become possible to trace the Strava Global Heatmap high-resolution data when mapping. When doing some routine updates and using this layer for assistance I noticed how many trails originally entered using the NTN’s official data aren’t quite correct. So along with adding changes, I’m tweaking the trail routes using the Strava data.

The primary issue is that the official data would often have a large number of points very close together — in some cases just inches apart — particularly around curves. These points were much closer than needed for accurate mapping, and yet these curves would be the main things that needed adjusting. Moving all of these points would be a hassle and the resolution wasn’t necessary, so by simplifying the route, correcting the nodes that remain, and adding in more as needed, cleanup of the route is much faster. It also reduces the number of nodes along each way, saving space.

The following images show a great example of this problem along Mossy (way 40781586), the last piece of single track in Pioneer Loop (relation 6109593) when ridden clockwise from the trailhead:

Detail of original data for Mossy in JOSM. Note the very detailed, yet inaccurate, curves.
Mossy after simplifying the way with 1m maximum error.
After manual cleanup of the simplified Mossy using the Improve Way Accuracy tool
Comments closed

CycleOps (Saris) Hammer Rattle: Belt Tension?

I’ve had a CycleOps (now Saris) Hammer smart trainer since late 2017 and it’s been working great, but lately has been making a slight rattling sound during post-ride spindown just before the flywheel stopped. It felt fine during use so I kept riding, but then when putting out a couple hard, short efforts during high resistance periods (in slope mode via Zwift) it made a loud clank/bang sound. I would also sometimes get a rumbling feeling as if the notches on the belt weren’t smoothly engaging with the notched pulleys. Various posts online attribute this to a worn belt, so I opened up the trainer to take a look.

What I found led me to believe the issue is with the belt tensioner coming loose, not a worn belt. I suspect for many the belt replacement fixes the problem because the replacement process includes re-tensioning the belt.

Inside the trainer there is an idler pully whose tension is adjusted via a threaded rod on a spring. This rod is turned via a 5mm hex head accessible from the bottom of the trainer (without opening it). The threads on this rod seemed a bit worn, it seemed loose, and shaking it made a similar metal-on-metal sound to the rattling and clank that I’ve been hearing.

As the belt is a motor-type timing belt, it’s pretty unlikely that human-level output in clean conditions will stretch it much. Removing and inspecting the belt and all pulleys showed that everything was clean and free of damage, so I reassembled it, tightened the tensioner to compress the spring a bit and tension the belt, and rode the trainer a few times. After this there was no more rattle and I was unable to reproduce the clank/bang during hard efforts.

It seems the cause of the noise was the lack of tension on the threaded rod, spring, and idler and it likely came loose over time. The rattle was from the tension rod rattling as the as the heavy flywheel and main fan wheel and belt came to rest. The bang noise was from the sudden heavy pedal load vs. the strong resistance unit removing all belt pressure on the idler and it all slamming back together when my pedal stroke dropped off.

So, if you’re hearing this same sort of noise and rumbling, try using a long 5mm wrench to tighten up the tensioner a couple turns. If this works for you it’s much quicker (and cheaper) than replacing a belt.


This trainer is an original CycleOps Hammer, sometimes referred to as the H1, and the whole Hammer/H2/H3 family of trainers is now sold under the Saris name. (The CycleOps brand has been owned by Saris for years, but now all products are sold under the Saris name.)

To open a Hammer (H1) trainer you need a 1/18″ hex tool for the small screws, a T-30 Torx for the large screws. The cassette must first be removed, and after removing the screws the snug-fitting side panel pulls away. Belt tension can be adjusted with a 5mm hex and the fastener is accessible without opening the trainer. The stock belt is an MBL 150S5M930 and available for under $10 online. (Saris sells the replacement belt with the three required tools for $59.99 + shipping.)

Comments closed

Presta O-Ring for Lezyne ABS-1 PRO HV Flip Chuck

I have an older Lezyne Digital Overdrive floor pump which has generally worked great, except when the original slide-lock chuck failed. Nicely, Lezyne sent me a new chuck — ABS-1 PRO HV — and this worked great until earlier this year when the Presta side began leaking unless I held the hose just-right.

It turns out the o-ring on the presta valve side of the flip chuck, which seals against the valve body, had worn to the point where it no longer sealed well. The photo above shows the worn o-ring on the left and a new one on the right.

I emailed Lezyne asking for the o-ring spec so I could get some, and they instead sent me two of the parts. Popping out the old o-ring and fitting in a new one sorted everything out.

When fitting the o-ring I measured it, figuring it’d be nice to know the size in case I want a quicker replacement of this wear part next time:

ID: 5.2mm
OD: 9mm
Profile: 1.9mm

This is the kind of customer service I really like. Getting exactly the small part that I needed to fix the pump is perfect. Repairing something is always better than replacing, and this was a very simple repair.

Comments closed

nginx for HTTPS Request Logging

Consider the following situation: You have a web app from a vendor and during a security scan it crashes. The web app is running over HTTPS with your certificates, but neither the scanning tool nor web app offer sufficient logging to see exactly which request caused the crash.

Because you can’t decrypt HTTPS without access to a client key log file (or making a bunch of TLS changes), and the client is a security scanning tool, Wireshark is not an option to see the triggering request. Fiddler is also likely out, as that’d require the security scanner to trust a new root cert. So what can you do? Stick something else in the way to proxy the connection, logging all the requests!

Having access to the private certificates for the server this is quite easy: set up nginx as a proxy. The only wrinkle is that getting access to all of the request headers requires Lua, so you’ll need to ensure your nginx install supports this. On macOS this was easy using Homebrew to install nginx from denji’s GitHub repository (the default nginx doesn’t support Lua):

brew tap denji/nginx
brew install nginx-full --with-lua-module --with-set-misc-module

This configuration uses the web app’s certificates in nginx to proxy requests it receives to your main site, logging the client IP, request, headers, body, and request status to intercept.log. Requests are broken out by line to make for easy visual reading. You may wish to move this all on to one line to make parsing easy:

events {
}

http {
    log_format custom 'Time: $time_local'
                      '
'
                      'Remote Addr: $remote_addr'
                      '
'
                      'Request: $request'
                      '
'
                      'Request Headers: $request_headers'
                      '
'
                      'Body: $request_body'
                      '
'
                      'Status: $status'
                      '
'
                      '-----';

    server {
        listen 443 ssl;
        server_name example.com;
        access_log /path/to/intercept.log custom;
        ssl_certificate /path/to/cert.pem;
        ssl_certificate_key /path/to/privkey.pem;

        location / {
            proxy_pass https://example.com;
            proxy_set_header Accept-Encoding ''; 
            set_by_lua_block $request_headers {
                local h = ngx.req.get_headers()
                local request_headers_all = ""
                for k, v in pairs(h) do
                    request_headers_all = request_headers_all .. ""..k..": "..v..";"
                end
                return request_headers_all
            }
        }
    }
}

To put this in place, ensure that requests from the scanner go to nginx instead of the web app and then nginx will forward and log the requests. There are a few ways you could do this:

  • Run nginx on the same server as the web app, move the web app to listen to another port for HTTPS, and set proxy_pass to the other port: proxy_pass https://example.com:4430
  • Run nginx on a new server, change the DNS records for the site to point to the new server, and point nginx to the old server by IP: proxy_pass https://192.168.10.10
  • If the scanner tool’s name resolution can be adjusted, such as via a HOSTS file or custom configuration, point it to the nginx proxy for the site name.

To test you can use a web browser on a client computer and a HOSTS file to point the original hostname nginx. To get the screenshot above I ran nginx on iMac running macOS, then in a Windows VM I changed the HOSTS file to map nuxx.net to the iMac’s IP. Firefox on the Windows VM then sent requests for nuxx.net to nginx on macOS which logged and proxied the requests out to the real nuxx.net.

Comments closed

Pi-hole (and PiVPN) with Ubiquiti UniFi

Pi-hole

My home network is based around Ubiquiti’s UniFi, with a Security Gateway (USG) handling the NAT/firewall/routing duties. For ad blocking and to have better control over DNS I use Pi-hole running on a Raspberry Pi.

With the following settings you can have the two working well together with UniFi doing DHCP and Pi-hole doing DNS. Internal forward and reverse resolution will work, which means hostnames will appear properly for internal devices on both consoles while requests are still appropriately Pi-hole’d.

Here’s how:

  • Set up the Pi-hole and put it on the network at a static IP.
  • In Pi-hole, under SettingsDNS turn on:
    • Never forward non-FQDNs
    • Never forward reverse lookups for private IP ranges
    • Conditional forwarding with IP address of your DHCP server (router) as the USG
    • Local domain name (optional) as your internal DNS suffix
  • In the USG, set DHCP to hand out the Pi-hole’s IP for DHCP Name Server.
  • In USG, under ServicesDHCPDHCP Server, set Register client hostname from DHCP requests in USG DNS forwarder to On.
  • Leave the WAN interface’s DNS set to something public, such as what the ISP provides or Google’s 8.8.8.8/8.8.4.4 or whatever. This ensures that if the Pi-hole goes down then the USG can still resolve DNS.

After setting this up clients will use Pi-hole for DNS, as configured via DHCP. Requests for hostnames and addresses on the local network (shortnames or local suffix) will get forwarded to the USG, ensuring ensures that internal requests work properly.

PiVPN

Taking this a step further, I also have PiVPN running on the same Pi, to provide an endpoint for connecting into my home network via Wireguard. Pi-hole and PiVPN integrate very nicely and are designed to work together, making the setup very smooth.

By default, PiVPN sets the Pi-hole as the DNS via a DNS option in the [Interface] section of the config. To ensure appropriately geolocated search results when connected to VPN, use a DNS which supports Extended Client Subnet (ECS) (under SettingsDNS) on the Pi-hole.

(For reference, I’m running Pi-hole on a Raspberry Pi 4 Model B with 2GB of RAM and it has plenty of overhead for both Pi-hole for ~20 devices and sustaining 50 MByte/sec via Wireguard. The Pi-hole section of this was originally written up here on Reddit.)

Comments closed