ESPHome Devices for Onkyo RI output; final and prototype.
Our living room has a very simple setup: a non-networked TV, an Apple TV, and an older Onkyo A-9050 amplifier that drives two small speakers and a subwoofer. It’s a great sounding yet simple setup for two channel audio, perfect for the basic streaming video watching we do.
Being older the amplifier doesn’t have any of the modern (eg: HDMI CEC) mechanisms for controlling it, but it does have a 3.5mm tip sleeve input on the back for Onkyo RI. This old, proprietary system uses a wired connection creating a bus that allows different Onkyo components to be controlled from one central component and thus one IR remote control.
This protocol is well documented, both via the LIRC project and some other sites (ref: LIRC documentation, Onkyo RI Protocol, docbender/Onkyo-RI) so this got me thinking it’d be pretty easy to implement in ESPHome and thus make the receiver controllable from Home Assistant. While this is only one-way control (since it’s basically a wired version of an IR remote), it would still allow for remote power on/off, input changing, etc.
After a few false starts, it turns out it was easy. Thanks to some pointers from folks in the ESPHome Discord I realized the best way was adding support for the protocol to the existing Remote Transmitter integration. Since this integration already had other protocols which used similarly timed protocols it was pretty easy for me to add Onkyo RI by copying the structure from another and modifying it for this protocol. (For reference, it’s not standard serial and requires specific timings, so it wasn’t as simple as just using a UART.)
I’ve since submitted PR #7117 to the ESPHome project to contribute this back, but despite passing all tests I’m still waiting for it to be accepted. (I looked into creating a custom component that could be included from another GitHub repo, but since this was best implemented by modifying an existing component, that didn’t make sense to me.) Until this gets accepted, I’ll just have to build esphome locally or if others want to do it, patching things based on the files in the PR.
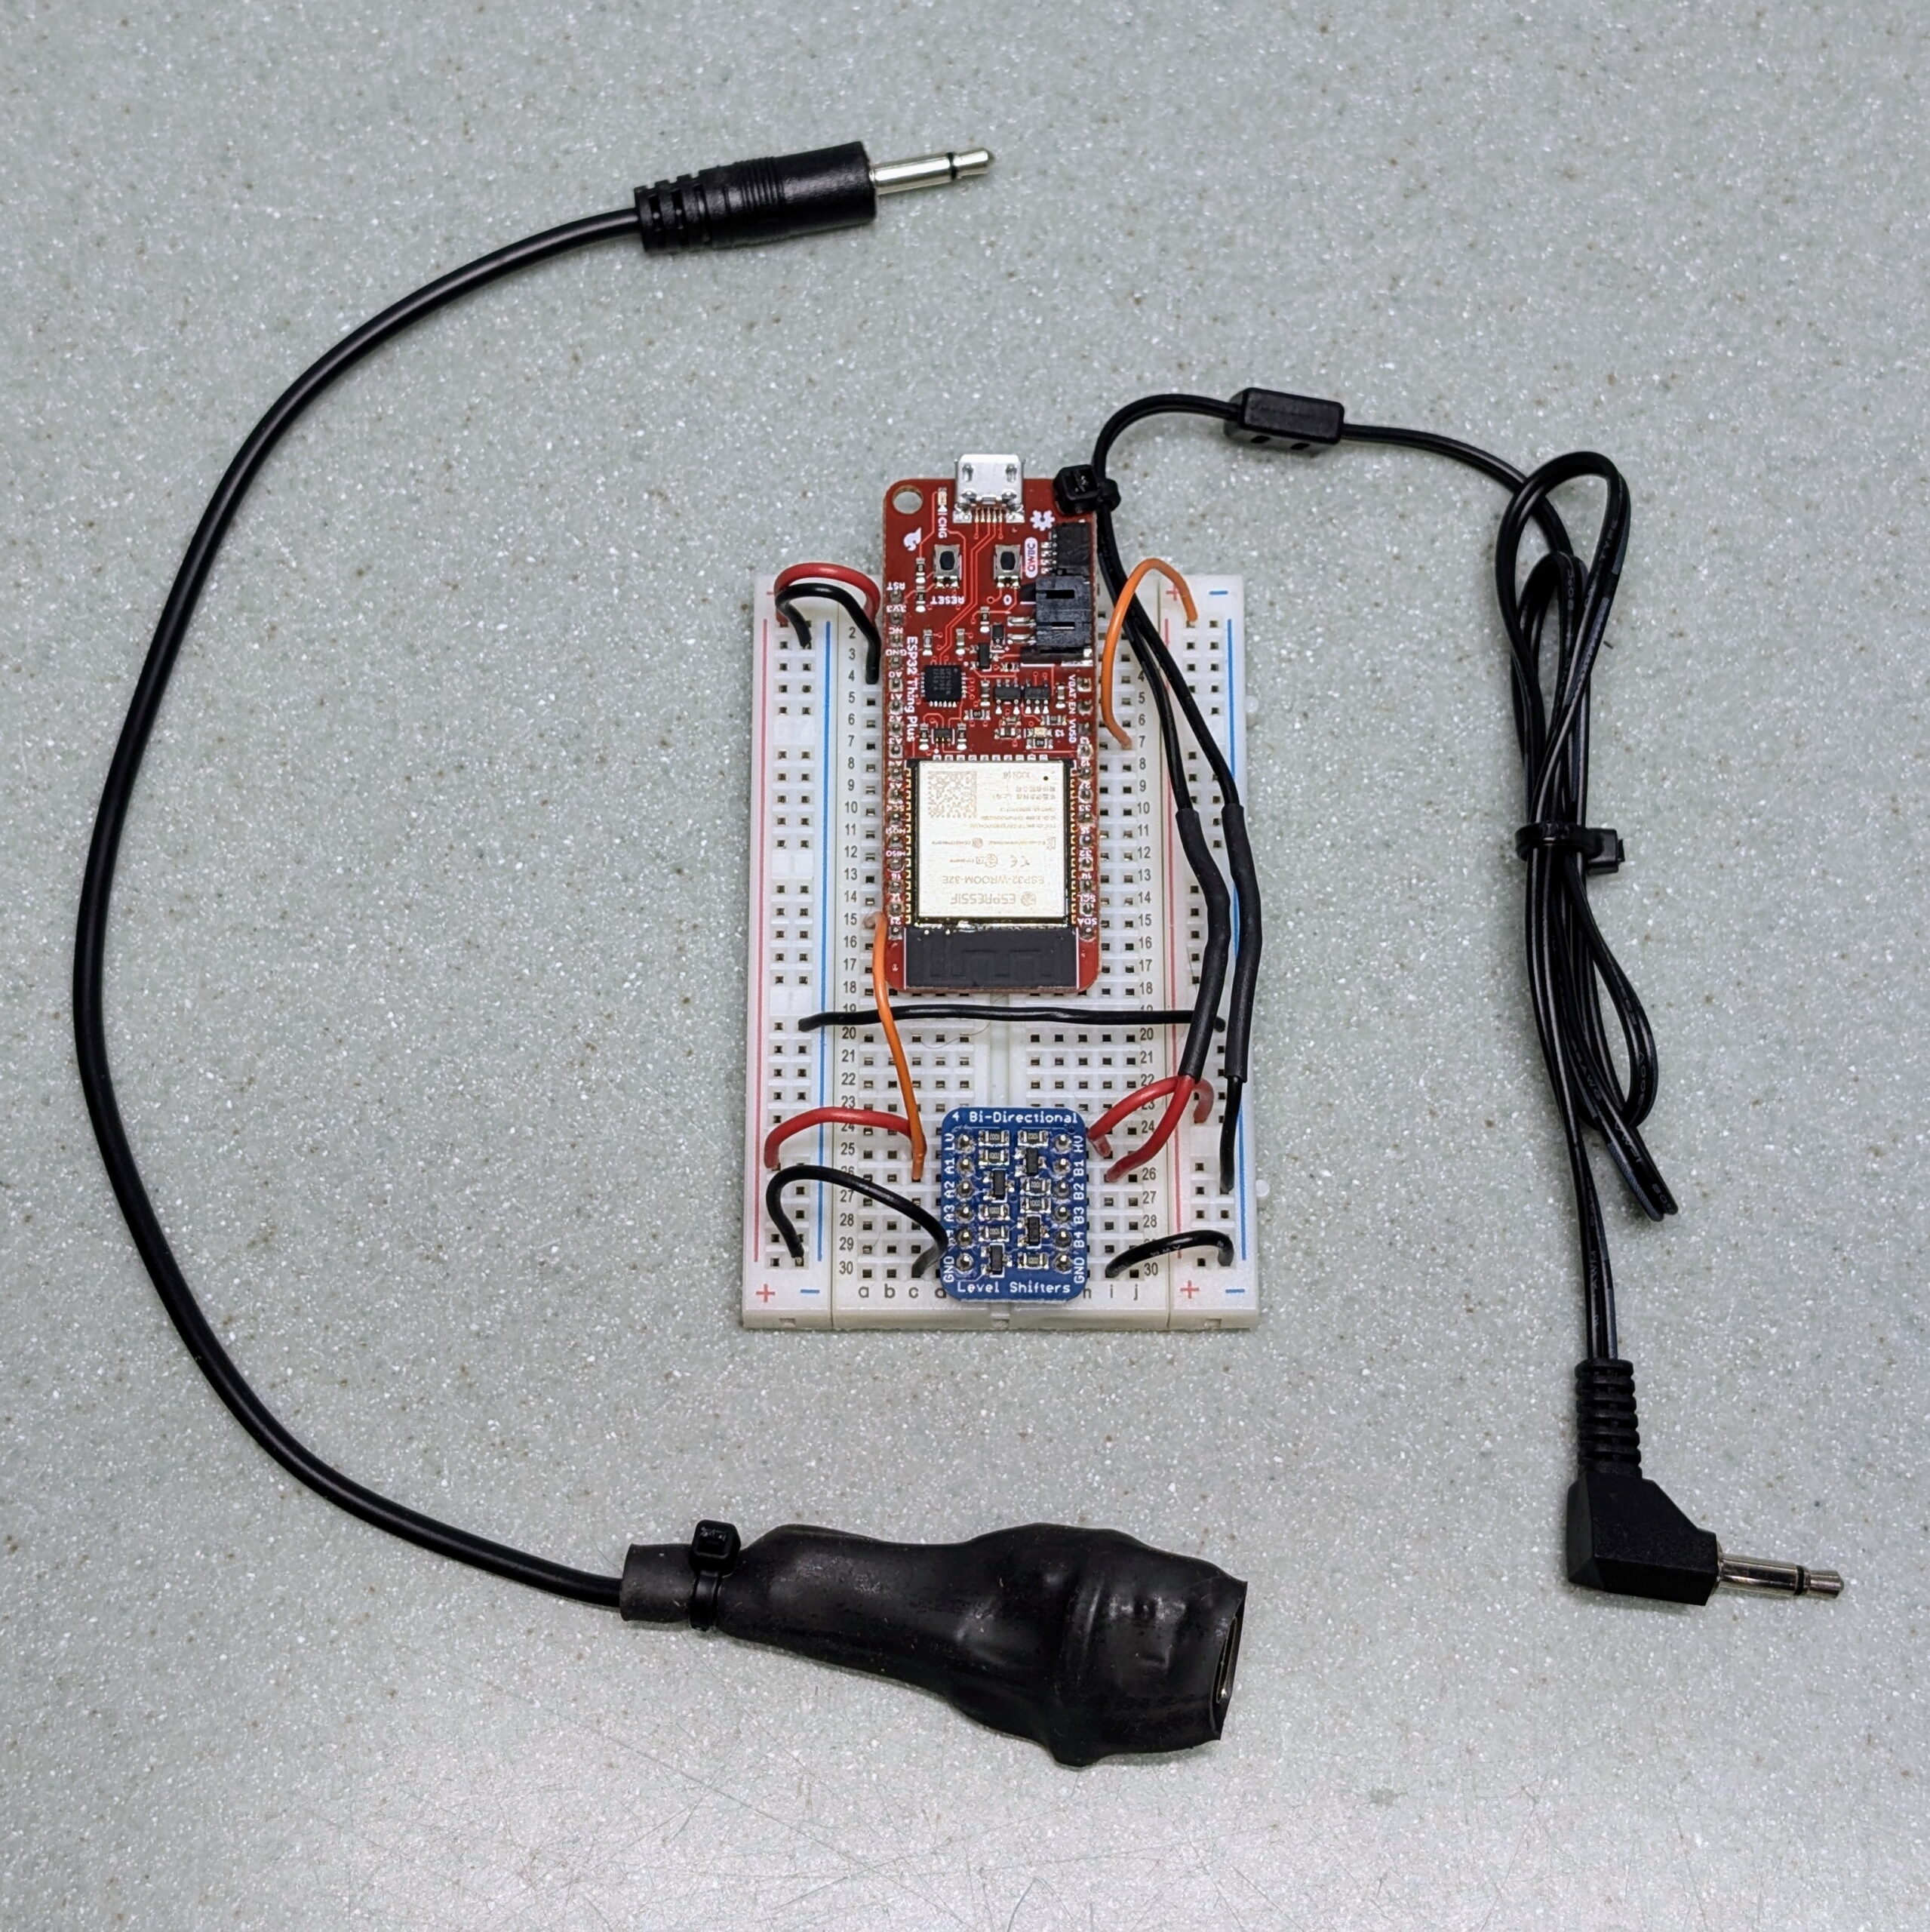
Getting it all wired up was pretty simple with the only thing needed was getting electrical levels right, as the ESP32 microcontrollers use 3.3V logic and RI uses 5V. Thankfully a simple level shifter based around a FET can handle this. I first prototyped it with a SparkFun ESP32 Thing Plus and an Adafruit BSS138 on a breadboard and this worked great.
I really don’t like the idea of having a fragile and ugly breadboard sitting in the living room so I made plans to replace it with something smaller. After ordering parts and letting them sit for a few weeks, I finally got around to it one rainy Sunday afternoon.
This smaller, final implementation uses a Seeed Studio XIAO ESP32S3, a cheap level shifter board from Amazon (electrically identical to the Adafruit BSS138), and a 3.5mm TS cable. This was all wired up then bundled, along with the ESP32’s external 2.4 GHz antenna, into the a single blob inside of some heatshrink tubing making for a simple, streamlined final package. This works great, and now I have a single thumb-sized module with a USB-C connector (for power input and reprogramming) on one end and a 3.5mm plug on the other for the receiver. And it shows up wonderfully in HA and works as a remote control.
While the initial prototyping went great, I did run into two problems worth mentioning:
First, the one of the super-cheap level shifters I got from Amazon seemed to be bad. After hooking it up levels seemed all wrong, and I was seeing 3.3V at the ESP32 end and a solid 5V at the plug. Turned out to be a bad level shifter (or perhaps bad PCB) but by moving to the second shifter on the same board things were fine.
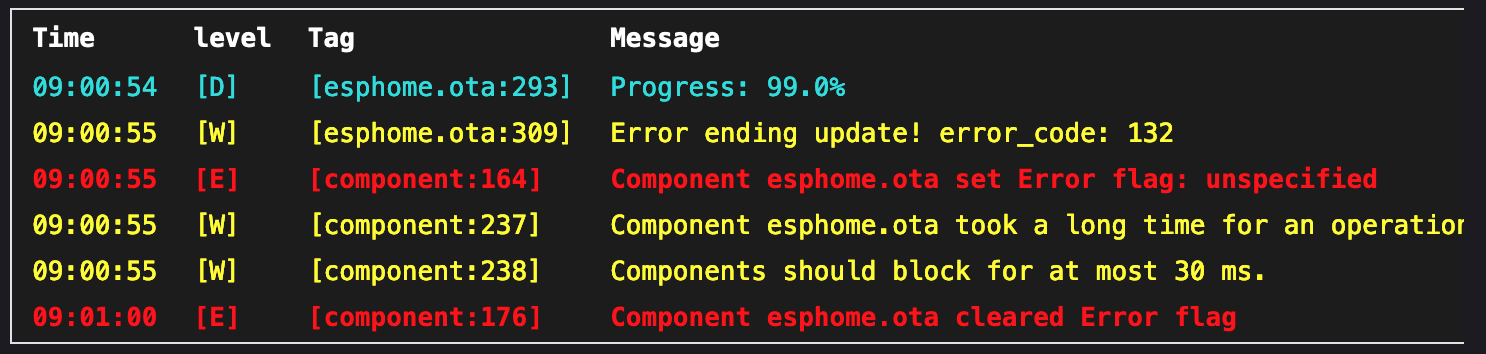
Second, when attempting to do an OTA update after the Onkyo RI firmware on the ESP32 S3 is running, it fails, indicating that Component esphome.ota took a long time for an operation (7339 ms)..
If I flash it back via USB with a default ESPHome config (via ESPHome web), it then OTA updates fine. This only happens on the ESP32 S3 and didn’t happen on the ESP32 WROOM, and seems related to how long the OTA takes on this module or maybe something caused by wireless transmission speeds? I didn’t try a serial upload nor troubleshoot any further as I both have a good workaround and see no need to reprogram the device any time soon.
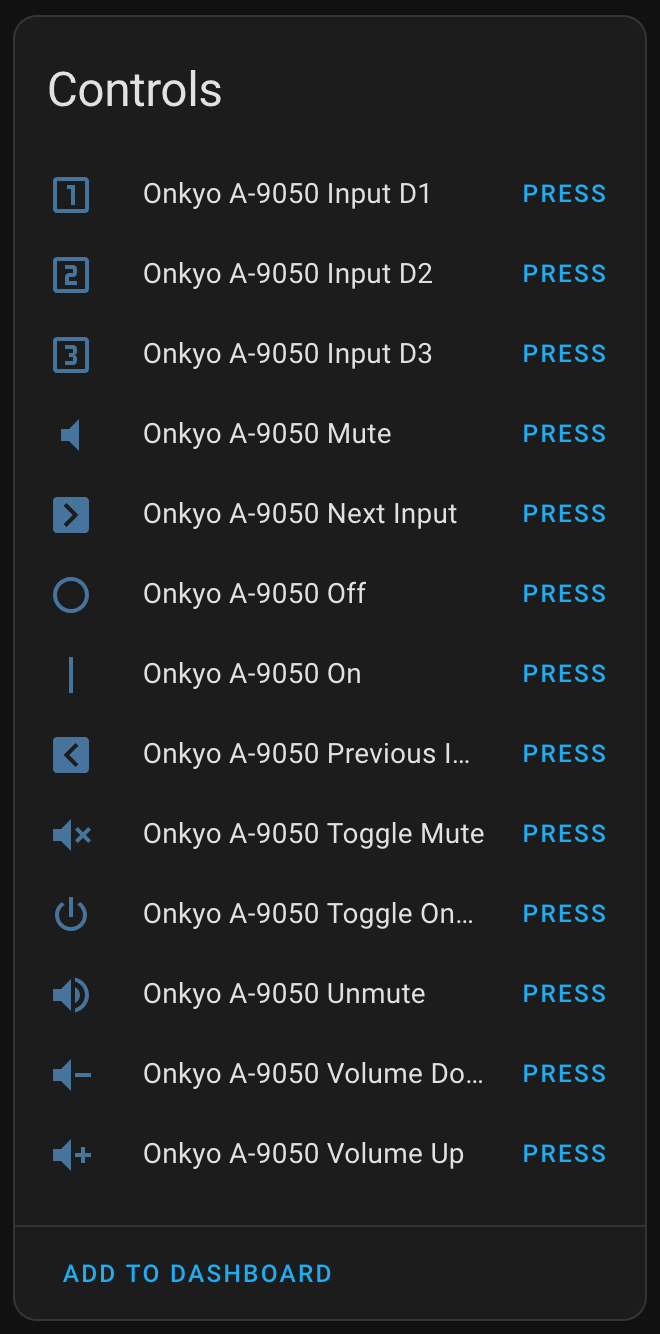
The ESPHome configuration used for the final version can be found here: onkyo-a-9050_seeed_xiao_esp32c3.yaml. This uses a handful of commands that I tested to work on the A-9050. For other Onyko RI receivers there may be different commands needed; I suggest consulting the protocol docs mentioned above to discover others. I made a point of adding rational icons to each so that once added to Home Assistant things look good.
Using these is then nice and straightforward in HA, such as a basic button here on my dashboard which sends the Toggle On/Off (power) command:
I’m not sure where I’ll go next with this. Toggling power on the receiver from a dashboard is neat, but not that important. Ideally I’d like to have a single automation that will change a couple of lights, turn on the receiver, and result in the Apple TV and television itself being turned on, but there’s still pieces missing to allow this.
It seems an Apple TV can’t be woken over the network when sleeping, the TV is not network accessible, and the receiver does not transmit status. So, I can’t do this with my current setup. I believe that it may be possible to build an ESPHome HDMI CEC device and connect it to another input on the TV to wake things up using something like Palakis/esphome-native-hdmi-cec, but that’ll be another project… At least now I’ve got a spare breadboarded ESP32 to start down that path. Time to order some HDMI breakout connectors, I guess.
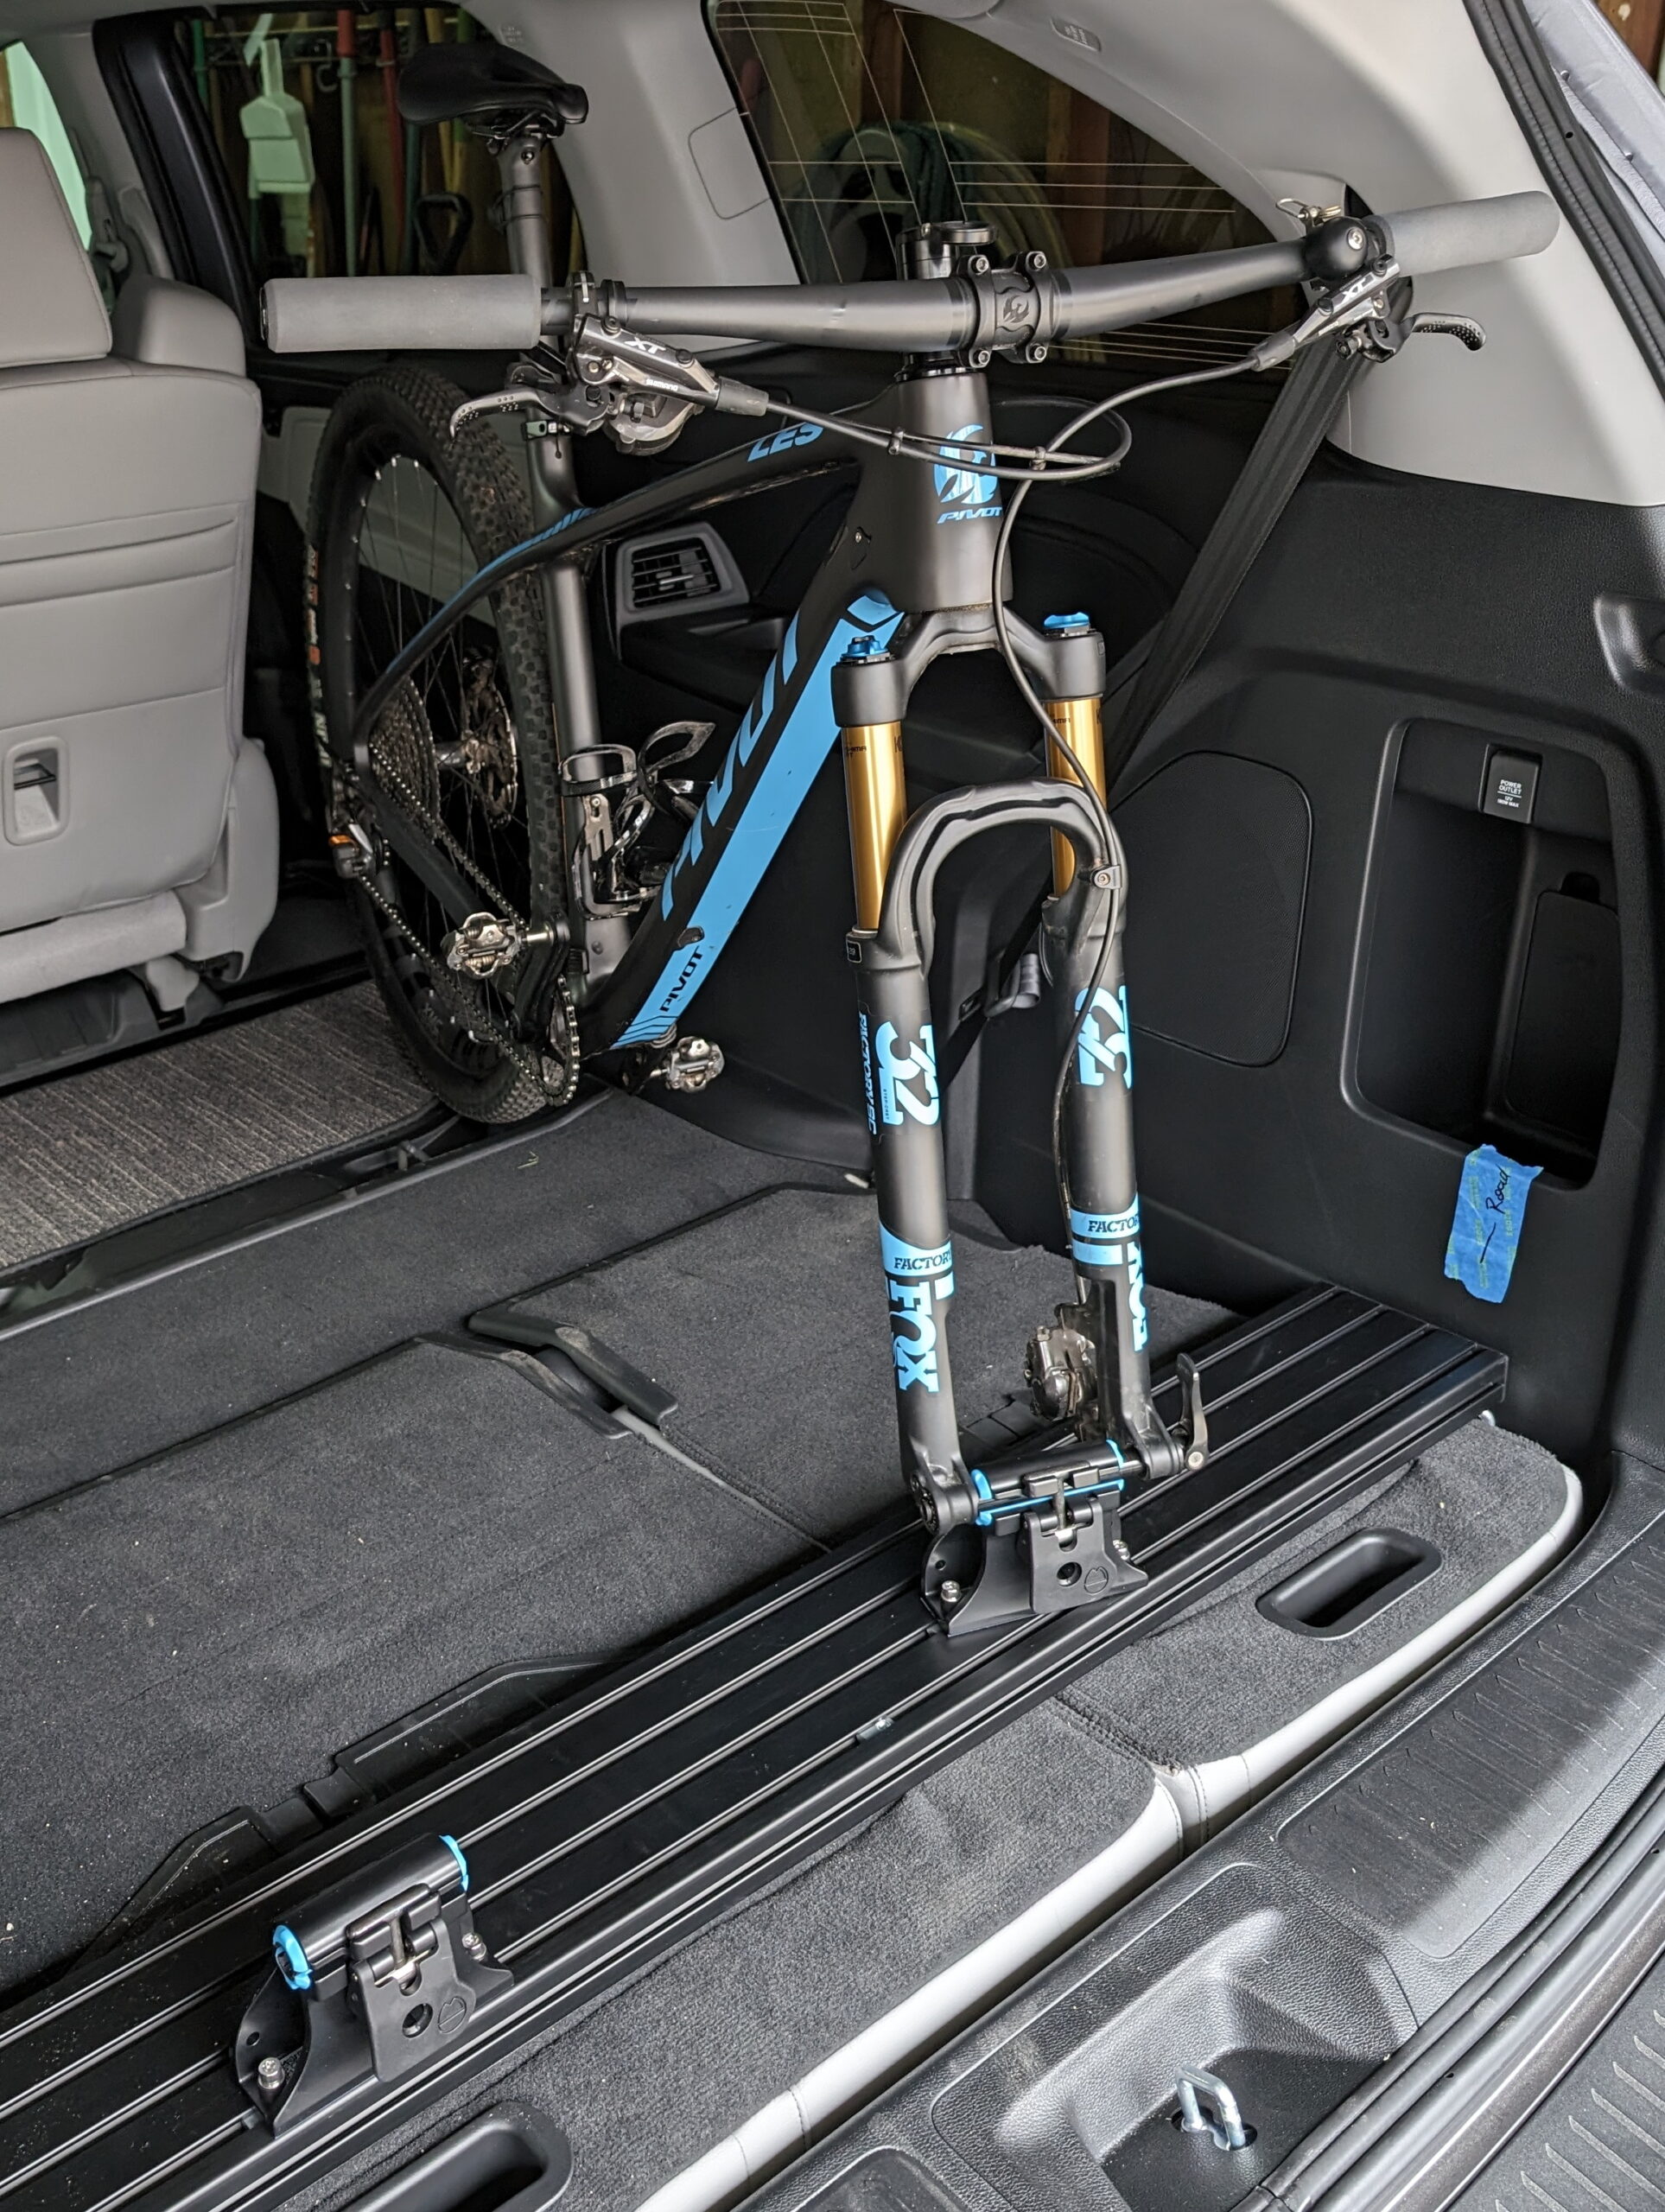
Recently I purchased a Honda Odyssey (2024 EX-L) to replace my aging Subaru Outback and get something a bit better for longer trips. Specifically, I wanted to be able to easily put two (or more) bikes inside, along with dogs and luggage. During winter we’d often drive to trails separately because that was the easiest way to keep both of our bikes clean on trips and this was irritating.
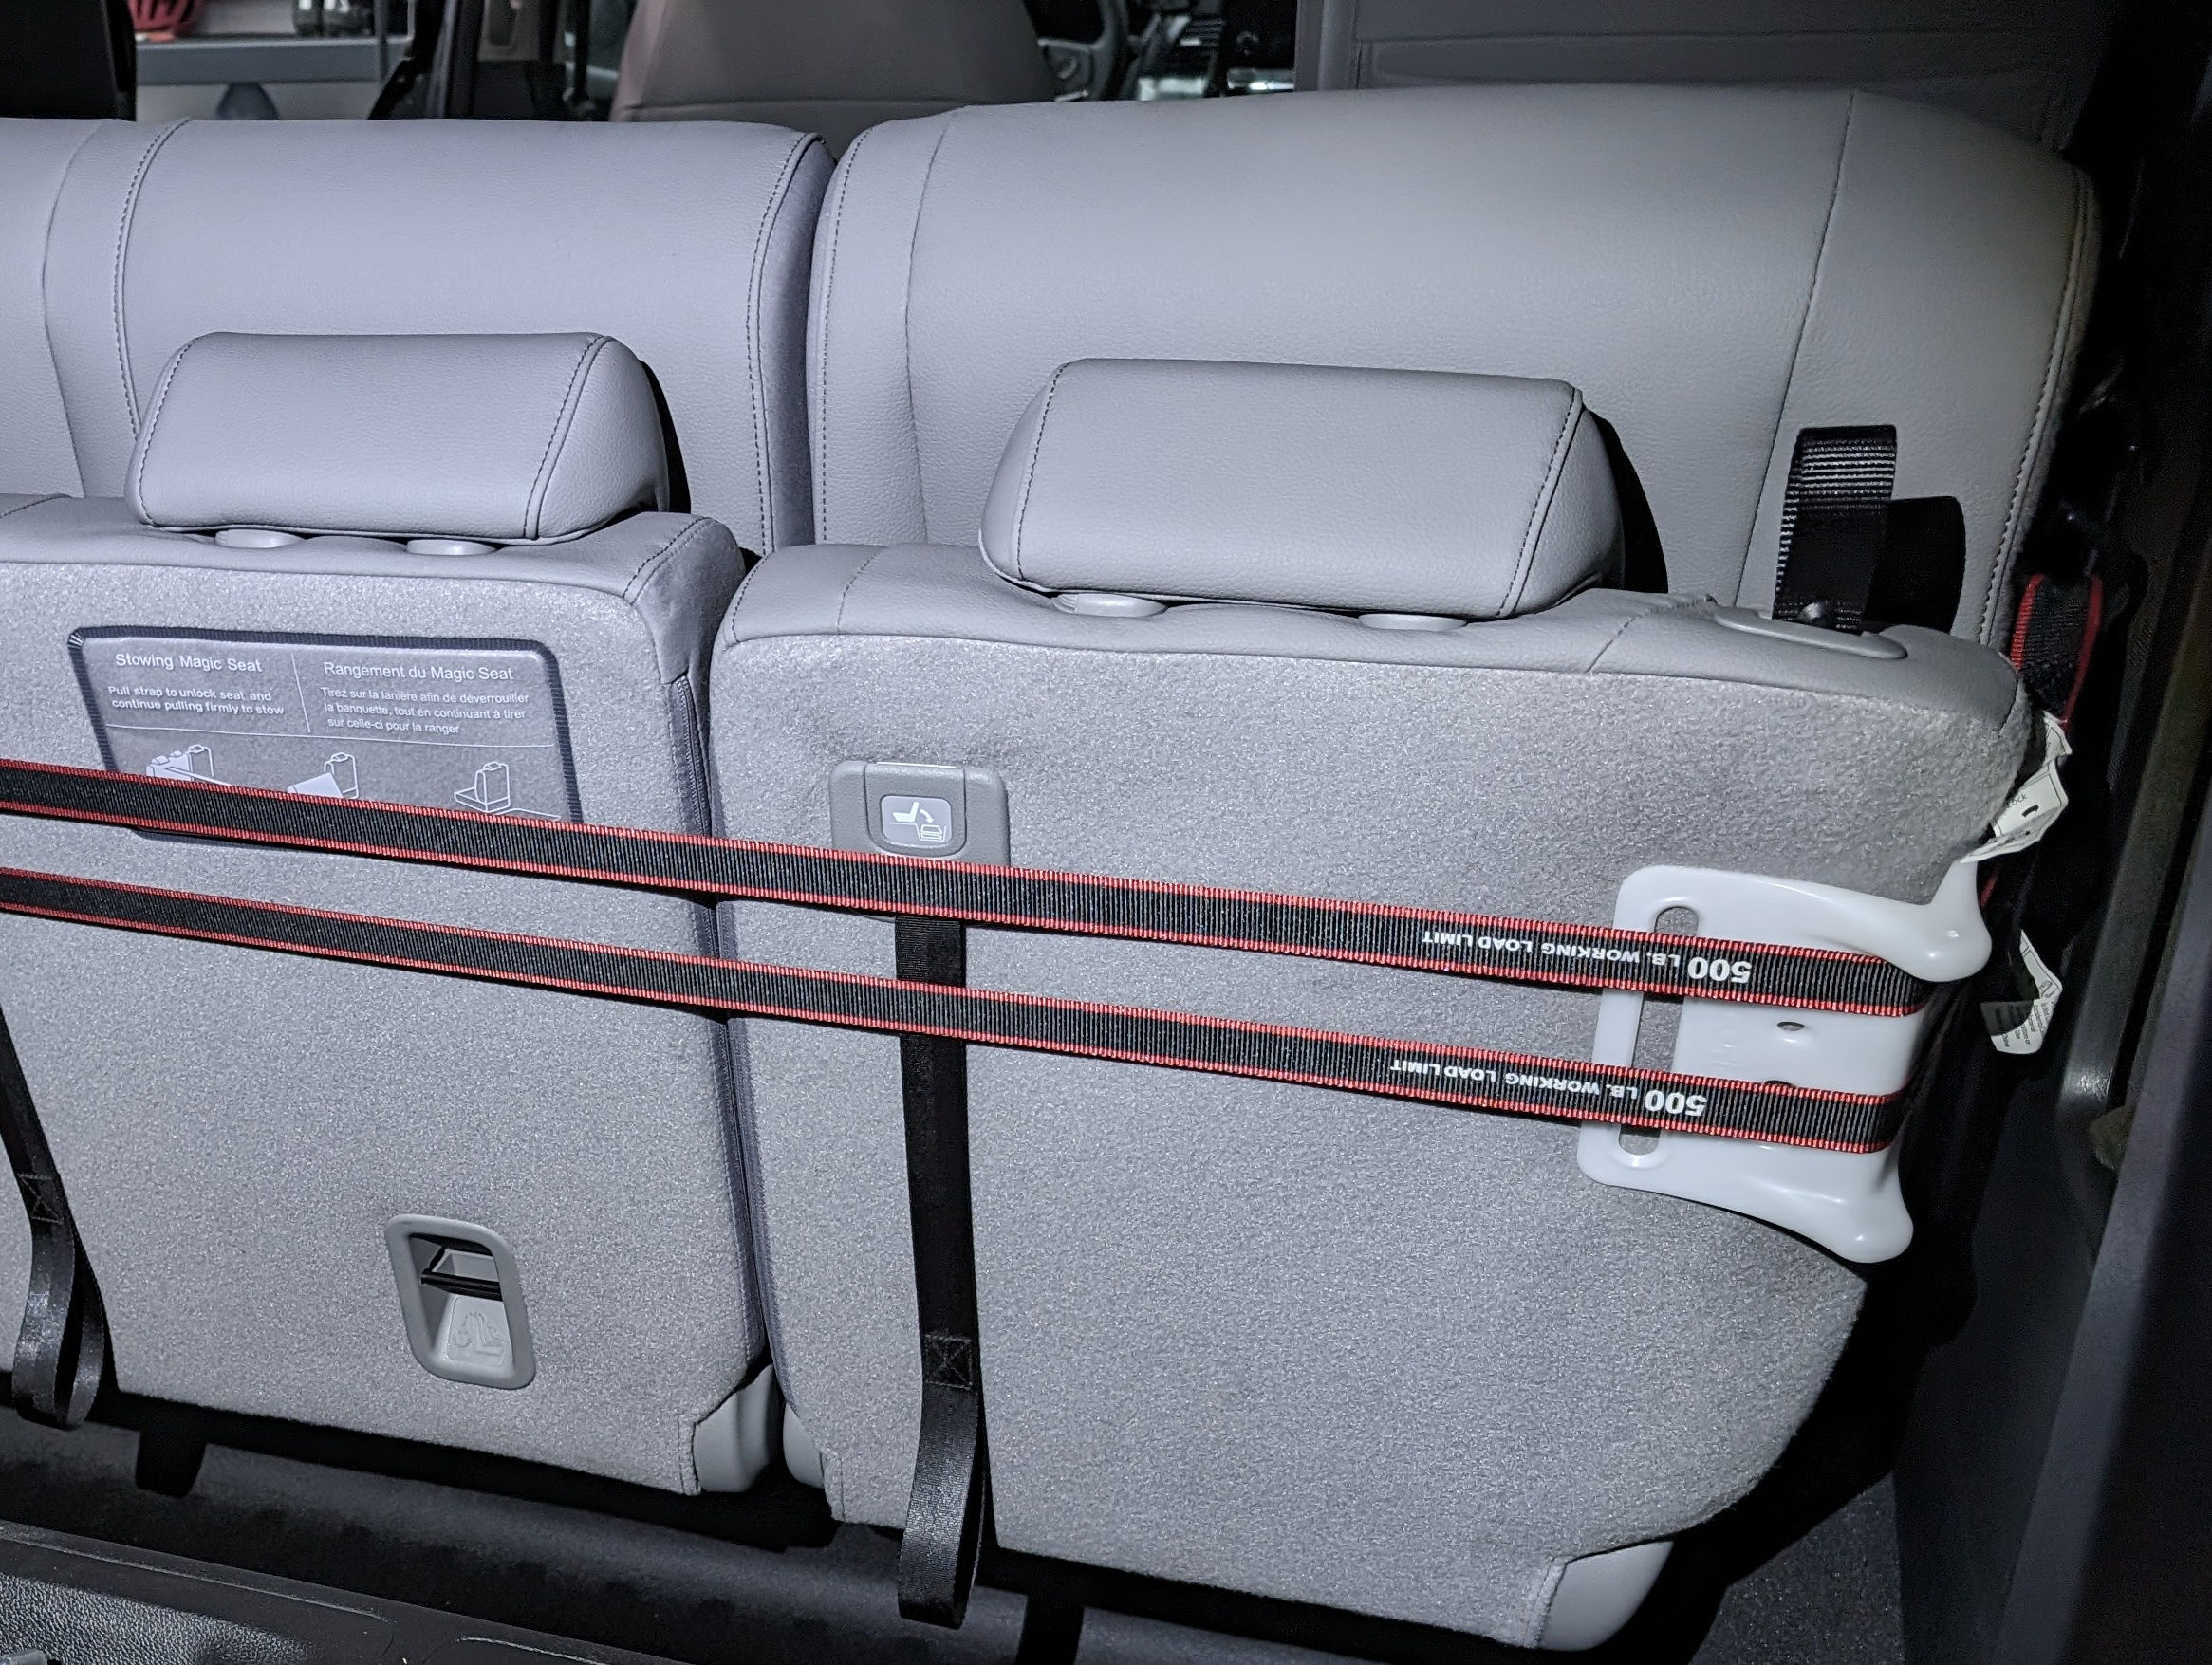
To securely hold the bikes inside I put together an adjustable, expandable rail system that holds bikes by their front through axles and is easy to adjust based on bike type, carrying needs, etc. The rail system is strapped to the rear seats as they sit folded into the floor, which provides solid mounting and easy access through the rear door. Combined with the adjustable, and outright removable, second row seats this works nicely for every bike in the house.
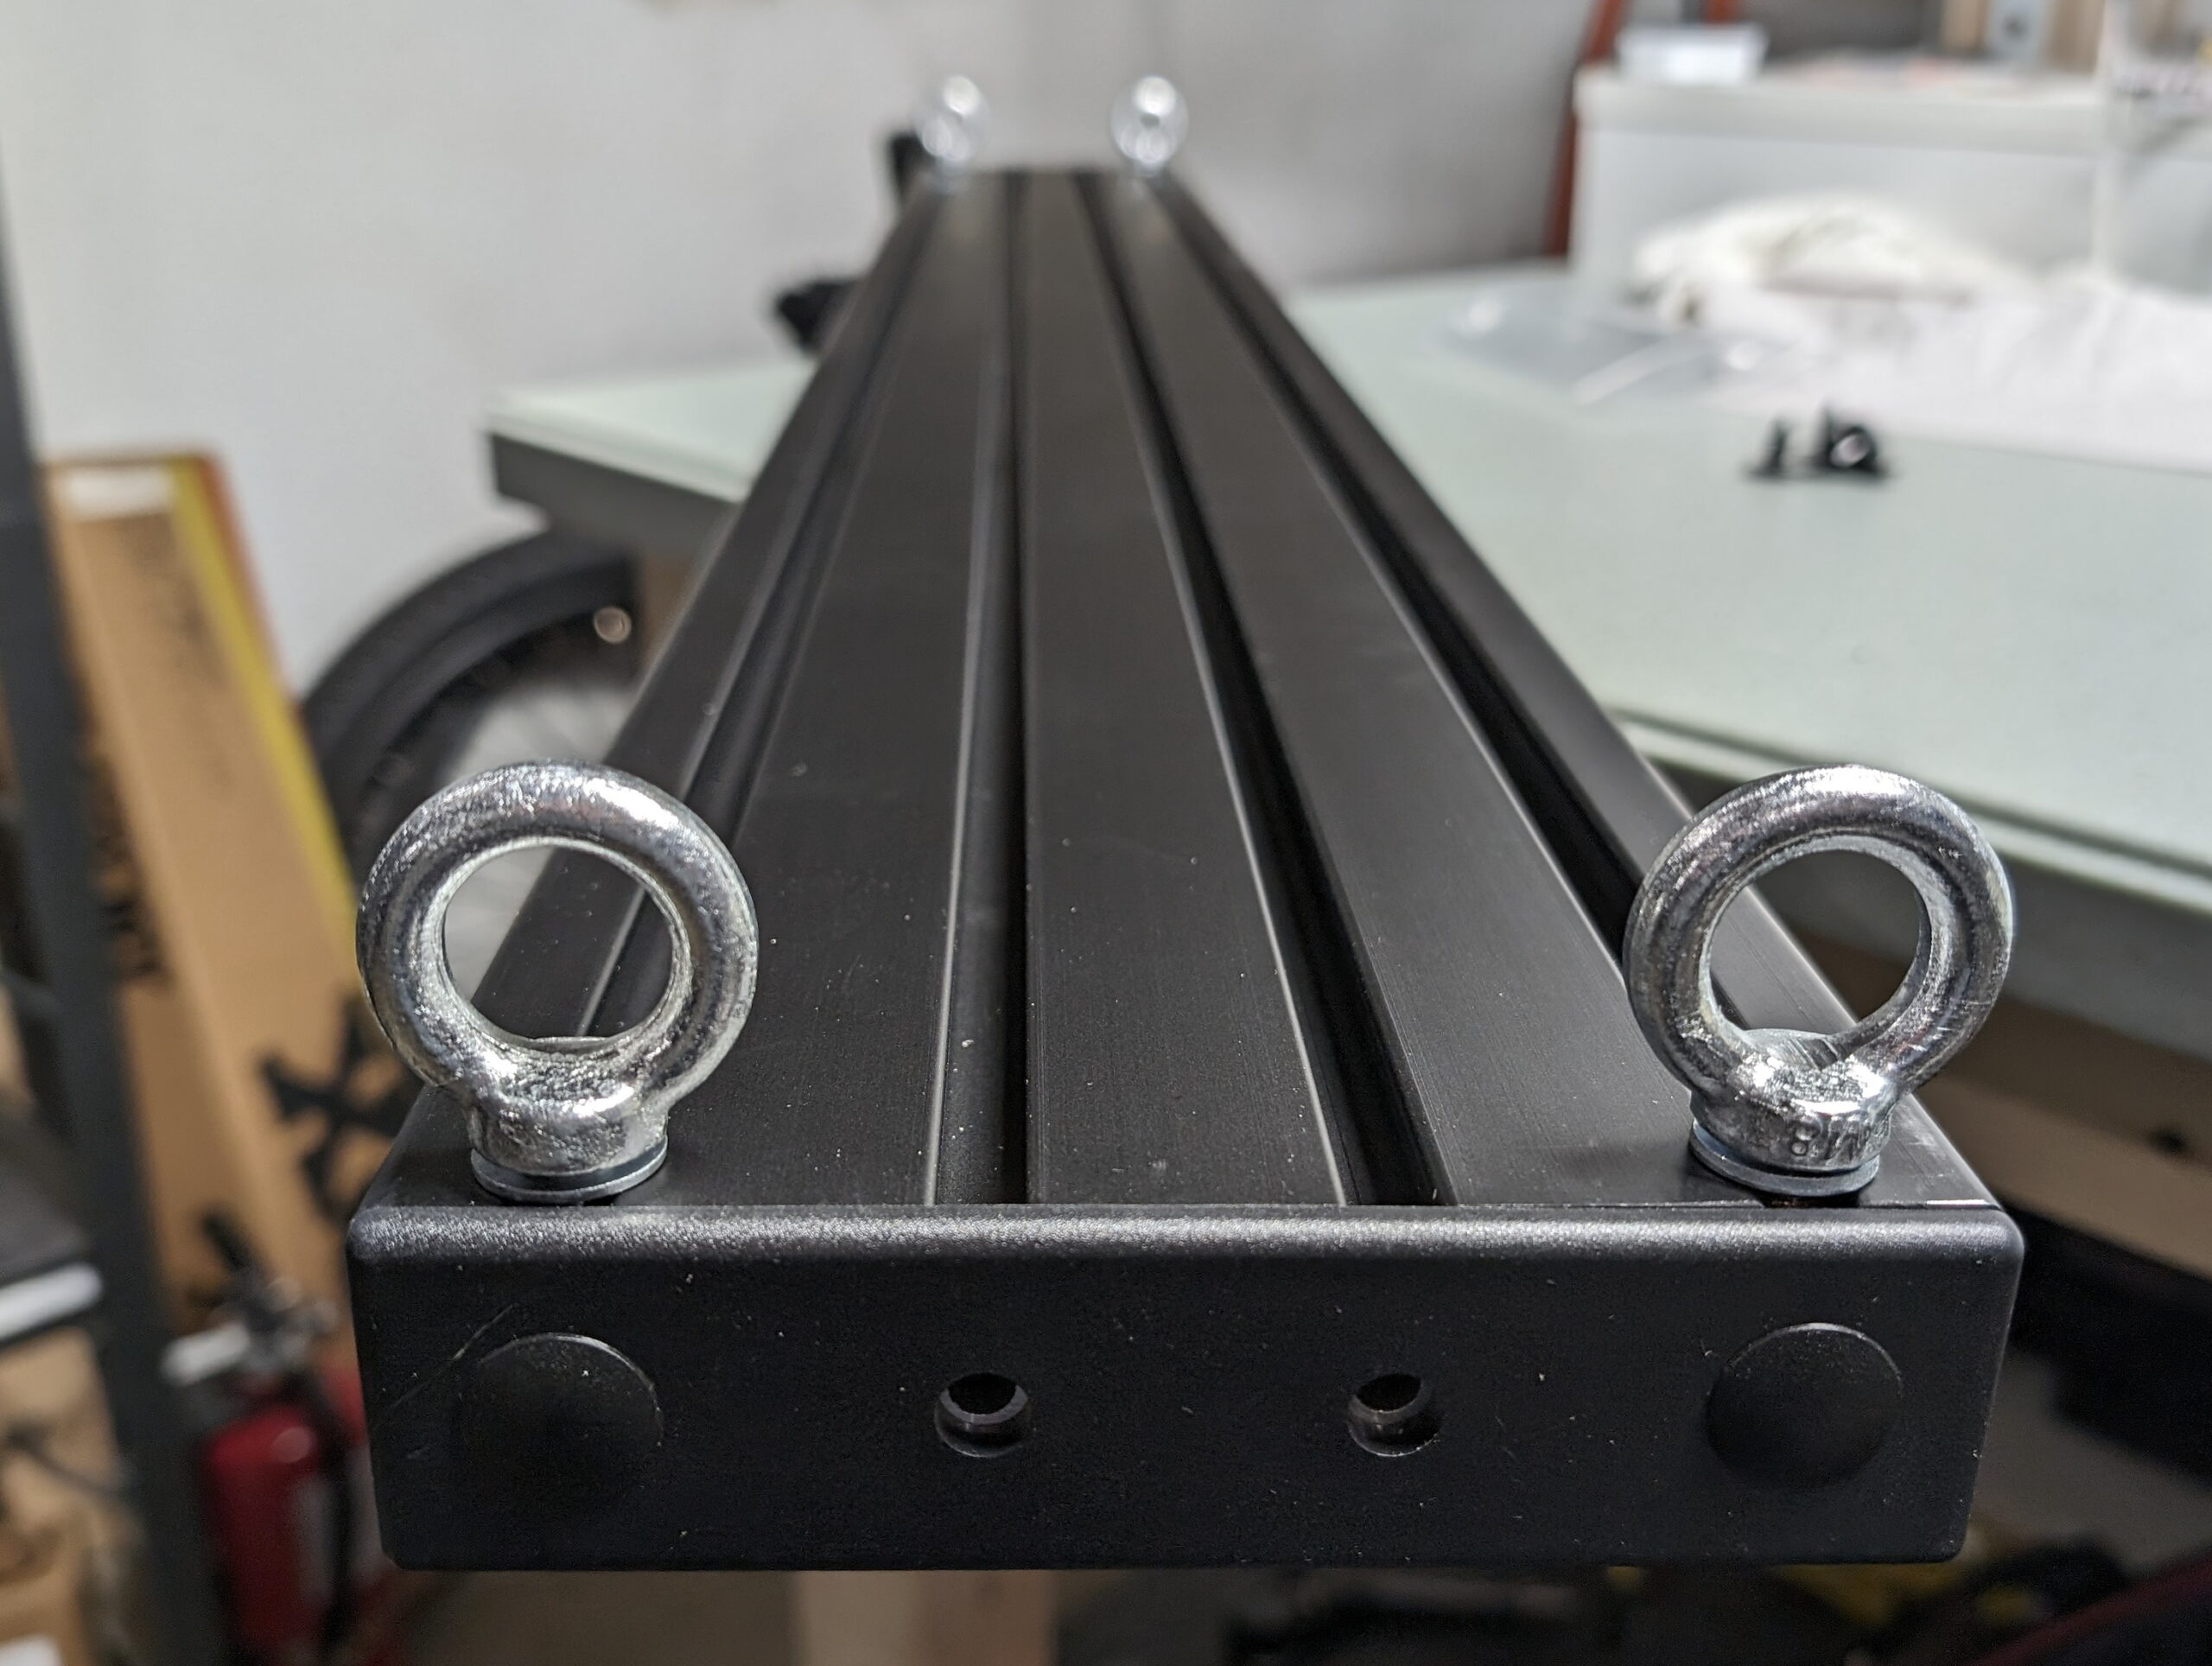
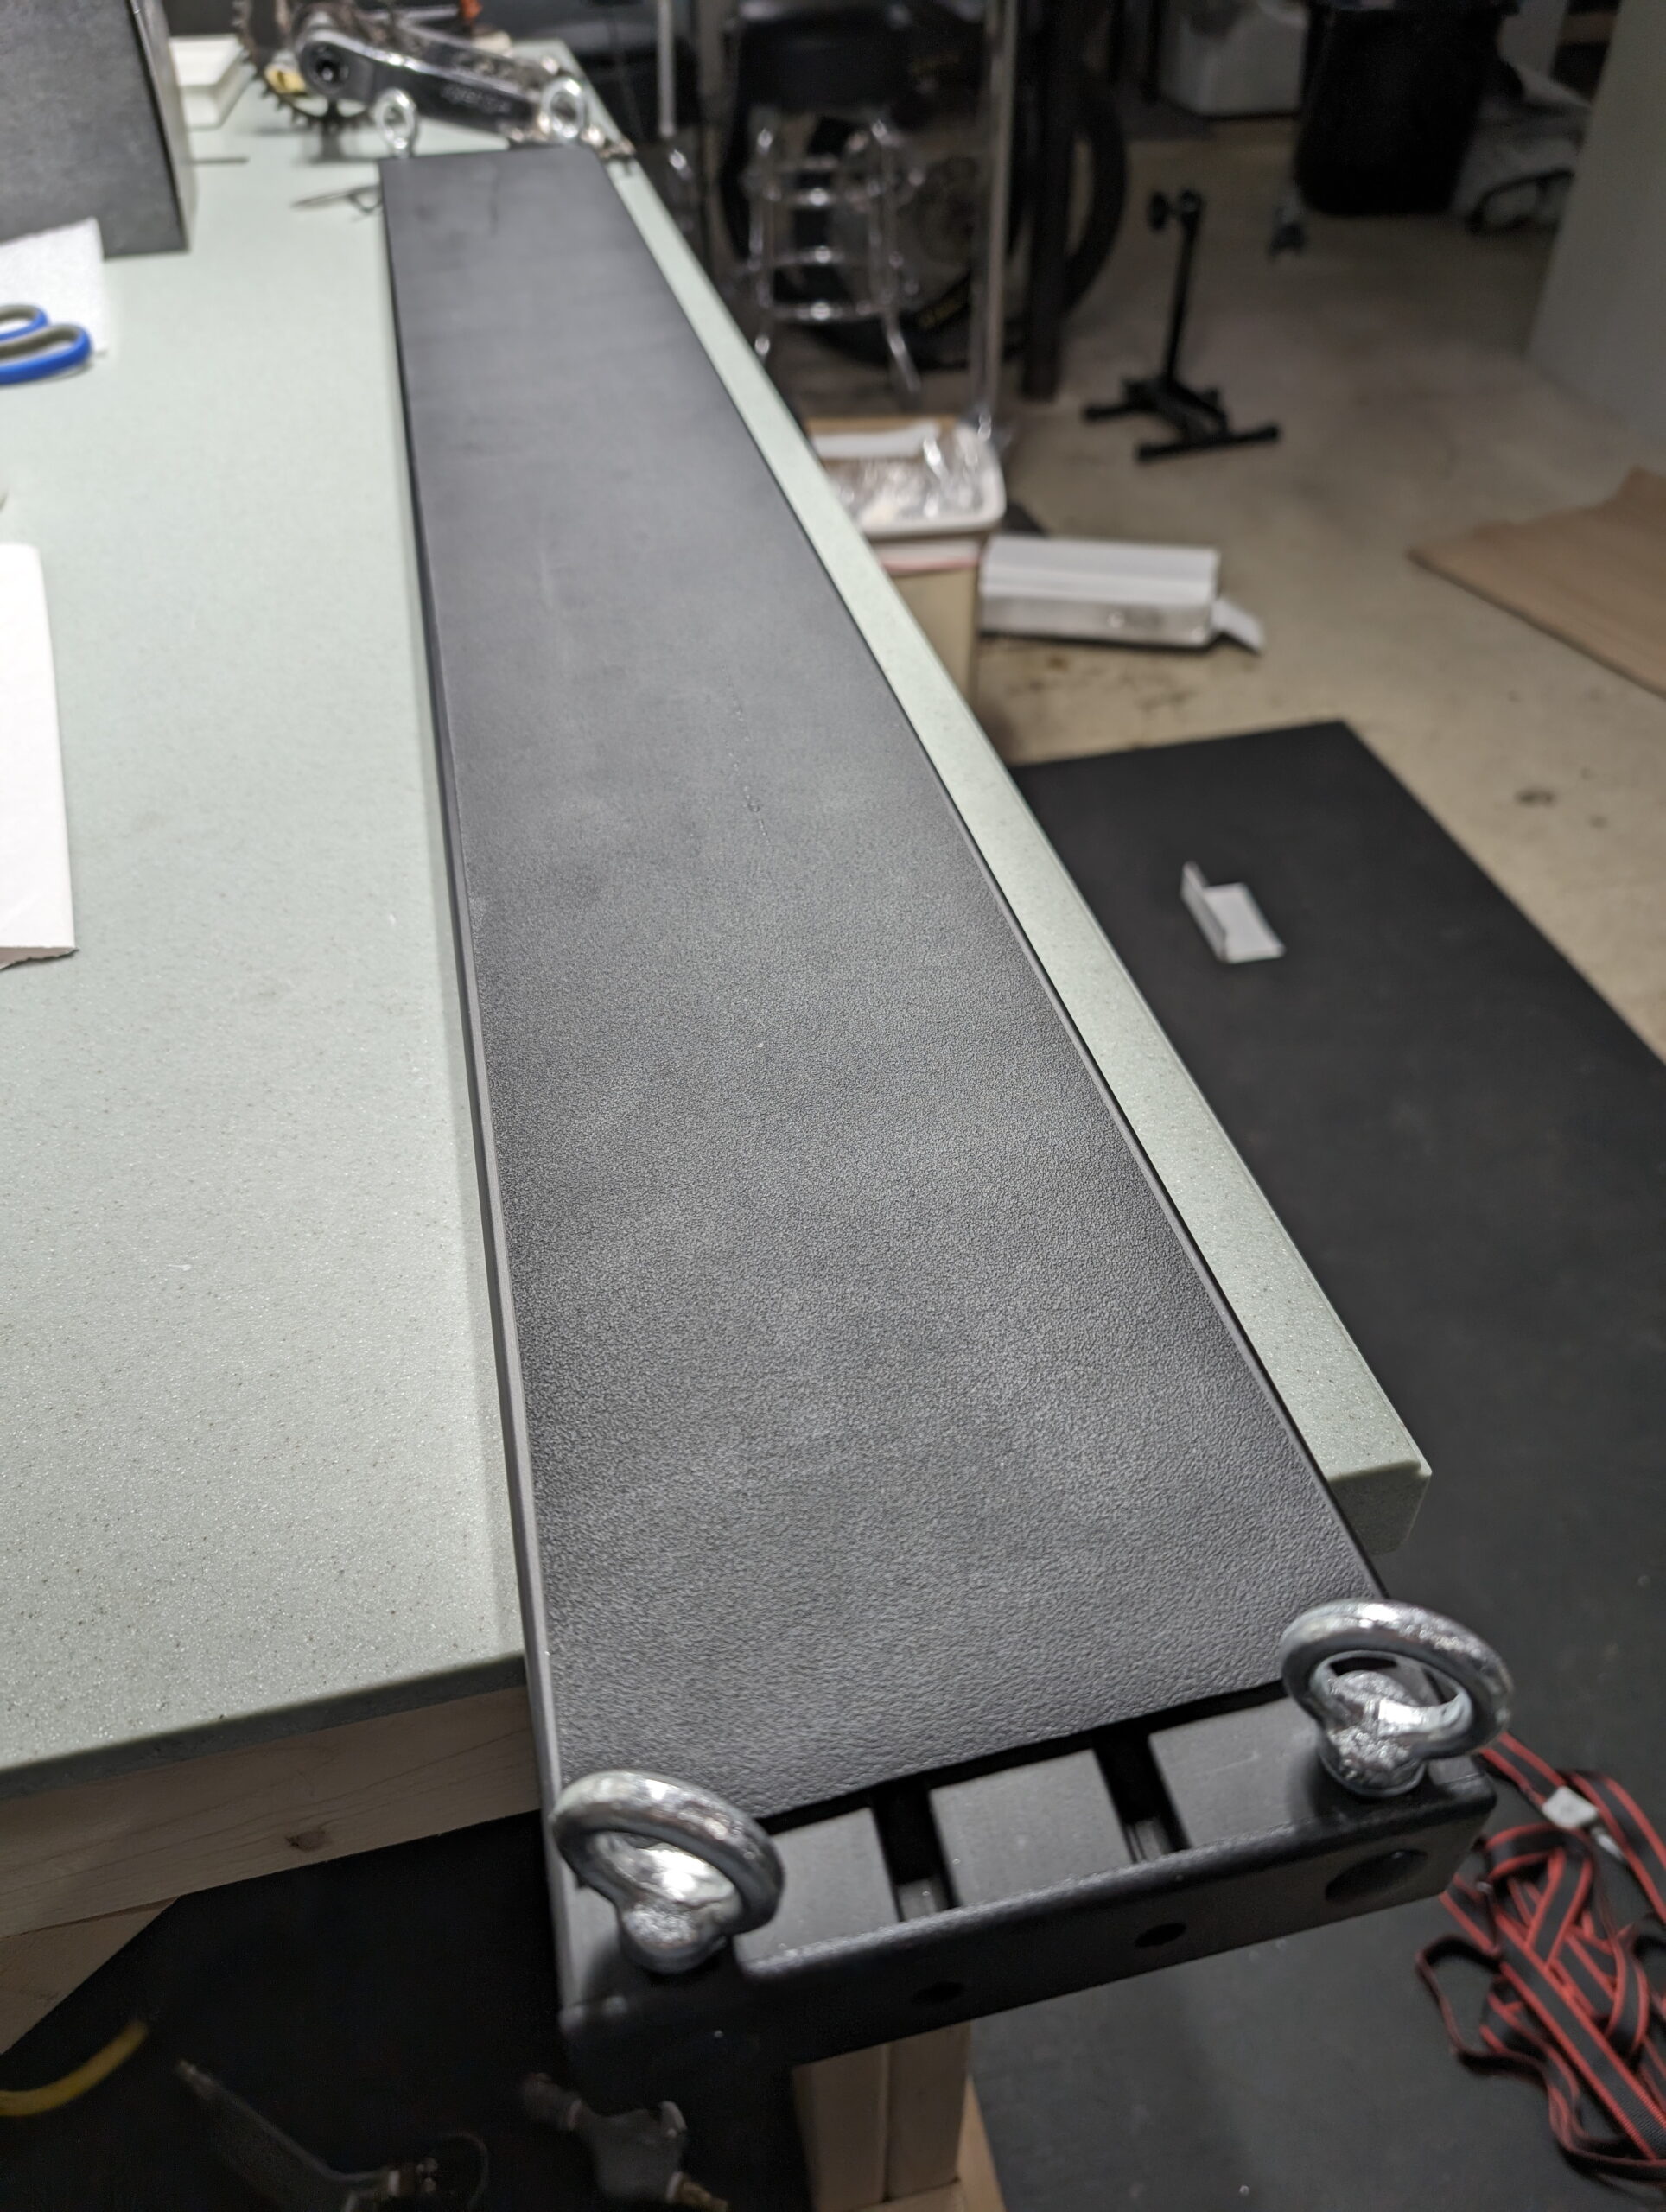
The main, base part of the rack is a 1.5″ x 6″ aluminum extrusion which has four slots on the larger faces. These slots are fitted with drop-in T-nuts to which the fork mounts can be fastened. To support easily repositioning the fork mounts I keep T-nuts in the unused slots, and chose ones with spring ball retention, which keeps them from rattling or sliding around while driving. While this style can be inserted or removed without removing the end caps, I keep spare ones in place because depending on the type of bike being fitted it is sometimes necessary to adjust the mount rotation or move them between slots.
Each end of the extrusion is capped with plastic face plates, and eyelets in slots on the underside are used with ratchet straps to hold the rail to the folded rear seats. A scrap of neoprene was stuck to the underside of the rail with small pieces of 3M VHB tape to help keep it from siding, and plastic corner protectors are used to keep the straps from digging into the seats.
Rocky Mounts DropTop mounts hold the bikes themselves to the rail, and the underside of each mount was covered with UHMW polyethylene tape to make side-to-side adjustment of the mounts smooth and avoid scratching the aluminum. The M6 bolts which came with the mounts were used to attach them to the T-nuts, but they are a bit long and bottomed out on the inside of the rail, so some nylon spacers are used beneath the heads of the nuts. I may eventually get some shorter bolts and avoid the spacers, but I really like the Torx head bolts that came from Rocky Mounts and I’m in no hurry to replace them. By varying the slot used the mounts can be angled at 0°, ~20°, or ~44° and can move forward or backward up to 4.5″. Coupled with easy side-to-side adjustment this makes staggering handlebars and fitting long mountain bike bars easy.
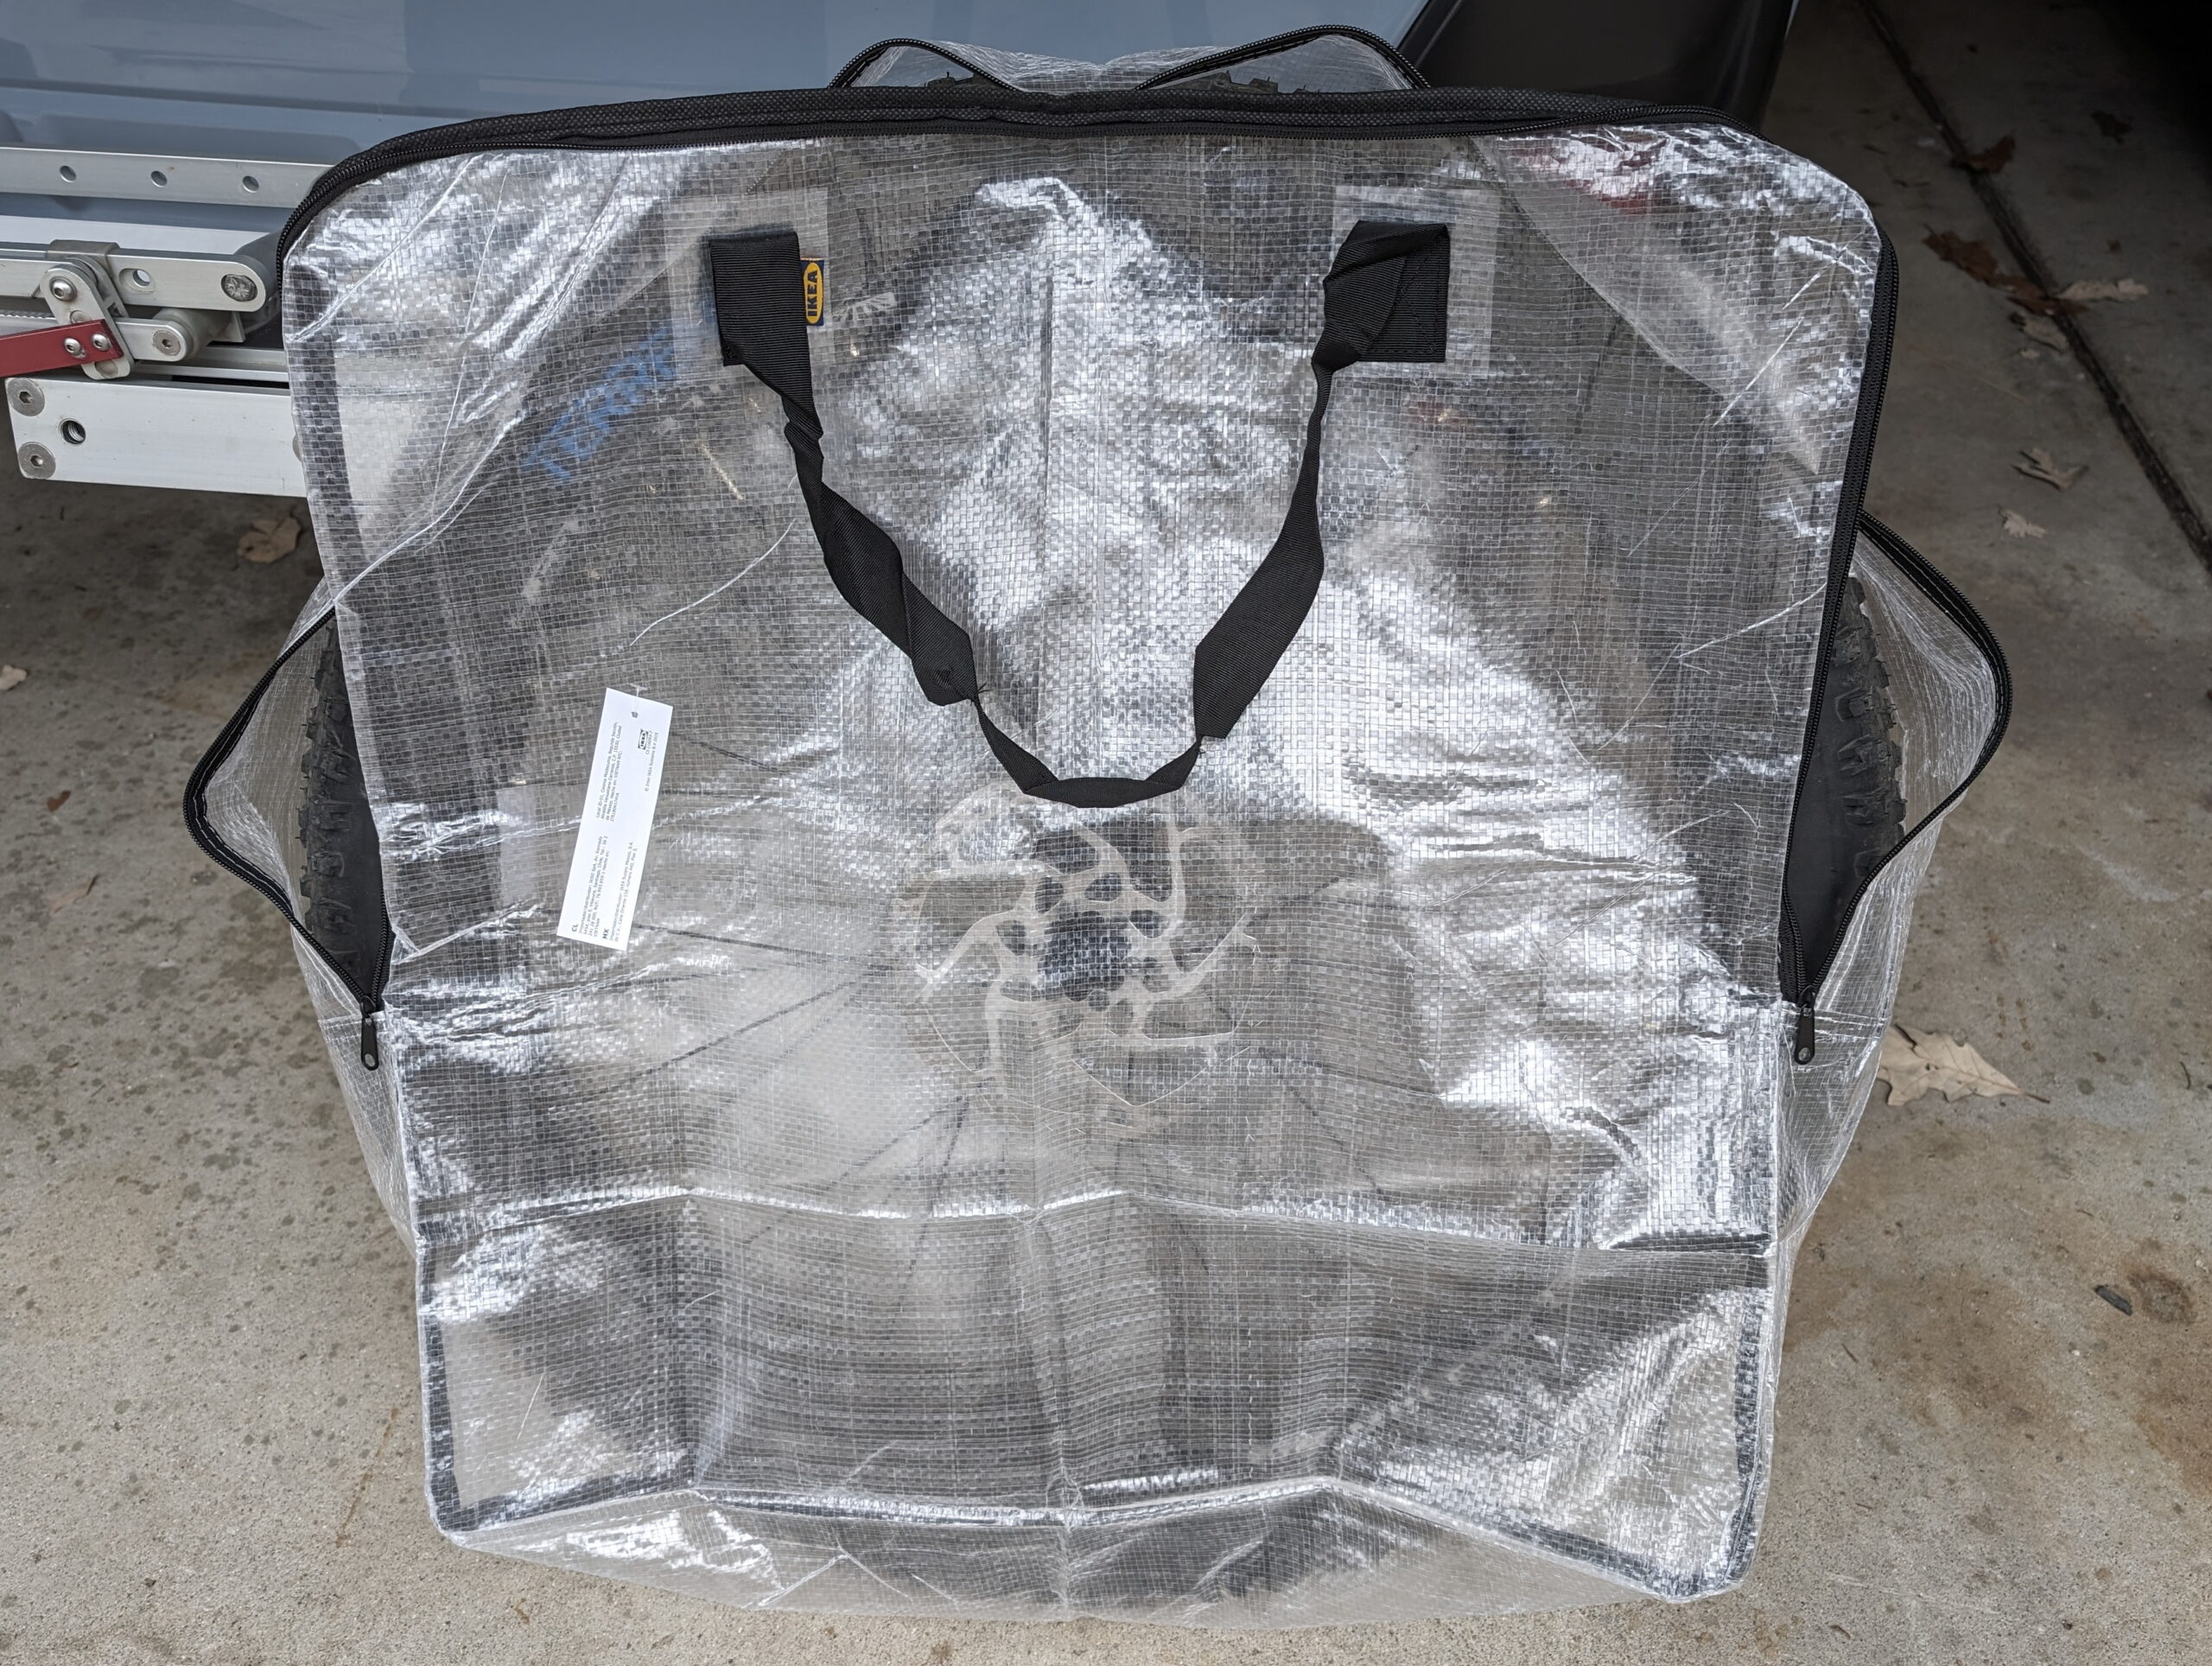
Finally, to hold the front wheels while they are off the bikes, IKEA DIMPA bags are working well. These aren’t always necessary, but with studded or potentially dirty tires and potentially setting them on other luggage, I like being able to drop the wheels into a bag before putting them in the car.
Plastic guards to protect the seats from the nylon ratchet straps.Pivot LES and Mach 4 SLUnderside of extrusion showing eyelets.IKEA DIMPA as Wheel BagNeoprene on the bottom of the rail.UHMW PE tape on the DropTopRocky Mounts DropTop attached to rail.
Comments closed
Quite a few years ago I came across Lighten Up!, which was a dawn-simulating alarm clock module that got connected between an incandescent lamp and used gently increasing light instead of noise. Coupled with a halogen bulb (that’d start out very yellow at lowest brightness) I had a wonderful sunrise-like alarm clock and it was much, much nicer than a beeping alarm.
The LCD displays in the Lighten Up! units began failing so I couldn’t change the programming, which was a hassle as the clocks in them drifted by a couple minutes per month. With a combination of COVID-19 remote work eliminating the need for an alarm clock and the devices dying, in the trash they went. (They also didn’t work right with LED bulbs, and now the person making them has closed down the business.)
I’ve been trying to use an alarm to stay on a more regular sleep schedule and while a bunch of other wake-up lights are available, they are dedicated units that are basically alarm clocks with built in lights. I really liked the elegance of the Lighten Up! and how it’d use an existing lamp, and outside of dedicated smart bulbs + an app I couldn’t find anything else like it. For a while I thought about developing my own hardware version that’d also work with LED bulbs, but never got around to it.
Lighten Up! (Image from Pintrest)
This winter I’ve been experimenting with Home Assistant (HA), and it turns out that with a couple cheap Zigbee parts (bulb and pushbutton from IKEA) it allows for a wonderful replacement/upgrade sunrise alarm idea. A next-generation Lighten Up!, if you will.
With everything put together the lamp next to my bed will now slowly come up to brightness 15 minutes before the wake-up alarm on my phone, reaching final as the normal alarm triggers. If I change the alarm time on my phone, or shut it off, the light-up alarm in HA will follow suit. Additionally, a physical button on the nightstand turns off the light off while replicating a sunrise alarm, or otherwise toggles the light on and off.
Even better, if I’m not home or if the alarm is set for other than between 3:00 AM and 9:00 AM (times during which I’d likely be in bed and wanting to wake up) the light won’t activate. This allows me to use alarms during the normal day for other things without activating with the light, or while traveling without waking Kristen.
Between this and the gently-increasing volume (and vibration) alarm built into the Android clock which triggers at the end of the sunrise cycle it’s a very nice, gradual wake-up system. And, all of this happens without any cloud services or ongoing subscriptions. My HA instance is local; the phone app communicates directly with it across either my home or the public networks. Communication between the physical controls and lights is a local, private network.
In this post I’ll document the major building blocks of how I did this so that someone else with basic Home Assistant experience (and a functioning HA setup, which is beyond the scope of this writeup) can do the same.
For reference, my Home Assistant hardware setup for this piece is:
With the Home Assistant Companion App for Android running on an Android phone, Home Assistant can get the date and time of the next alarm. After installing the app, go into Settings → Companion app → Manage sensors and enable the Next alarm sensor. My phone is named Pixel 8, so the alarm is now available as entity sensor.pixel_8_next_alarm. Note that this is not available if an iPhone (or other iOS device) is used. (ref: Next Alarm Sensor)
Part of setting up HA configures a Zone (location) called Home. This, combined with the default location information collected by the companion app, allows HA to know if my phone is at Home (or elsewhere), via the the state of entity device_tracker.pixel_8 (eg: home).
Note: While I give YAML of the automations for configuration reference, most of these automations were built using the GUI and involve the (automatically generated) entity and device IDs. If you are setting this up you’ll want to use the GUI and build these out yourself using the code for reference.
To make this all work, three community components are used and must be installed:
Ashley’s Light Fader 2.0: This script takes a light and, over a configured amount of time, fades from the light’s current setting to the defined setting (both brightness and color temperature) using natural feeling curves (easing). It will also cancel the fade if some conditions are met. I use this to have the light fade, over 15 minutes, using a sine function, to 70% brightness and 4000K temperature, and cancel the fade if the light is turned off or brightness changes significantly, the latter of which allows the button next to the bed to cancel the alarm.
To make this happen I turn on the bulb at 1% brightness and 2202K (it’s warmest temperature), then use the script to fade to 70% and 4000K over the course of 15 minutes. This does a decent job of replicating a sunrise or the results of the Lighten Up! with a halogen bulb.
This is configured as an automation I call Bedroom Steve Nightstand: Lighten Up! (Sunrise). Note that it has no trigger because it’ll be called from the next automation:
Adjustable Wake-up to Android alarm v2: This blueprint for an Automation takes the time from the next alarm sensor (alarm_source) to trigger an action before the alarm happens. I use this to initiate Ashley’s Light Fader 2.0 at 15 minutes before my alarm, only when my phone is at Home, and and the alarm is between 3:00 AM and 9:00 AM.
Part of configuring this is setting up a Helper or basically a system-wide variable, called Pixel 8 Next Alarm (entity id: input_datetime.pixel_8_next_alarm, type: Date and/or time).
This is configured as an automation called Bedroom Steve Nightstand: Lighten Up at 15 Before Alarm, set to only run if my phone is at Home and it’s between 3:00 AM and 9:00 AM:
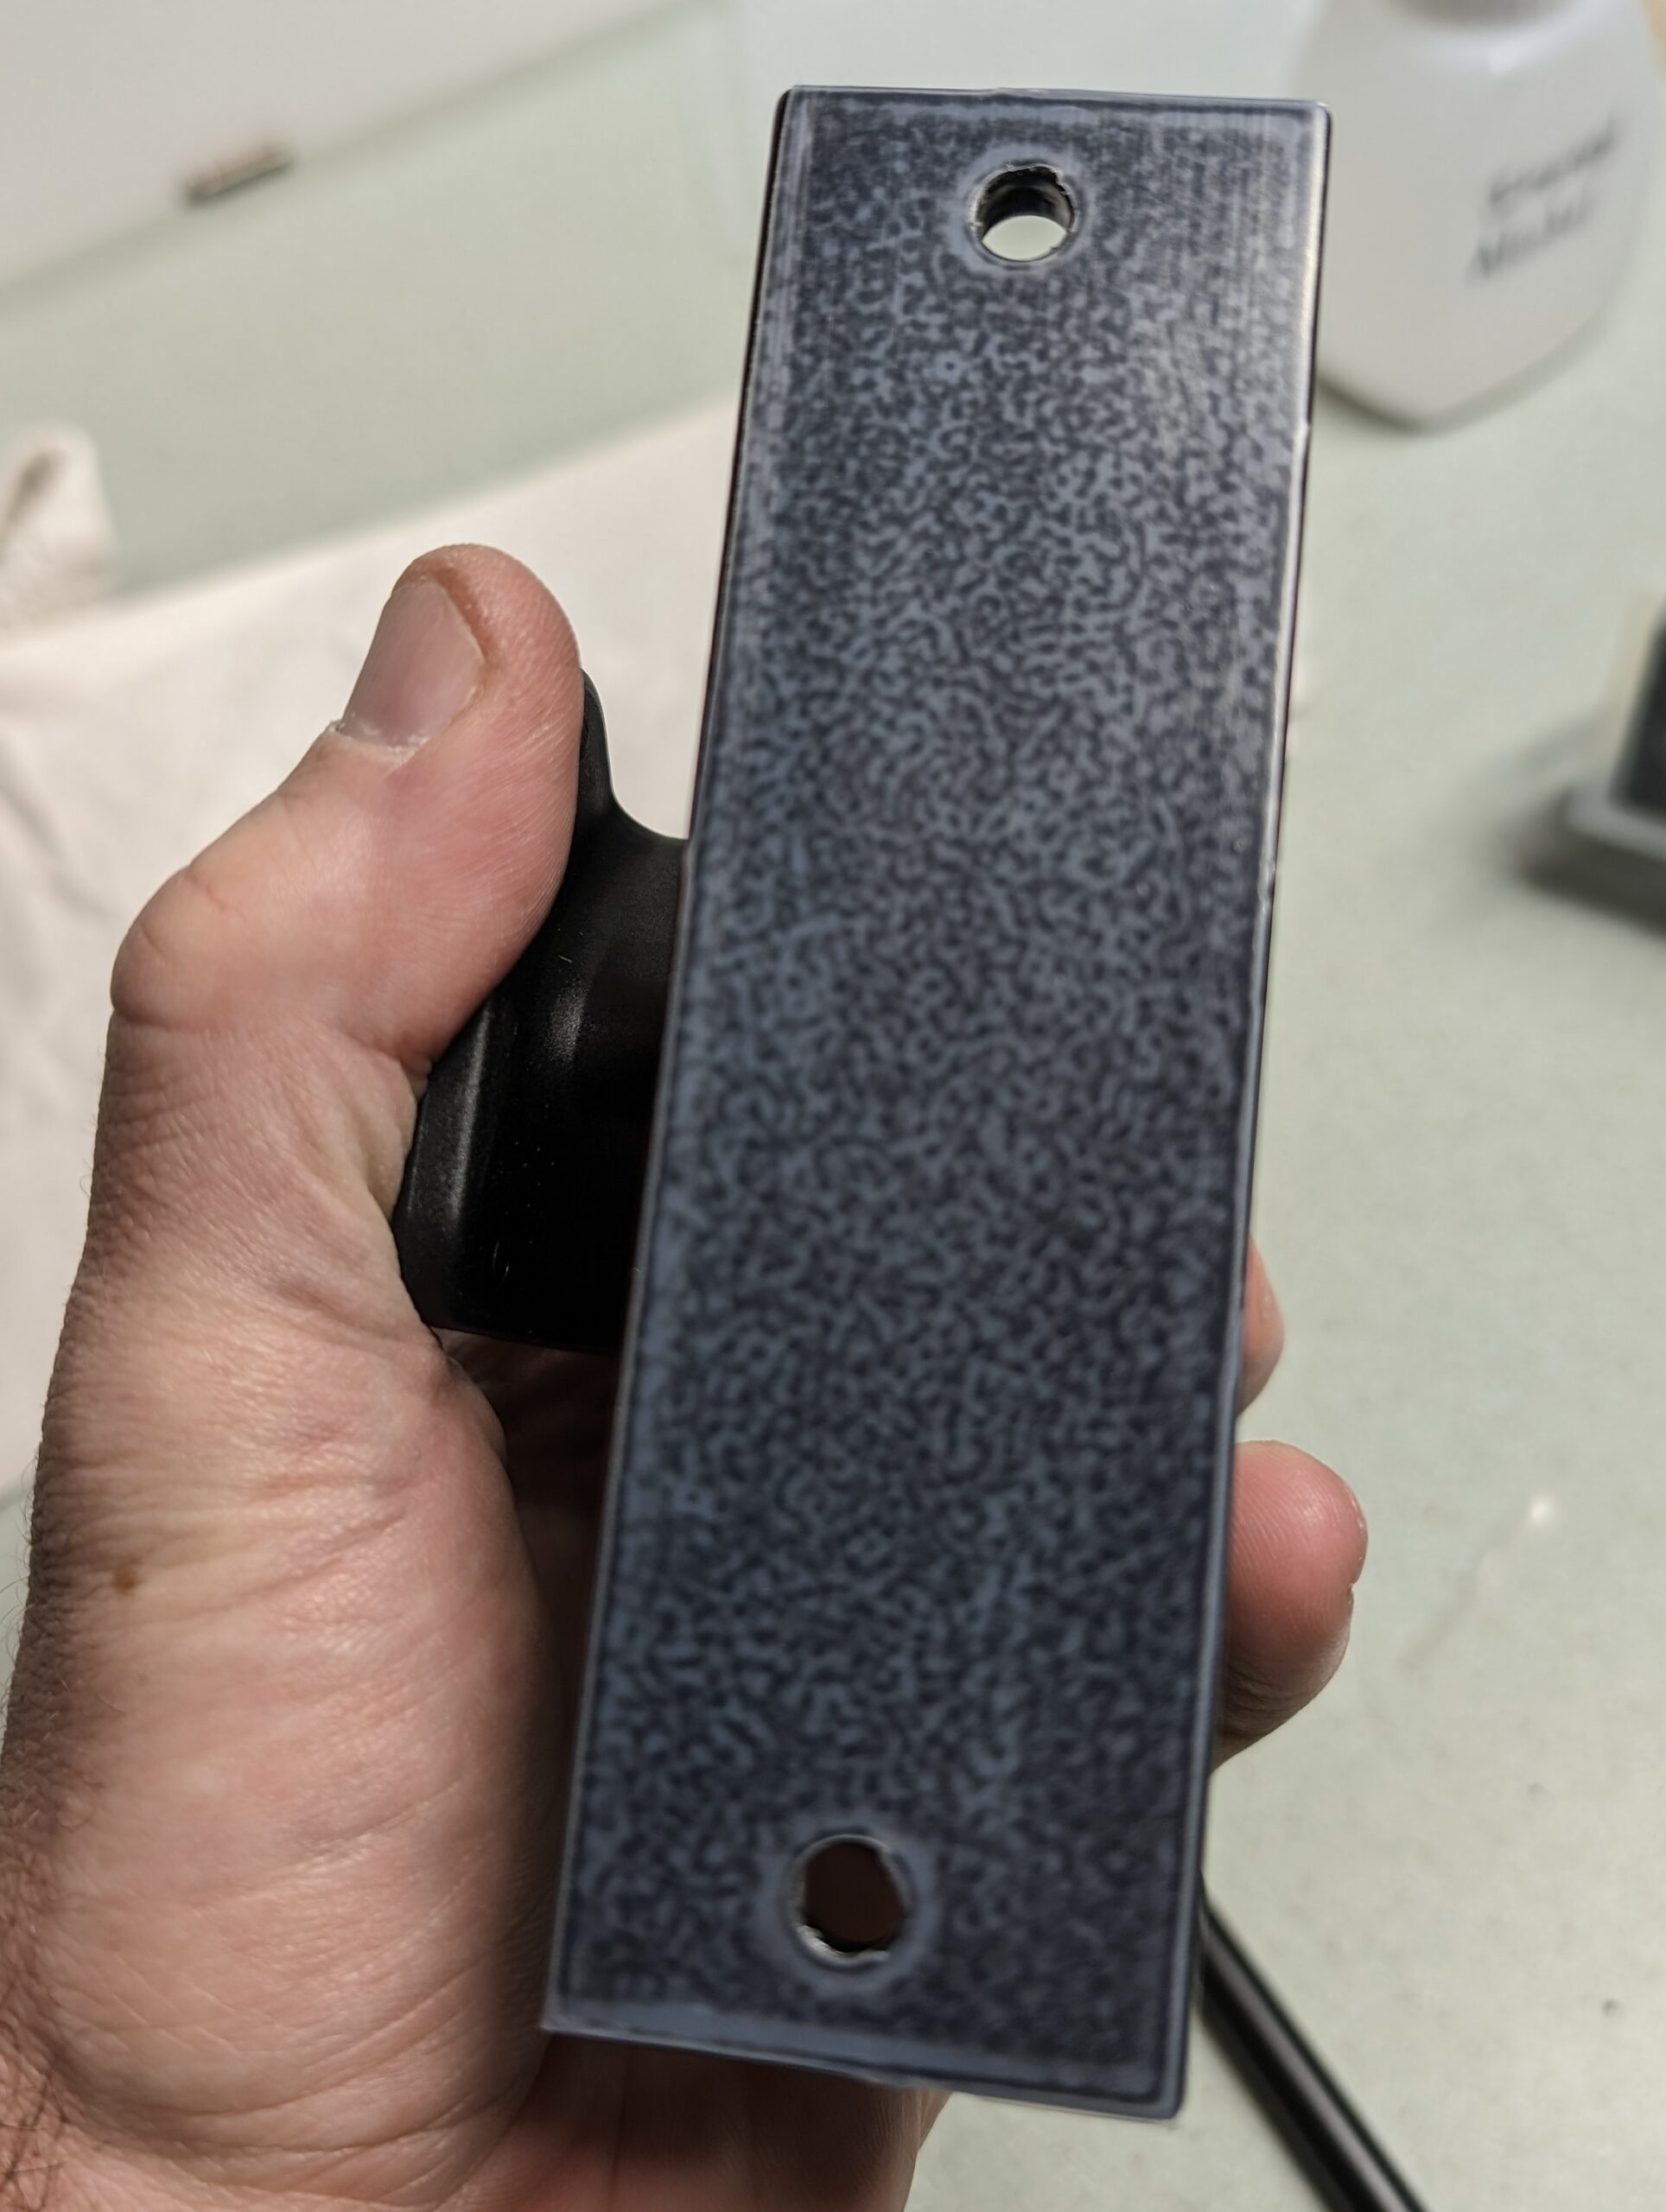
I don’t want to get out a phone and dig into an app to manage the light, so next to the bed I have a TRÅDFRI Shortcut Button for controlling the light. If the button is pressed while the light is simulating sunrise, it turns off. If the light is off it turns it on, or visa versa.
Because turning the light off mid-dimming leaves it set at the current color and brightness, I use this instead of the normal Toggle action. In here I check the state of the bulb and either turn it off (if on), or turn it on to 100% brightness and 4000K if it is off:
alias: "Bedroom Steve Nightstand: Light Toggle"
description: >-
  Doesn't use the normal toggle because it needs to set the light color and
  brightness just in case it was left at something else when turned off
  mid-alarm.
trigger:
  - device_id: 12994a6c215ae1d4cfb86e261a2b2f3b
    domain: zha
    platform: device
    type: remote_button_short_press
    subtype: turn_on
condition: []
action:
  - if:
      - condition: device
        type: is_on
        device_id: e3421c7d54269752a371fe8443daf95f
        entity_id: 78599118c4ab8043cf03ce6532546b94
        domain: light
    then:
      - service: light.turn_off
        metadata: {}
        data:
          transition: 0
        target:
          entity_id: light.bedroom_test_bulb_light
      - stop: ""
    alias: On to Off
  - if:
      - condition: device
        type: is_off
        device_id: e3421c7d54269752a371fe8443daf95f
        entity_id: 78599118c4ab8043cf03ce6532546b94
        domain: light
    then:
      - service: light.turn_on
        metadata: {}
        data:
          color_temp: 153
          transition: 0
          brightness_pct: 100
        target:
          entity_id: light.bedroom_test_bulb_light
      - stop: ""
    alias: "Off to On: Full Brightness and 4000K"
mode: single
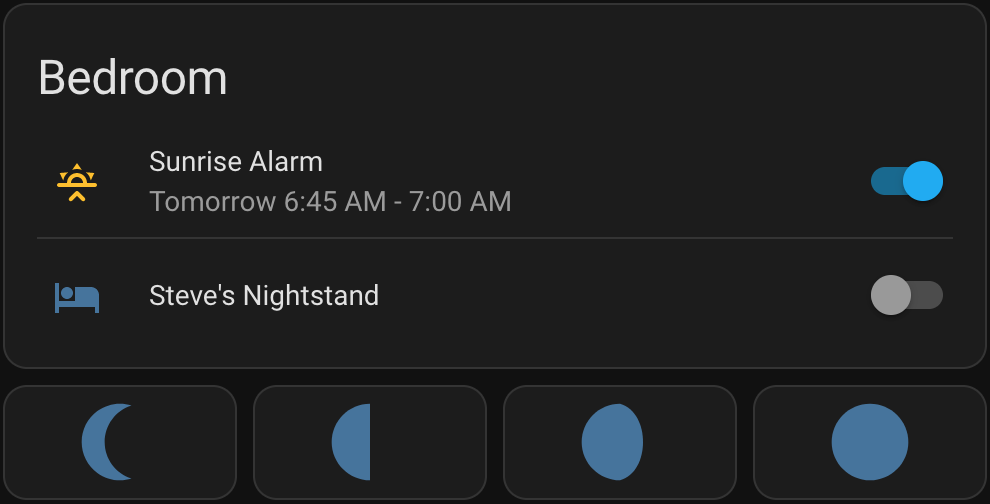
Finally, I also have this all displaying, and controllable, via a card stack in a dashboard. For the next alarm info I started with the template in this post but modified it to simplify one section by using now(), fix a bug in it that occurs with newer versions of HA, and then build it into something that better illustrates the start and end of the simulated sunrise. Because normal entity cards can’t do templating (to dynamically show data) I used TheHolyRoger/lovelace-template-entity-row and some Jinja templating to make it look nice.
This gives me a row which shows the next alarm time (or “No alarm” if none set), nicely formatted, and has a toggle that can enable/disable the Bedroom Steve Nightstand: Lighten Up at 15 Before Alarm automation. Finally, I added a row of buttons to allow easy toggling between 1% / 454 mireds, 33% / 357 mireds, 66% / 294 mireds, and 100% / 250 mireds so I can manually set the light to some nice presets across dawn to full brightness.
The result of all of this is that, if my phone is at home and I have an alarm set between 3:00 AM and 9:00 AM, the light next to the bed will simulate a 15-minute sunrise before the alarm goes off. If the light is simulating a sunrise, pressing the button will turn it off. Otherwise, the button toggles the light on and off at full brightness, for normal lamp-type use. Finally, via the Home Assistant UI I can easily check the status of, or turn off, the sunset alarm if I don’t want to use it.
So far, this is working great. There’s two things I’m looking into changing:
First, the bulb I’m using, 405.187.36, is an 1100 lumen maximum brightness. This is a bit too bright for the final stage of the alarm, and it’s minimum brightness is a bit higher than I’d like and seems a little abrupt. (Ideally the initial turn-on won’t be noticable.)
Since IKEA bulbs are cheap and generally work well, I’ll likely try a few other lower brightness ones and see how they work out. Both 605.187.35 (globe) and 905.187.34 (chandelier) are color temperature adjustable, 450 lumen maximum, cost $8.99, and look like good candidates as I expect their minimum brightness to be lower.
There is also 104.392.55 ($12.99), but it is fixed at 2200K and has a maximum brightness of 250 lumens. I suspect this will be nicely dim for the start, but wouldn’t allow a color transition and might not have enough final brightness to make me feel ready for the day.
I may also try something like 204.391.94 ($17.99), which is adjustable color, as this could allow me to use something like the sunrise color pallete, but this would require moving to a different script for fading. The current script doesn’t support fading between colors (see here for discussion around this), so this would take a lot of work on my part. Probably more than would be beneficial, since varying color temp on white-range bulbs is pretty darn good already.
Second, the TRÅDFRI Shortcut Button (203.563.82) that I’m using has been discontinued. It’s a nice, simple button, and I can trigger on it using short or long press. It’s replacement, SOMRIG Shortcut Button (305.603.54), isn’t in stock at my local IKEA so I don’t have one, but I expect it to be two buttons that can each have short or long presses, and perhaps even double-click on each. If so, I may add something more like dimming the nightstand light to use as a reading light, or perhaps something to leave on for the dogs when we’re gone.
Thinking a bit bigger picture I could even do things like use an in-wall dimmer to have the adjacent closet lights serve as wake-up lights. But as all the quality ones of these are Z-Wave I’d have to get another radio for the Pi and… and…
The possibilities for this stuff are nearly endless, which is neat, because it becomes an engineering problem of what to do that provides sufficient benefit without complexity for complexity’s sake. This, at least, a Home Assistant-based replacement for the old, beloved Lighten Up!, is great.
Note: This post has been updated a few times since original posting to fix grammar, a bug in the Jinga2 template for displaying the next alarm, and to add buttons for setting lamp brightness.
Update on 2025-May-23
With the release of Adjustable Wake-up to Android alarm v4 in January 2025, the helper input_datetime.pixel_8_next_alarm is no longer needed and can be deleted. Accordingly, the line in the card defining sunrise_start needs to be changed to something like this. The -900 is the offset / number of seconds before the alarm that the automation is scheduled to trigger:
{% set sunrise_start = ((state_attr('sensor.pixel_8_next_alarm', 'Time in Milliseconds') /1000) - 900) | int %}
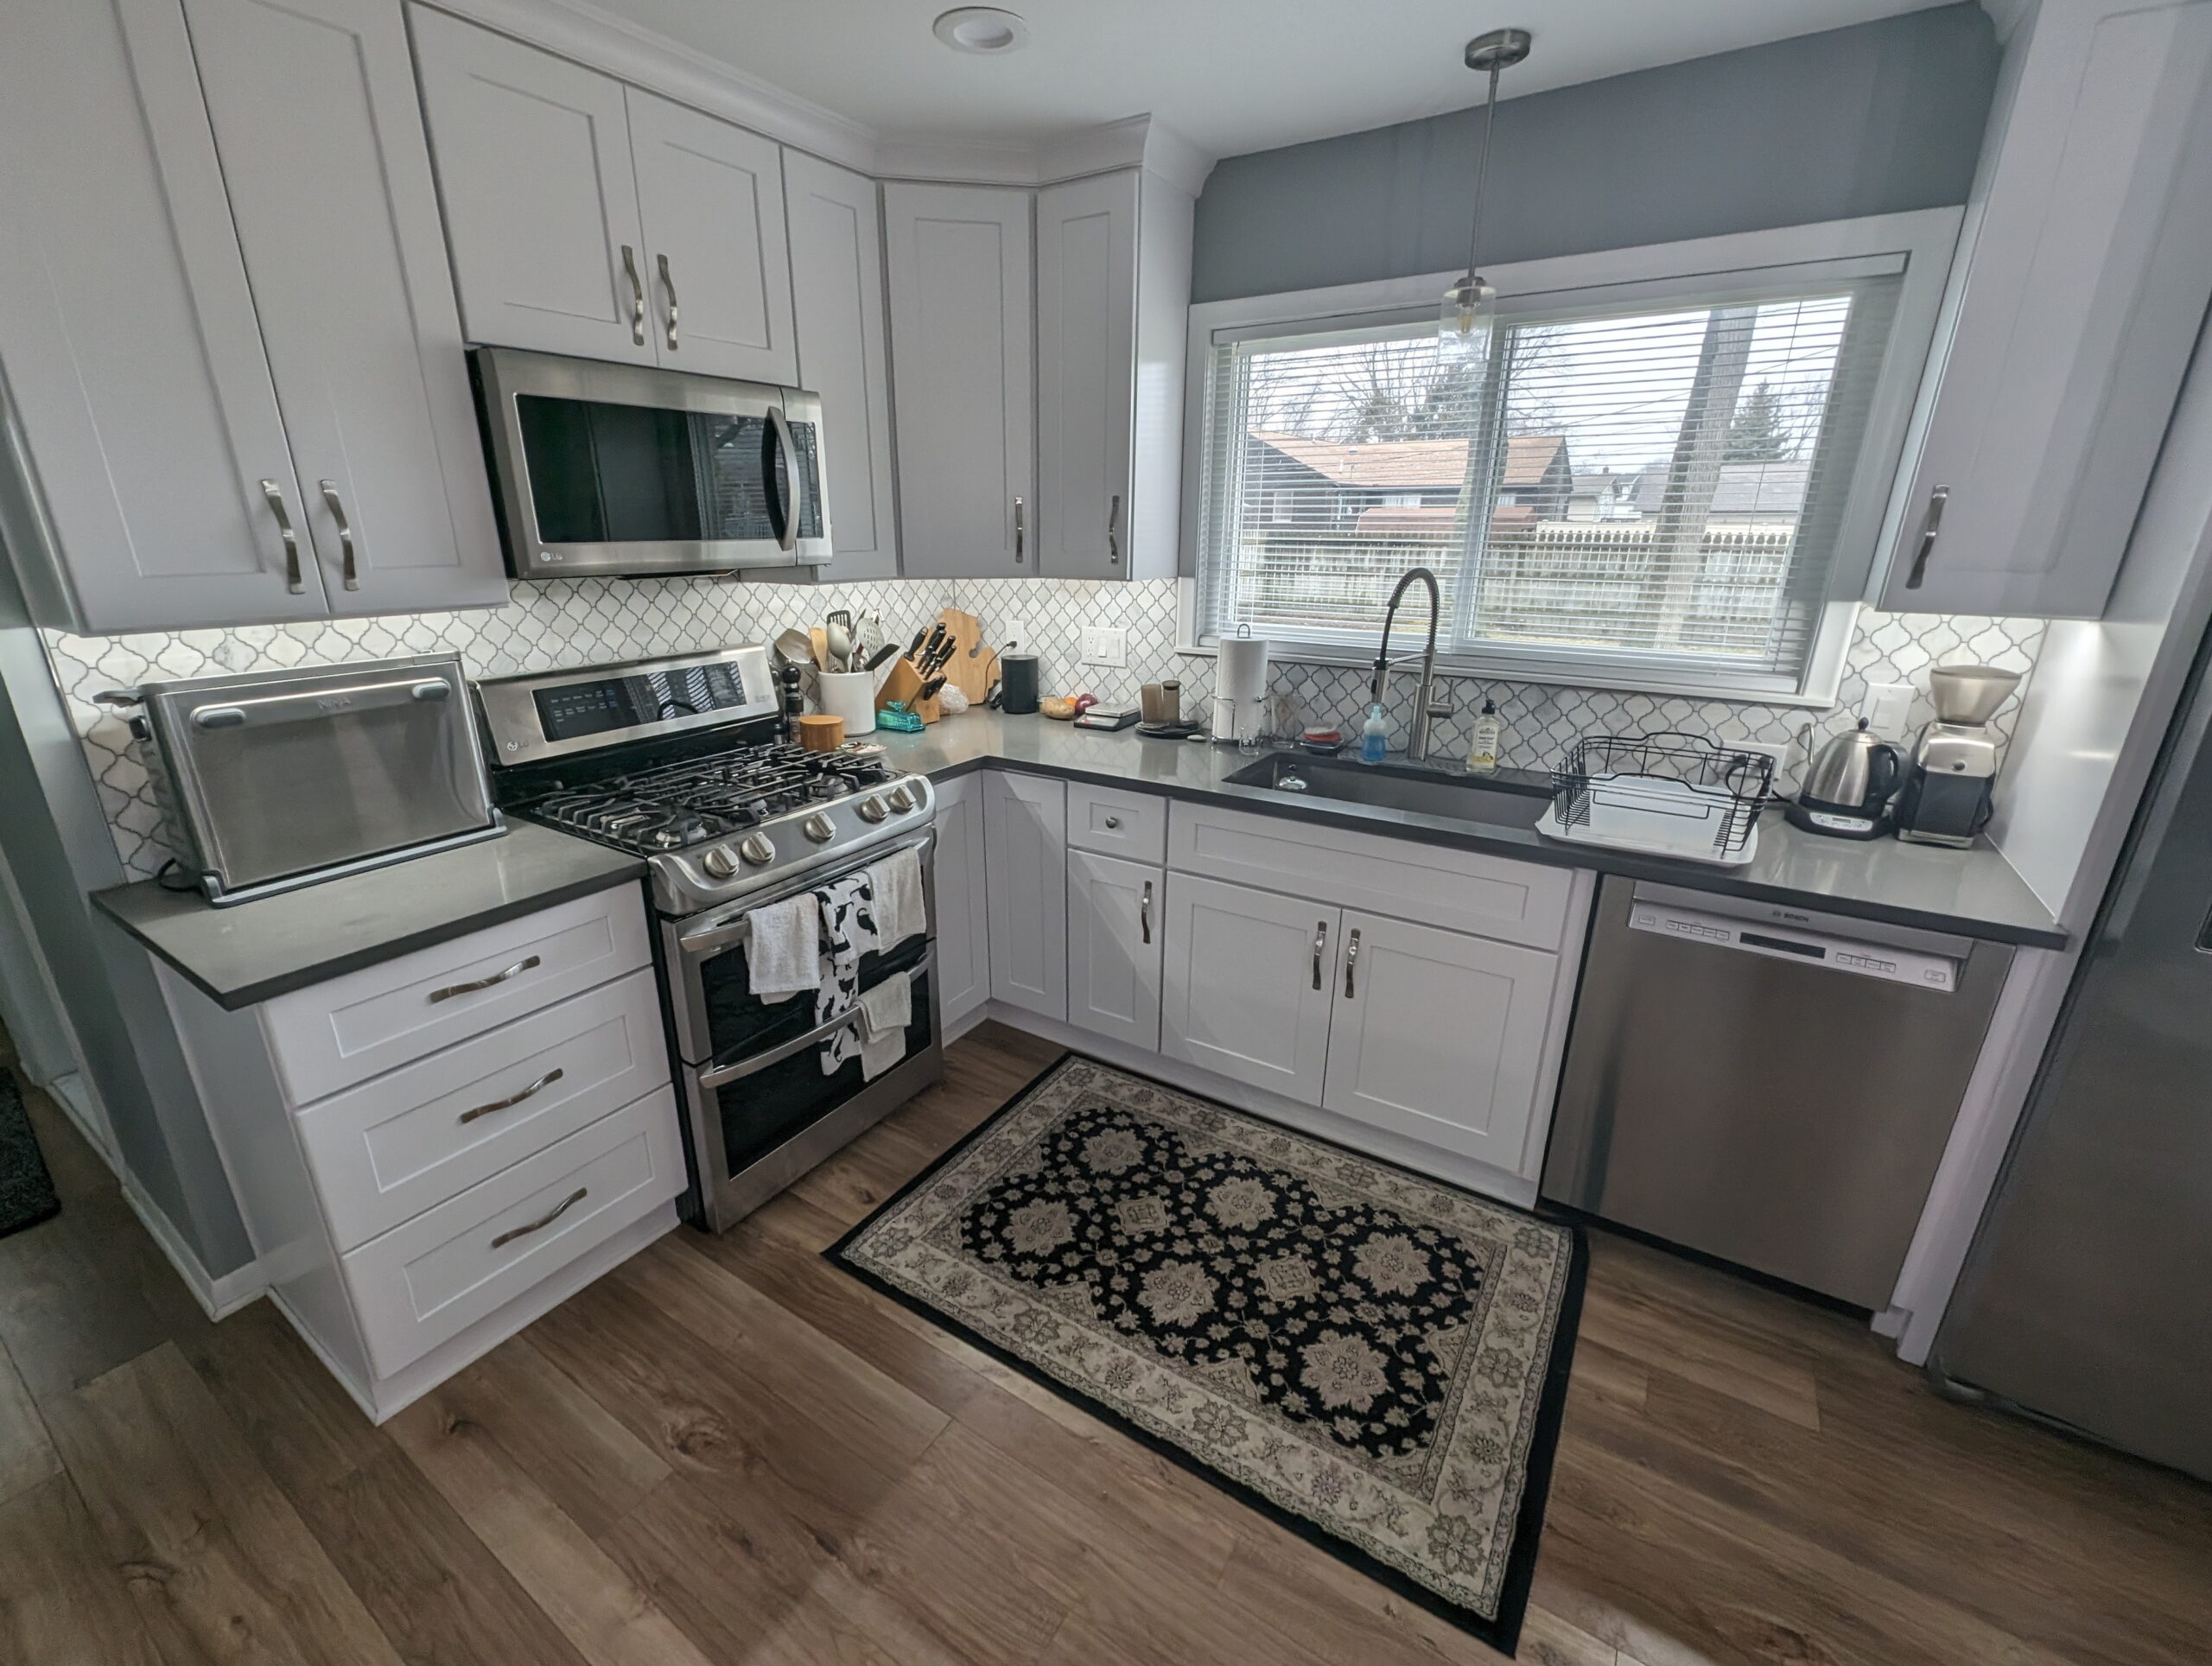
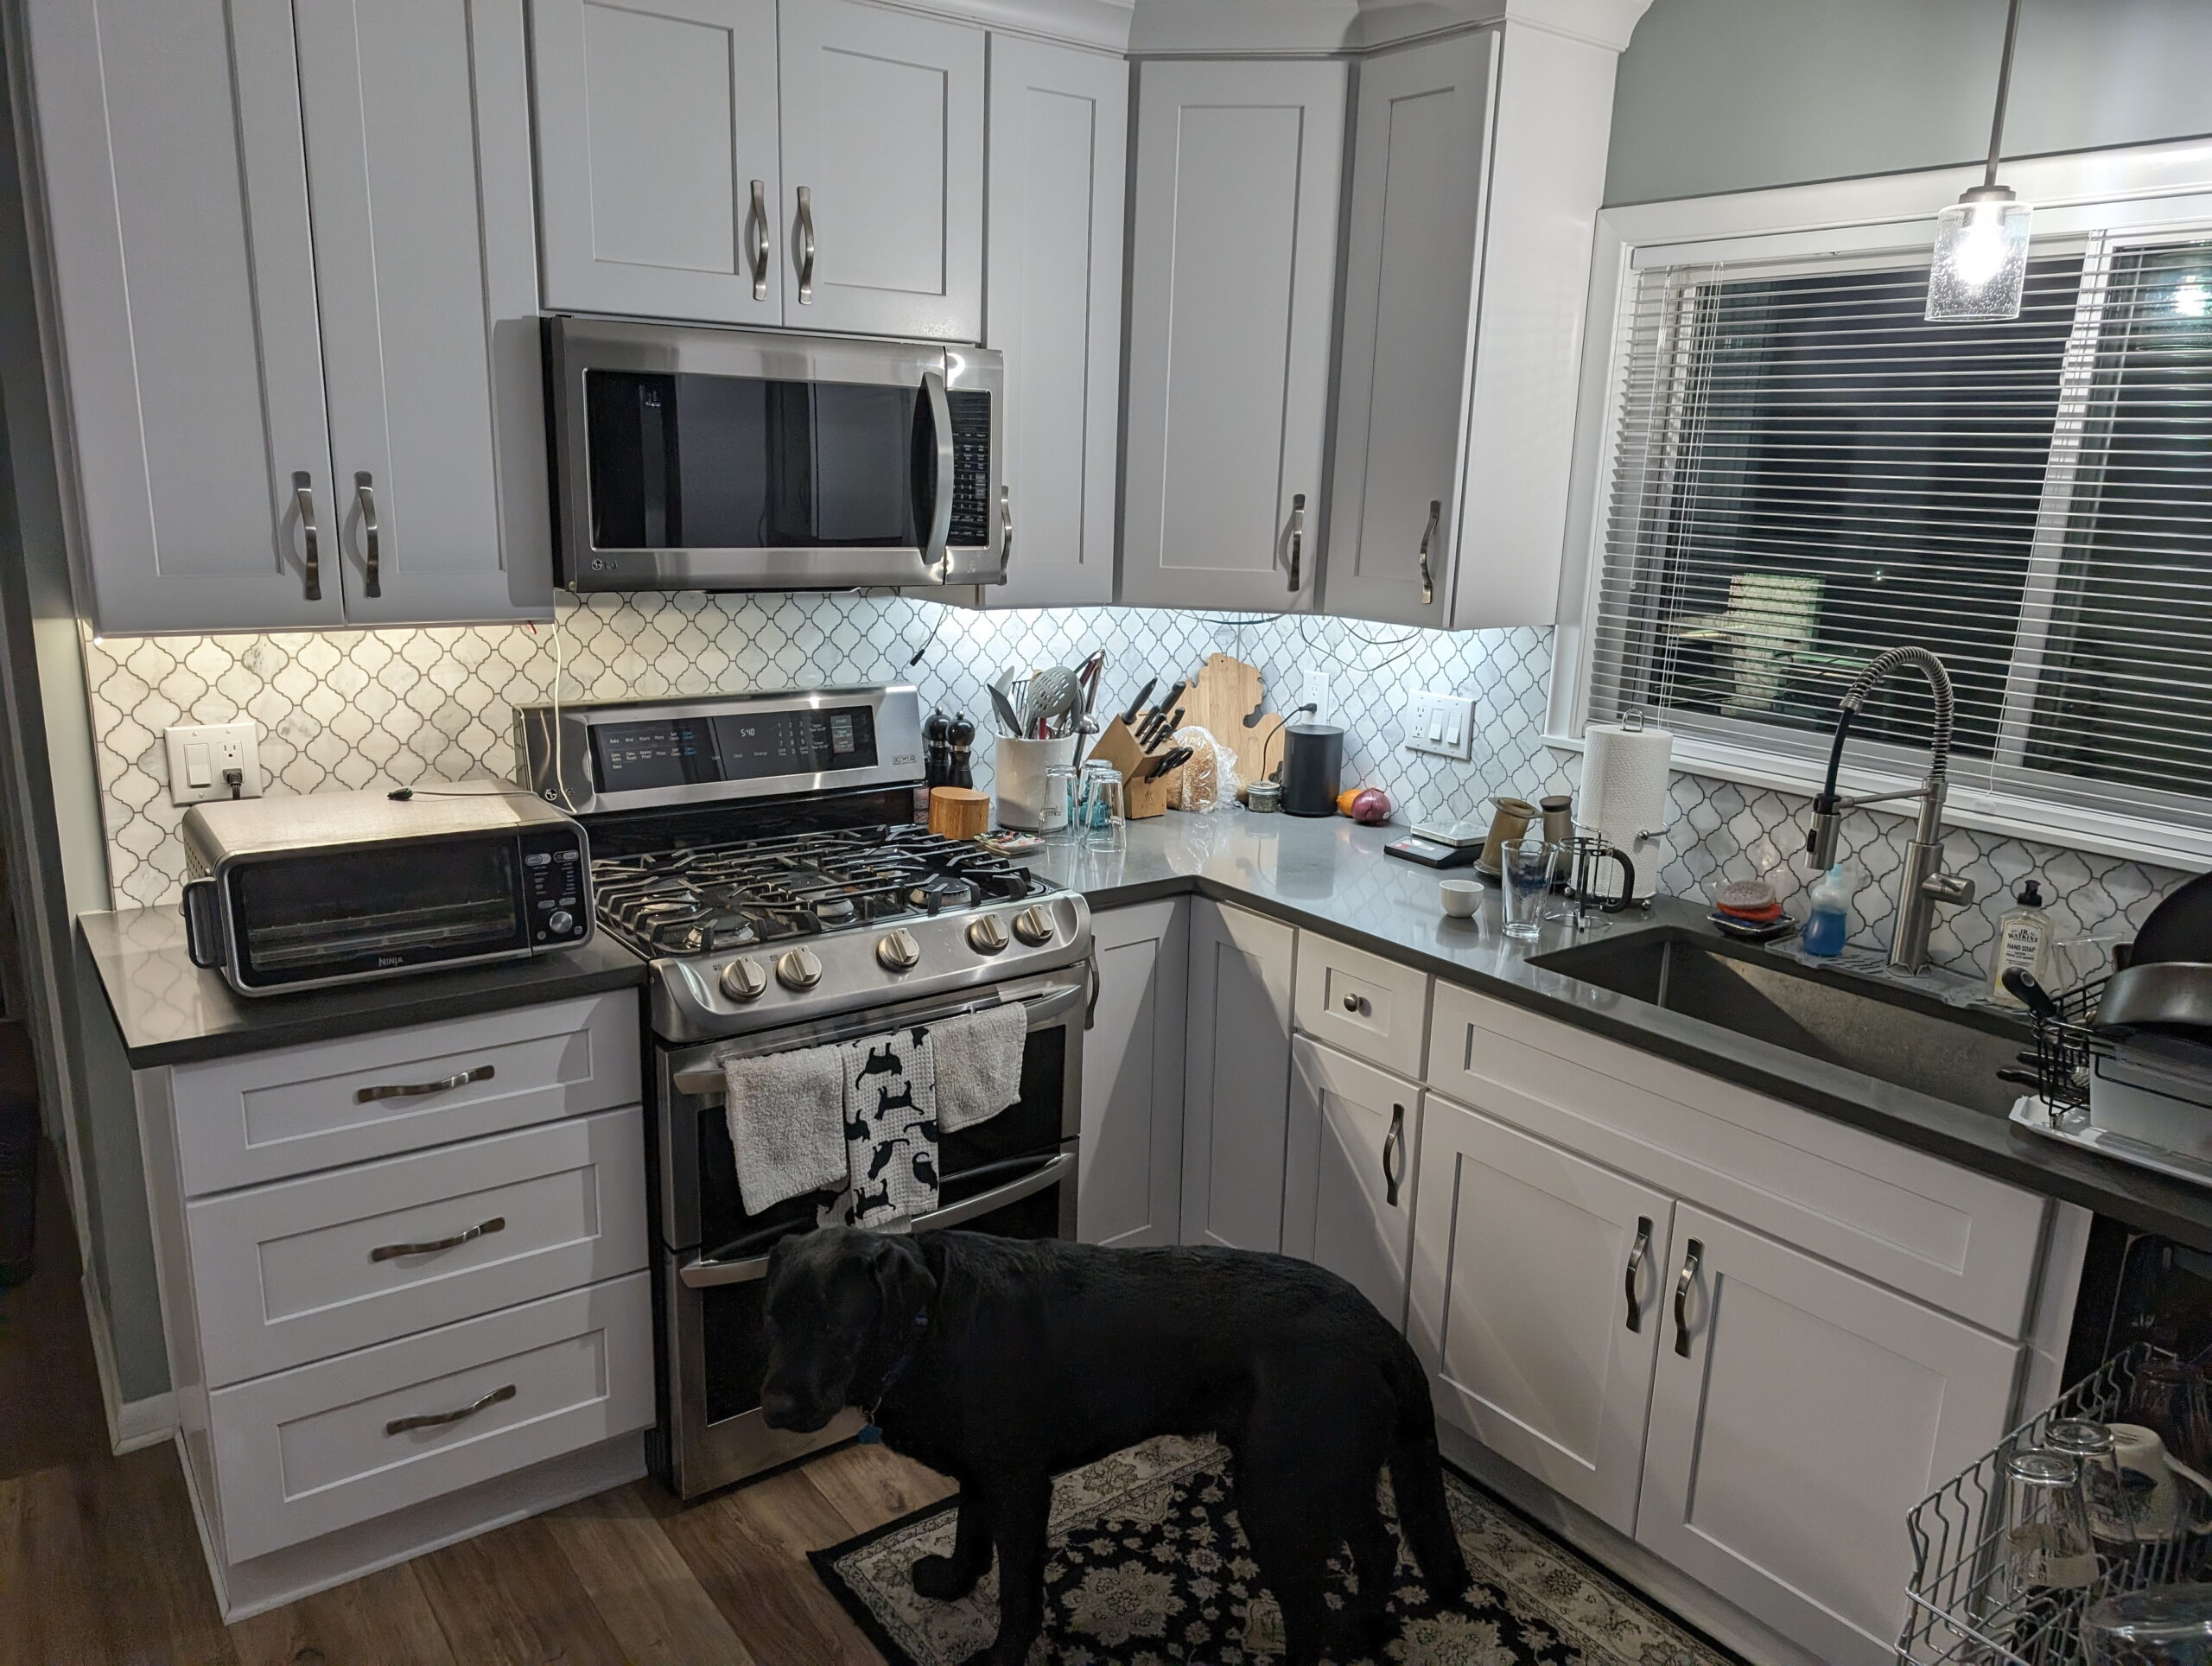
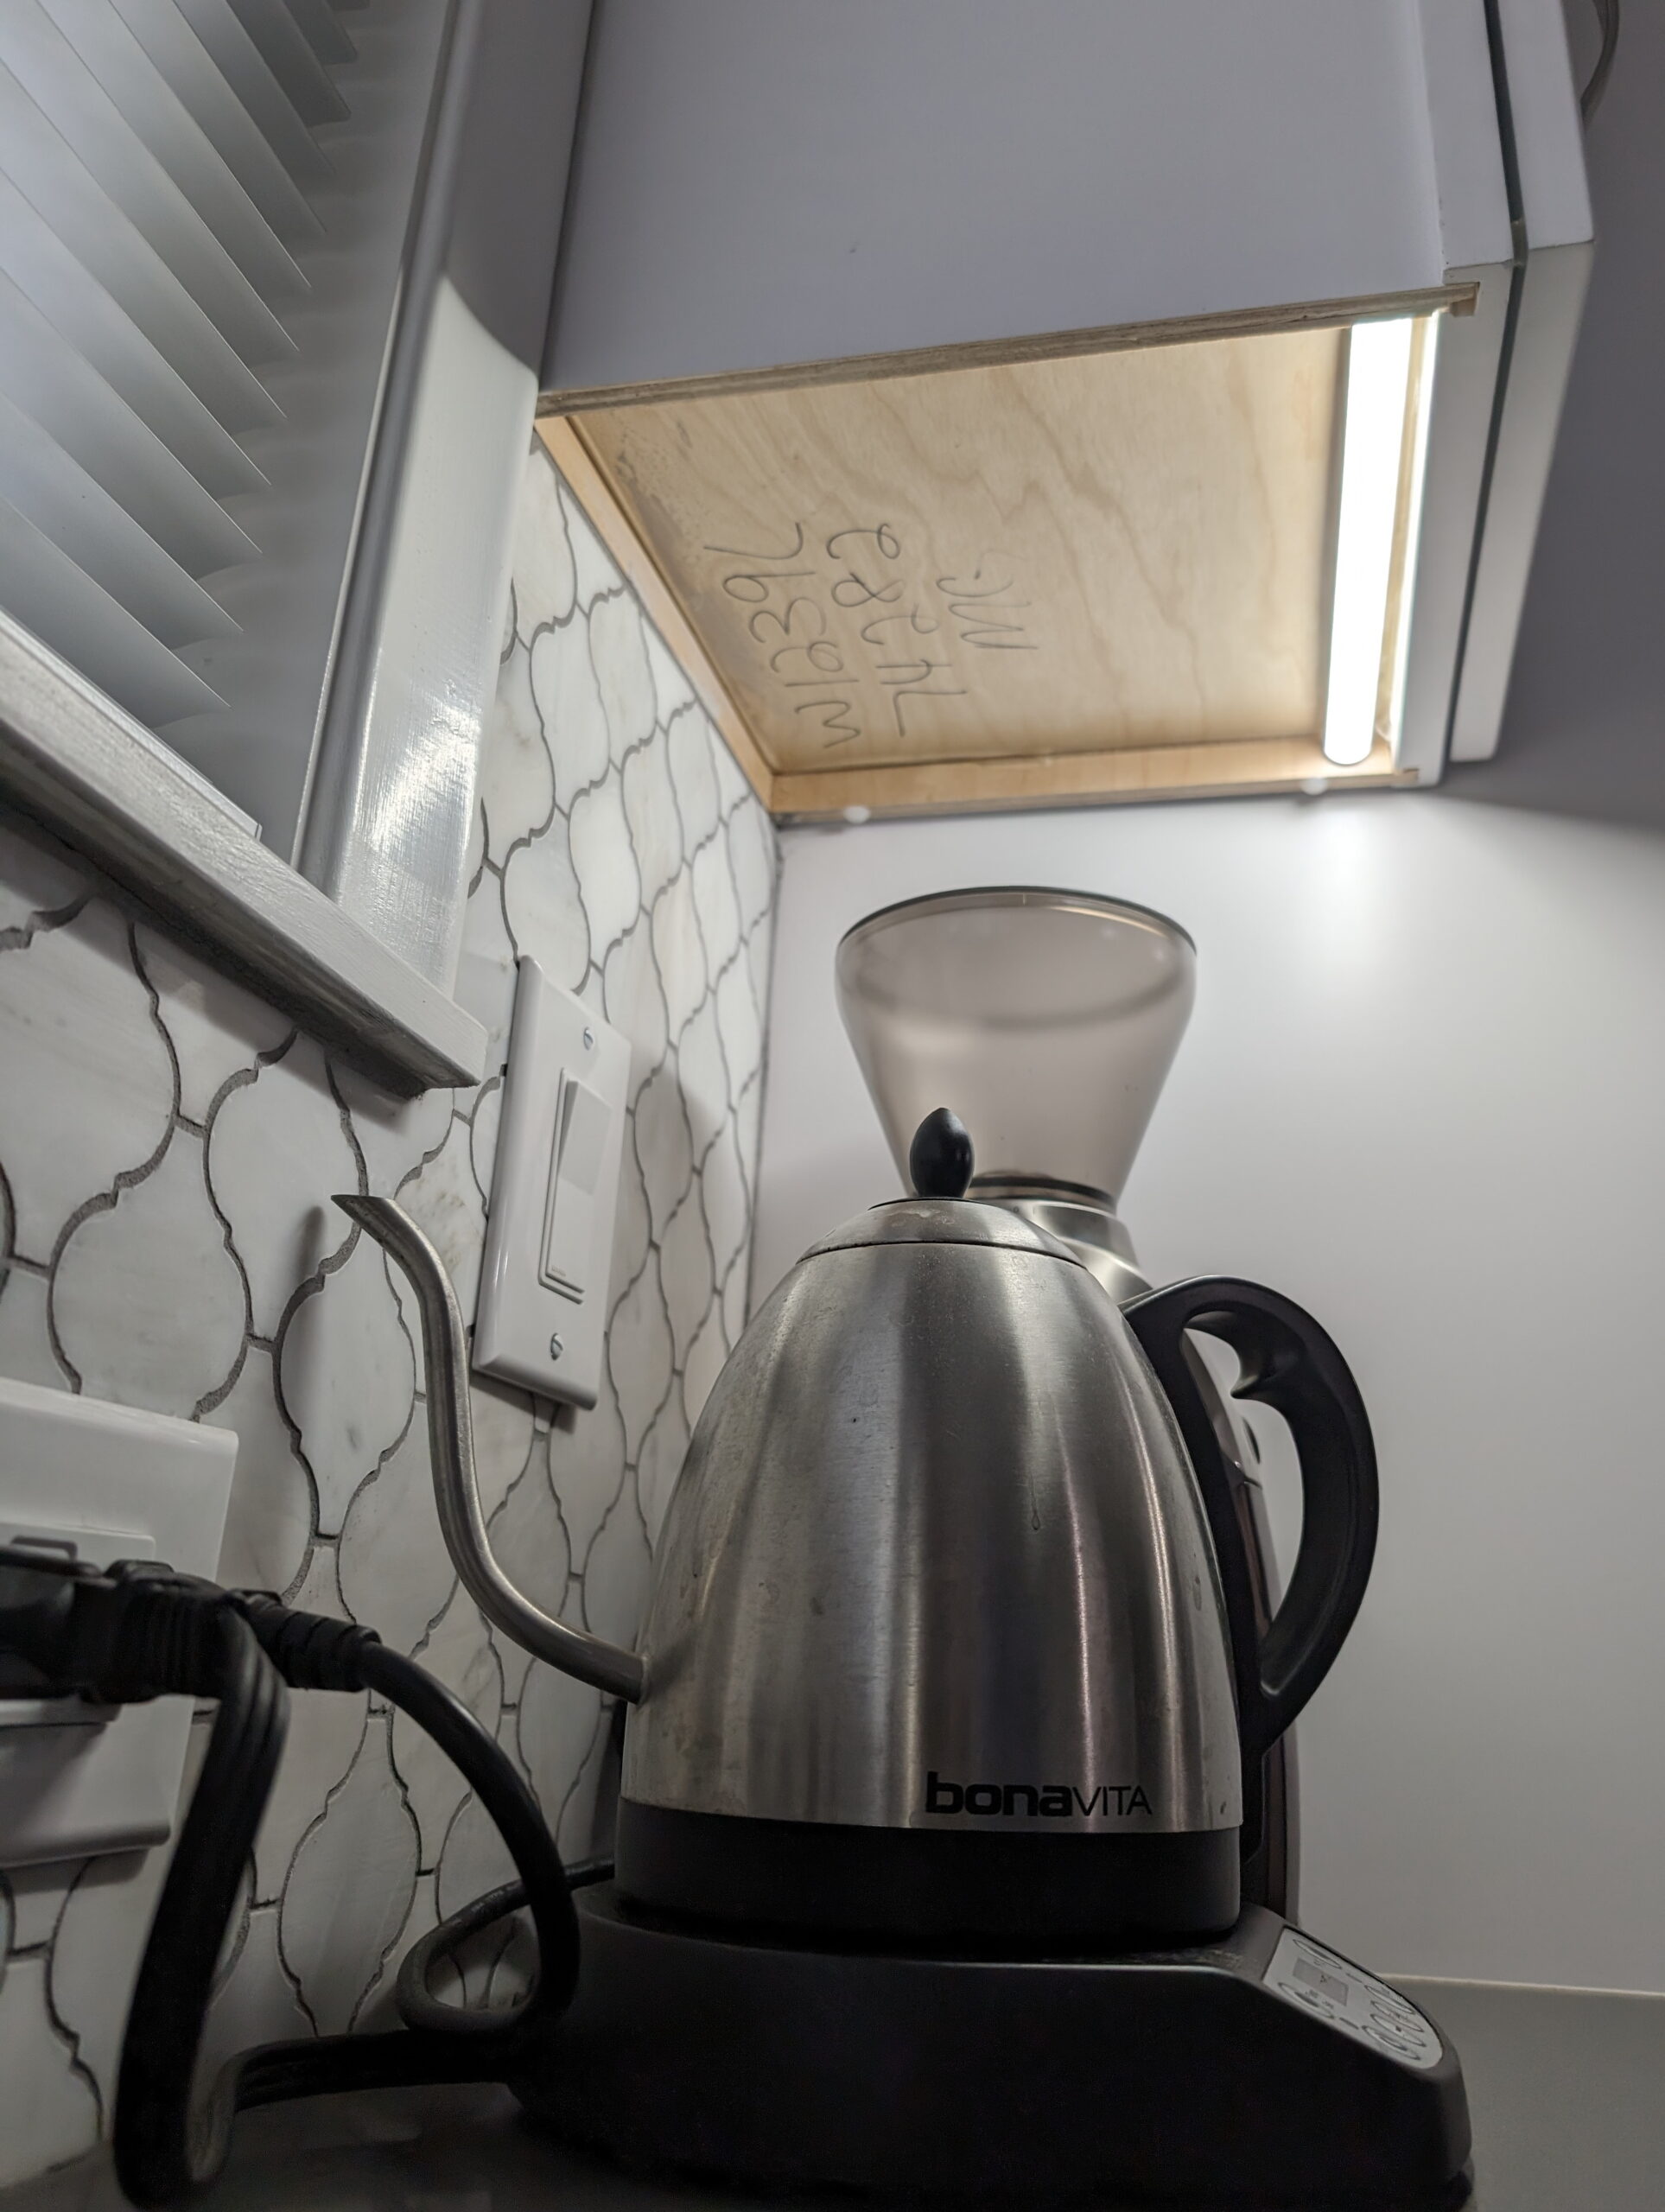
After the kitchen was redone in our new house, the under-cabinet space (where lights would go) was intentionally left unpopulated; something for me to finish later. The electrician had fitted an outlet per cabinet grouping, and a switch on the wall that toggles those outlets, but I’d asked him to skip the lights because I really wasn’t sure what style or color we wanted, nor how I wanted to wire things. Being low voltage with the outlets and switch already fitted, it would be fairly straightforward later on.
This winter, looking for a project, I decided to finally get this done. After talking with my friend Dan and some investigating, I finally got a solution together.
What I ended up doing was sourcing a handful of parts, flexible PCB LED strips, aluminum enclosures, wire, and wall wart power supplies on Amazon, assembling it, and sticking it to the underside of the cabinets. This has worked out well, so I wanted to share what I did.
Our kitchen has three overhead cabinet groupings, the left-most has 22″ of face, the corner has 37″ of face (2x 10″ side cabinets and 1x 17″ center cabinet), and the right-most is a single 10″ cabinet. I had originally thought of ringing the underside of each cabinet with LED strip lights, but after some consideration I decided to do a single light assembly along the front edge of each cabinet, pointing down, with a wide-angle diffuser.
In the kitchen we have daylight (5000K) colored lights, but as the under-cabinet lighting is likely to be used as more of a night or secondary light, I figured on ~4000K lights. After buying strips of both 4000K and 6000K of to test, we ended up with some strips listed as Cool White 6000K. This matches pretty well whenever the overhead lights are on and it’s bright to cloudy day outside, and likely because of the grey-ish countertops it still looks fine when they are the only lights on.
It would have been possible to use a different type of strip that has multiple color temperature white LEDs and selectable color temperature, but doing this requires a controller external to adjust the light strips, which would have added around $60 just for the controllers, plus another $10 or so in LEDs, a remote control, more space taken up in the cabinets. This setup, with fixed color strips, is just AC-DC adapters plugged into the existing mains outlets, and the LED strips connected to the adapters. If we find that this isn’t good I may eventually go to controllers, but for now this is working nicely.
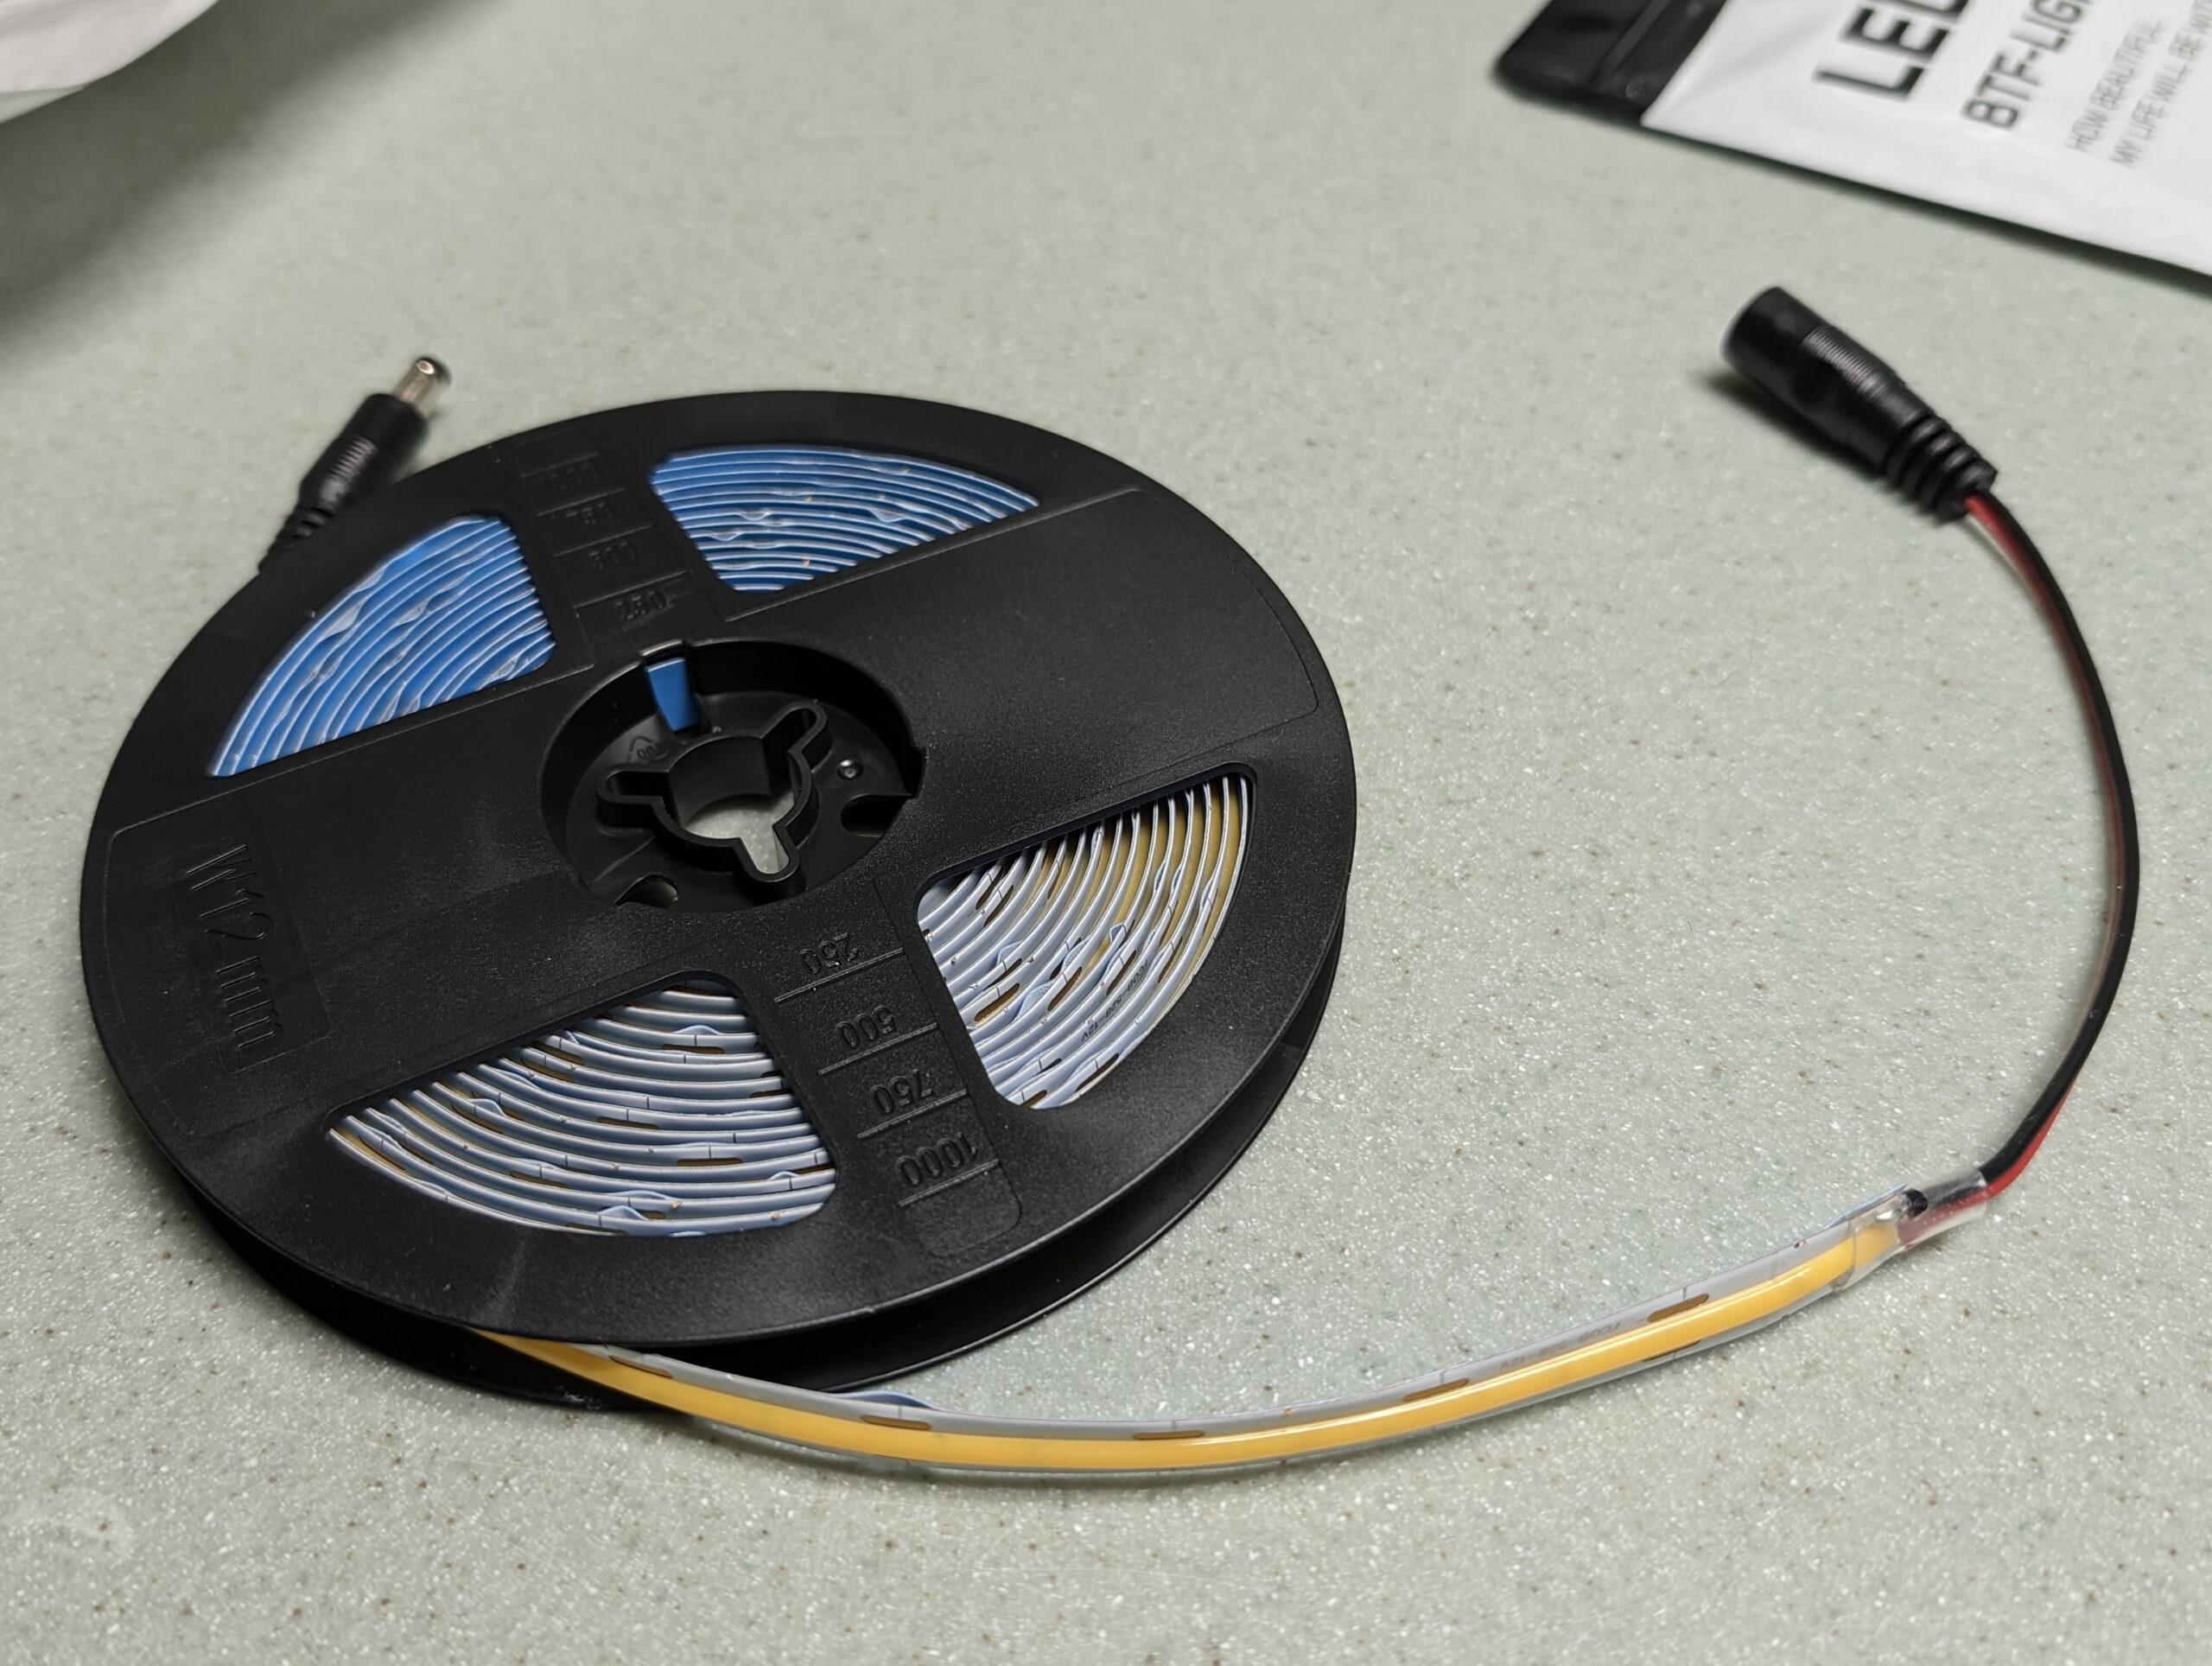
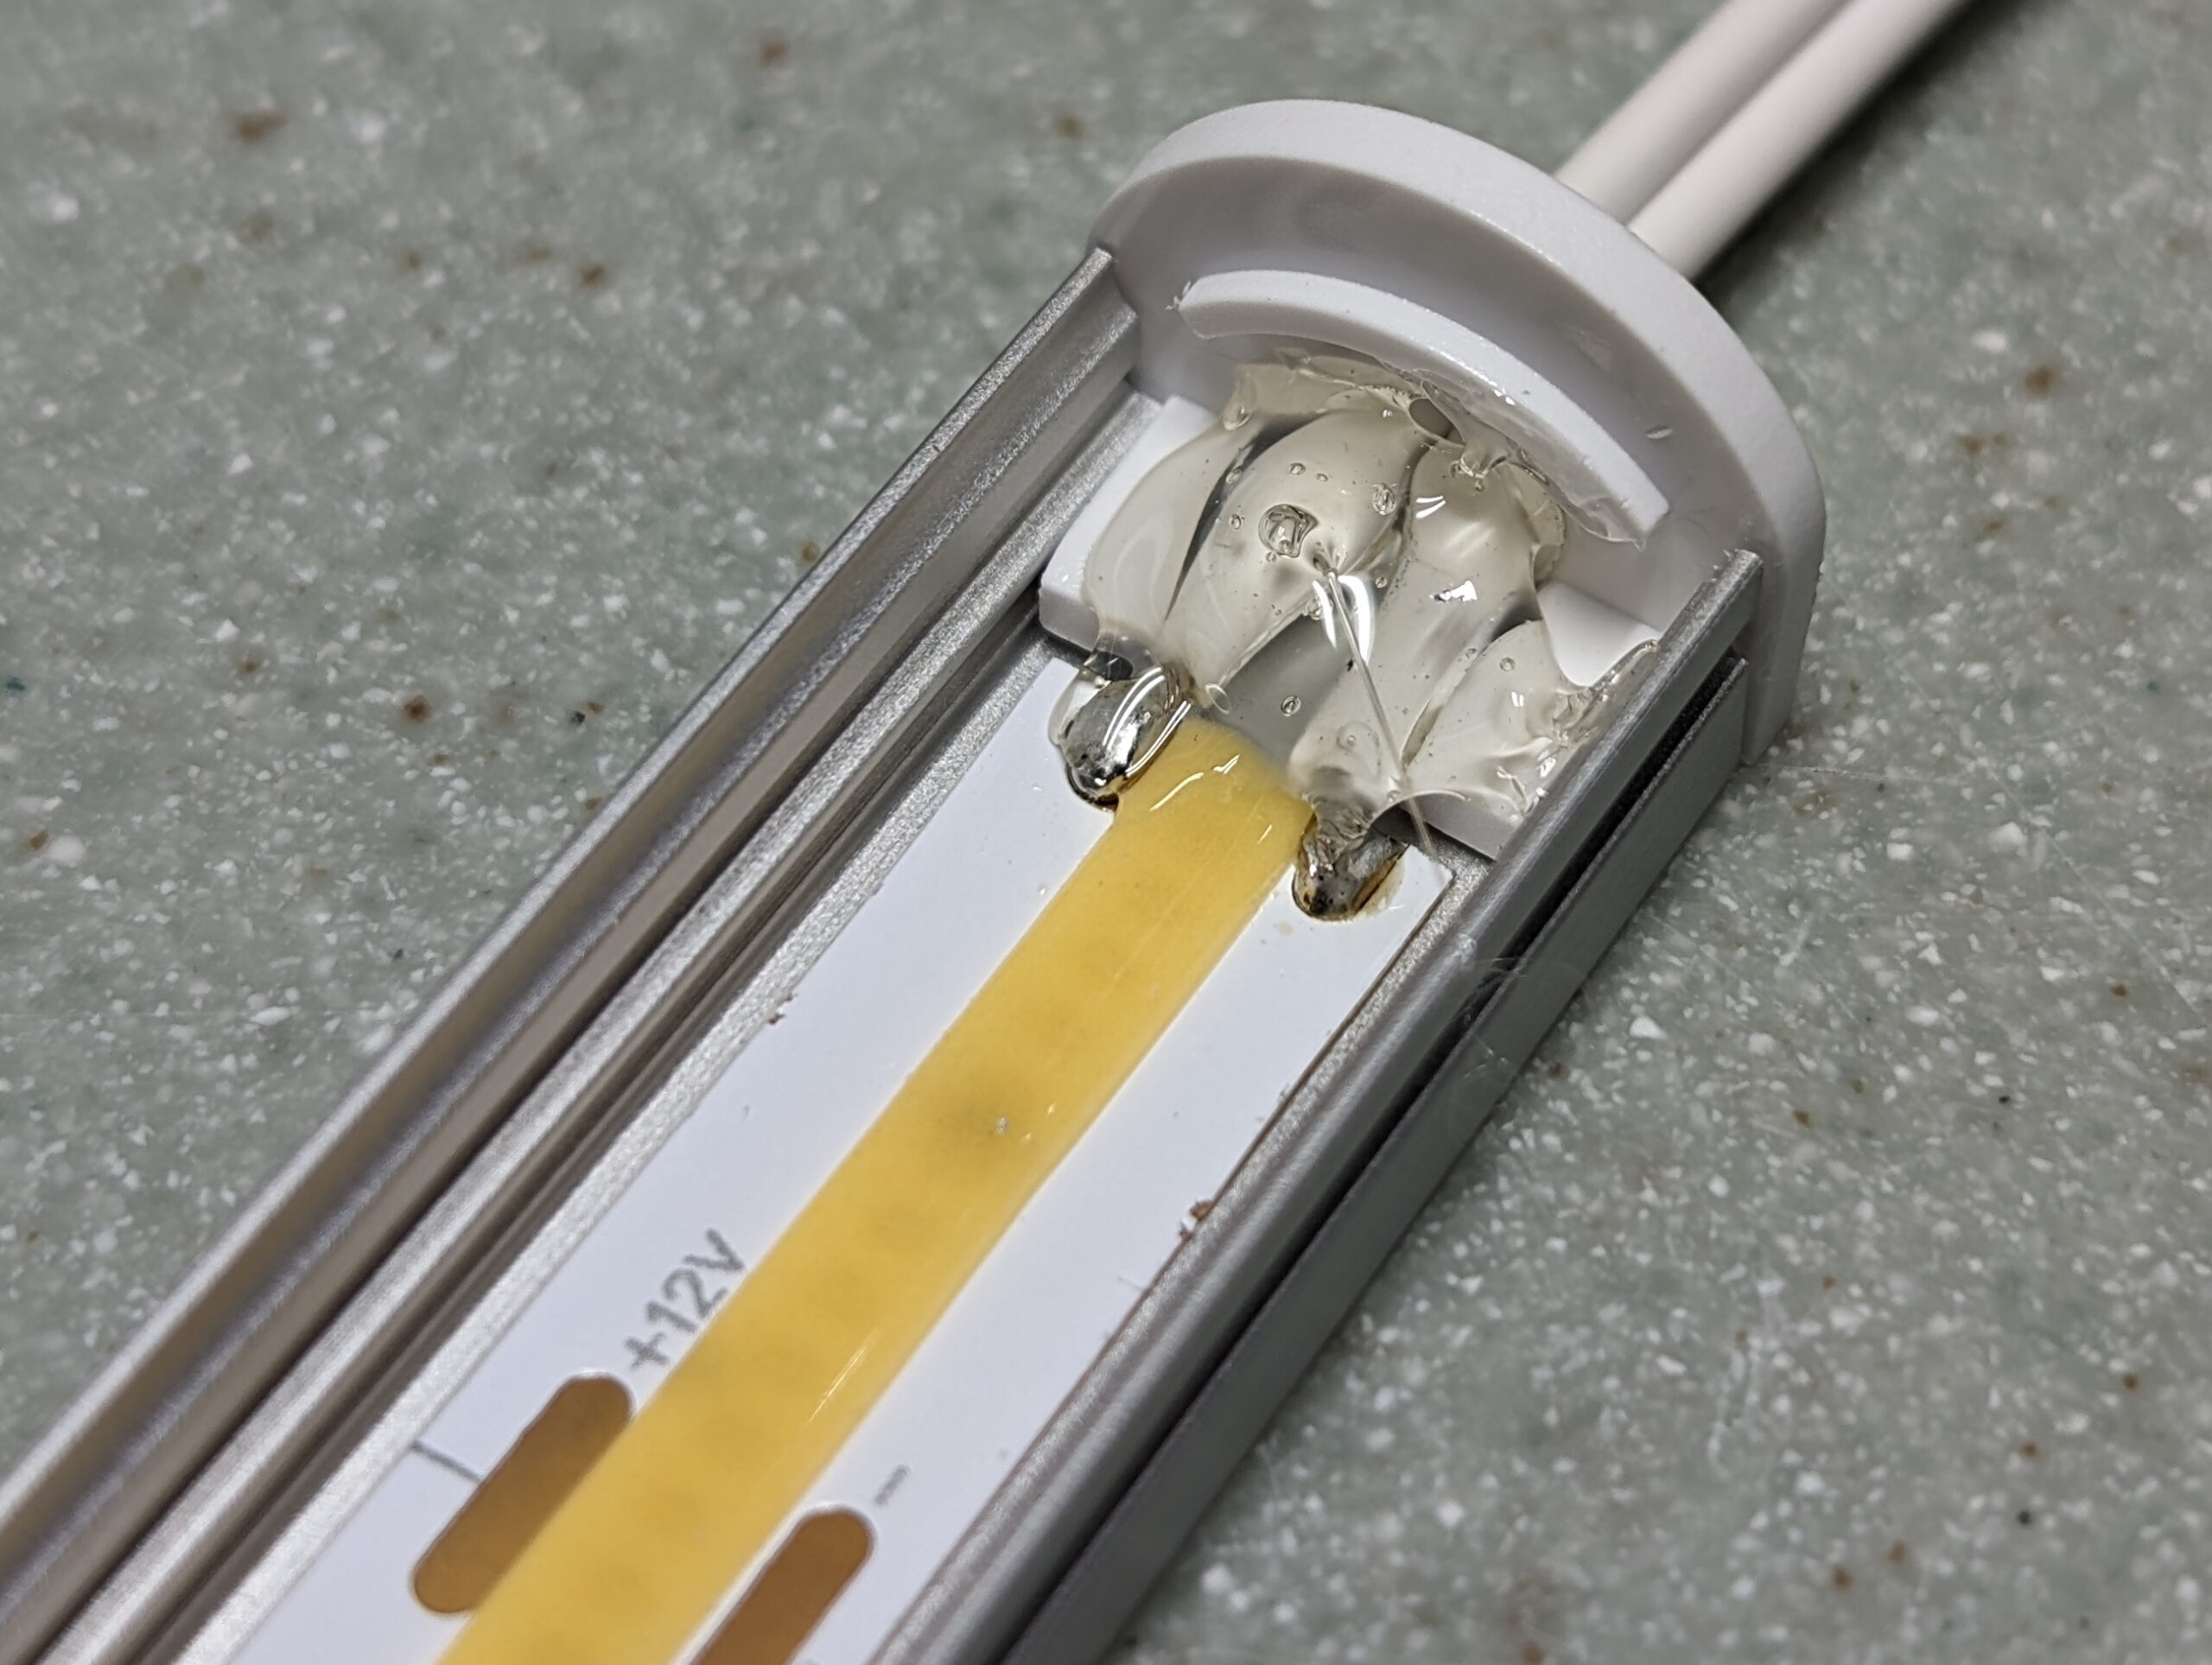
For the LED strips I chose FCOB LED strips from BTF-LIGHTING, 528 LEDs per meter, in 12V. With the heavy silicone coating over the LED chips it makes for a fairly even light. I chose the 12V variant of the lights because they have cut-points 22.83mm, which made it easy to make maximize the amount of LED strip under each cabinet. If the runs were longer it would have been wise to choose 24V to decrease the amperage, but at 14 watts per meter (W/m), the longest light segment will only take ~1.1 amps (A) so this should be fine. (Amazon Link)
For hookup wire I bought a simple coil of white 20 gauge copper clad aluminum (CCA) wire, again from Amazon. I already had some hookup wire, but I wanted white to blend in nicely with the cabinets. (Amazon Link)
For power supplies I picked up a basic five-pack of 12VDC / 2A wall warts. While I only needed three, the cost for five was $7 more than buying three, and since I’ll have LED strip left over and will likely build some more arrays for elsewhere in the house, I wanted spares. They also happened to come with (very cheap) barrel to screw terminal adapters that worked well enough. (Amazon Link)
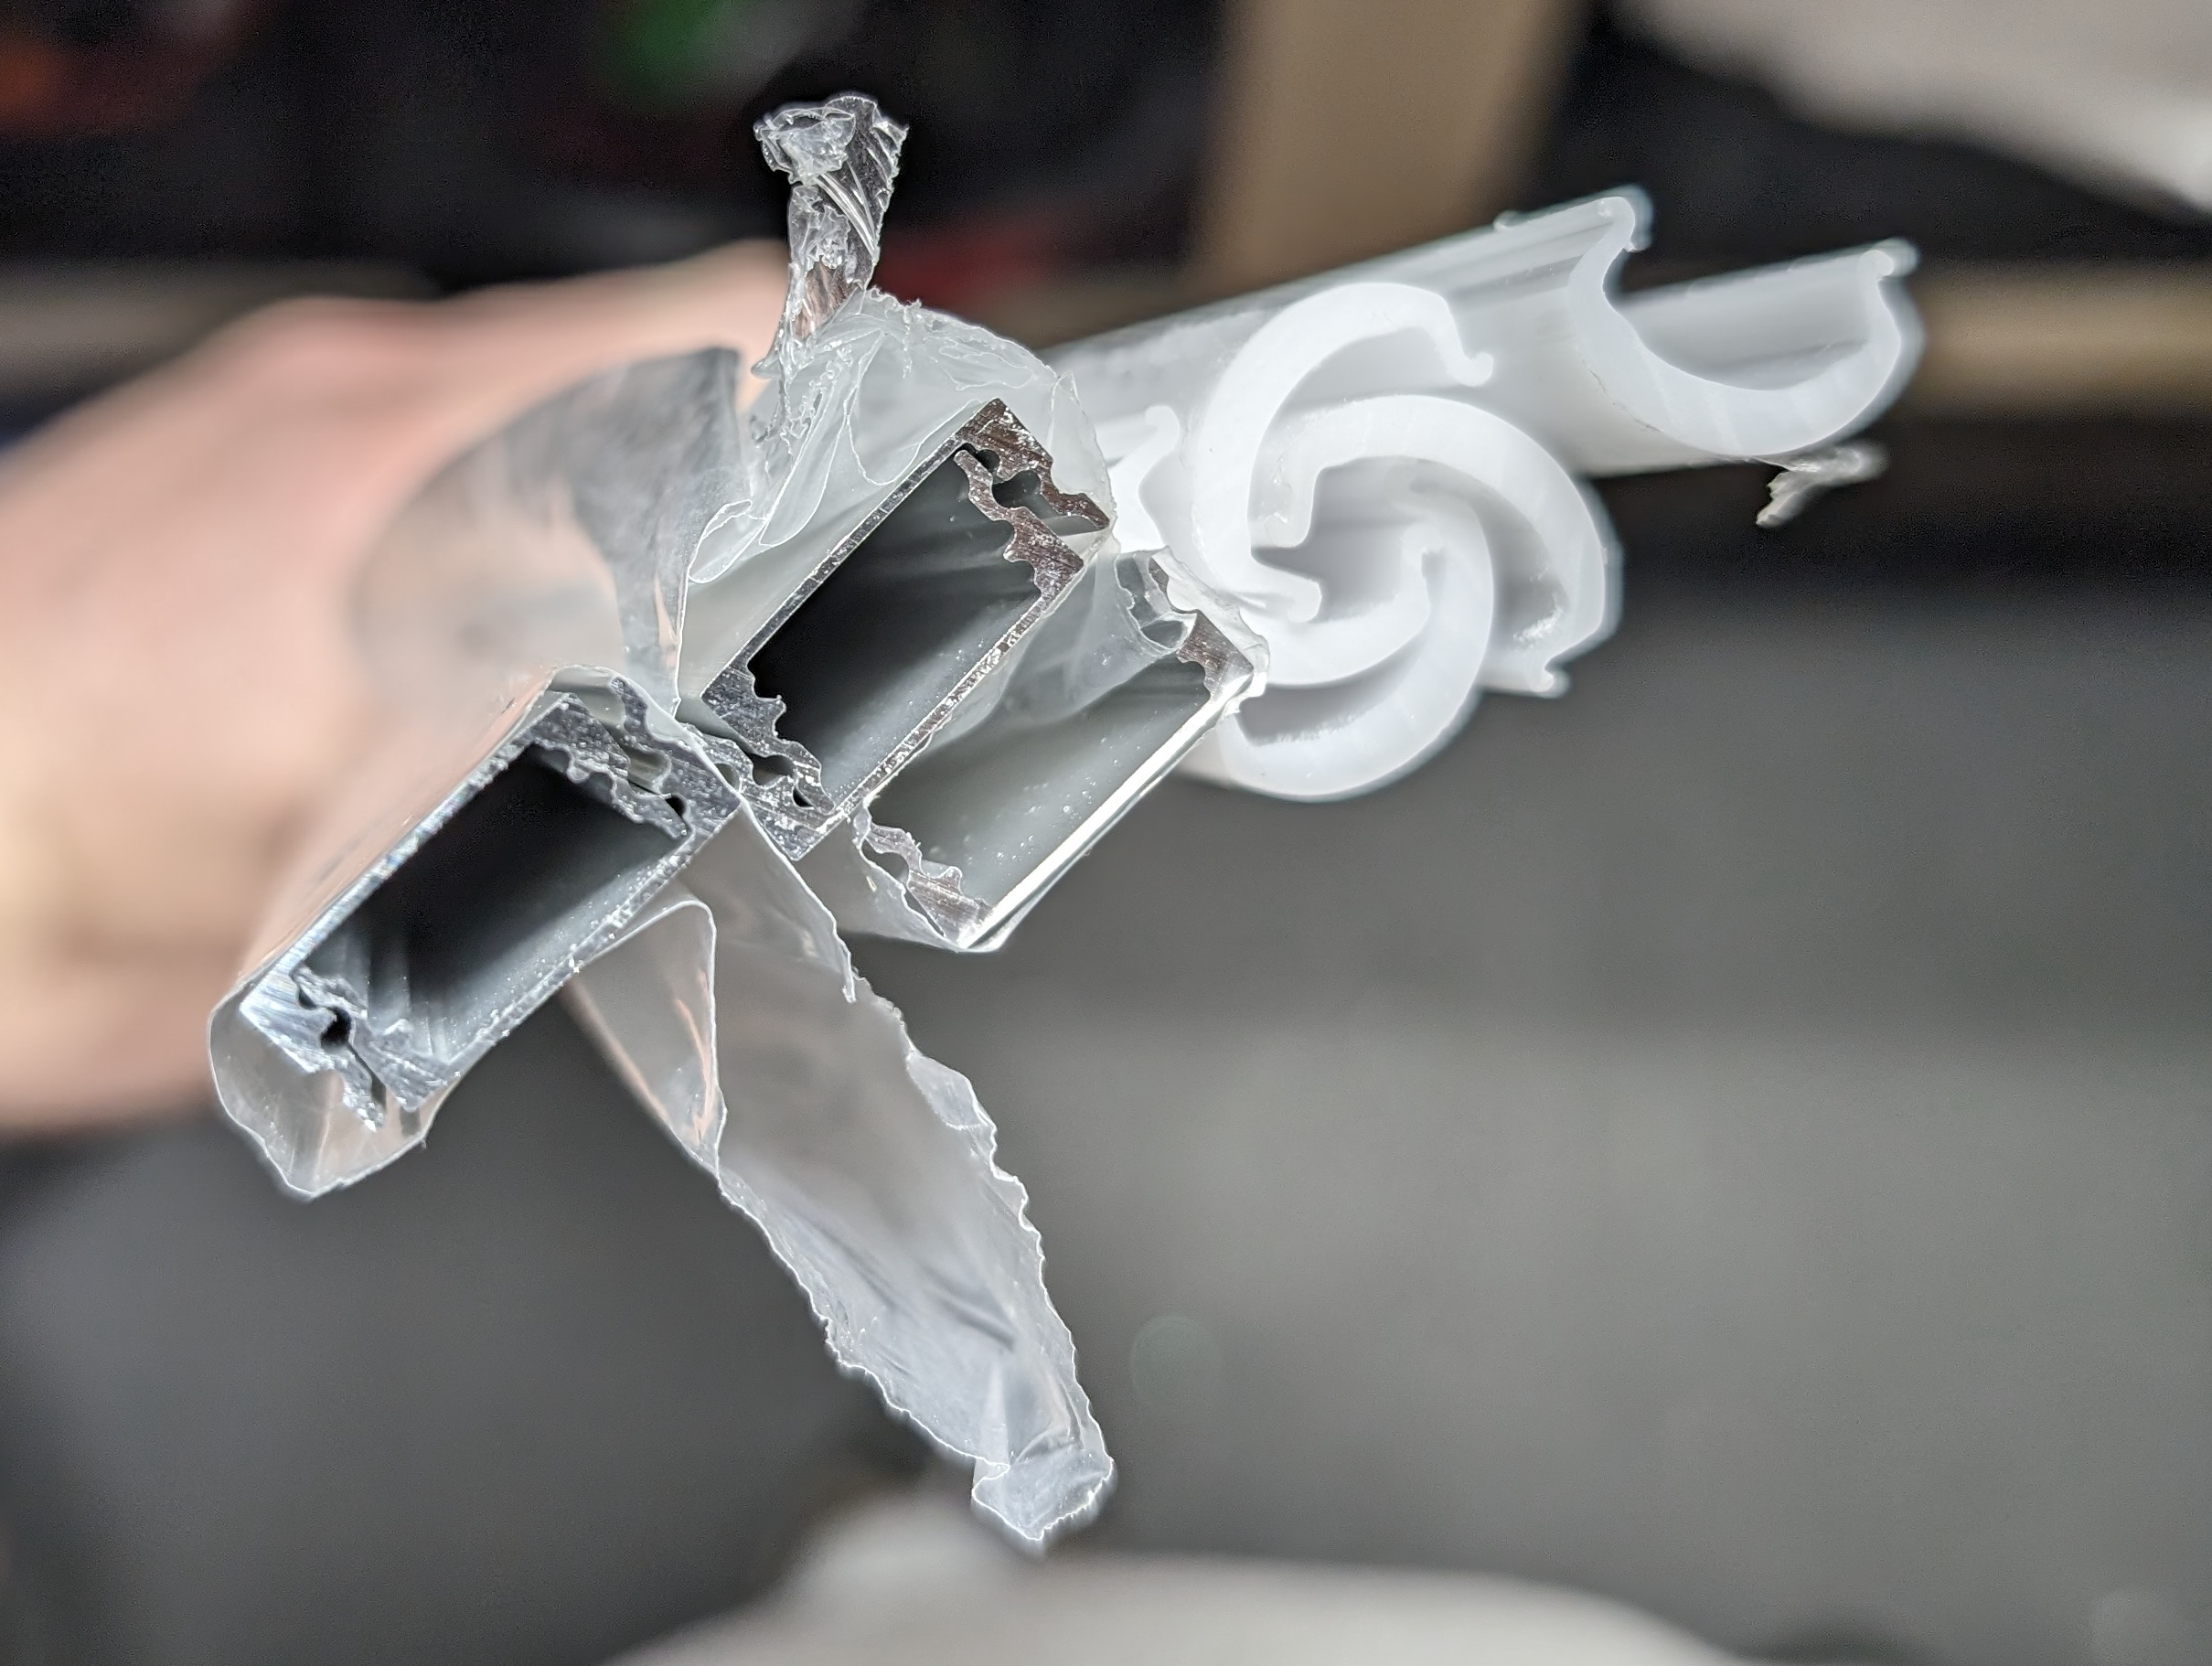
Initially I was going to mount the LED strips directly to the cabinets, but Dan convinced me that even while out of sight it would look much better in an enclosure, and he was right. The project feels properly finished this way and it looks tidy. The enclosures also add additional diffusion, making the light look smoother and more even and overall better. For this I chose some 1m long pieces of aluminum channel with a 60° milky white domed cover, then cut it to width for each cabinet section. (Amazon Link)
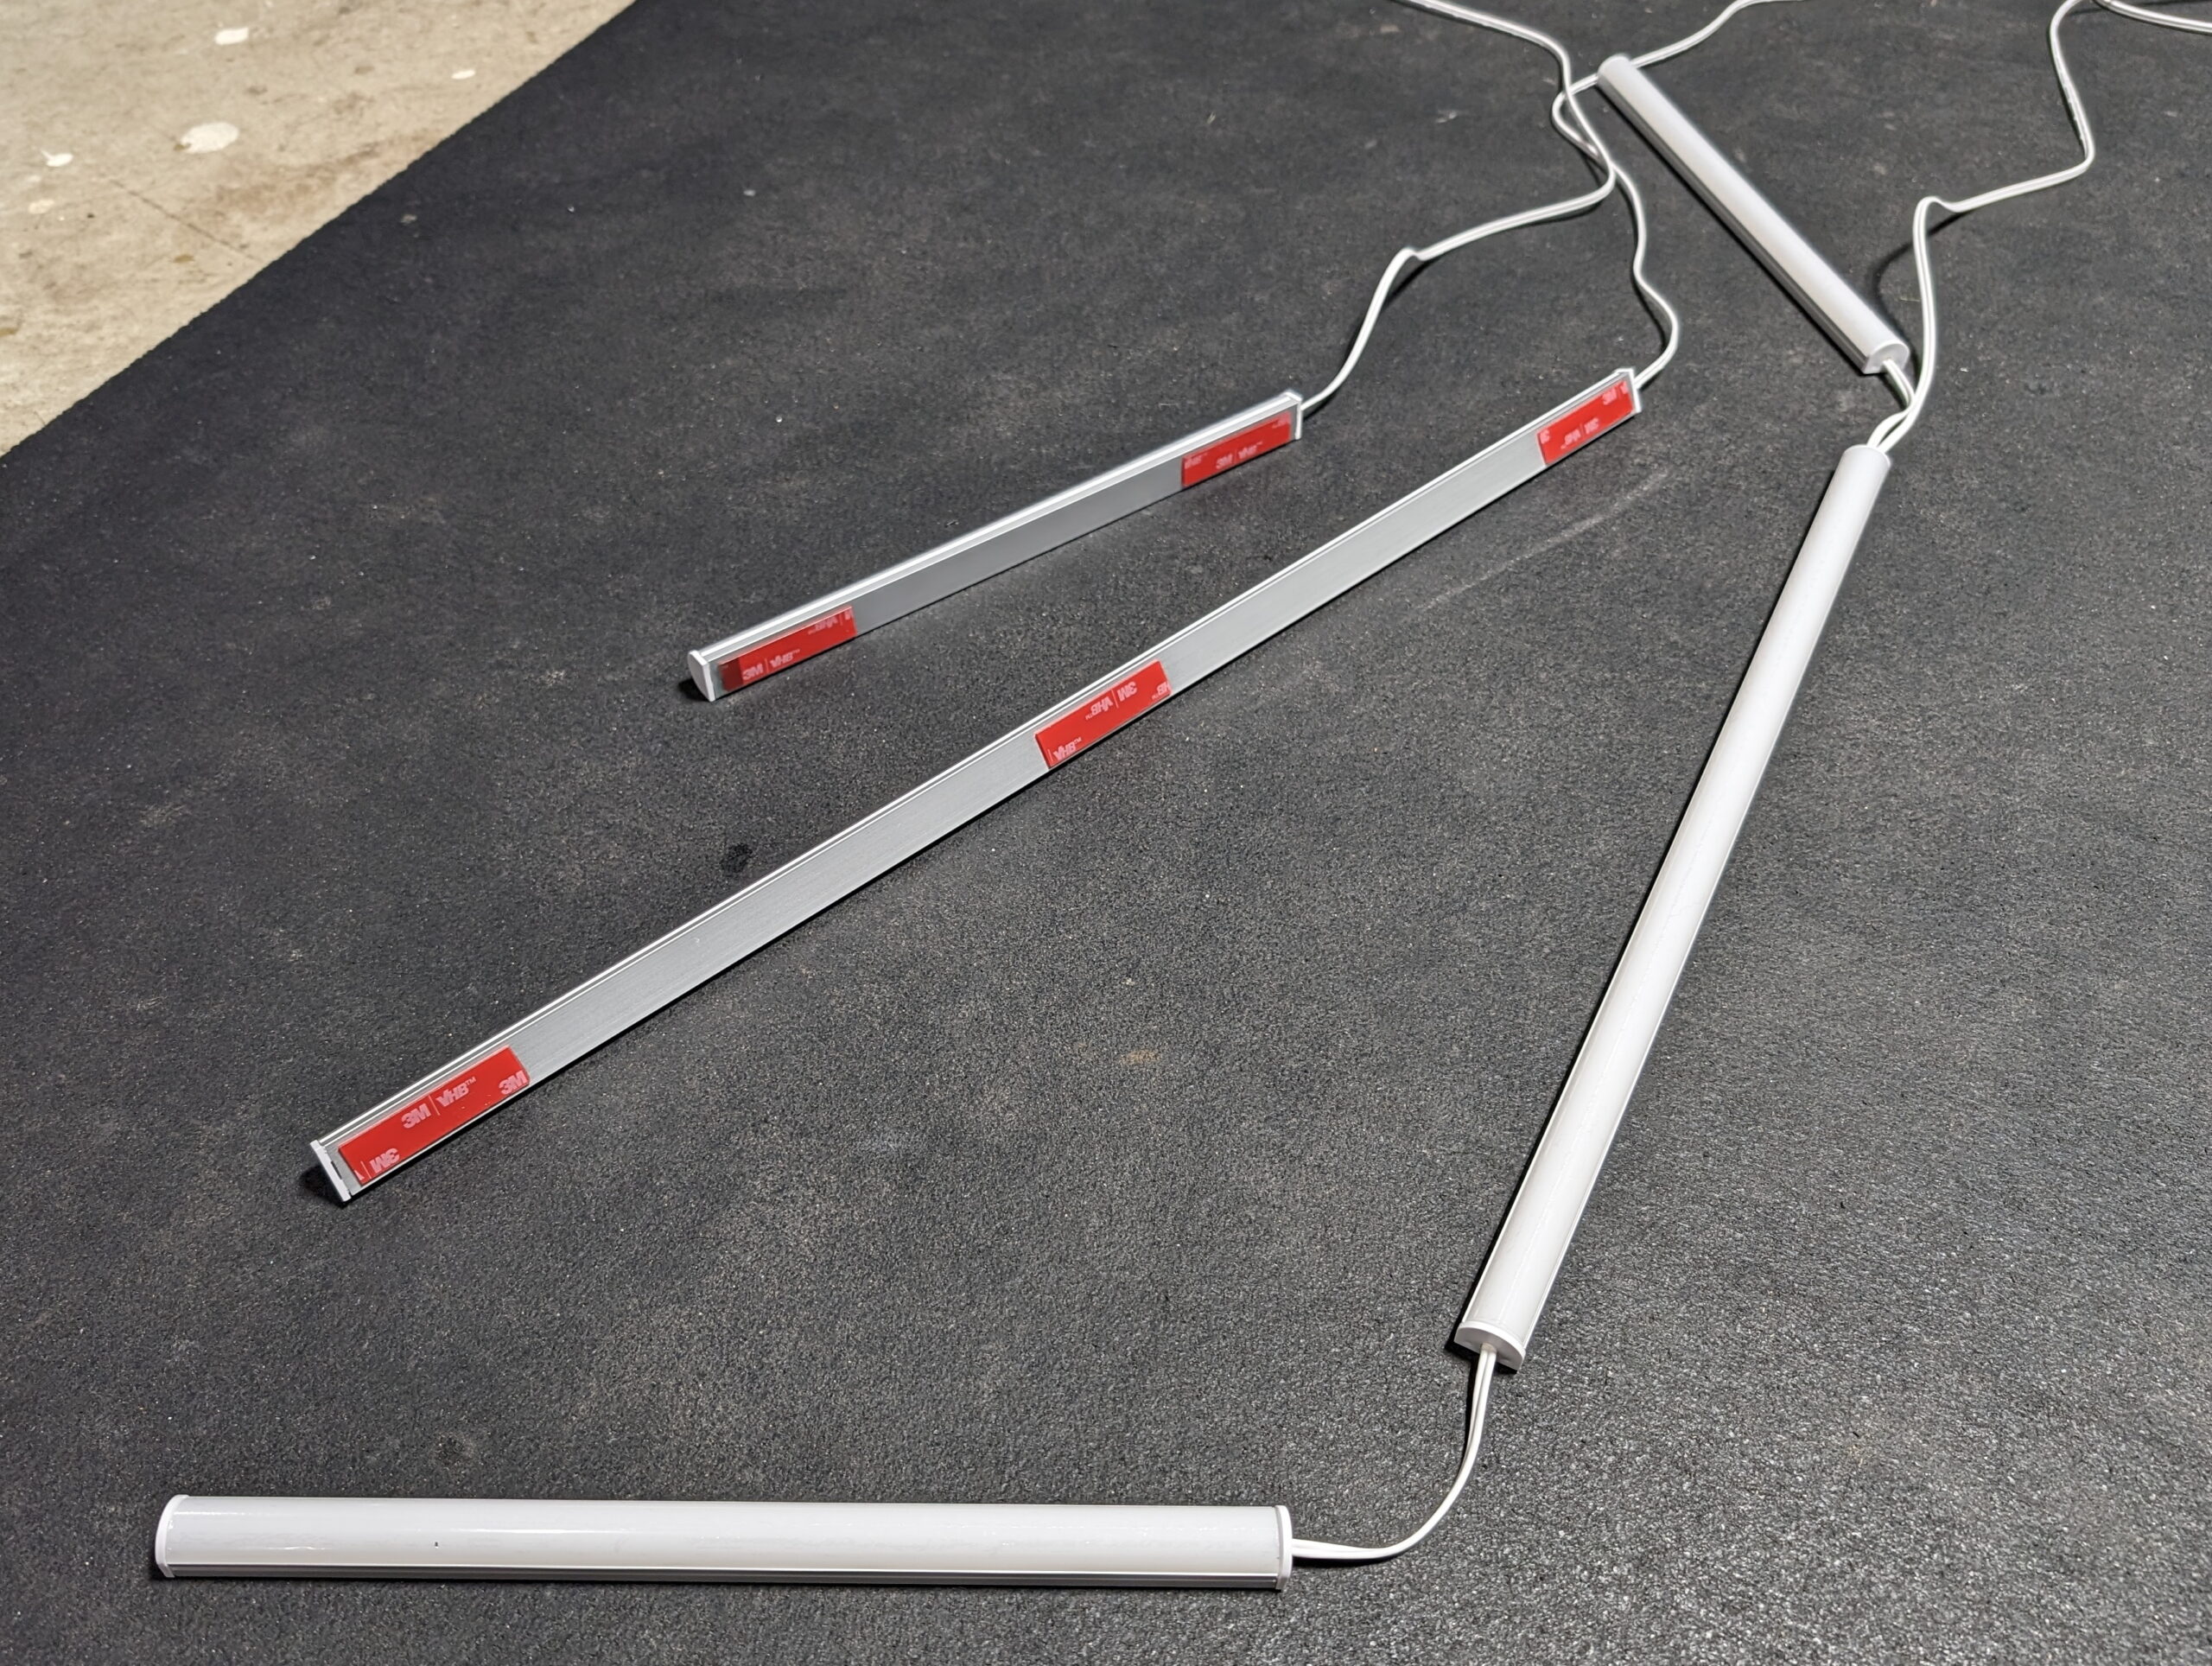
The light enclosures include screws and mounting clips, but I instead opted for tape, and picked up a 5 yard roll of 3M VHB 4910, which is specifically described as being good for Polycarbonate, Aluminum, and Acrylic/Polyurethane Paint; perfect for sticking these housings to the underside of cabinets. (Amazon Link)
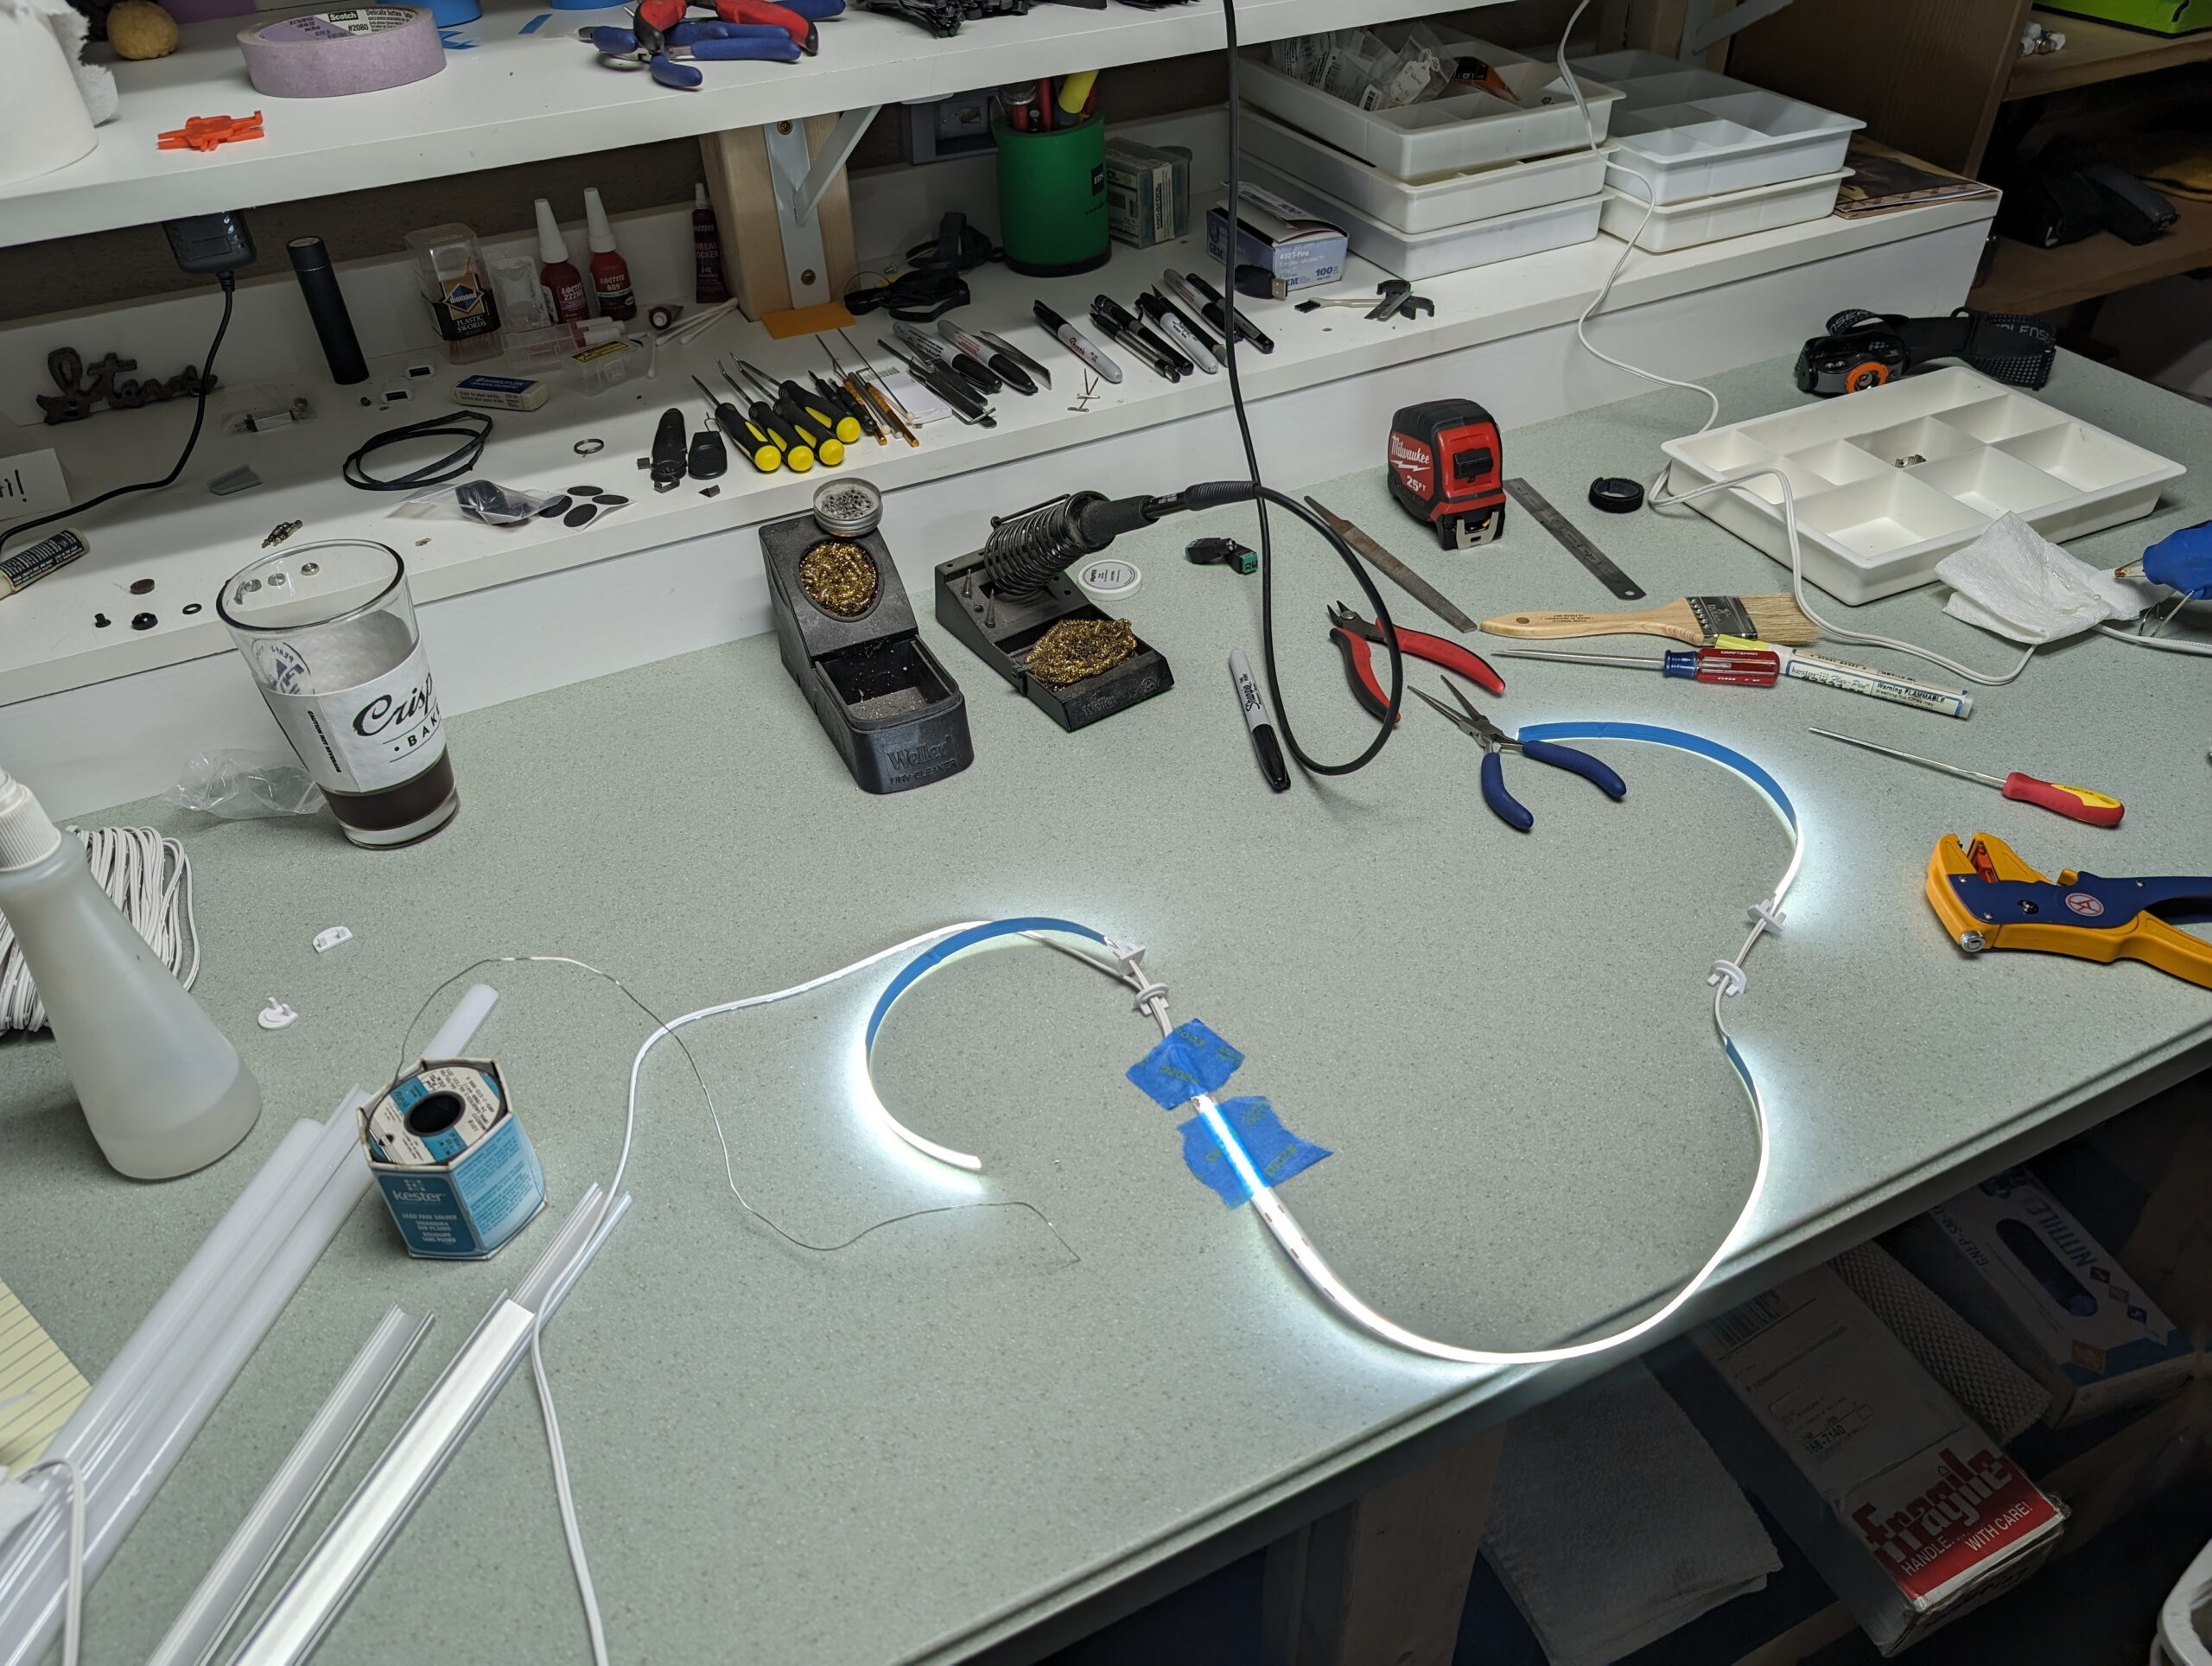
Assembly was done by first determining the width of the housings, so I went with even-inch sizes that are just slightly narrower than the underside of the cabinet. This resulted in five pieces: 1x 22″, 1x 16-1/2″, and 3x 10⁻¹/4″. With the cover snapped into the aluminum channel it all cut clean and easily using a circular miter saw with a fine tooth carbide blade.
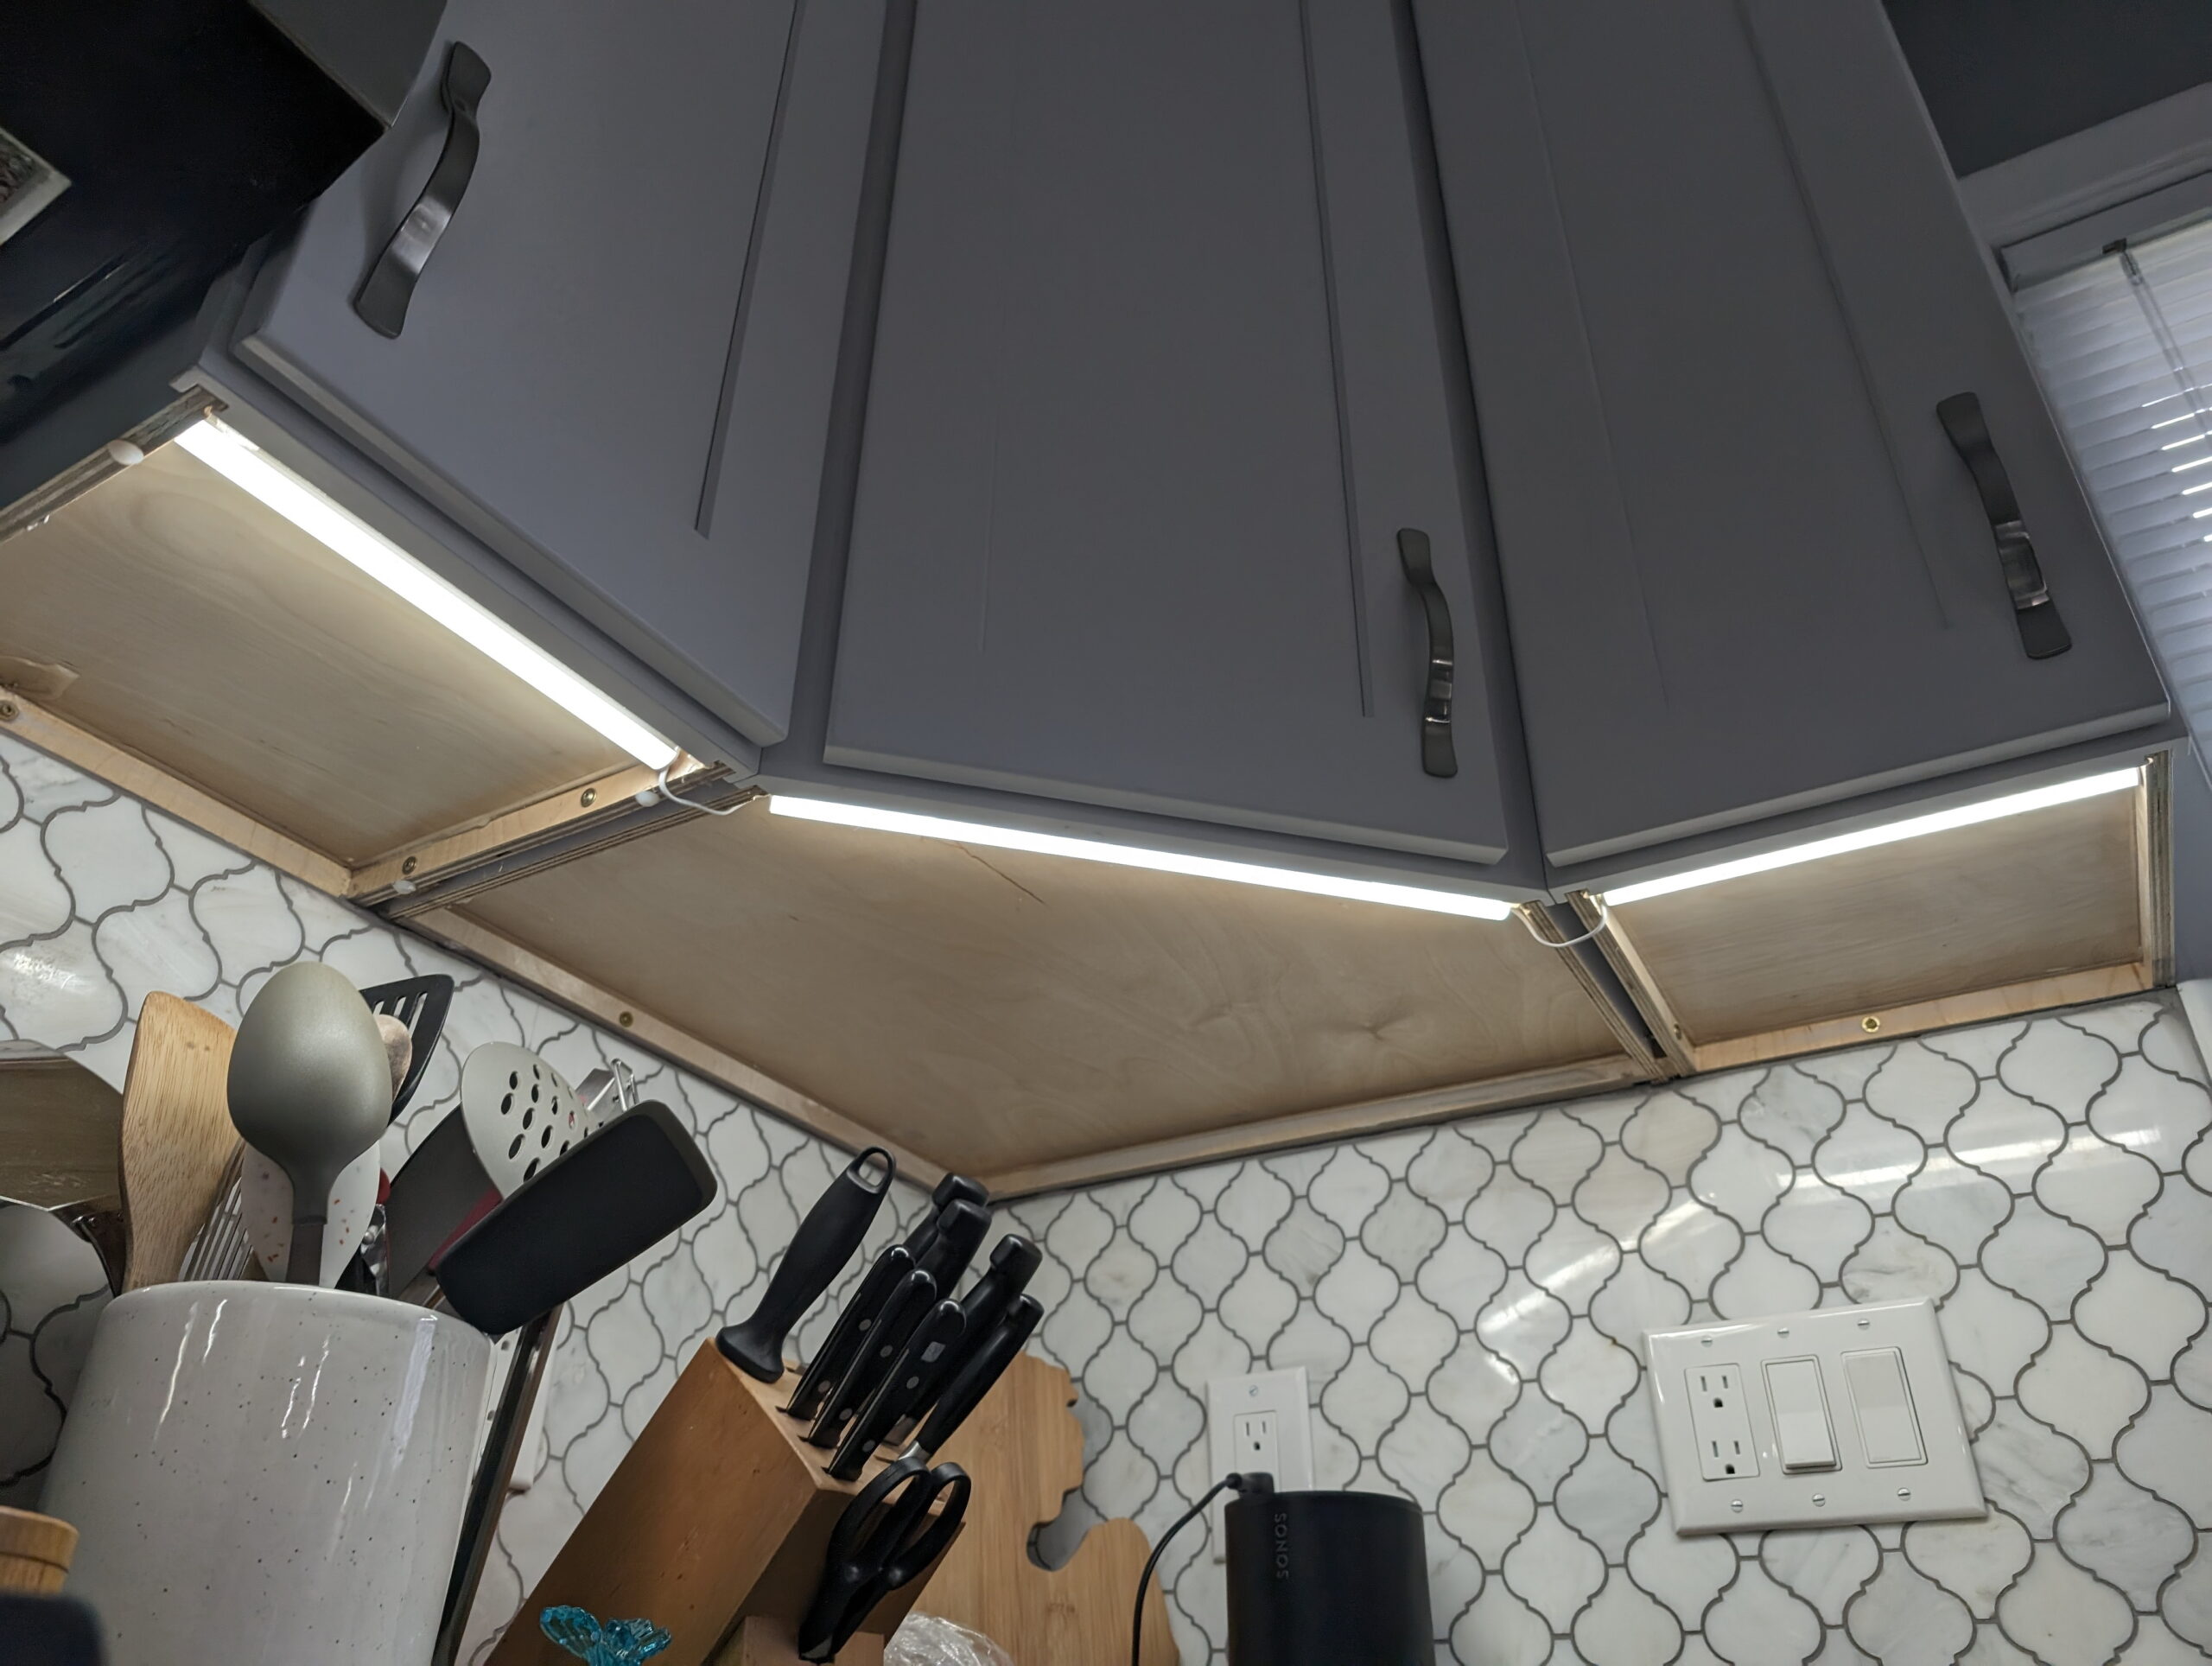
I then cut LED strip to the next step shorter than the housing, soldered the supply wire, stuck the strip into the housing via it’s self-adhesive backing, fitted the endcaps, added hot-melt glue for strain relief at the solder area, and snapped the face on. For the corner cabinet lights I wired it in a T arrangement, with the two sides being fed from the center, and then a wire out of the center to head up to the cabinet. This arrangement was because the corner cabinet holds the outlet near the back left side and it minimizes wire distance. It may have also helped with voltage drop on a long-ish strip of LEDs, but I’m not sure the ~30″ total would be enough to actually cause a problem.
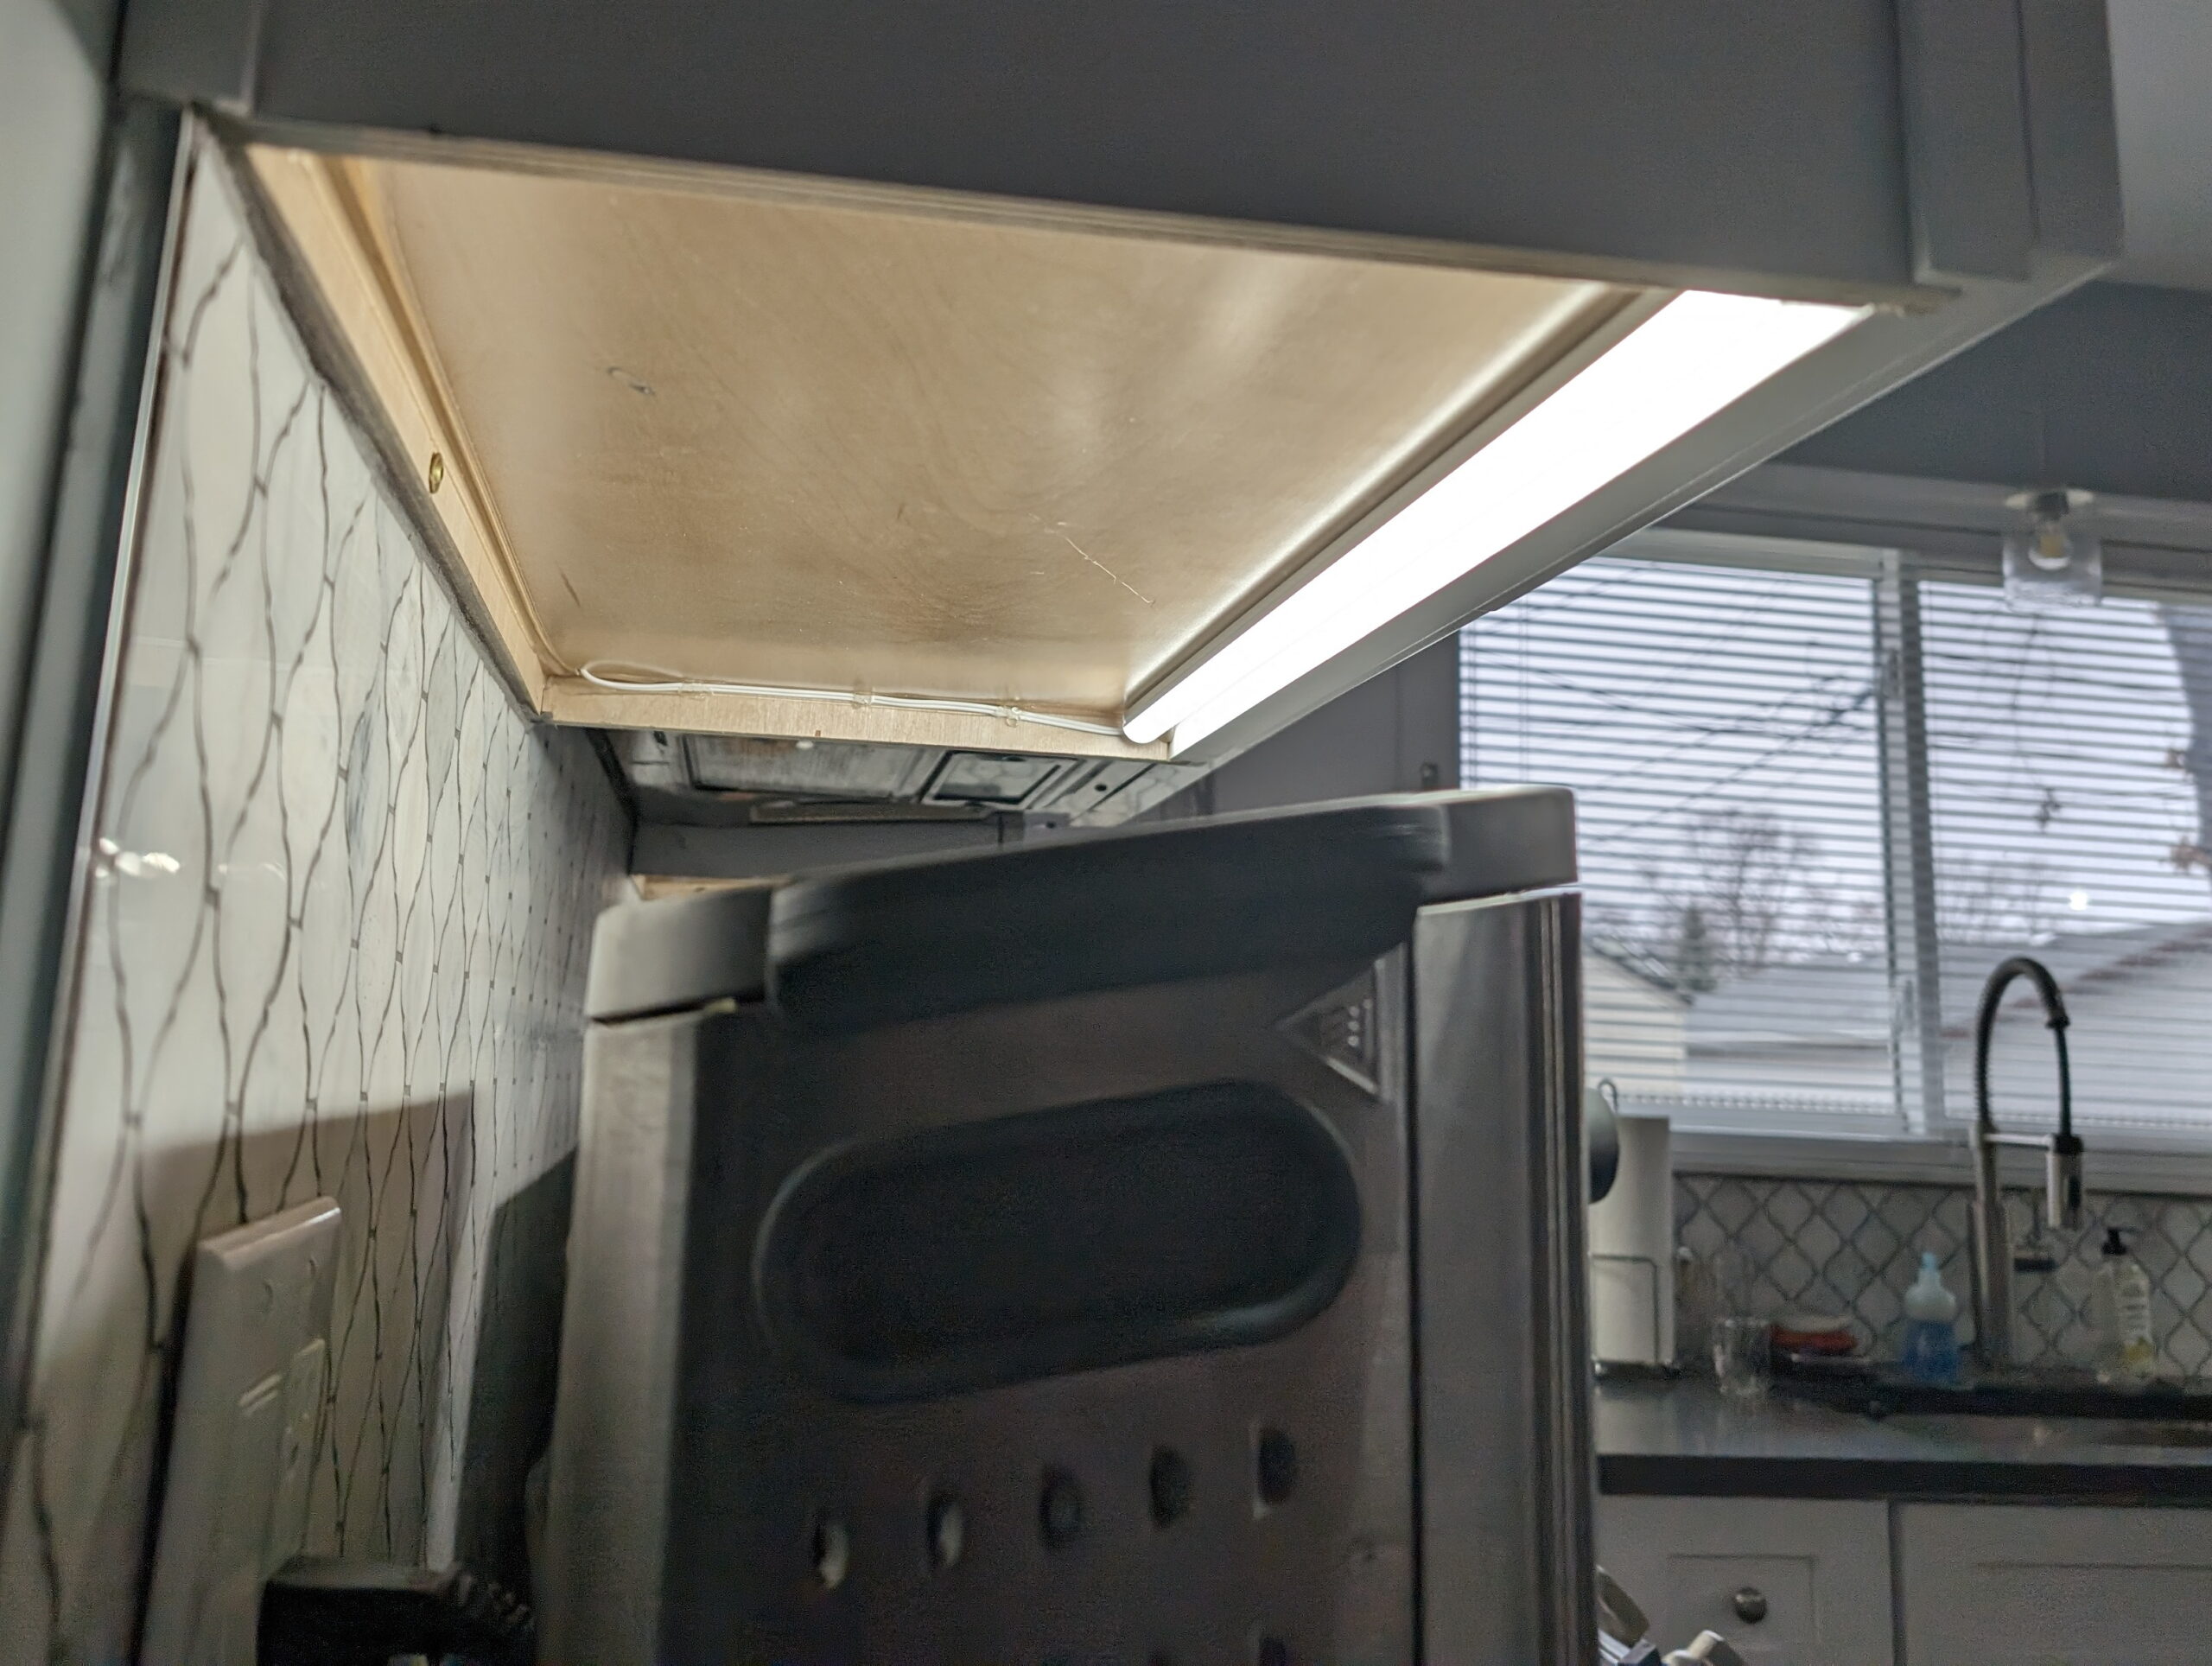
A small hole (3/16″) was drilled in the underside of the cabinet to run the wire up to the supply, cabinet undersides cleaned and strips stuck in place with VHB tape, wire was tacked in place with hot melt glue, and screw terminal to barrel adjuster adapters (which came with the power supplies) fitted. A bit of cable tying to tidy the cables in the cabinets and it’s all done.
Total cost for this project was $122.83, and that includes the unused 4000K strip that I bought as a test. There is enough extra left over to do at least another 10′ of enclosed light somewhere else in the house, so I might build some light strips for under my workbench shelves or perhaps where I have music gear in my closet.
Kristen and I are both really happy with how it came out. More than just filling in the room and serving as a night light it actually offers usable additional light when working on the counters, especially when cooking at the stove.
These days bikes ridden anywhere but pavement are almost exclusively rear-shifting-only (1x) — without a front derailleur — and for good reason. Unfortunately, when I bought my Warbird there weren’t many (any?) 1x groups for drop bar use; Shimano hadn’t even announced their excellent gravel-focused GRX group. So, my bike came with the best bang-for-the-buck drivetrain at the time, Shimano 105 R7000. This remains an excellent groupset, and I put it on my new road bike, but a couple things about it were a bit lacking for off-pavement use: lack of a clutch derailleur to keep the chain taut when things got rough, and the front derailleur.
Early on I switched the rear derailleur to a clutched Ultegra RX (RD-RX800-GS), which was basically a preview of GRX, and worked wonderfully. It dropped right in place on the bike and Just Worked to solve chain slap. But, I still had one more problem… The front derailleur.
Salsa Warbird v4 Front Derailleur Cable Route
Located where the rear wheel flings debris, front derailleurs are quite prone to getting gunked up while riding, and (unfortunately) the Warbird exacerbates this by having the shift cable exit the frame at the bottom bracket, behind the seat tube, facing upward. This location collects whatever flings off the tire and is a very hard place to seal a moving cable. Coupled with our gritty, chloride-treated dirt roads, the result has been shift cables and housing corroding and binding far before any other drivetrain parts wear.
This corrosion leads to extra drag on the shift cable needed to shift, up until things bind firmly, after which the sacrificial Main Lever Support L (part number Y63X80010) in the shifter to breaks (exploded view). The overall design of this sacrificial part is great; a removable and cheap plastic bushing on the shift/brake lever blade that presses against the metal piece that handles the shifting. If the cable becomes too tight this $3 piece fails before anything else in the shifter, and replacing it takes seconds. But, the cable and housing also need to be fixed, and COVID-era parts shortages (these supports were unobtainium for about 12 months — I was using 3D printed ones for a while) and it all quickly becomes an irritation.
I’d lived with front shifting quirks for a couple years as most of the time it was fine, but losing the front derailleur was always in the back of my mind. Mountain bikes have this way for years, with a rear cassette that provides all the range needed, and this has become common on new gravel bikes.
After front shifting failed early on in De Ronde van Grampian and I ended up stuck in the big ring, I realized two things: I should get rid of the front derailleur, and I don’t need quite all the range that a 50-34/11-34 2×11 drivetrain offers. I use most of the range, but could lose a little on the top and bottom end of the range and be fine.
The first change was to remove the front derailleur, which was made easy by the front shift housing being split with a barrel adjuster below the handlebar. I was able to pull the cable and remove the housing all the way back to just under the the bar, leaving 2″ stub of housing unobtrusively peeking out of the bar tape. Next time I rewrap the bars I’ll remove this, but for now it’s fine.
Then to finish the conversion I fitted a Wolf Tooth 42t chainring specifically designed with an offset designed for 1x. None of the single-ring chainring bolts that I had around the house fit right, so I grabbed some of Wolftooth’s matching chainring bolts and it was all set. The ring fits the crank perfectly, worked great with the original chain length, and the I could shift across the whole of the cassette without any rear adjustment.
I did two rides on local rolling dirt roads and except for some longer steep climbs things were good. I was feeling good for both rides, so I didn’t mind having to grind out the longer climbs in sub-optimal cadence, but I realized I might need some more range on longer days. I’d also been concerned the left brifter would be flappy and noisy without a shift cable connected, but it’s just the same as before.
Next up was getting more gear range…
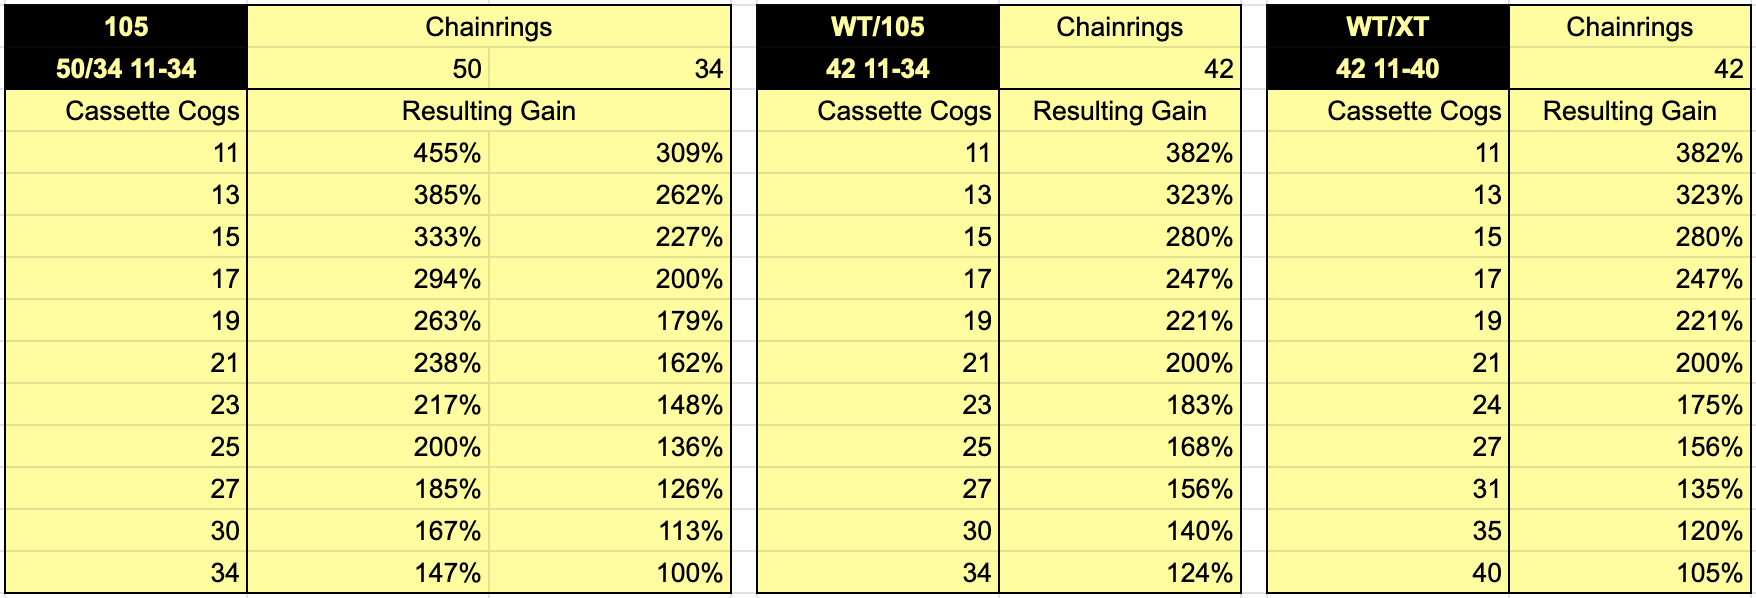
Gear Ratios for 105 R7000 50/34 11-34, 42×11-34, and 42×11-40.
The original Shimano 105 R7000 drivetrain, with 50/34 chainrings and an 11-34 cassette, gave a range from 455% to 100%, plenty for all my riding, but with a whole bunch of overlap. While I’d use the lowest ratio gears somewhat frequently, I’d almost never use the highest gear because at typical cadence I’d be moving well above 33 MPH. At those speeds I’m probably coasting down a hill and no longer pedaling.
After changing to a single 42t chainring the available ratios were 382% to 124%. At the high end this is nearly identical to everything but the rarely-used smallest cog, but at the low end it was like I lost the easiest two gears. On a couple test local couple-hour rides I didn’t absolutely need them, but it did require a bit more effort on some of the harder climbs.
With 11-speed mountain bike drivetrains on the decline, I came across Shimano XT 11-40 cassettes on sale and decided to try a bigger cassette on the rear of the bike. I was still on the original cassette and it was nearly worn out, so a change was due. This required a 1.85mm spacer to make the MTB cassette fit on a road freehub, which moved the cogs outboard, but a few limit adjustments and all was good. Now with a range of 382% to 105% it was almost identical to what I’d use on the original 2x setup.
Ultegra RX derailleur and 11-40 Cassette
The larger cassette fit pretty well, but caused some small quirks in spacing with the upper jockey wheel: the B-tension screw had to be cranked in almost all the way to have the gap set properly on biggest cog. It was quite a fiddly adjustment, as a quarter turn too far one way would have the jockey wheel rubbing on the cassette and a quarter turn the other would make shifting slow. This much B-tension also unwrapped the chain from the cassette a fair bit, making me concerned that with less chain on the cassette while pedaling the chain and cassette would wear faster than normal.
At this point I did a test ride and everything worked great when riding. Between the new chain (old was at 0.5%), cassette, and chainring the drivetrain was silent and I didn’t have a bit of trouble, but I still wanted it to be better.
A few days earlier I’d ordered a Wolftooth RoadLink DM, a nifty part that replaces a link in rear derailleurs like mine, repositioning it to handle larger cassettes. This is advertised to improve chainwrap and shifting performance, and immediately after installation the benefits were apparent. On the biggest cog chainwrap is much better, the derailleur no longer looks over-extended, the B-screw doesn’t need to be turned all the way in, and shifting feels more spot on.
Ultegra RX w/ RoadLink DM and 11-40 Cassette
While I could have fitted a Shimano GRX RD-RX812 derailleur instead of using the RoadLink DM on the Ultegra RX, this would have cost $90 more than the RoadLink DM, and I’m not sure it’d be any better.
All done, total cost for this was $265.03 after tax, and with a new cassette, chain, and chainring, I’ve now basically got a new drivetrain.
Wolf Tooth Chainring: $84.95 Wolf Tooth Chainring Bolts: $26.45 Shimano XT Cassette: $95.39 Shimano SLX/105 Chain: $26.49 Wolf Tooth RoadLink DM: $31.75
I’m quite happy with how this all turned out. A problem is solved, worn out things were upgraded, functional parts were kept, and it works great. My Warbird is ready for another year of gravel fun.
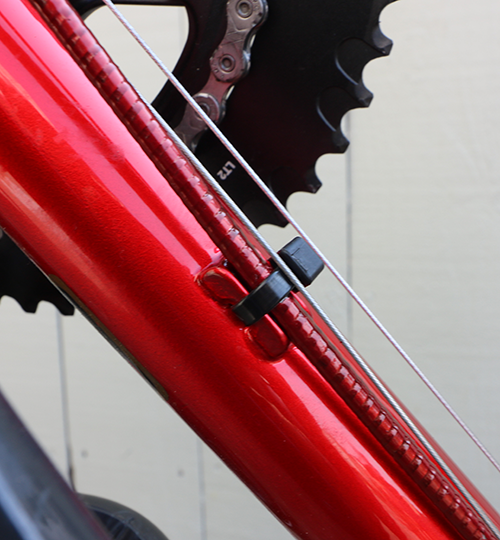
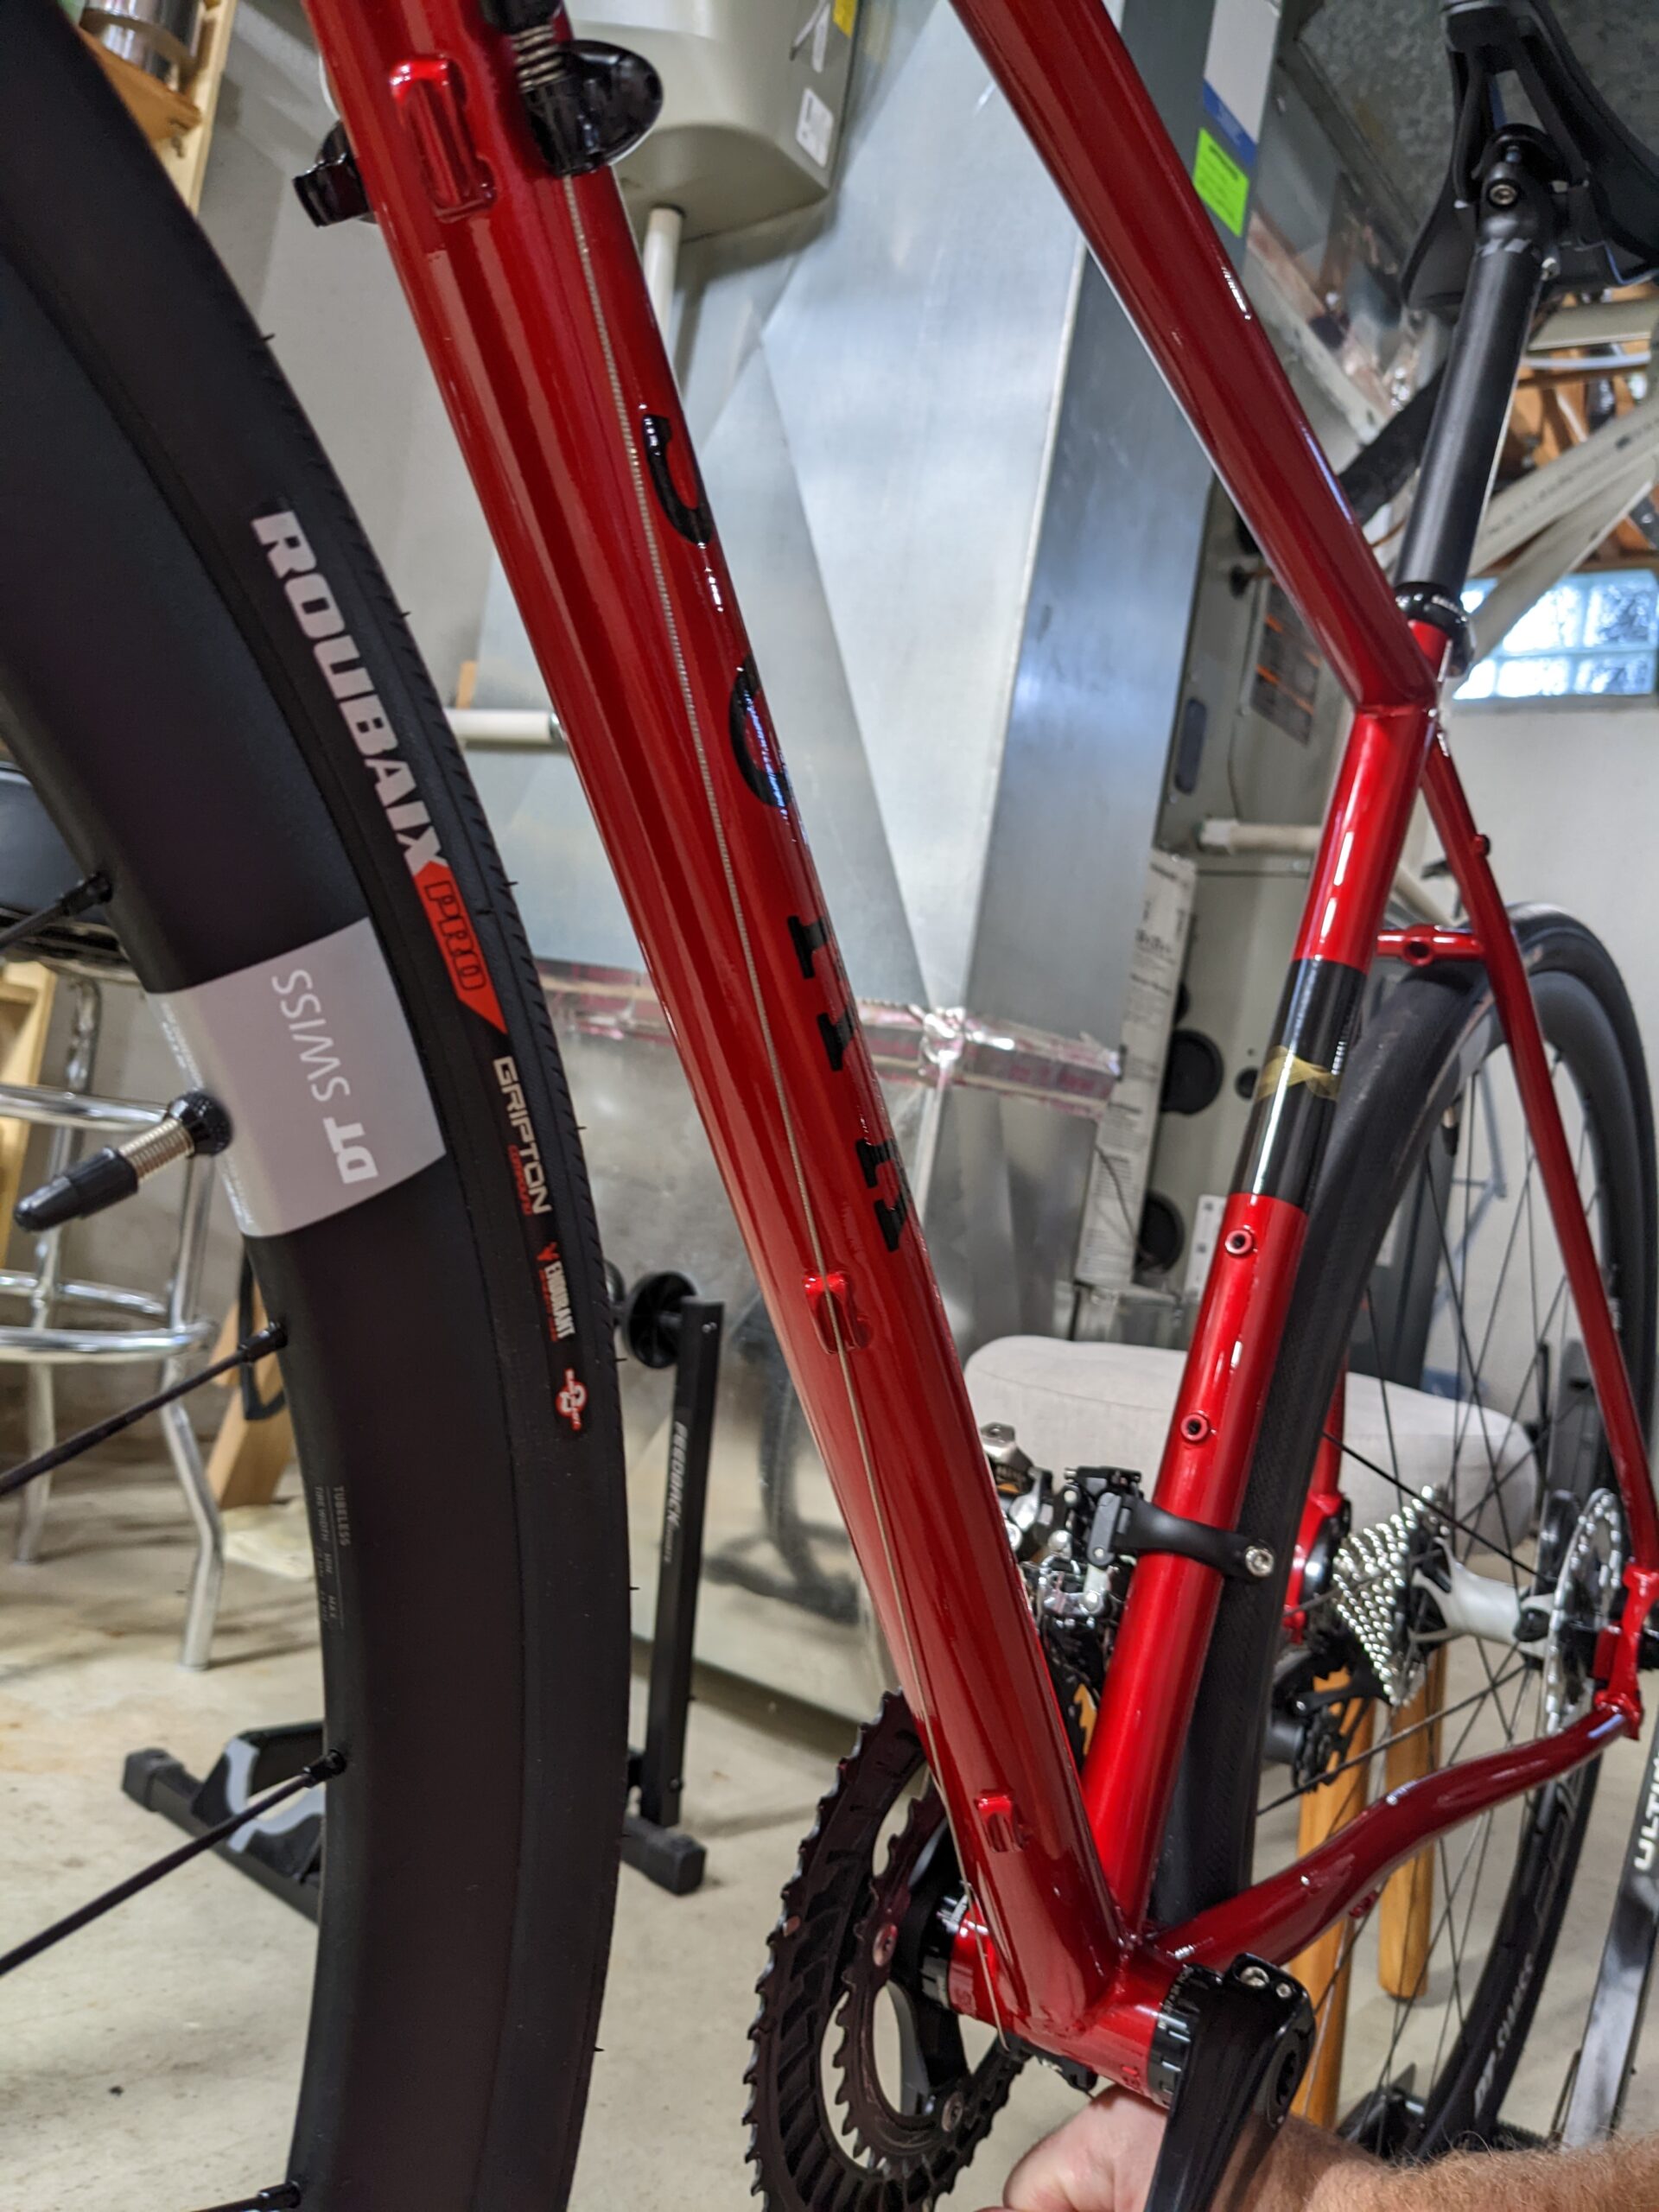
Shift cable/brake interference on prototype Soma Smoothie HP Frame (Photo from Soma)
Originally this post was going to be about my new road bike, but instead I’m writing a warning about the new Soma Smoothie HP and a safety issue, recommending against buying it without fully understanding the possible downsides. While the specs of this frame promise to be an excellent modern steel road bike, it has a design problem that can lead to rear brake failure.
Specifically, the location of the brake housing mounts results in the front derailleur cable resting on the brake cable at a mount. Over time movement of this cable can cut into the brake hose/housing, cable clip/tie, etc. If not caught in time this can lead to brake failure.
I purchased one of these frames and have been excitedly building it up, finding this problem late into the build when preparing to run the shift cables and brake lines.
When I brought this up with Soma seeking for a solution, they dismissed the issue, saying they identified this interference during frame development, but that it’s not concerning to them. Stan, with Soma, instead suggested that I rely on the cable tie (as seen above) to mitigate the rub, that rubbing through a brake hose or housing will take a long time, and to add additional material (rubber cable donuts or tape) to the cable if I am worried about it.
I disagree, as any component that’s designed to move should not have unintentional rub, particularly not against a safety-critical system like a brake. A frame should be designed to avoid this; it should not be necessary to bodge in rub protection to stave off cables cutting into other housing.
The photo at the top of this post is of Soma’s prototype build and shows the interference and their reliance on the head of a cable tie for keeping the shift cable in place and away from the brake line. Beyond the safety issue of the front shift cable rubbing on the brake line, the cable does not have a clean path between the upper stop and lower guide, which can lead to shifting issues.
While it would be possible to build this frame up as a 1x (no front derailleur) system to avoid this interference, I want this to be a double-chainring road bike (Shimano 105 R7000) and thus is not an option for me. Or one could go with wireless shifting, but due to cost this isn’t an option for me either.
I really wish Soma had fixed this interference when they first identified it, or at least mentioned it in their documentation so I would have passed on buying the frame. All it would have taken is moving the brake routing to either the centerline (like on this Lynskey) or much further up the downtube (like on my Salsa Vaya) and it’d have been solved.
After I found this a good friend reached out to me, and I’ve since passed the frame on to him. He was looking to build an wireless shifting road bike with fenders, and this will work out perfectly for him. With the electronic shifting he won’t run into this cabling issue.
For those considering this frame, unless you are going with wireless shifting, a 1x setup, or are willing to deal with the compromises of a shift cable rubbing on a brake housing/hose, I suggest that you look elsewhere.
EDIT on 2024-Feb-20: This evening I received email from Stanley at Soma Fabrications about updates to the Smoothie HP frame. It sounds like this will alleviate the concern I mention, so I’m sharing it here:
I just want to update you that early 2023 we replaced the plastic BB mounted cable guide on all our HP frames with one of those guides with two mounting holes (similar to Shimano SP18) which moves the derailleur wire just enough to avoid any contact with the zip tie or brake housing.
Though we maintain the opinion the possibility of the front derailleur wire cutting thru both the zip tie and housing in real world use is extremely remote with the old set-up, we chose to improve the routing.
The new production that arrived this month moves the brake guides to the 6 o’clock area which will probably avoid contact no matter what plastic guide is used on the BB.
Stanley Pun, Soma Fabrications, via email on February 20, 2024
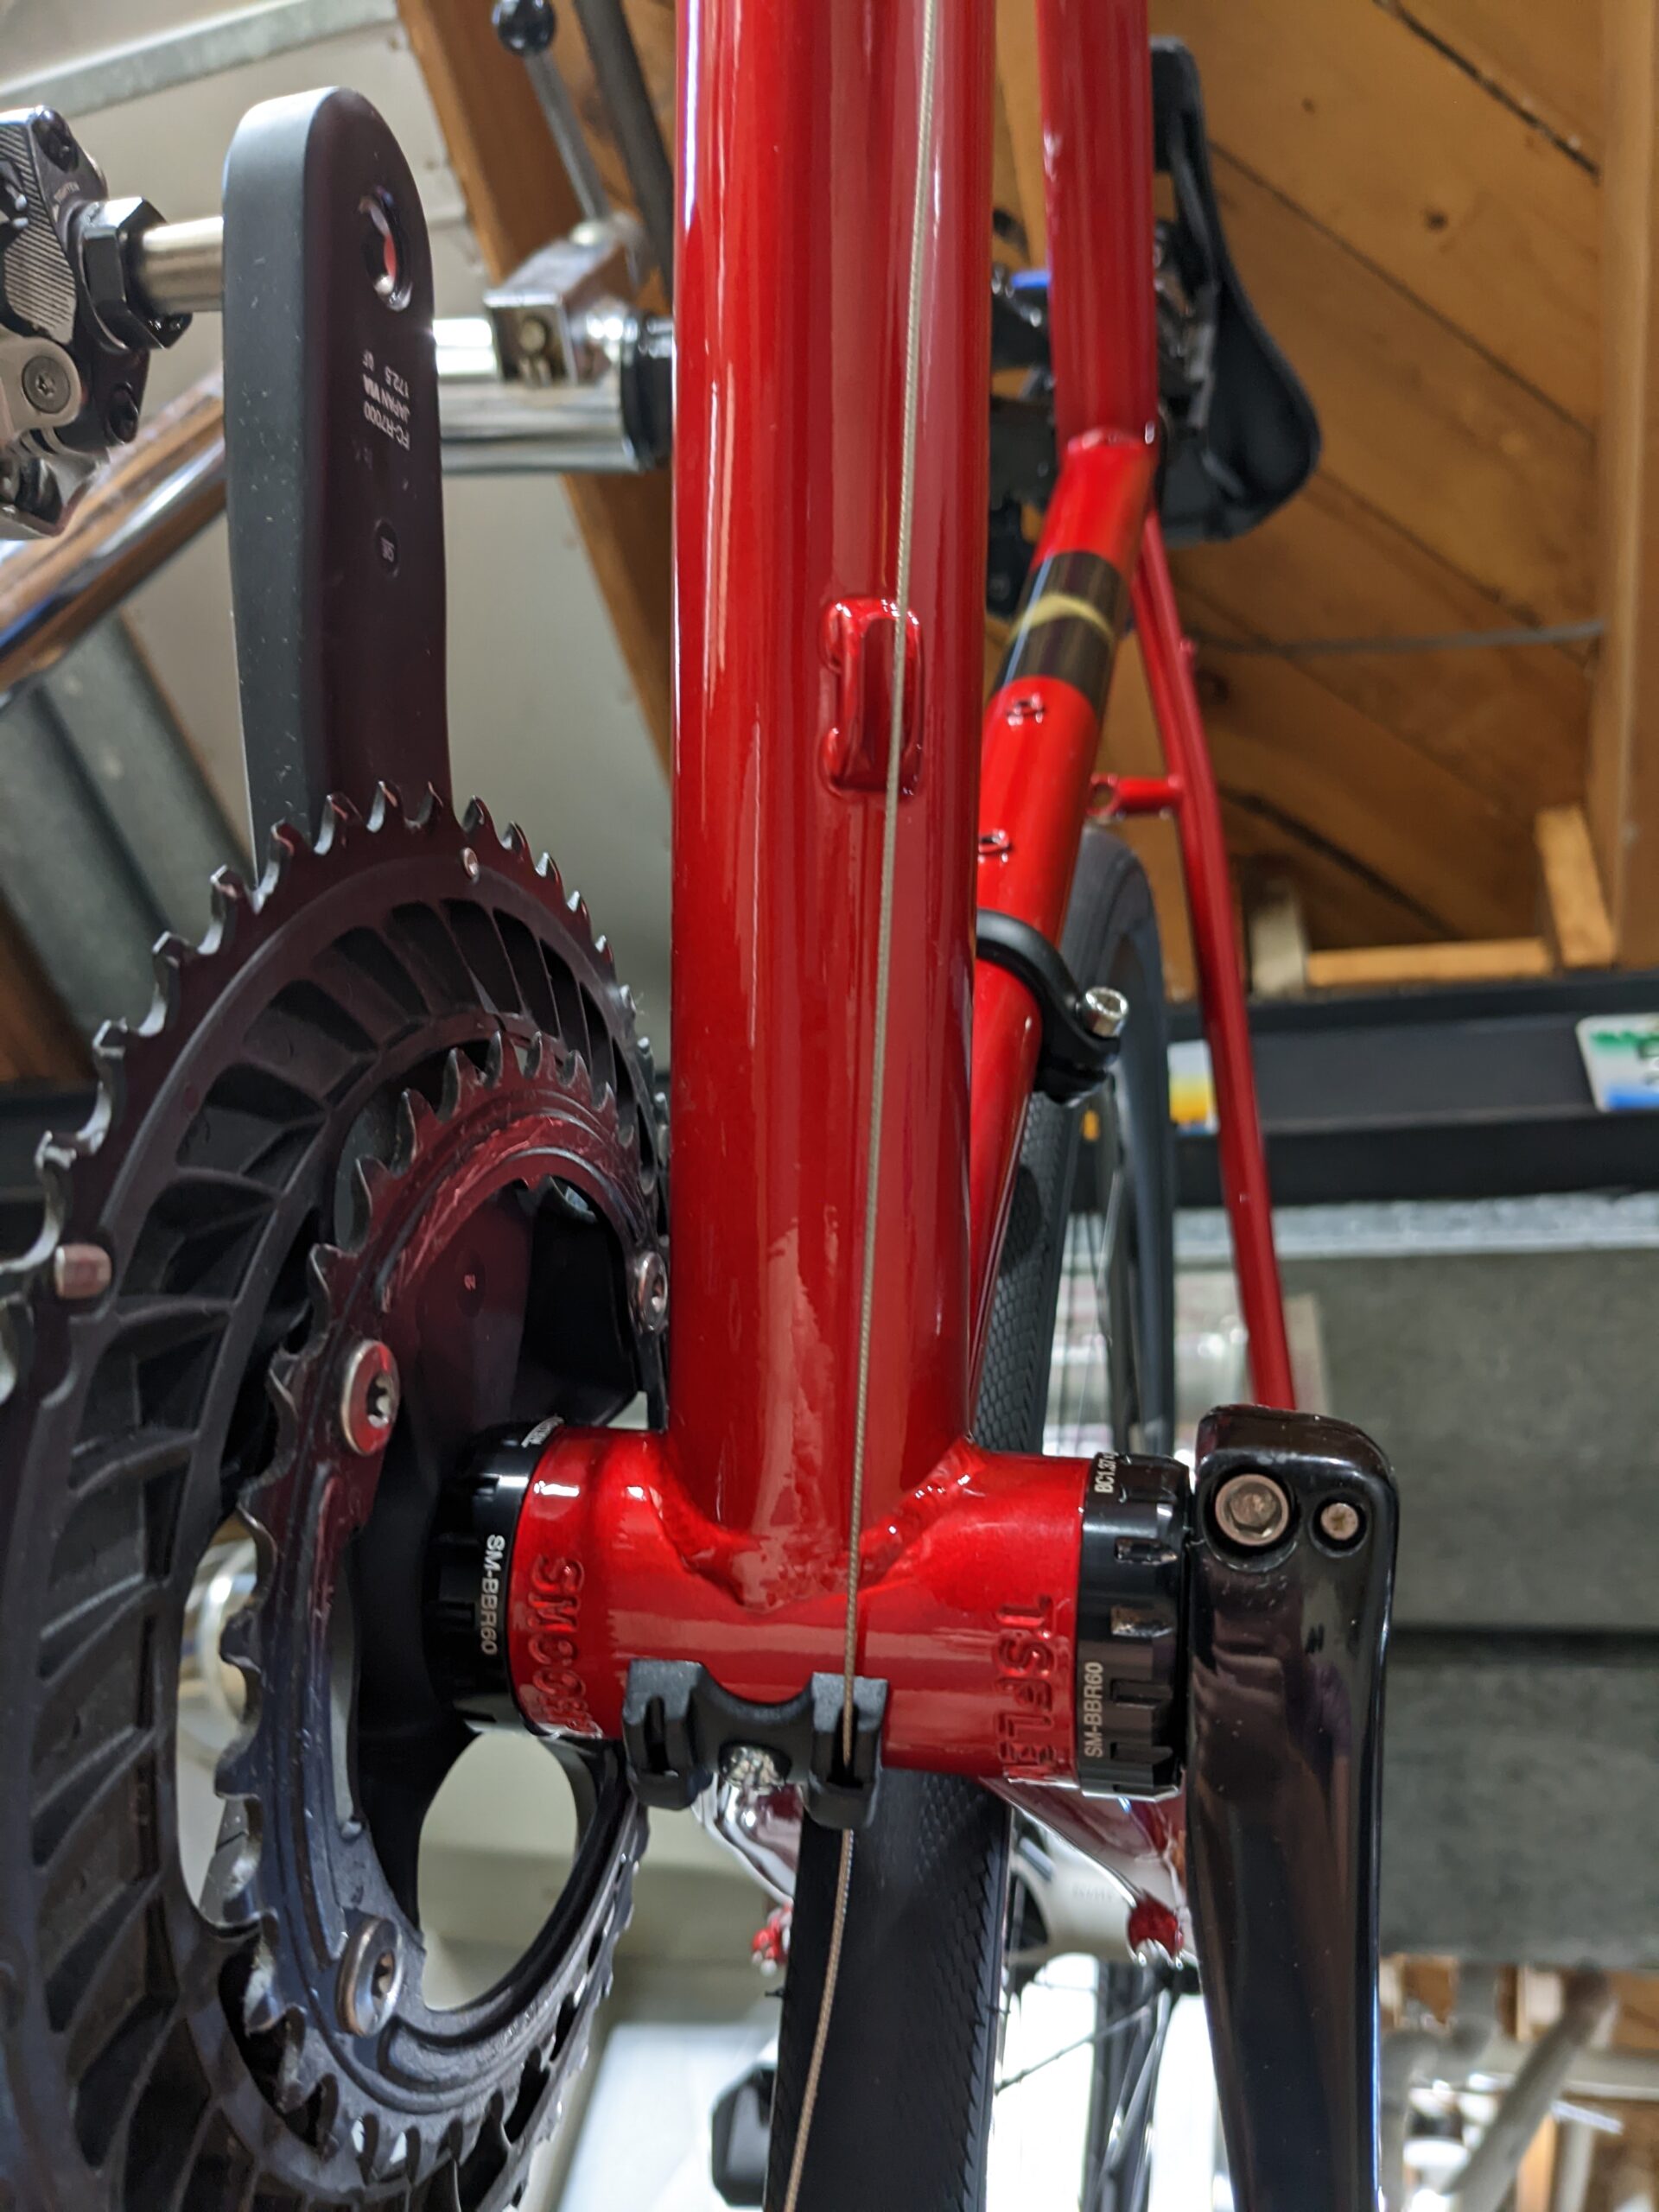
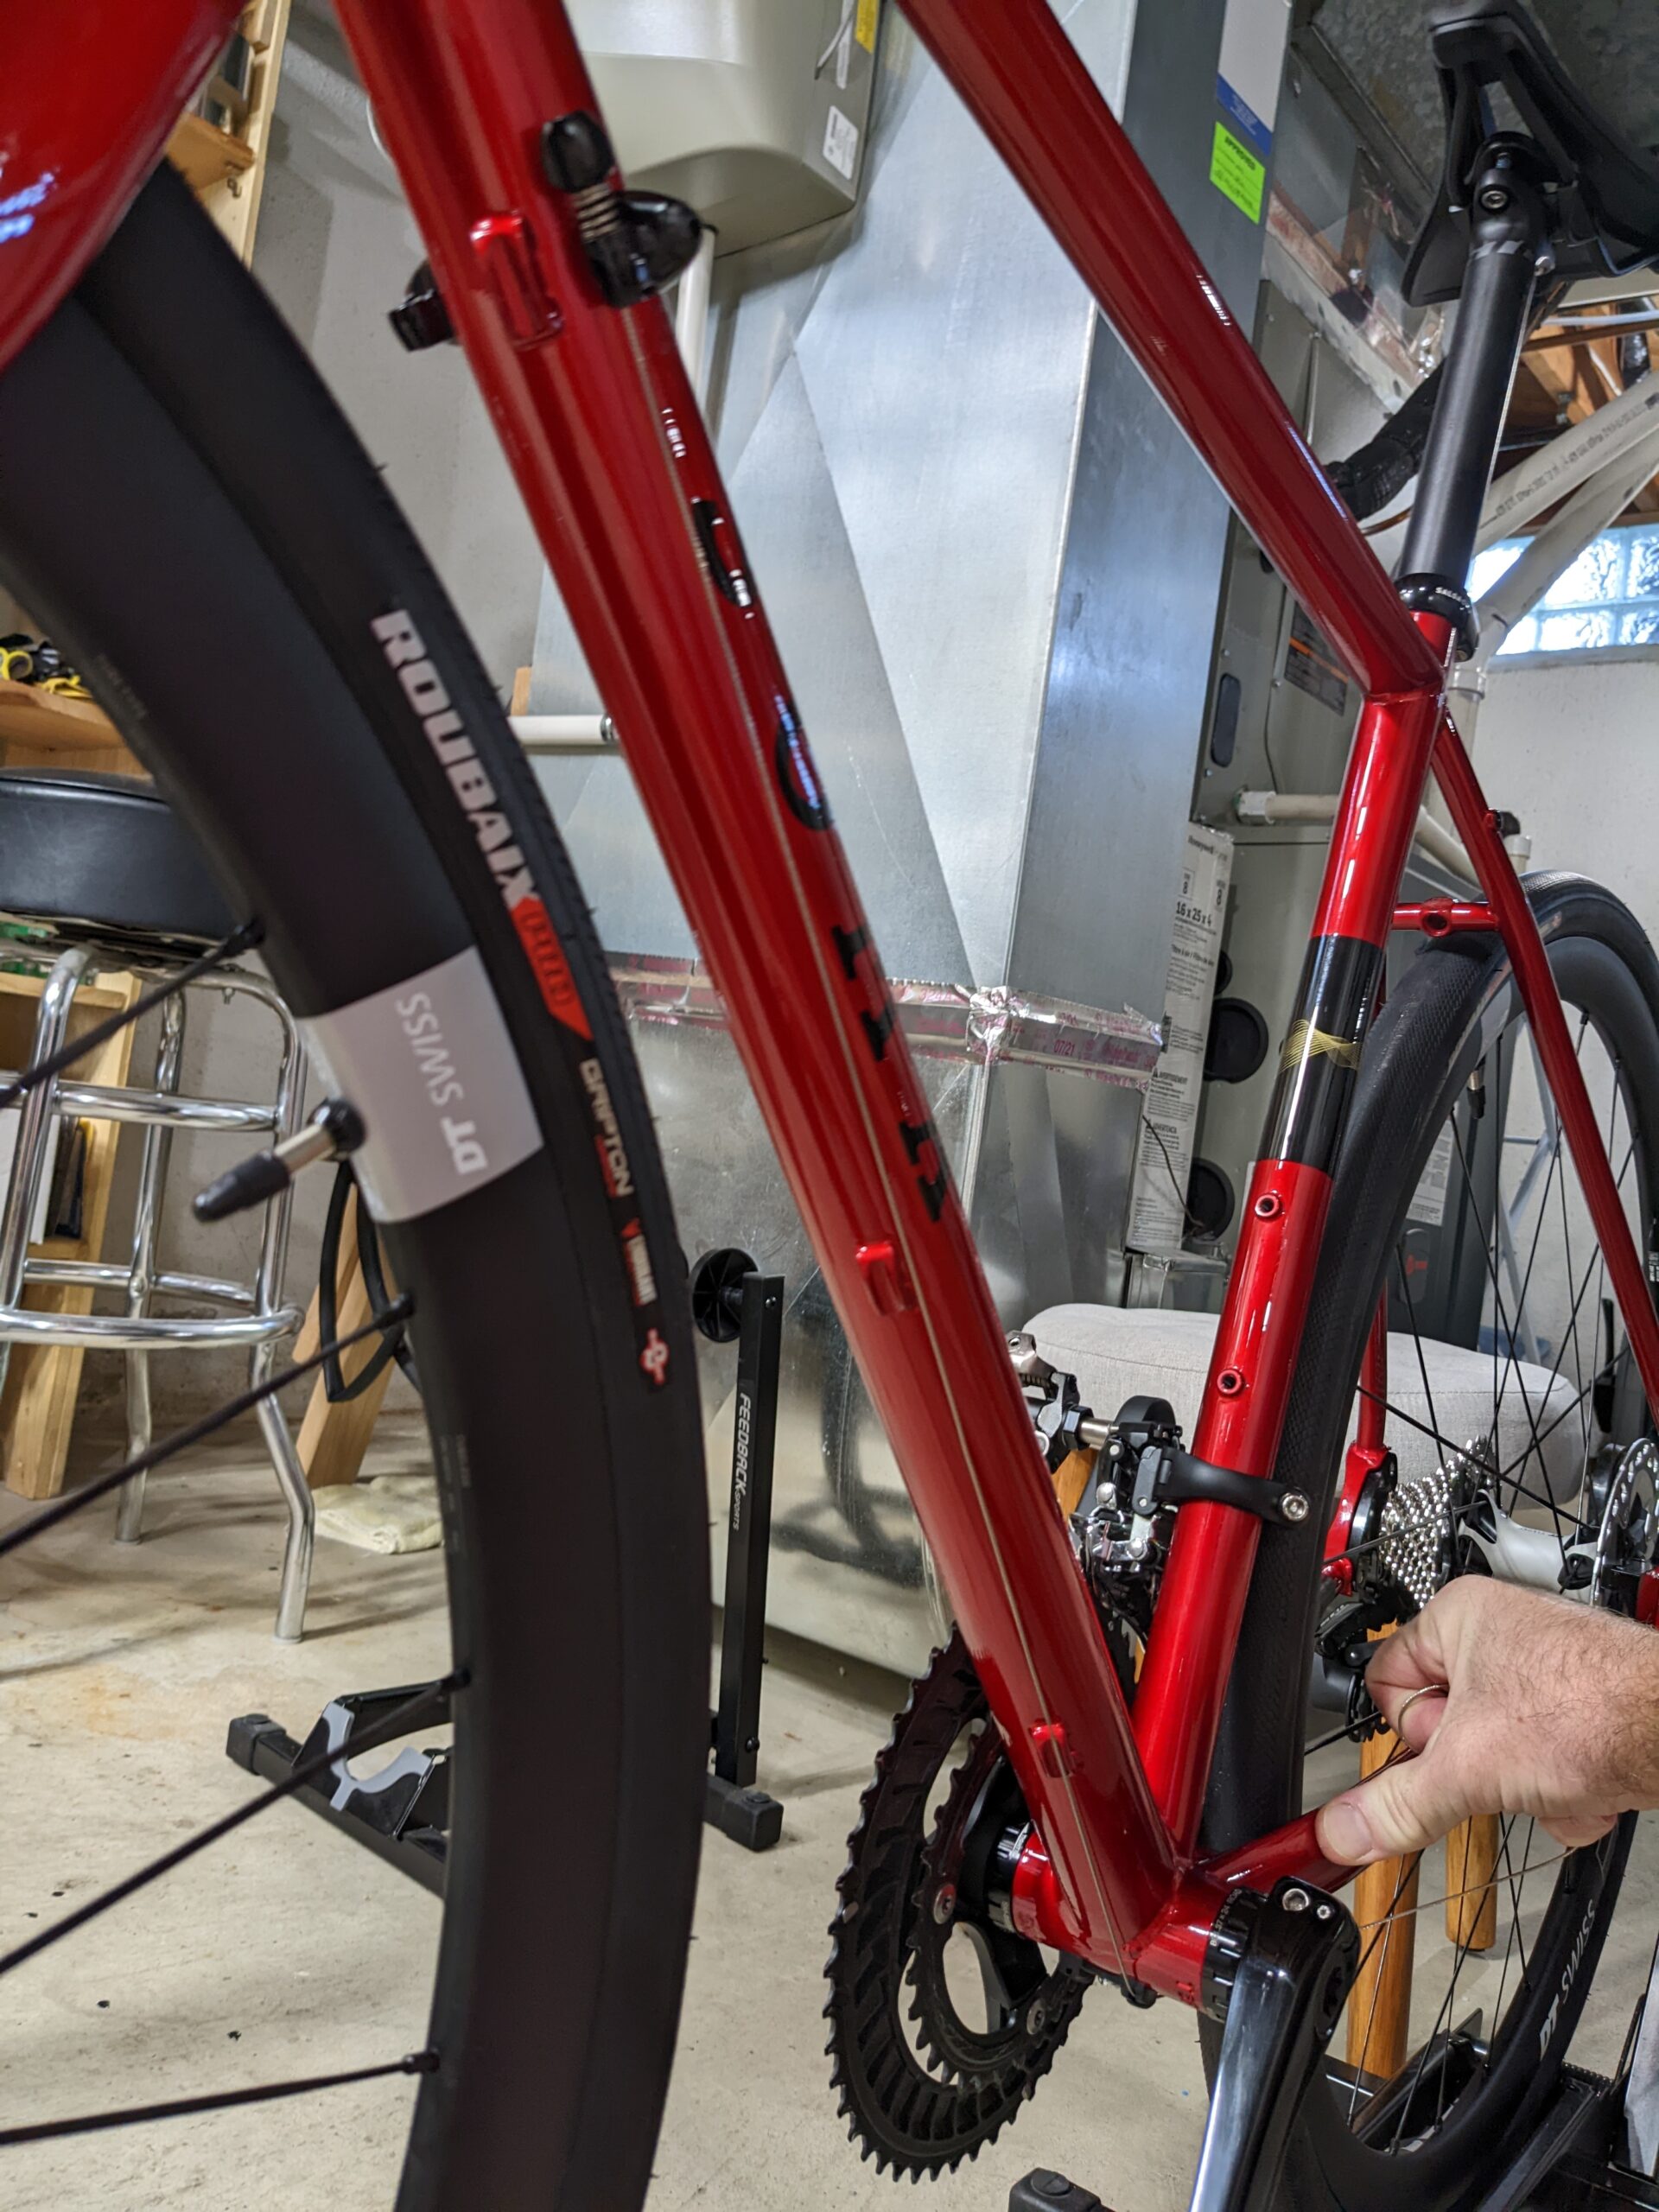
Below are photos showing the interference on my frame. These were taken when the build was nearly complete, while I was planning cable routing. These photos are when I first realized the problem and reached out to Soma.
Detail of cable from non-drive-side stop to front derailleur guide. Cable sets inside of brake mount.
Cable from non-drive-side stop to front derailleur guide sits in lower brake mount.Cable from non-drive-side stop to rear derailleur guide sits in middle brake mount.
Comments closed
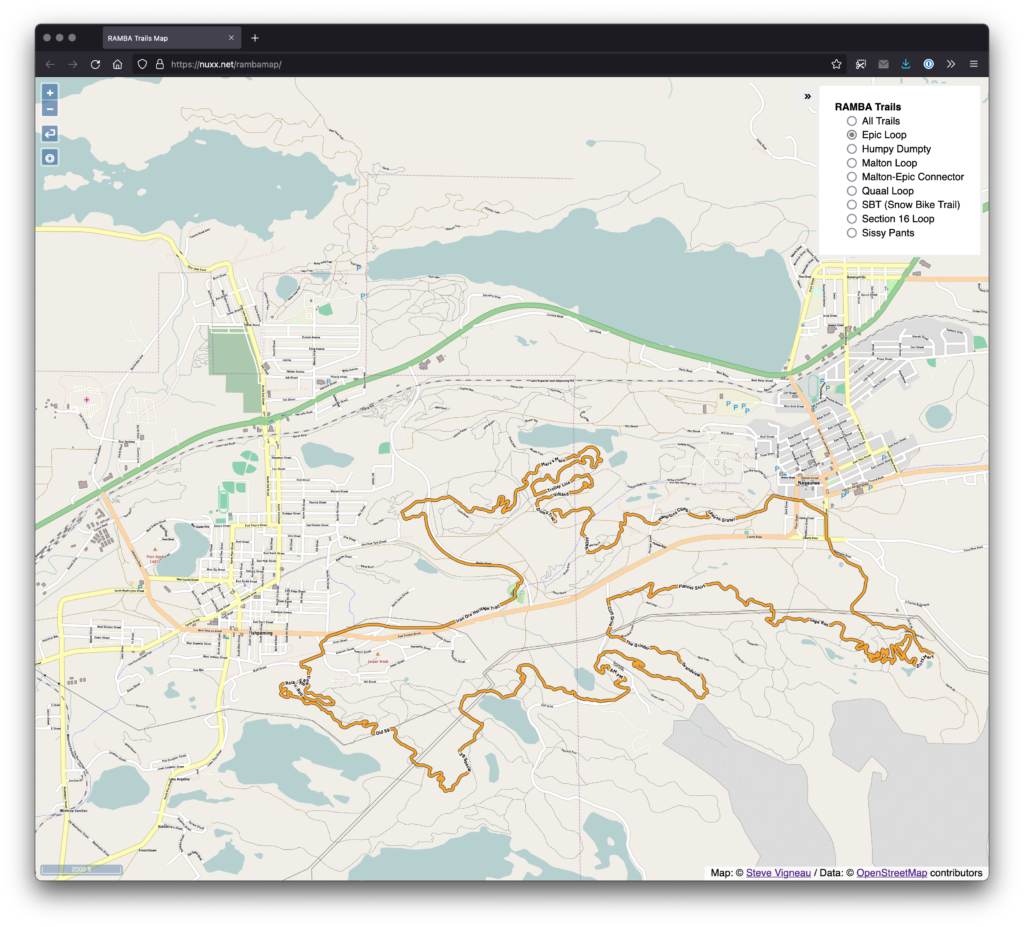
Kristen and I have been spending a good deal of time in the Ishpeming and Negaunee area this year, and I’ve made it a personal goal to become more familiar the local trails — both RAMBA-supported and otherwise — and get them documented OpenStreetMap (OSM). Having these trails in OSM provides two big benefits: they appear in other mapping tools (such as OsmAnd, GaiaGPS, Strava, MapMyRide/MapMyRun) and the trail data can be freely used to build other tools.
Official RAMBA Map v6 from 2018
Over the years of making trail maps with OpenStreetMap I’ve mostly produced PDFs for printing, leaving mobile and online mapping to other apps. These work well, but have the big downside of rendering routes with their style. That is, online maps via these tools’ show the routes, but look quite different from print maps, even if all the data for them to display more data (such as colour=* tags on relations) is in OSM.
While these apps work pretty well, and I use them myself routinely for navigation, I got the itch to see if I could make a web-based map that looked more like locally produced print maps than app-based renderings. It seemed like a good project, a good way to learn some basics of modern web development, and maybe make something useful.
What I ended up with was a slippy map of showing the RAMBA trails that uses layers of pre-rendered tiles to show the different official trail routes, placed over a background map. The map viewer is client-side JavaScript that loads static tiles from a basic web server, making this a very simple app to host (just a bunch of static files on a site).
In this post I intend to document the major steps of how I made this map, why I used the tools I did, and share the code to reproduce (and update) this build. Hopefully this’ll allow others to get their head around these map presentation basics, perhaps even reusing this work to make and host another map.
Update OSM Data
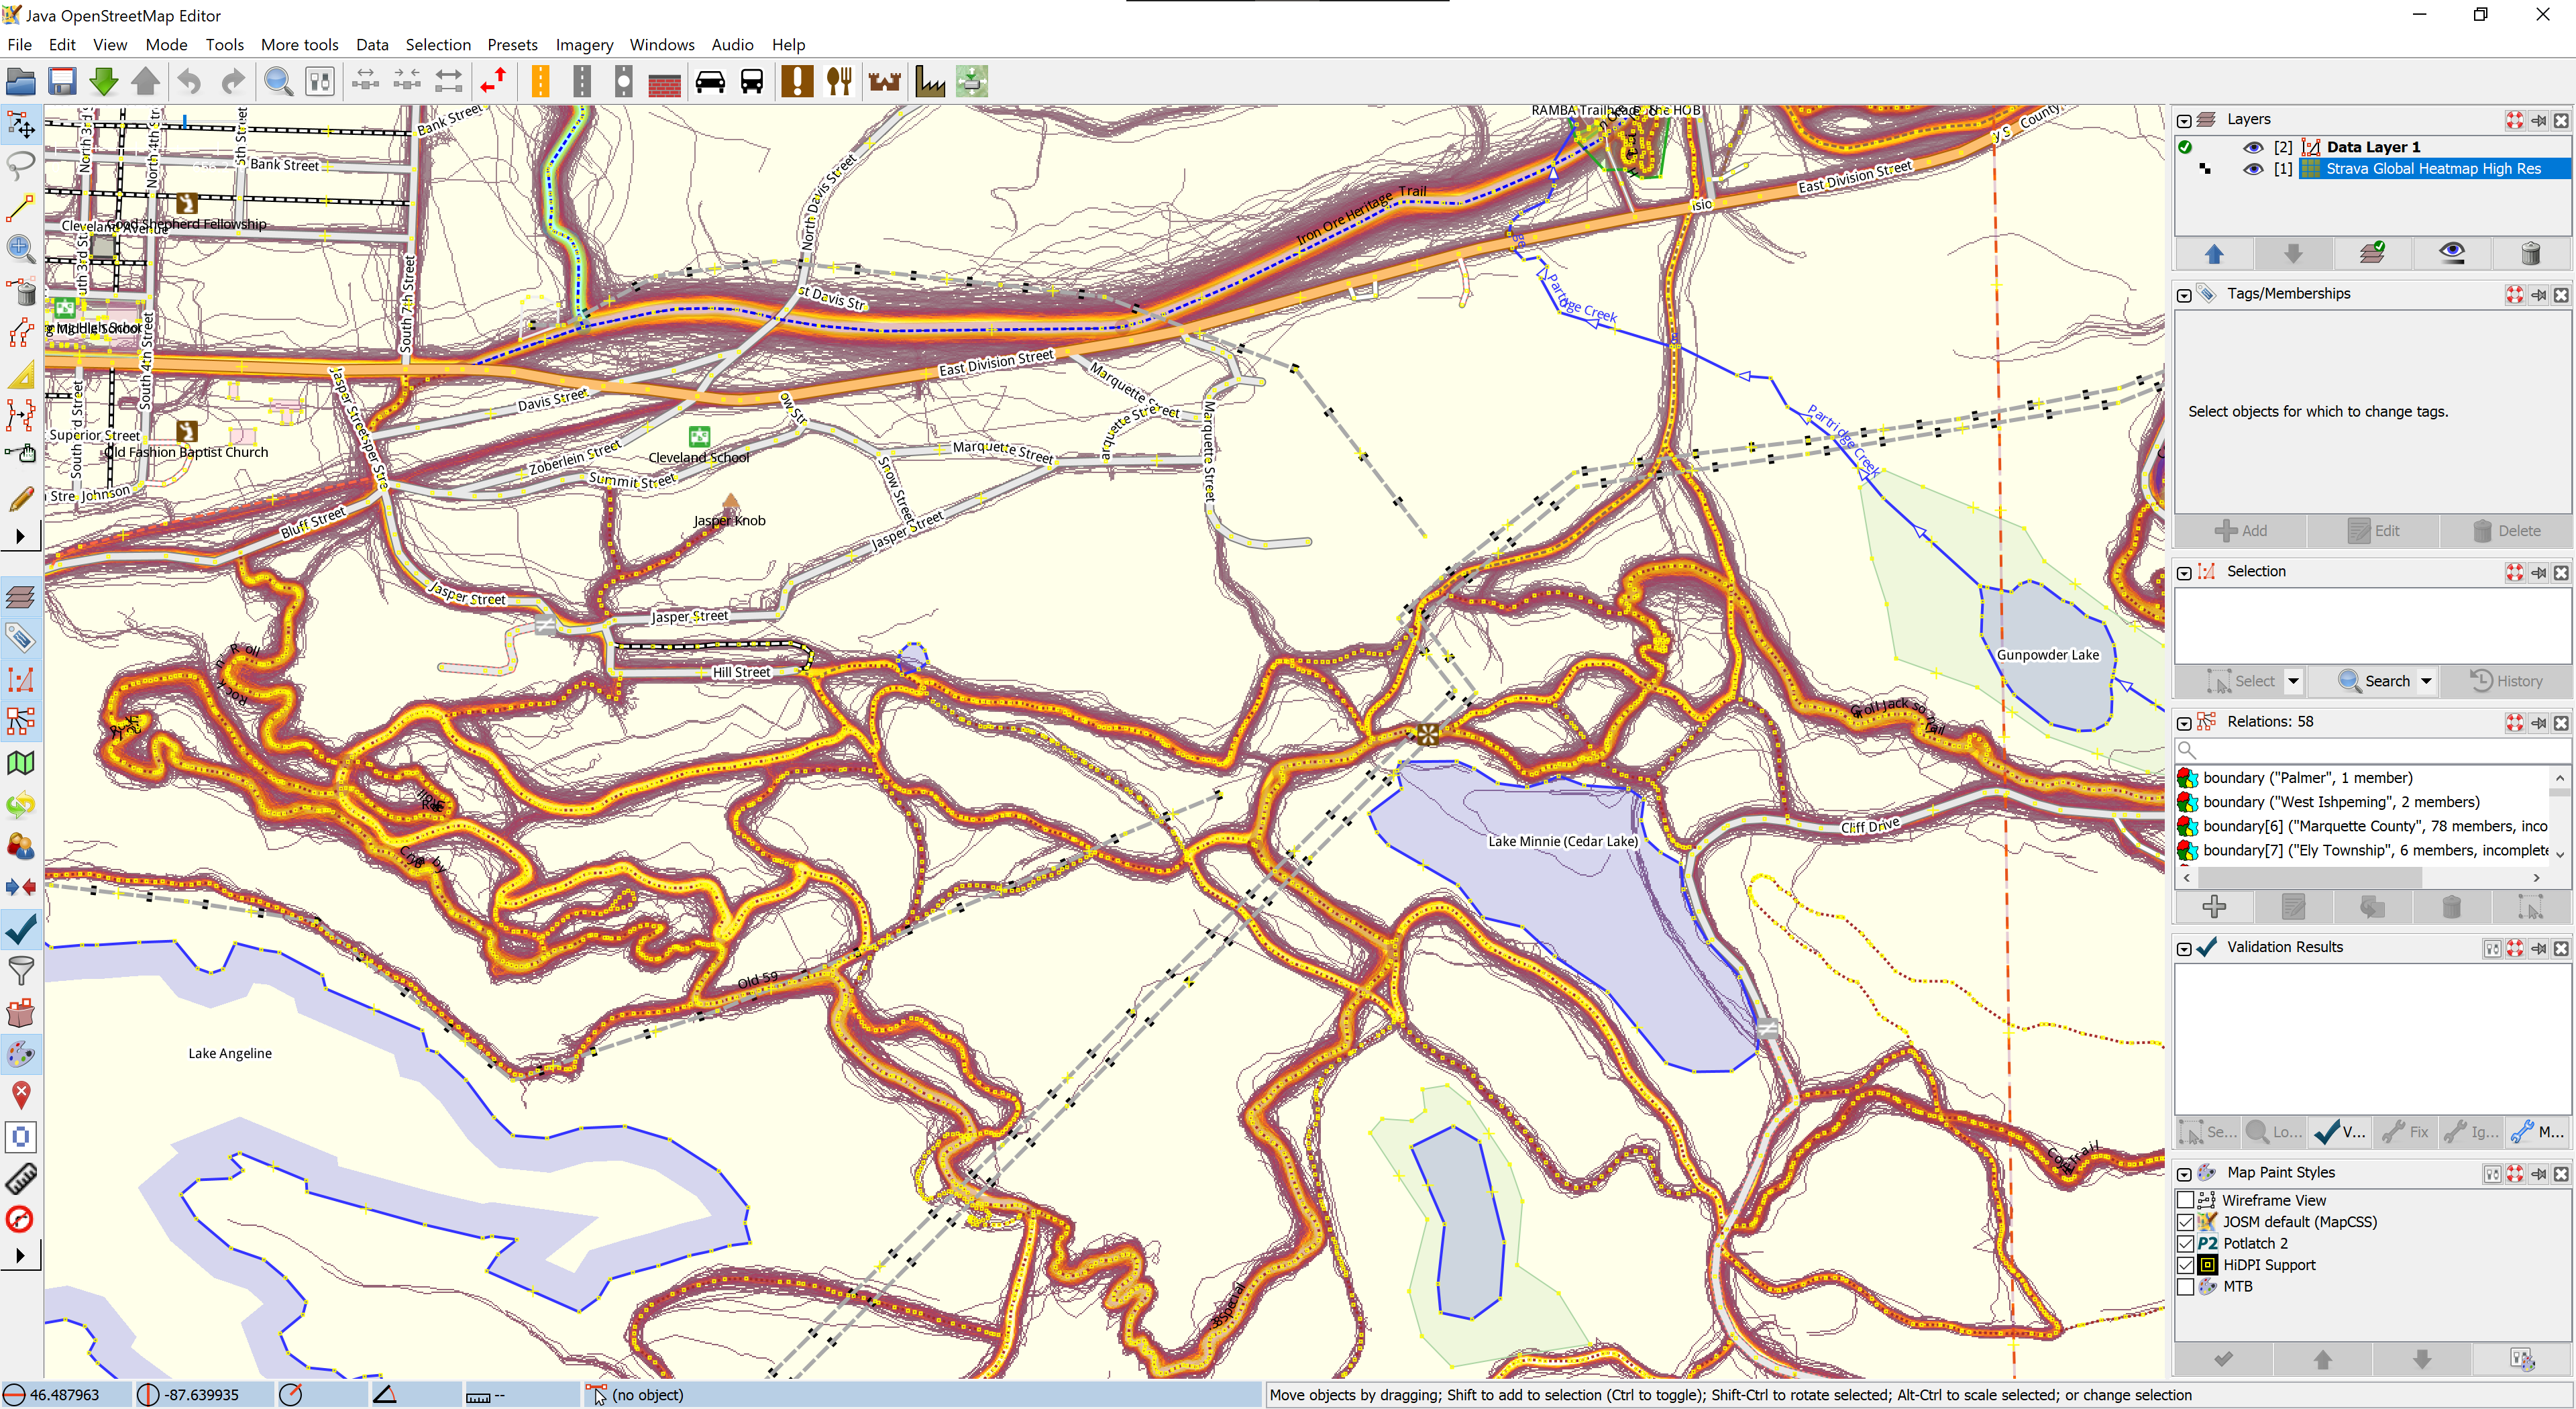
Strava Global Heatmap in JOSM
Mostly outside the scope of this article but worth a mention, a significant amount of time was spent ensuring that the RAMBA area trails are accurately listed in OSM. Without good data it would not be possible to go further, as the OSM data is the base data used to create other maps.
By combining information from a bunch of sources, and doing some personal surveying of trails while riding and hiking, I was able to get all of the official RAMBA trails documented, along with numerous other paths and tracks in the area. This building a complete picture of the usable trails in the area.
Information used to get the RAMBA trails in OSM included:
Hand-annotated map from Danny Hill listing local trail names.
These sources were combined in JOSM, cross-referenced, ways drawn and tagged, relations built out, and before long a complete picture of the RAMBA-area trails — official and otherwise — were in OpenStreetMap.
Most importantly, beyond documenting the trail locations, trails were grouped into route relations to show each official route, and then all the official routes were grouped into a superroute for all the RAMBA trails. As of time of writing, relation RAMBA Trails (12425503) is the superroute that aggregates the individual trail routes such as Epic Loop (8467869) and Malton Loop (8468010).
The result of this is accurate trail data that’s easy to query for and style using other tools.
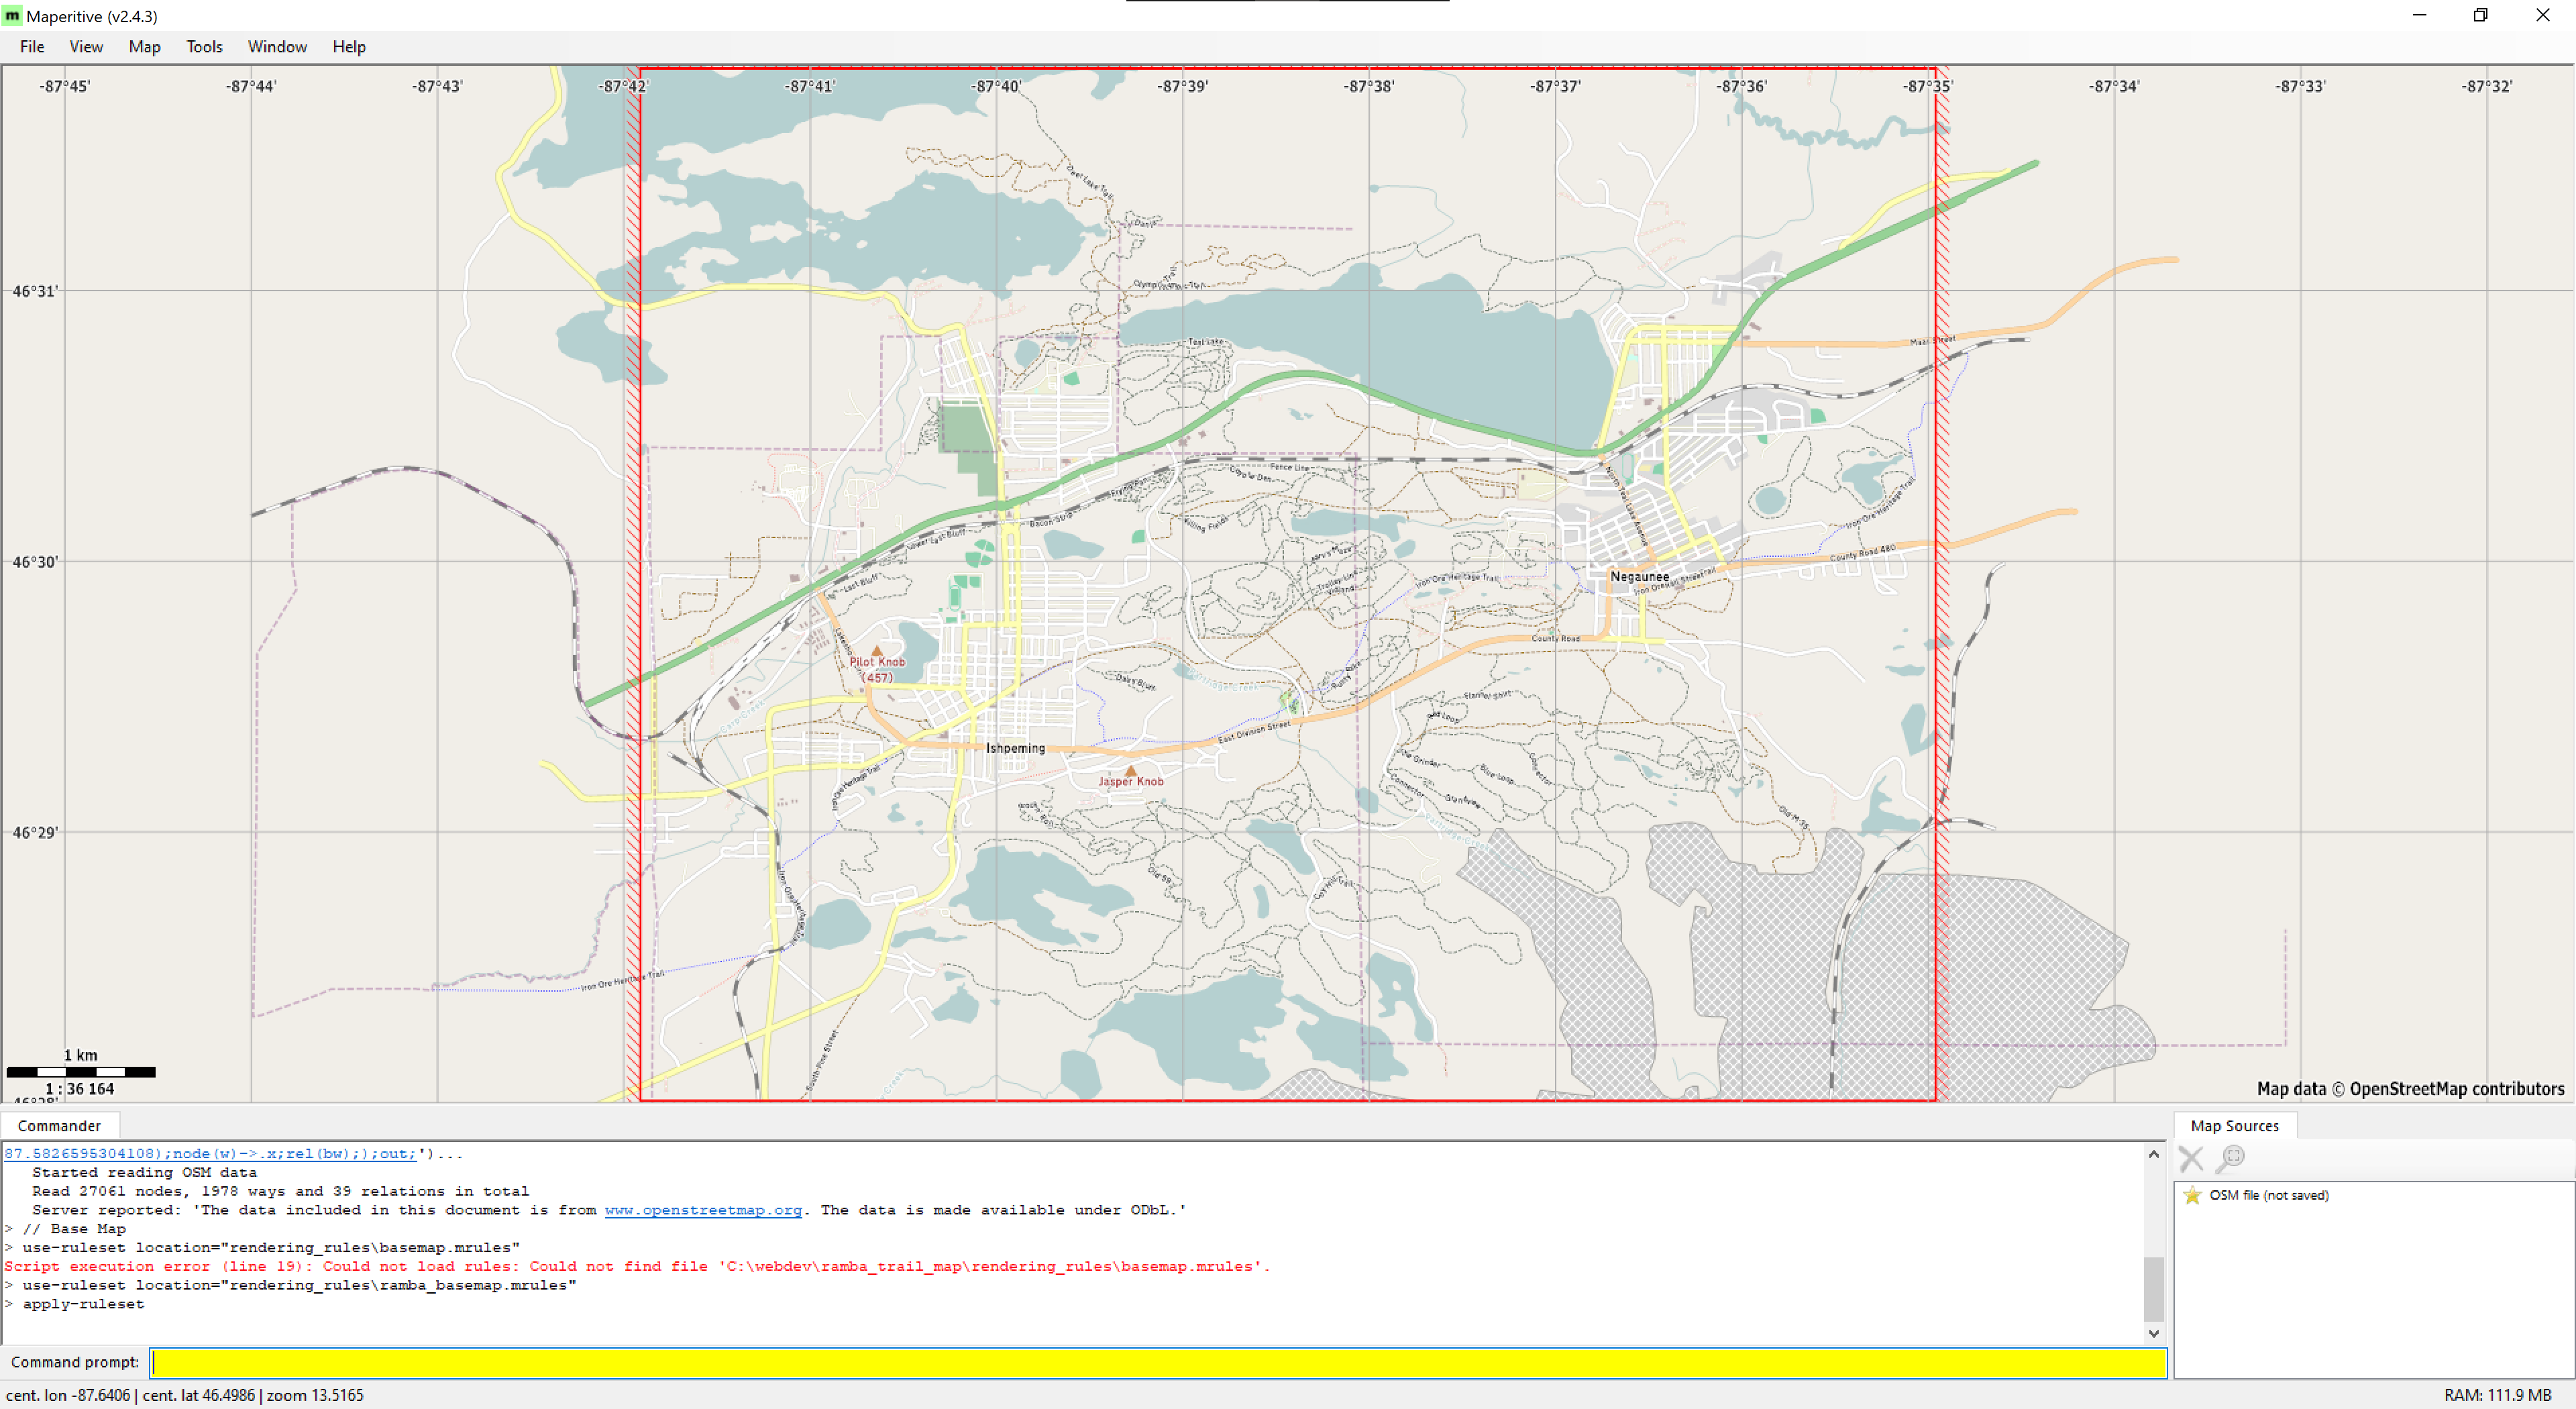
Rendering Tiles with Maperitive
There are myriad ways to render tiles from OSM data, with most of these involving setting up a database server and a toolchain which’ll generate, cache, and serve tiles on demand. For most large data sets this makes a lot of sense, but for a small trail system I really wanted to use static tiles I could serve from a simple webserver.
Eventually I came across Maperitive, a desktop application for Windows that takes GIS data (including OSM), stylizes it with a relatively simple ruleset, and can generate tiles in the standard XYZ format for use elsewhere. It can also be scripted, which meant I could use it as part of an automated workflow to generate new tiles as the OSM data changes. This seemed like a good solution, so I set about writing some rulesets that would reasonably show the RAMBA trail routes and some automation around it all.
After a lot of experimenting I settled on a having separate tile set for each of the official loops, an overview of all trails, and a base map. The base map would always be shown, and a user can toggle between layers which highlight all the trails or individual loops.
After a few iterations of custom rules, I settled on a simplified set based on the Default.mrules file which comes with Maperitive for rendering the base map. The only modification was changing the font to Michael Adams’ Roadgeek 2005 Transport Medium font, as it looks nicer than the default, Verdana. For the overview and route layers I created simple rules based on the the default rendering of highway=path, using the Heavy version of the font. The rule for each trail route (relation) selects the trails in a given relation then colors them accordingly.
Creating these rules took a bit of fiddling, as Maperitive is both a bit of a dead project, not completely documented, and (in the latest Beta) sort-of buggy where sometimes the map display would stop updating. Still, even though I’m not great at making attractive things, I was able to come up with something that worked well enough.
Conveniently, Maperitive also comes with a command line version (Maperitive.Console.exe). After settling on rendering rules and a tile generation script, I used this as part of an automated workflow which downloaded OSM data directly then rendered each of the tile sets.
After tile generation I used a Windows binary of OptiPNG to losslessly compress the tiles, resulting in a ~62% space savings (original: 746MB, optimized: 286MB) which’ll reduce storage and bandwidth overhead.
The Front End
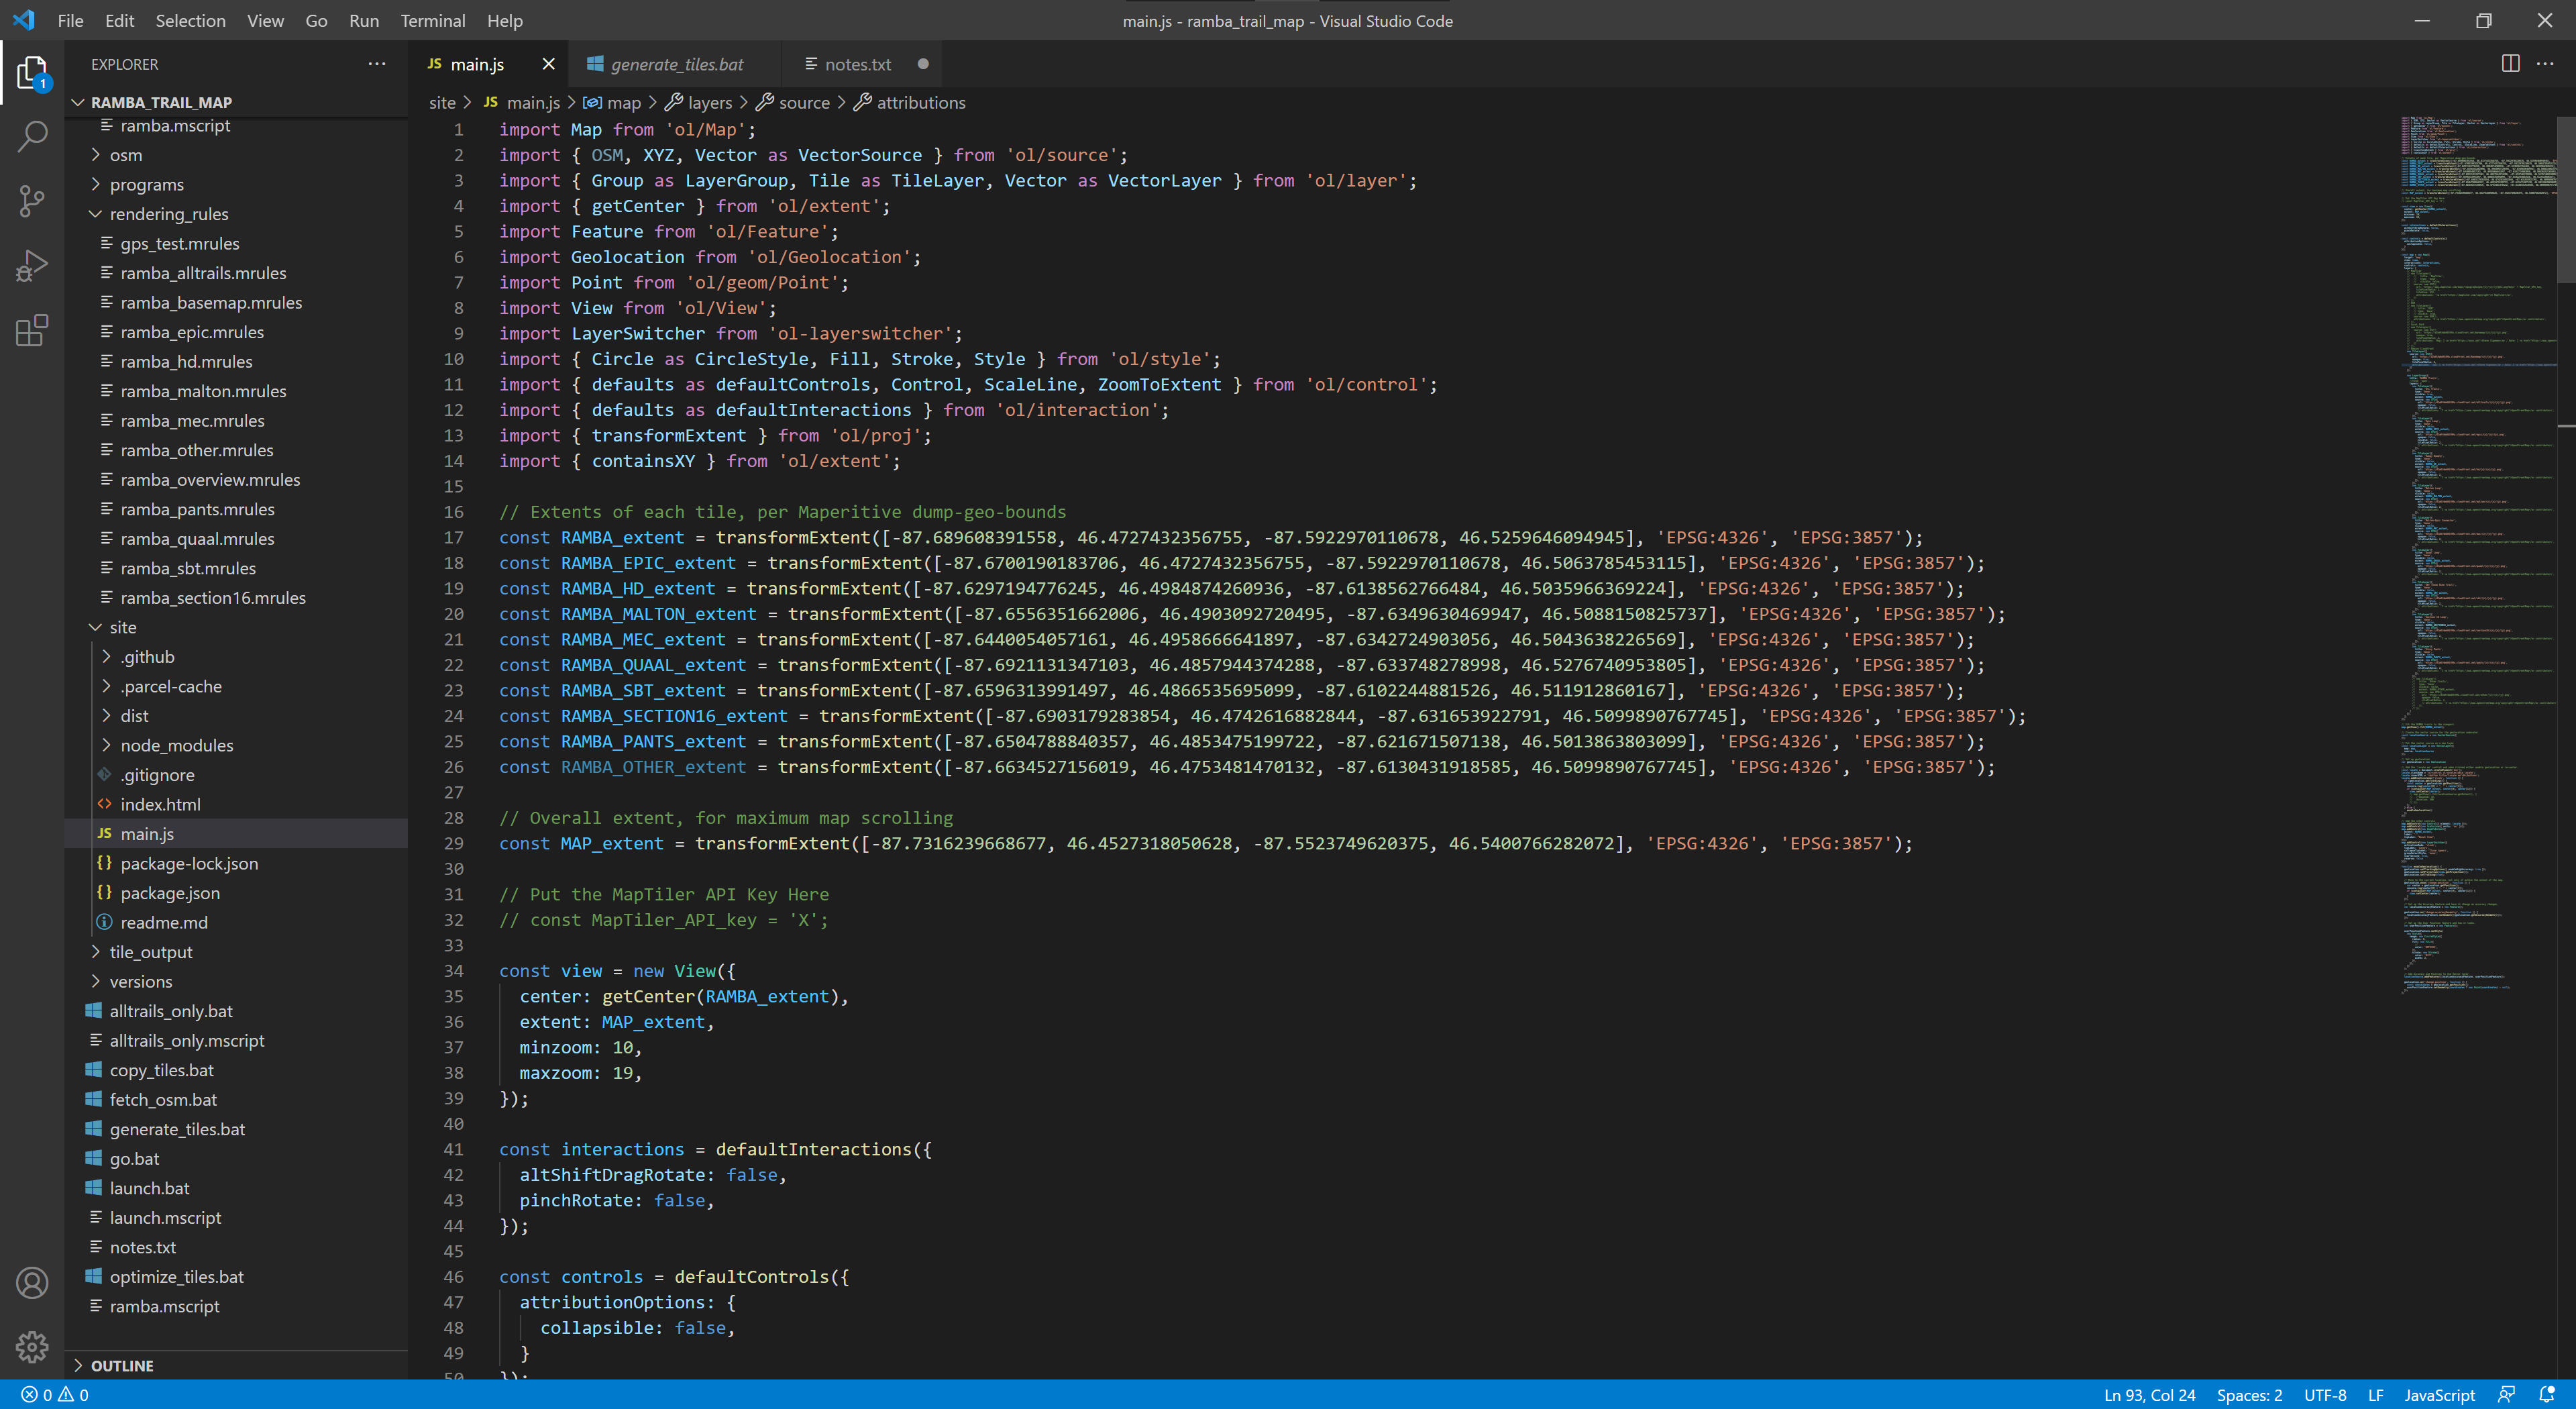
Editing in VS Code
With tiles generated I needed a way to display them. It turns out that OpenLayers was easy to use and it all ran as simple client side application in a browser. By using npm and parcel, with Visual Studio Code for editing, it was quite easy to get the site developed, tested, and bundled up for deployment. The only component I had to add was ol-layerswitcher control, which provides an easy way to toggle between layers.
Prior to this I had very little experience with modern web development, with my exposure to JavaScript pretty much limited to reading others’ code to figure out what it’s doing. After a bit of confusion (and having to accept the hidden complexity of using an application bundler), I was able to focus solely on writing a single main.js file with a basic index.html that together do what I wanted:
Run full screen by default.
Show all trails by default, with toggles for the defined routes (layers of the map).
Show an attractive background map below the routes to show the rest of the area.
Offer controls to use geolocation to showing one’s location on the map and reset the view to the original map extents.
Look sane on desktop and mobile devices.
This ended up being much easier than I thought, and between the OpenLayers Examples and just some basic programming I was able to get something I’m happy with. Far more time was spent designing the tiles and thinking about what I wanted it to do than writing the code to display it all.
Tile Hosting
The actual map tiles are a number of small PNG files, and a typical session of viewing and panning around the map can result in hundreds of image loads. This was seeming a bit slow when being served from nuxx.net via HTTP/1.1, so I looked into using HTTP/2 to improve performance.
Unfortunately, it was not simple to turn on HTTP/2 here at nuxx.net as I’m using PHP for WordPress, which in turn requires MPM prefork, which precludes mod_http2. I could have set up another web server and such, but for now I’m hosting the tiles in AWS, with the tiles uploaded to an S3 bucket and served via CloudFront.
This should allow for better tile download performance than what I can do from my server. Despite potentially incurring a bit of a financial cost it is a good experiment in hosting tiles in the cloud. I may change this in the future, particularly if it becomes cost prohibitive, but for now it’s working well.
Follow Along At Home
If you would like to generate this same map, start by downloading this ZIP file: ramba_trails_map_code_1.0.zip. It contains the scripts and rules needed to generate the map tiles (ramba.mscript and the .mrules files), the index.html, main.js, and package.json for the OpenLayers-based front end, the .osm file used to generate the first release of the map, and a few batch files that tie it all together.
These batch files are included to will help you out, but may need some editing to fit on your environment:
fetch_osm.bat: Uses curl to download all OSM data within a bounding box that encompasses the Ishpeming/Negaunee area.
generate_tiles.bat: Runs ramba.mscript via Maperitive.Console.exe to generate the tiles.
optimize_tiles.bat: Copies the unoptimized tiles from the .../tile_output/raw output directory to the .../tile_output/optimized directory, then runs OptiPNG against the tiles to optimize them in place.
To build the web app you’ll need to install npm, parcel, create a new OpenLayers app as per the directions here. Then install ol-layerswitcher (npm install ol-layerswitcher), replace the default index.html, main.js, and package.json with the ones I provided, and you should be ready to go.
Updating the Map
As you can see, the map is two major pieces: the front end and the tiles. Whenever the map data changes in OSM the tiles can be regenerated to update those layers. The code for the front end web app only needs to change if the storage location changes, features are going to be added, etc.
Conclusion
This map has worked out rather well and I’m happy calling it v1.0. It’s been a great learning experience, and I’ve even managed to produce something useful that didn’t exist before: an interactive map of some of the most rugged single track trails in Michigan; one of my favorite places to ride mountain bikes.
It’s far from perfect, and there are some things I could do differently, but for now, I’m considering it a success. When in Negaunee for vacation last week I successfully used development versions of this map to find my way around, so I know it’s better than nothing.
If you find any quirks in the map data — such as trails with wrong names or in the wrong location — please take a screenshot and show me what’s wrong and email that to steve@nuxx.net. I’ve done my best to ensure the RAMBA trails are accurately mapped, but I’ve certainly missed some things.
Problems
No key or other ancillary information (such as logos) as are normally found on print maps.
No terrain. While 1m DEM elevation data is available from the USGS, I couldn’t figure out how to use it in Maperitive for generating hillshading.
No easy way to add clickable items to show additional info, link to external map apps (eg: for navigation).
Maperitive’s text rendering isn’t the best, resulting in goofy looking text at some zoom levels.
Long trails only have one label placed on the middle. Trails with one name broken into multiple ways will be labeled numerous times.
Due to being run in a browser it’s a sufficient, but not great, mobile experience. Specifically, selecting the geolocation, recenter, and layer controls can be fiddly because they are so small.
Does not work offline, but thankfully most of the RAMBA area now has good mobile data coverage.
Things To Investigate
Keep an eye on AWS cost and performance.
Look at Leaflet for the front end, as it seems a bit more modern.
Consider rendering map tiles with TileMill. This will add a lot of complexity both in setup and styling tiles, but once done should allow a lot more flexibility in styling and overcome most of Maperitive’s problems. mapbox/mbutil should work for getting XYZ PNGs out of MBTiles files.
Consider using a tile server if I don’t want to deal with discrete files.
Look more into using vector tiles with client-side styling. (I passed on this for now, as a GeoJSON file showing each of the route is a large download and had no benefit over raster tiles.)
Maperitive should run under Mono, and OptiPNG is available for many platforms, meaning it should be possible to reproduce this build under macOS or Linux. Note that the GUI for Maperitive will not currently run on macOS due to Windows.Forms currently being based on Carbon, which is not available for 64-bit macOS. So while the CLI should work, the GUI version isn’t currently compatible with macOS 11.5 (Big Sur) and higher.
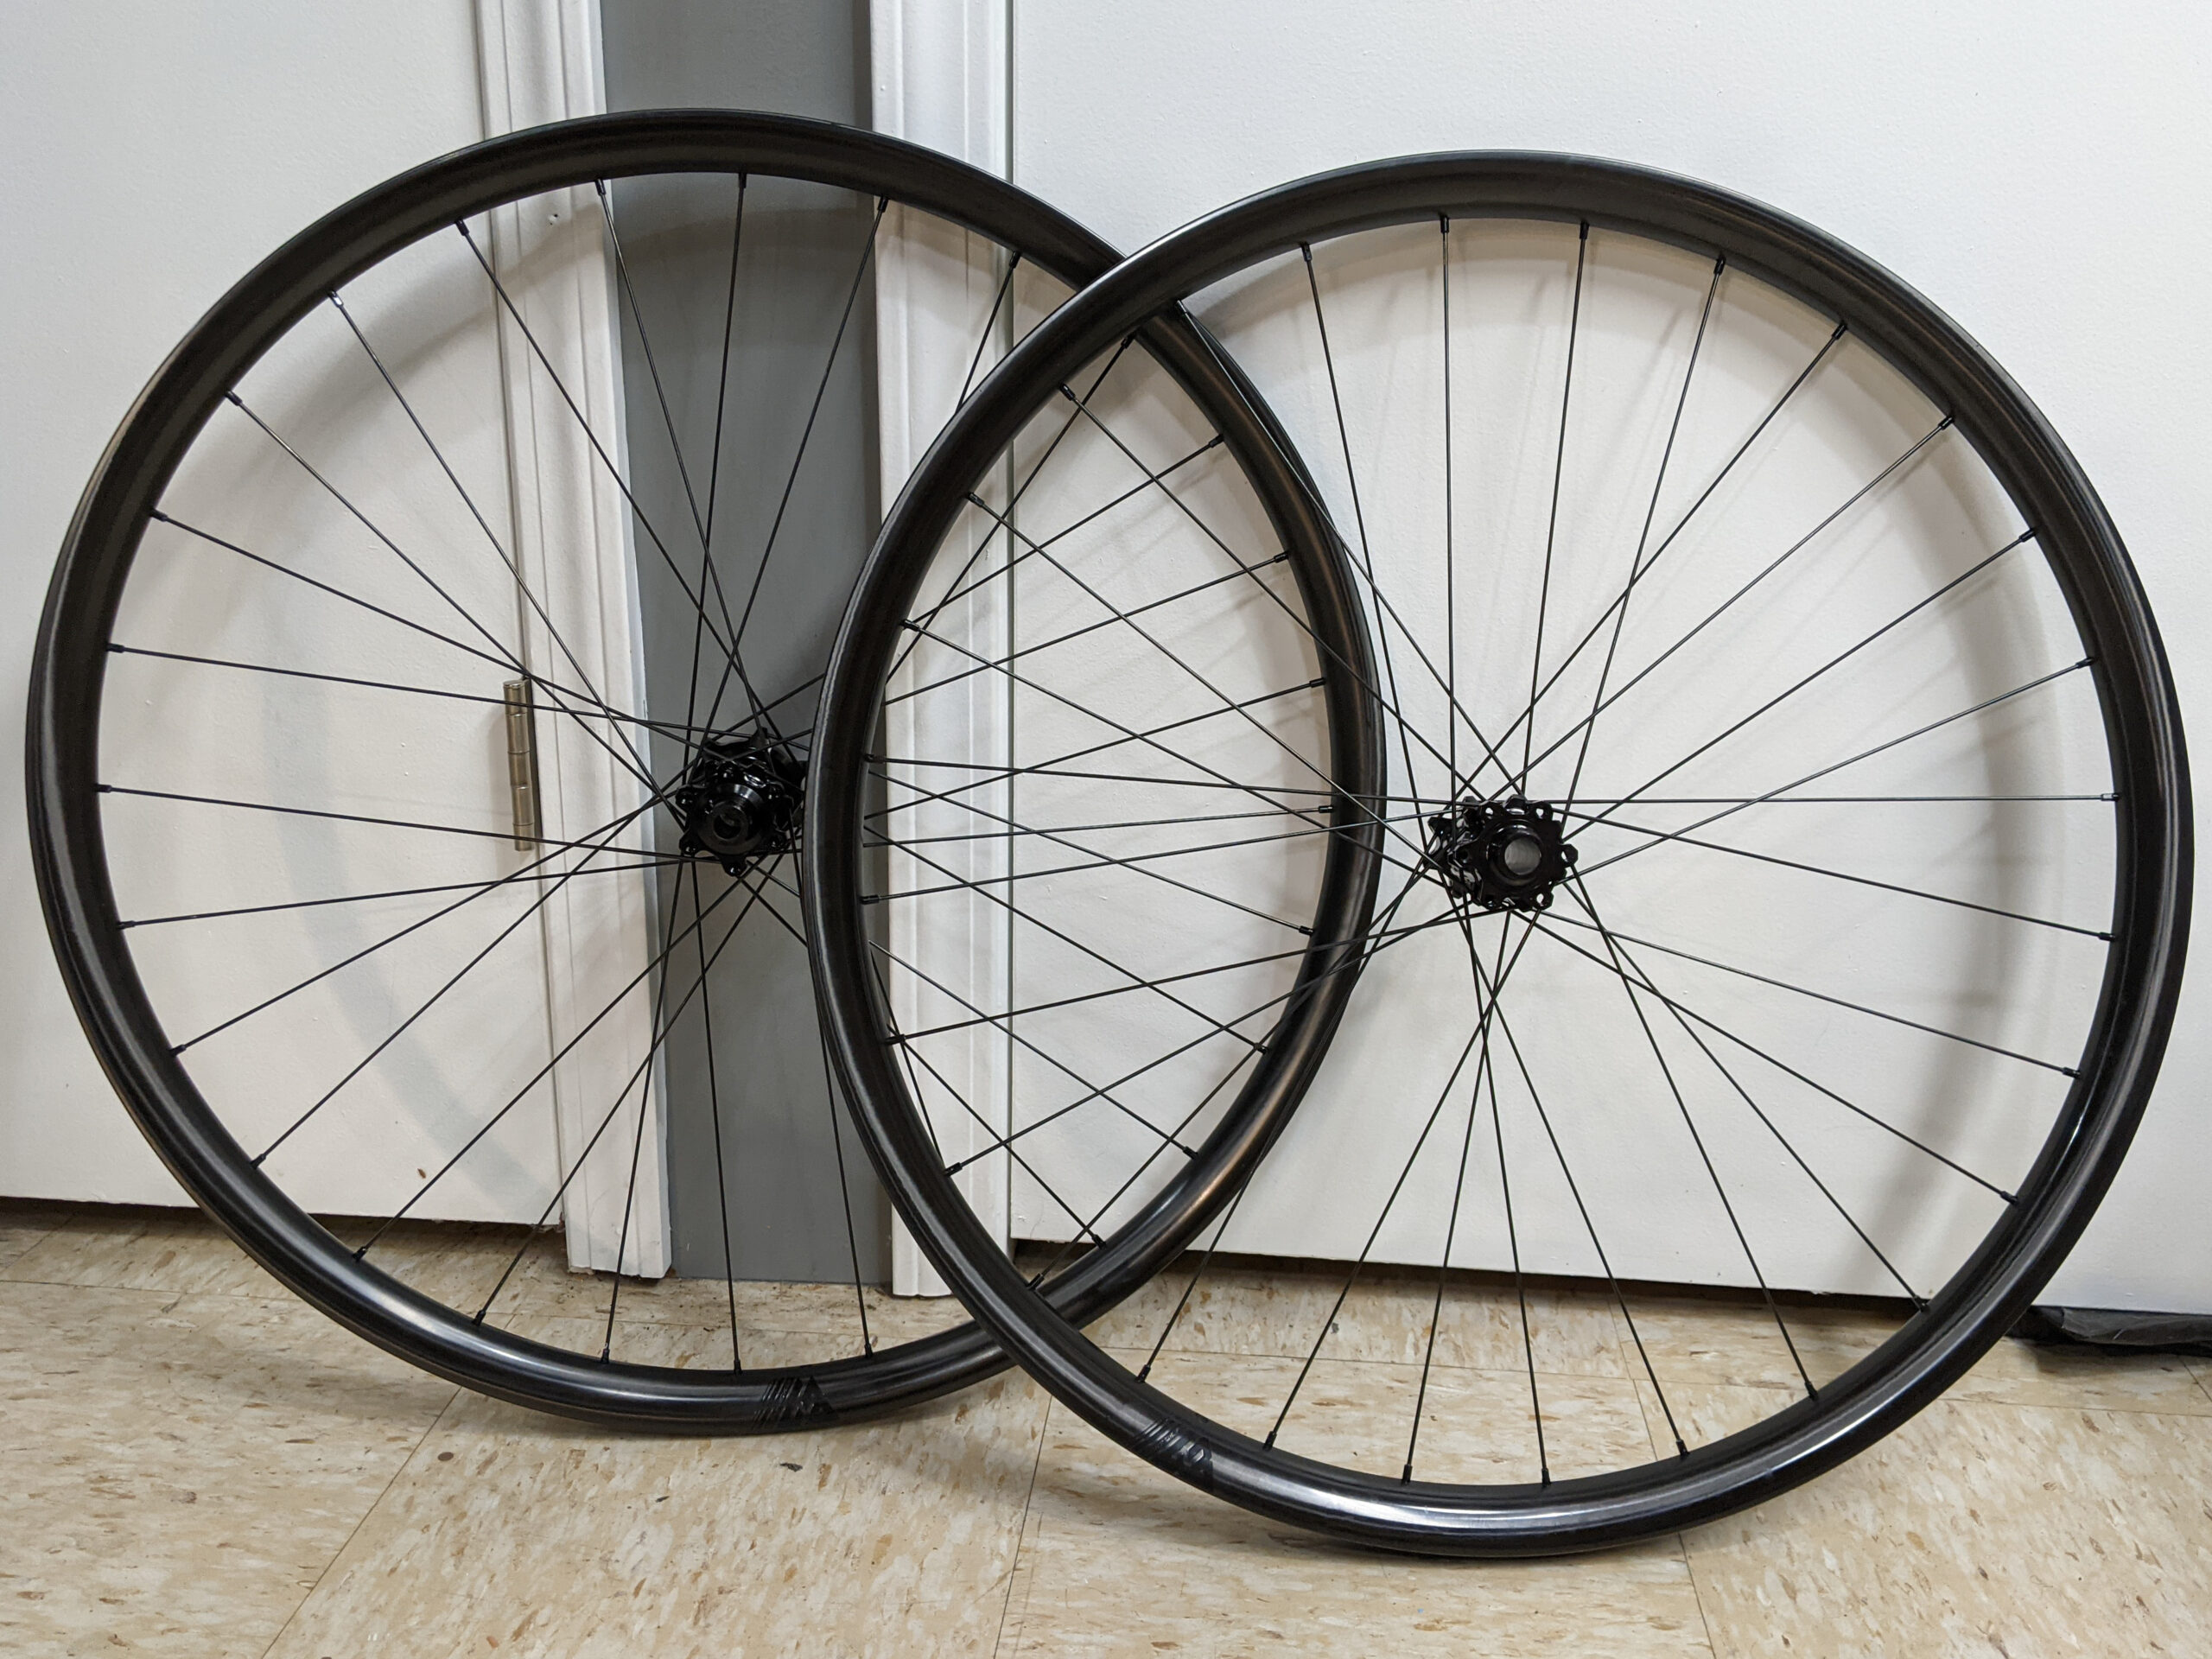
Both the Electric Queen and Timberjack were fitted with the same Industry Nine Trail S Hydra 28H wheelset; a really nice value wheelset which mates the amazing Hydra hubs with aluminum rims. Despite slightly denting (and fixing) the rear rim, these have held up great and been wonderful to ride, but I still occasionally found myself missing the stiffness (and durability) of carbon rims.
As the bike sat over winter I figured it’d be a good time to upgrade to the carbon rims, so just before Thanksgiving when Light Bicycle was offering a bit of a sale I ordered a set of rims and got the process started. Between these value rims and (literally) slow-boat-from-China [1] shipping, eBay special spokes, and spare nipples from previous builds I was able to put together a nice, solid, carbon wheelset for about $550 less than if I’d bought a complete similar set from I9. And I’ll have some rims to sell (or reuse).
The Trail S Hydra rims come with straightpull hubs that I9 doesn’t sell separately, but they were nice enough to send me the specifications for them. With some forward/backward checking against the original rims and spokes (597mm ERD, 303mm spokes) I found the DT Swiss Spoke Calculator to work great for these hubs as well.
For rims I chose the Light Bicycle Recon Pro AM930 rim, which is their high end 30mm internal 29er rim with a nude unidirectional carbon finish. As options I chose 28h drilling, black logos, and black valve stems to match the hubs and any bike. (Silver logos would also have been fine to match the hub logos, but I really prefer plain looking rims.)
When shopping around for spokes a deal popped up on eBay offering a whole box of 298mm DT Swiss Competition straightpull spokes, which perfectly match Squorx nipples left over from previous wheel builds. I love working with nipples like these, because they are tightened with a T-handle tool from the back side, which makes building way more comfortable and faster than with a traditional spoke wrench. And it means no chance to mar the anodizing on the nipples.
The wheels were built up using Ultra Tef-Gel as thread prep, to a maximum tension of ~131kgf. Before starting the build I hadn’t realized that the inner and outer spokes on each side of the rim would be a different tension. As their flange offset is a bit different for each set of spokes on each side, necessary so the straight spokes don’t interfere with each other, the bracing angle is slightly different resulting in a different tension.
I did have a slight issue where, when bringing the front wheel to tension and trying to hit the Light Bicycle recommended tension of ~145kgf, the inner Squorx heads broke off three nipples. After this I detensioned the wheel and brought it back up to a lower, but still appropriate, spec. (In the process of figuring this out I ended up cutting two spokes as the nipples couldn’t easily be turned. After the third I detensioned the wheel and decided to build to a lower tension.)
Final tension for the wheels are as follows, with the small number the indicator on a Park Tool TM-1:
Front Wheel (NDS / L / Brake Side is Steeper Bracing Angle):
Per usual with carbon rims building is a matter of centering the rim, eliminating runout, and detensioning the spokes. There’s really no truing (in the traditional sense) because single-spoke tension doesn’t really affect a stiff carbon rim.
Out of pocket cost was $651.13 on top of of the original wheelset, for a total of $1519.27 (excluding tires and sealant and whatever I can sell the old rims for):
A complete Industry Nine Hydra Trail S Carbon would cost about $2015 (with Shipping + Tax), about $500 more than the end cost of building these. While this set doesn’t have the US-made Reynolds Blacklabel rims, I’ve been happy with Light Bicycle rims on previous bikes and anticipate these’ll be just as good.
The final build, without tape/valves/tires/rotors/cassette, comes in at 794g for the front wheel and 917g for the rear wheel (1711g total). This is a 51g savings over the Trail S Hydra build when going to wider and stiffer rims. This isn’t enough weight savings to notice, but at least it didn’t add anything.
When putting the wheels back together I fitted the old tires as they still have a good bit of life left. I also used the original valve stems from Industry Nine as they are a bit shorter and I prefer the brass body versus the aluminum valves that came with the rims. It also turns out that Light Bicycle provided more than 2x as much tape as needed for the rims, which is great for future spare use. (The rims came with two rolls, one roll did both with plenty to spare.)
[1] The shipping notification states: “It is scheduled to board a Matson Liner’ ship for a sea journey of about 3-4 weeks before its arrival at Los Angeles port in the US. Then UPS will pick the package up to manage the local delivery for you. It is only when the pickup is made, the information at UPS website will be updated further as well as you could reach out to UPS by calling 800-742-5877 for quicker help then.”
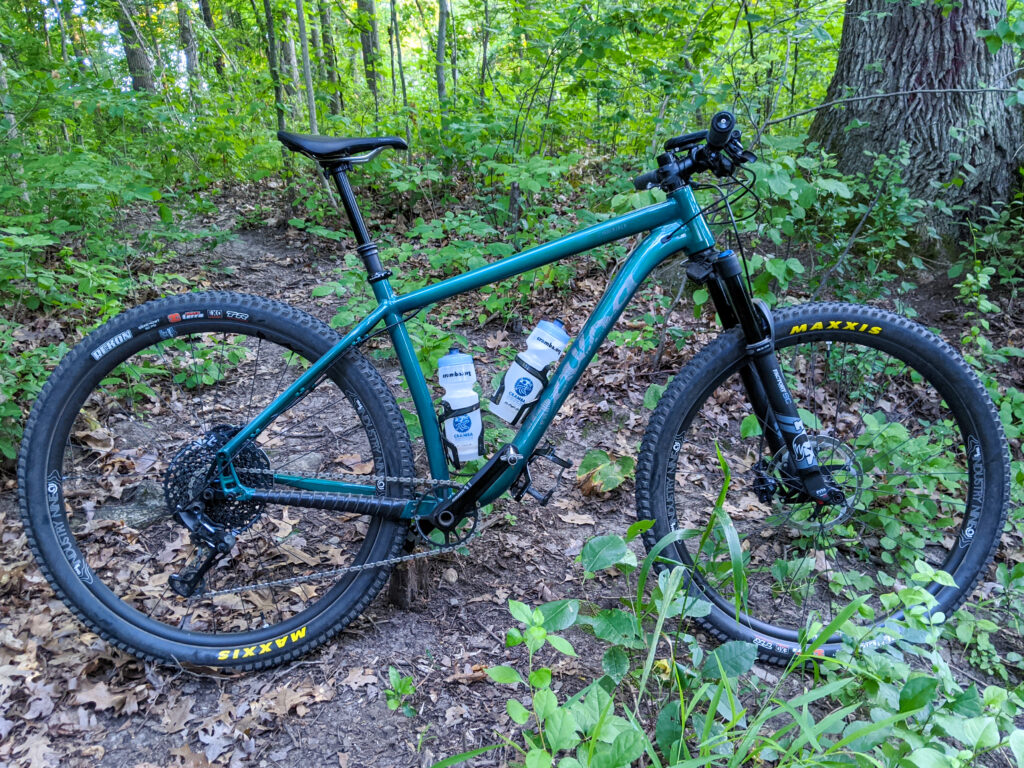
Unfortunately, the only good solution was to get a different frame. The Salsa Timberjack was my original choice for this hard tail trail bike build, but I got excited by the idea of a steel bike, loved the paint on the Electric Queen, and glossed over the seat tube angle. By the time I realized I needed a new frame the stand-alone black frames were no longer available. Fortunately, over at the excellent Sports Rack Marquette, Evan had some new frames from complete bikes available, and I was able to get a beautiful gloss teal frame from a 2019 Timberjack Deore 27.5+ from them.
Besides matching my wants geometry-wise, the frame is a great choice because all parts except for the headset swapped over, and the frame came with a headset. While the stock Cane Creek 10 is a lower end part, which lacks sealing on the top bearing cover and has a plastic compression rings and crown races and black oxide bearings, it works and will be fine for a while. The fork was already fitted with a higher end matching crown race, and I have a Cane Creek Hellbender 70 headset ready swap in once the bearings and compression ring start to go.
One downside to the Timberjack vs. Electric Queen is that I’ll no longer have a rigid fork for the bike, but if I really want one the Firestarter 110 Deluxe is a perfect match. The top tube on this bike is also a little bit tall, as it’s also designed for bikepacking and fitting a top tube bag, but it’s plenty comfortable to ride and I love all the bottle cage options.
To round out the build and get the colors nice I ordered some new fork decals from Slik Graphics. Unfortunately, I screwed up and ordered the decals for the Factory-series forks, so while it looks good, I technically have the wrong upper logo on the fork lowers. I’ve since ordered another set with the proper Performance decals for the upper, and am waiting for them to arrive. Since this order was placed Slik became involved in a dispute with Fox, so I’m hoping to receive the updated decals. Even if they don’t arrive, at least the colors are right on the fork. I could even remove the upper decals and have it still look good.
When finishing up the build I ran into a significant problem with the brakes: squealing and vibration. Due to part availability I’d purchased the calipers and levers as a non-retail / meant-for-complete-bikes / likely grey market set from a well-known eBay seller, ronde-cycling. I was never able to get them bedded in properly, and after a few rides they began squealing horridly and shuddering under hard braking. This seller offers different pads options with the brakes, and I began to suspect they handle the pads with each brake set sale, did so poorly, and contaminated the pads before they got to me.
I tried the normal recommendations of cleaning everything, sanding the pads and rotors, and even baking the pads in the oven, but on each bed-in procedure they’d begin squealing again. Resolution a set of new J04C pads and a bed-in and now the brakes are working great. At ~$50 for a new set of pads this really added to the cost of the brakes, but at least they are now working.
Final build, with water bottle cages, pedals, and computer came out to right around 27 pounds. And, it fits! Since building it I’ve put over 180 miles and nearly 16 hours on the bike, haven’t touched the geometry, and I’m really happy with the result. It’s exactly what I wanted; a high quality hard tail trail bike.
Get osm2ai.pl working on your computer. I run this on macOS, and it works fine on Linux as well. Since it’s a Perl script there are probably some dependencies; likely resolved by installing a few modules.
Process each OSM file with: osm2ai.pl --input infilename.osm --projection mercator --output outfilename.ai
Open each file in Illustrator, combine them into a larger document, make it look the way you want, etc.


")