Press "Enter" to skip to content

Month: May 2020

All-City Electric Queen: Rugged XC / Trail Hard Trail Bike

Nearly four years after getting a full suspension XC / trail bike (2016 Specialized Camber) and beginning to really enjoy riding with a bit more travel and a dropper post I started getting the itch to build a similarly spec’d hard tail. Picking up a few particularly good deals (frame/fork), shopping smartly, using some parts I’d collected over the years, and getting some parts from friends, I ended up putting together an All-City Electric Queen.

This steel frame from a QBP brand best known for urban bikes, fitted with a smart choice drivetrain (SRAM GX), higher end wheels (I9 Hydra hubs) and suspension (Fox 34), and reliable brakes (Shimano SLX) is the solid spec build that I was wanting. The frame came complete with a matching rigid fork, and I anticipate switching over to the rigid fork in springtime or when the Fox 34 is out for service.

After the first shakedown ride at Stony Creek I’m pretty happy with the bike. The geometry of the frame itself is a little curious, but it seems to fit me well. Specifically, it has a fairly slack seat tube, tall head tube, tall seat tube, and rather high top tube. This means I have minimal stand-over (akin to the Titus Racer X 29er) and the saddle has to sit quite-forward on the rails, but it seems to work and feels good when pedaling. It also results in the controls (dropper lever and shifter) hitting the top tube when turning the bars, so I’ve had to pad the top tube with some 3M mastic tape.

I suspect this frame would work well for the sort of long-leg/short-torso rider who often finds themselves on a custom frame, but it also works well for me. It also means that a slim top tube bag like the Relevate Designs Tangle would fit along with bottles. Or, it could have been placed almost 1.5″ lower (with a shorter head tube and seat tube) and still been good… But I’m not a frame designer, so I suspect there’s some good but unknown-to-me reason why this was done.

Coming in at 28 pounds it’s not a light bike, but being a cheaper steel frame, 120mm fork with 34mm stanchions, 2.4″ wide quite-knobby tires, dropper post, and aluminum rims I’m okay with it. Going to some carbon bits (eg: bar) I could drop some weight, but I don’t think it’ll matter much, as this is roughly the same weight as the Camber, which I love riding.

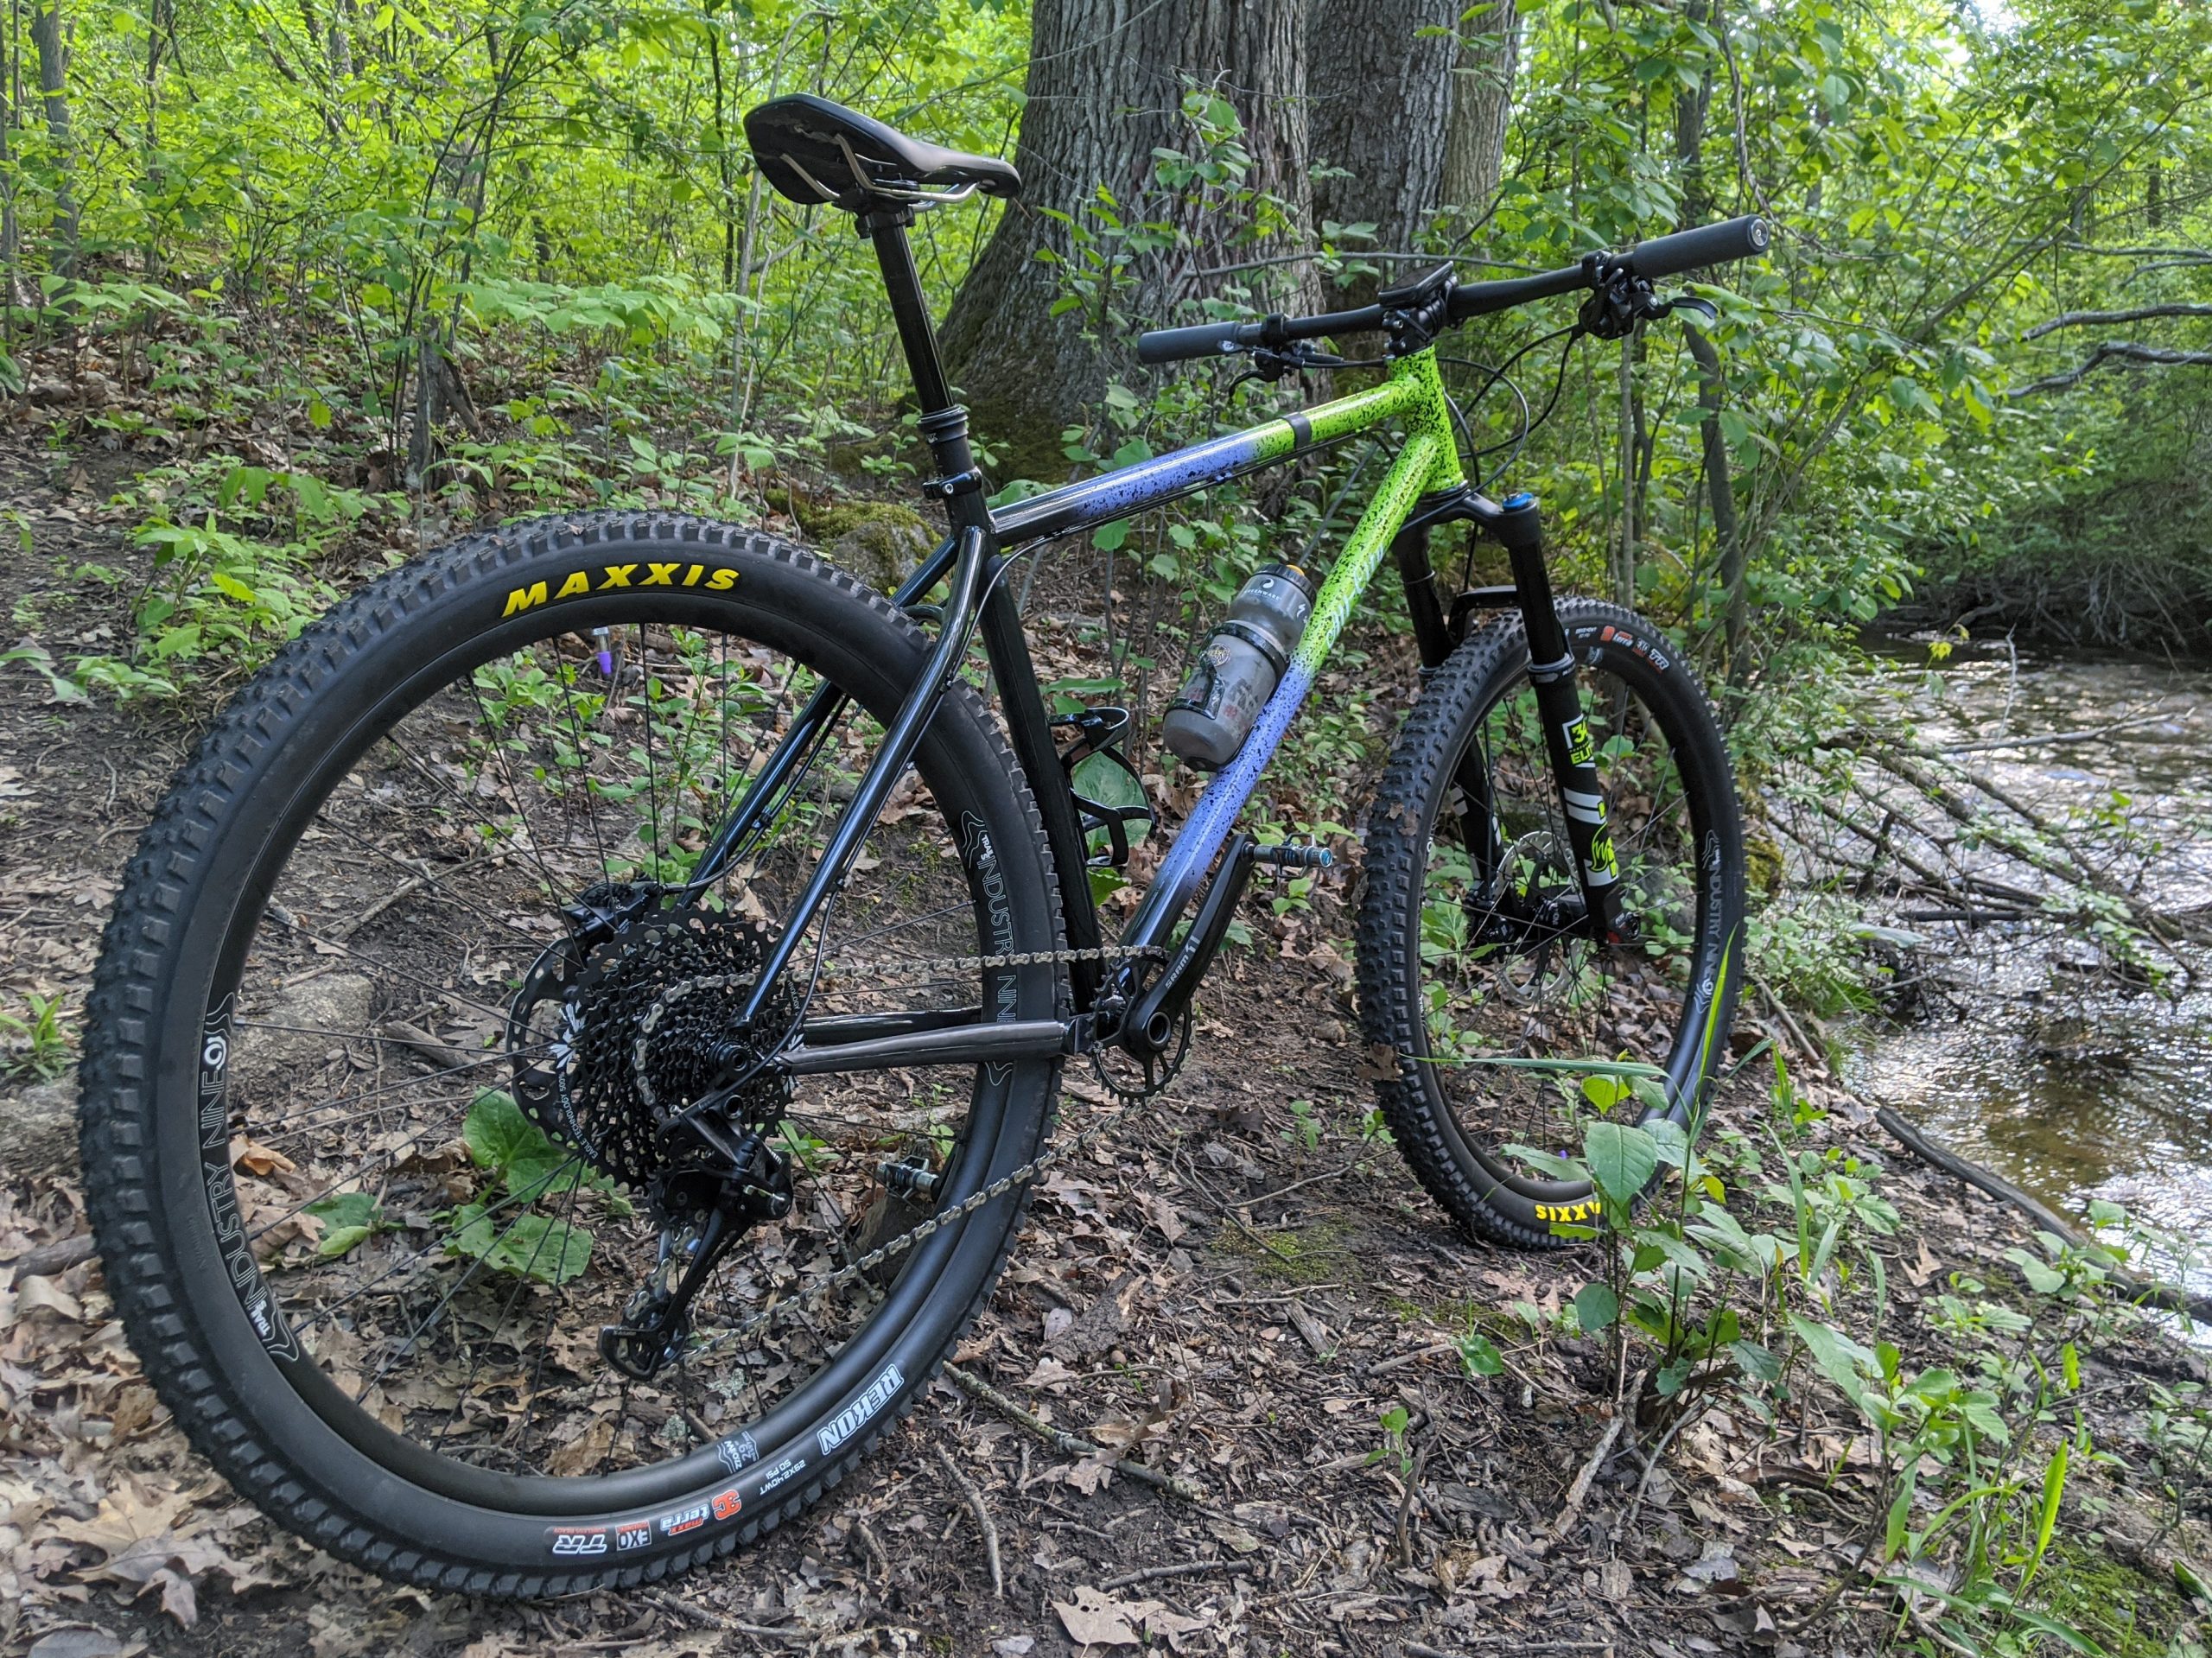
Part details are below, and photos of the build showing everything from parts to checking clearances, can be found here: All-City Electric Queen.

Frame: All-City Electric Queen (Large, Lavender/Lime w/ Splatter)
Fork: Fox 34 Step-Cast (Factory, FIT4 damper, Black Upper Tube Finish, 120mm, 51mm offset, 15QR)
Headset: Cane Creek SlamSet (Black, ZS44/EC44/40)
Crankset: SRAM X1 1400 GXP
Bottom Bracket: SRAM GXP (Black)
Chainring: SRAM X-SYNC 2 (32t, steel, Direct Mount, 3mm / Boost)
Derailleur: SRAM GX Eagle
Shifter: SRAM GX Eagle
Shift Cables / Housing: Shimano Bulk
Cassette: SRAM XG-1275
Brakes: Shimano SLX M7100 (Levers: BL-M7100, Calipers: BR-7100)
Front Rotor: SM-RT86-L (203mm)
Rear Rotor: SM-RT86-M (180mm)
Front Brake Adapter: SM-MA-F203P/P (160mm Post to 203mm Post)
Rear Brake Adapter: Shimano SM-MA-R180P/S (IS to 180mm Post)
Stem: Specialized Stout XC, (+6°, 75mm)
Bar: Salsa Salt Flat (750mm)
Wheels: Industry Nine Trail S Hydra 28H (29″)†
Tires: Maxxis Rekon (29 x 2.4″, 3C/EXO/TR)
Seatpost: Fox Transfer Performance Elite (2020, Black, 125mm, 30.9mm, Internal)
Dropper Lever: Wolf Tooth ReMote Light Action (Black, 22.2mm Clamp)
Seatpost Collar: Salsa Lip-Lock (Black, 33.3mm)
Saddle: Specialized Power Expert (143mm)
Pedals: Crank Brothers Eggbeater 3 (Blue, from El Mariachi Ti)
Grips: ESI Extra Chunky (Black)
Bottle Cages: Specialized Zee Cage II (Black Gloss, 1x Left, 1x Right)
Computer: Garmin Edge 530, Garmin Speed and Cadence Sensors (v1)
Bell: Mirracycle Original Incredibell (Black)
Derailleur Hanger: QBP 687
Frame Protection Tape: 3M 2228, McMaster-Carr UHMW PE

Rigid Fork: All-City Electric Queen (Large, Lavender/Lime w/ Splatter)
Crown Race: Cane Creek BAA0009S (40-Series 52/30mm Steel)
Front Brake Adapter: Shimano SM-MA-F203P/S (IS to 203mm Post)

† Per I9, these are built with Sapim Race Straight-Pull spokes, 303mm all around. (For 29er. If these were 27.5 wheels they’d be 285mm.)

Comments closed

High Resolution Strava Global Heatmap in JOSM

Mapping trails in OpenStreetMap (OSM), using JOSM, is done by overlaying one or more data sources, then hand-drawing the trail locations using this background data as a guide. While not a default in JOSM, with a little know-how and a paid Strava Subscription the Strava Global Heatmap data for this can be used as well.

While there’s a fair bit of info about doing this scattered across some JOSM tickets (eg: #16100), this post is to document how I make this work for me by creating a custom Imagery provider. Because there isn’t an official (and robust) plugin to authenticate JOSM against Strava it’s a little tricky, but overall isn’t bad.

First, you need to sign into Strava, then go to the Global Heatmap and get the values of the three cookies CloudFront-Key-Pair-ID, CloudFront-Policy, and CloudFront-Signature. These values are essentially saved credentials, and by using them in a custom Imagery provider URL, JOSM will use these to access the Global Heatmap data via your account and make it available as an Imagery layer.

The easiest way to get these cookie values is to use the Developer Tools built into your web browser:

  1. Launch your web browser, either Firefox, Chrome, or Edge.
  2. Go to the Strava Global Heatmap, sign in if needed (check the Remember me checkbox), and be sure it’s properly displaying high resolution data.
  3. Load the developer tools for your browser to show cookie details:
    • Firefox: Click the Hamburger MenuWeb DeveloperStorage Inspector (or press Shift-F9), expand Cookies and click https://www.strava.com.
    • Chrome: Click the Three Dots Menu → More tools → Developer tools (or press Ctrl-Shift-I), select the Application tab, expand Cookies, then click https://www.strava.com.
    • Edge: Click the Three Dots Menu → More tools → Developer Tools (or press F12), select the Storage tab, expand Cookies, then click heatmap.
  4. Get the value of three cookies, CloudFront-Key-Pair-ID, CloudFront-Policy, and CloudFront-Signature, and make note of them (in Notepad or such). You’ll need them to build the custom URL. Here’s examples of what the three cookies will look like:
    • CloudFront-Key-Pair-ID: VB4DYFIQ7PHQZMAGVMOI
    • CloudFront-Policy: FTUGYikErADOqGmqEnPTaaZ3LCE2QbOJSSsmPD9vdY0hfjSWWHZBgnRai1aQcvUe
      2YtgkG3KdP8IencRaGrS3I5bHAeabQ4I776T7UipDPFzNVh9PBIRvb3DjDqVfssp
      mBA5IrxacQGfB2YmKwegp9OTBfUFkvtEQOlzeXfqeuc34cp408GYXSvp2DsnxKFh
      ofbwygraae3VZqnZxp3vBpz3lBoyPnBEN1djJkxpU1fF_
    • CloudFront-Signature: lrMJG0L6zJilpSdGEnWug0zskcMDD5VVGdSRu~P4OOVp5z8iCMBRBO040wxunEQQ
      p0wVHdaCaTFAVqiM0jC0AApW7HigXjx57nsoEVslOzRuoX9S3g-
      FCePWYNPyZcJ95~6SoGdNRHz-
      b-ZZxk4ERhjzXCNIEE8Gt5uImitcPN3HRlhXexS39g30~5OEv~4FHzXfOOIhQ5X5
      cGUD0SpdYviBE~vkAJCk3TbQMXxlJbyX4OOL5xvVPv5WjzMKTuvEk6Z9m6iFBbZc
      8ov4qS60th0tZ1RM4pNMoIWKoqPS3~UPGISe6Xa8Kq-
      tQPxHlfGciI5uhoTp4b7lPussh52QaN__

(Note: These are not real values, you’ll need to look up your own.)

Next is to add a custom imagery provider for the Strava Global Heatmap to JOSM using a URL that you build with these cookie values:

  1. EditPreferences… (F9)Imagery preferences
  2. Create a new TMS string by replacing the [] sections in the following string with the cookie values from above, without the []s:
    • tms[15]:https://heatmap-external-{switch:a,b,c}.strava.com/tiles-auth/all/hot/{zoom}/{x}/{y}.png?Key-Pair-Id=[CloudFront-Key-Pair-ID]&Policy=[CloudFront-Policy]&Signature=[CloudFront-Signature]
  3. Add a new TMS entry by clicking the +TMS button.
  4. Paste the string from Step 2 into Box 4, Edit generated TMS URL (optional), and then give it a name in Box 5, such as Strava Global Heatmap High-Res.
  5. Click OK twice to return to the main JOSM window, and then try to use this layer over some existing data, just as you would aerial imagery.

If it doesn’t work, double-check your URL and be sure the entered cookie values are right, including the underscores after CloudFront-Policy and CloudFront-Signature. Also be sure you haven’t logged out of Strava, as this will expire the cookies. (If you make changes to the URL in JOSM you will need to delete the existing imagery layer and then re-add it to have the new URL used.)

These cookie values, in particular CloudFront-Signature, will occasionally change as cookies are expired and reset or if you log out of Strava. If things were working and then stopped, you may need to get new cookie values from your browser and update the TMS strings.

By default the TMS URL we started with shows the default heatmap, for all activity types, with Hot coloring. Depending on what other data you are working with it may be useful to show just Ride or Run data, perhaps in different colors. In the TMS URL, the first part after tiles-auth is the type of data, and the second is the color. By using this format, replacing [data] and [color], you can create additional heatmap layers:

tms[15]:https://heatmap-external-{switch:a,b,c}.strava.com/tiles-auth/[data]/[color]/{zoom}/{x}/{y}.png?Key-Pair-Id=[CloudFront-Key-Pair-ID]&Policy=[CloudFront-Policy]&Signature=[CloudFront-Signature]

Valid values for type of data: all, ride, run, water, winter.

Valid values for heatmap color: hot, blue, purple, gray, bluered.

Creating multiple layers, riding-only and running-only, of different colors was extremely useful when mapping Avalanche Preserve Recreation Area in Boyne City as cyclists tend to stick to the mountain bike trails and runners to the hiking trails. While I had orthorectified maps from both the city and TOMMBA, the separate riding and running heatmaps made the routes much clearer. In the example image above (link) I have the Ride data as color Hot and the Run data as color Blue; perfect for illustrating the mountain bike vs. hiking trails.

If you’d like to see this area as an example load the are around changeset 85690641 or a bounding box with the following values and see for yourself:

  • Max Lat: 45.2077126
  • Min Lat: 45.1878747
  • Min Lon: -85.0339222
  • Max Lon: -84.9832392
Comments closed