After getting the Onkyo RI support for ESPHome and Home Assistant in place, it was neat that I could turn my Onkyo A-9050 amplifier on and off remotely, but it wasn’t actually very useful; it didn’t save me any time/hassle. This iteration, adding HDMI-CEC support, brings it all together.
Back when I started this project, my main goal was to find a nice way to deal with toggling the power on the amplifier. Because I only use a single input on the amplifier and volume is already handled by the Apple TV remote, I don’t use the remote and it’s stored away in the basement. Normal practice was to manually press the power button on the front before using it, but this was irritating so I went looking for a better way, and the result was this project.
Initially I was looking at a way to use Home Assistant to coordinate powering the Apple TV and amplifier on, but it turns out there’s no good way to power up an Apple TV remotely; or at least not from anything that’s not an Apple device. I thought about going down the path of figuring out how the iOS / iPadOS does it, but the results of that would need to be incorporated into pyatv and chasing Apple’s changes was not a path I wanted to go down.
I then began thinking about it inversely: What if I could tell when the Apple TV woke and slept, and then take action based on that? After all, it’s already using the well-established Consumer Electronics Control (HDMI-CEC) to wake the TV… What if I could listen for that? And we’re always using the Apple TV remote when watching content and there’s no need to wake it while out of the room, so pressing a button on the remote to get things started is just fine.
Well, it turns out that was easier than I thought. Using Palakis/esphome-native-hdmi-cec, a HDMI-CEC component for ESPHome, and then doing a little protocol analysis I now have a device that:
- Listens for the Apple TV to wake up and sends and sends a Power On to the receiver.
- Listens for the Apple TV to go into standby and sends a Power Off to the receiver.
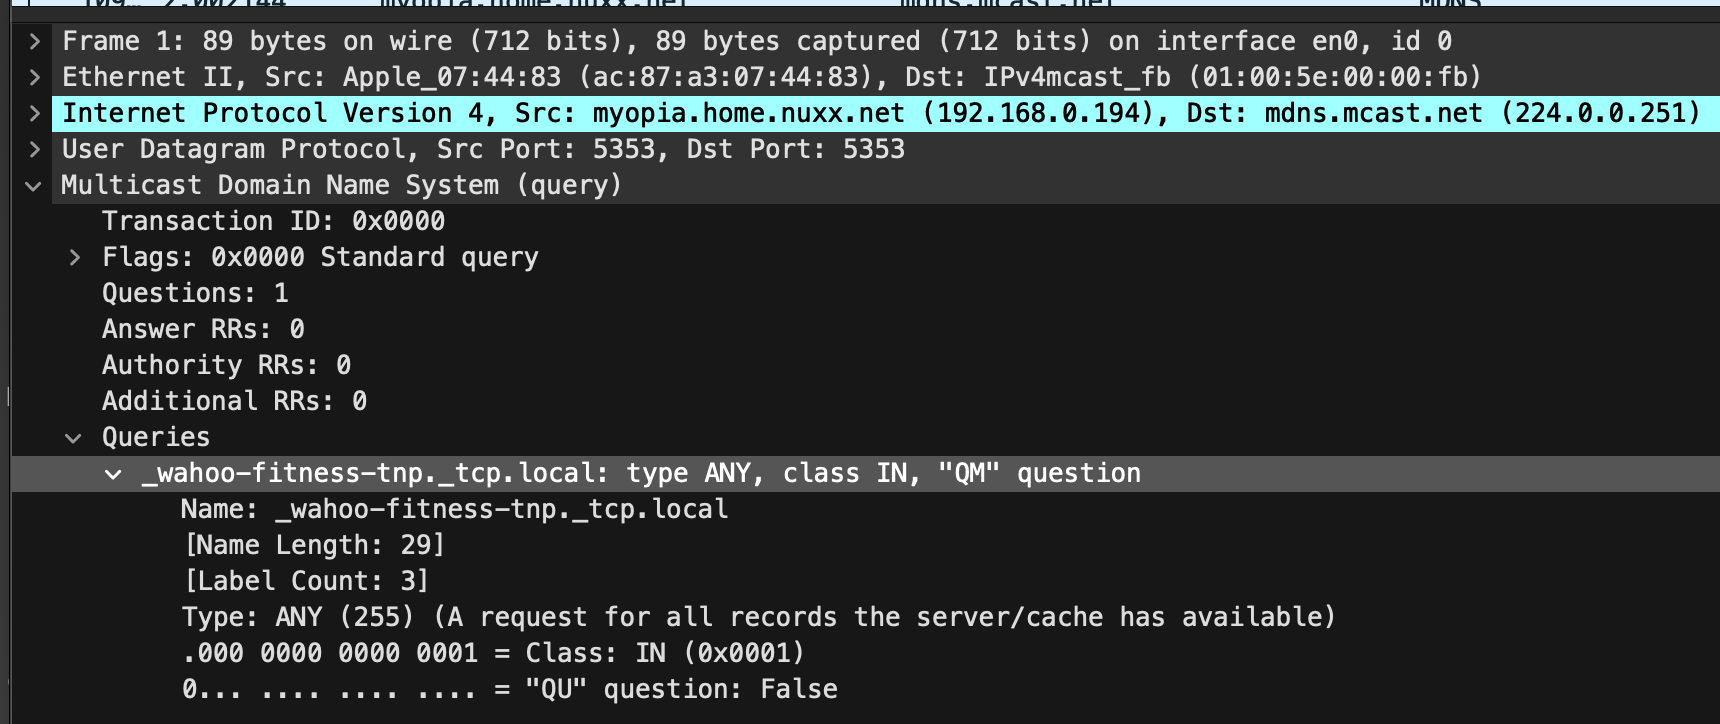
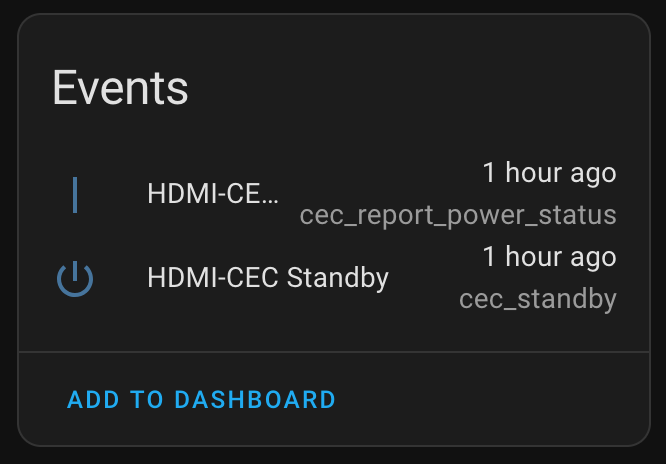
- Sends events to Home Assistant whenever a broadcasted HDMI-CEC Standby (0x36) or Report Power Status (0x90) are received.
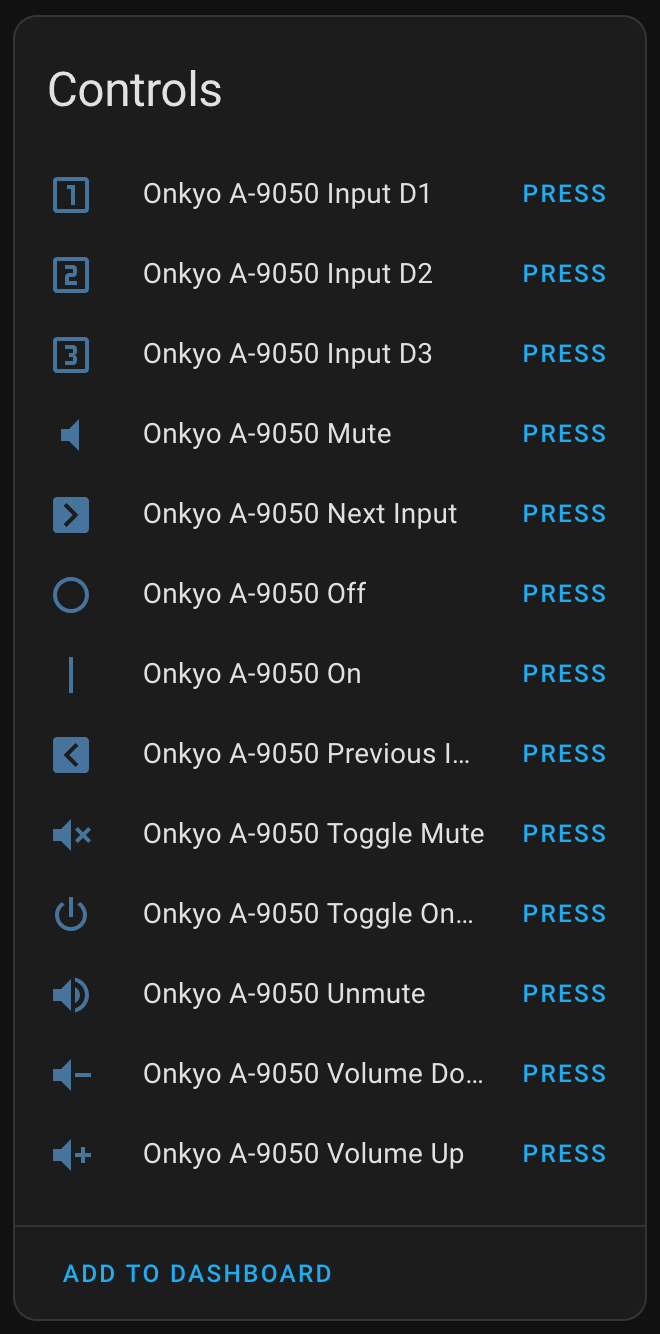
- Exposes controls in Home Assistant for a variety of Onkyo remote control commands and broadcasting an HDMI-CEC Standby (0x36). The latter puts my TV and the Apple TV to sleep, and also gets heard by ESPHome (loopback) and results in the amplifier being powered off.
- Exposes a service in Home Assistant allowing arbitrary HDMI-CEC commands to be sent.
The result is that when I press a button on the Apple TV remote to wake it up the amplifier powers on, the TV wakes up (as before), and all is ready to go with one button press. This satisfies my original goal, and also allows some lights to be turned on automatically.
I’ve still got some lingering architectural questions and may be digging further into the HDMI-CEC stuff to see if I can make it work better, but for now I’m happy. If/when I take this further, the big questions to answer are:
- Currently ESPHome powers on the amplifier without Home Assistant. This feels rational for a device bridging the two protocols and makes the amplifier work more like a modern HDMI soundbar, but is it the best way to go? Running it all through HA would be a lot more complicated and network (and HA) dependent, but I could instead use the notification in HA trigger a Power On at the receiver. Are there ever situations where I’d want this device to not power on the amplifier?
- The HDMI-CEC implementation is very simple, solely listening for two messages I saw the Apple TV send and taking action on them. One of these, Report Power Status, is per-spec used to send more than notifications of power being on. Should this be changed or further built out? (Note: Because the library doesn’t implement DDC for device discovery and addressing and such, it can’t be a full-fledged implementation. But that much is likely not needed; there’s more I can do.)
- Is it possible to wake the Apple TV via HDMI-CEC? It’s not immediately obvious how, but perhaps with a bit of probing…?
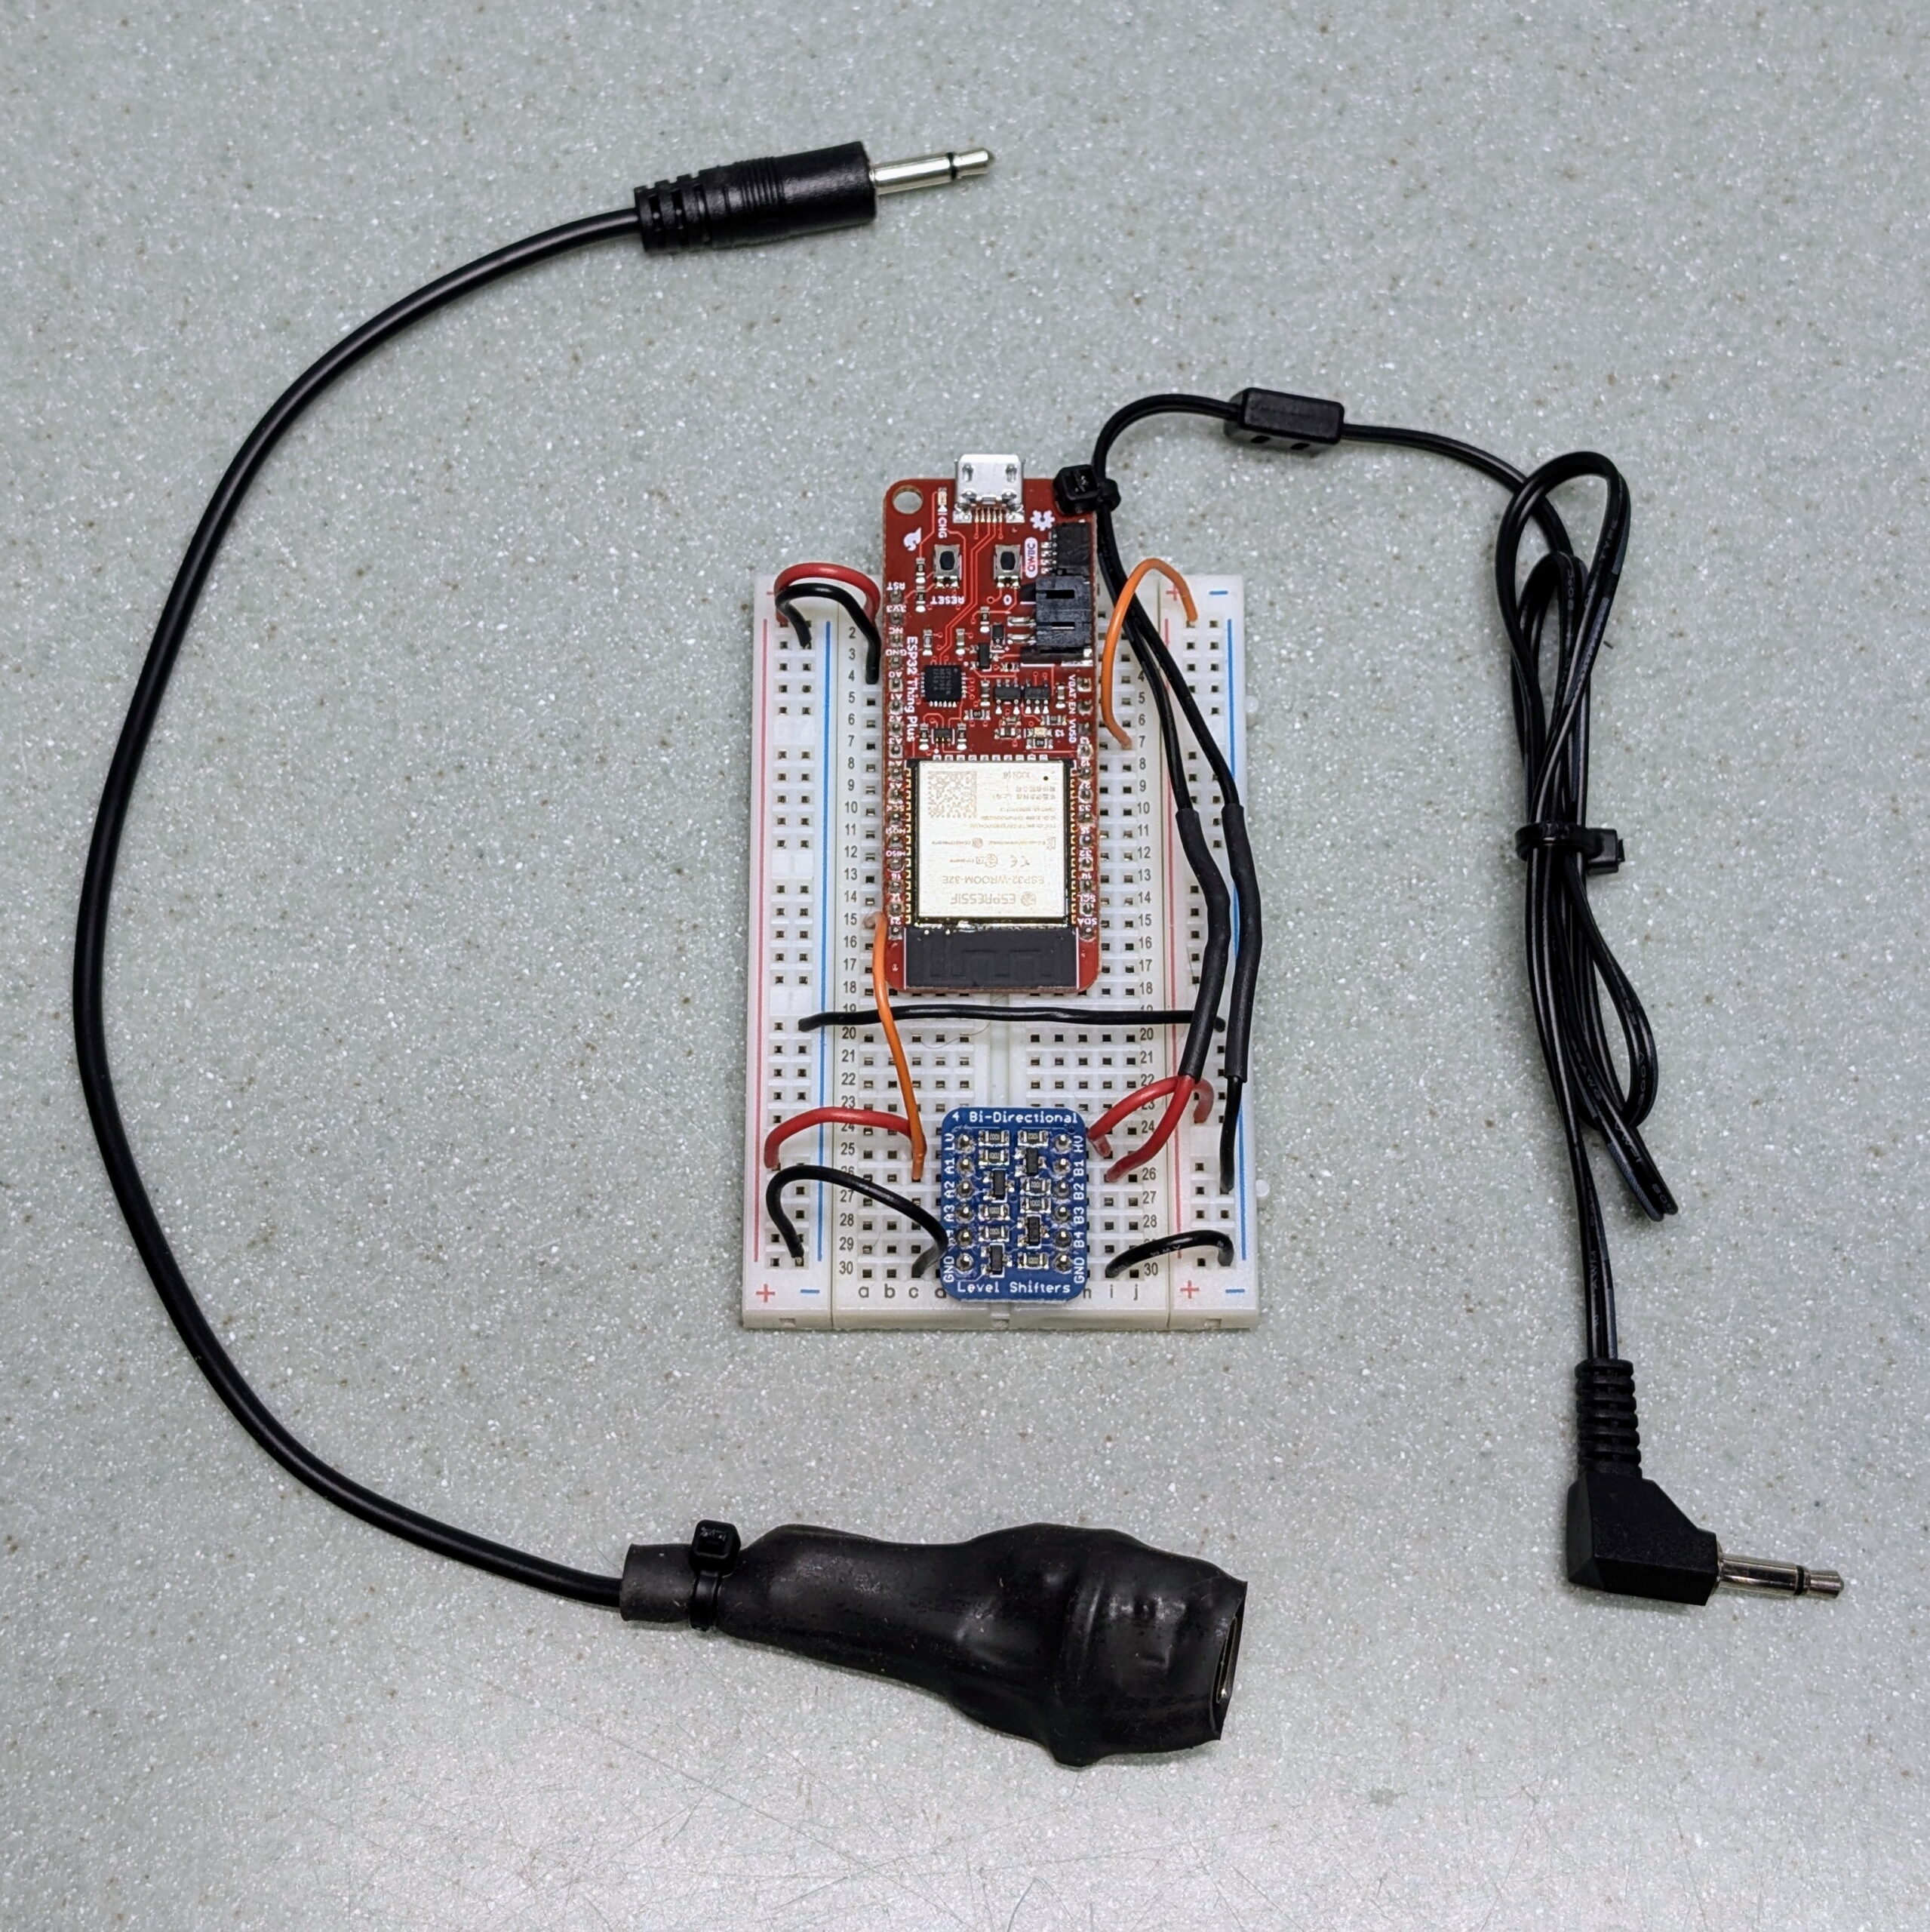
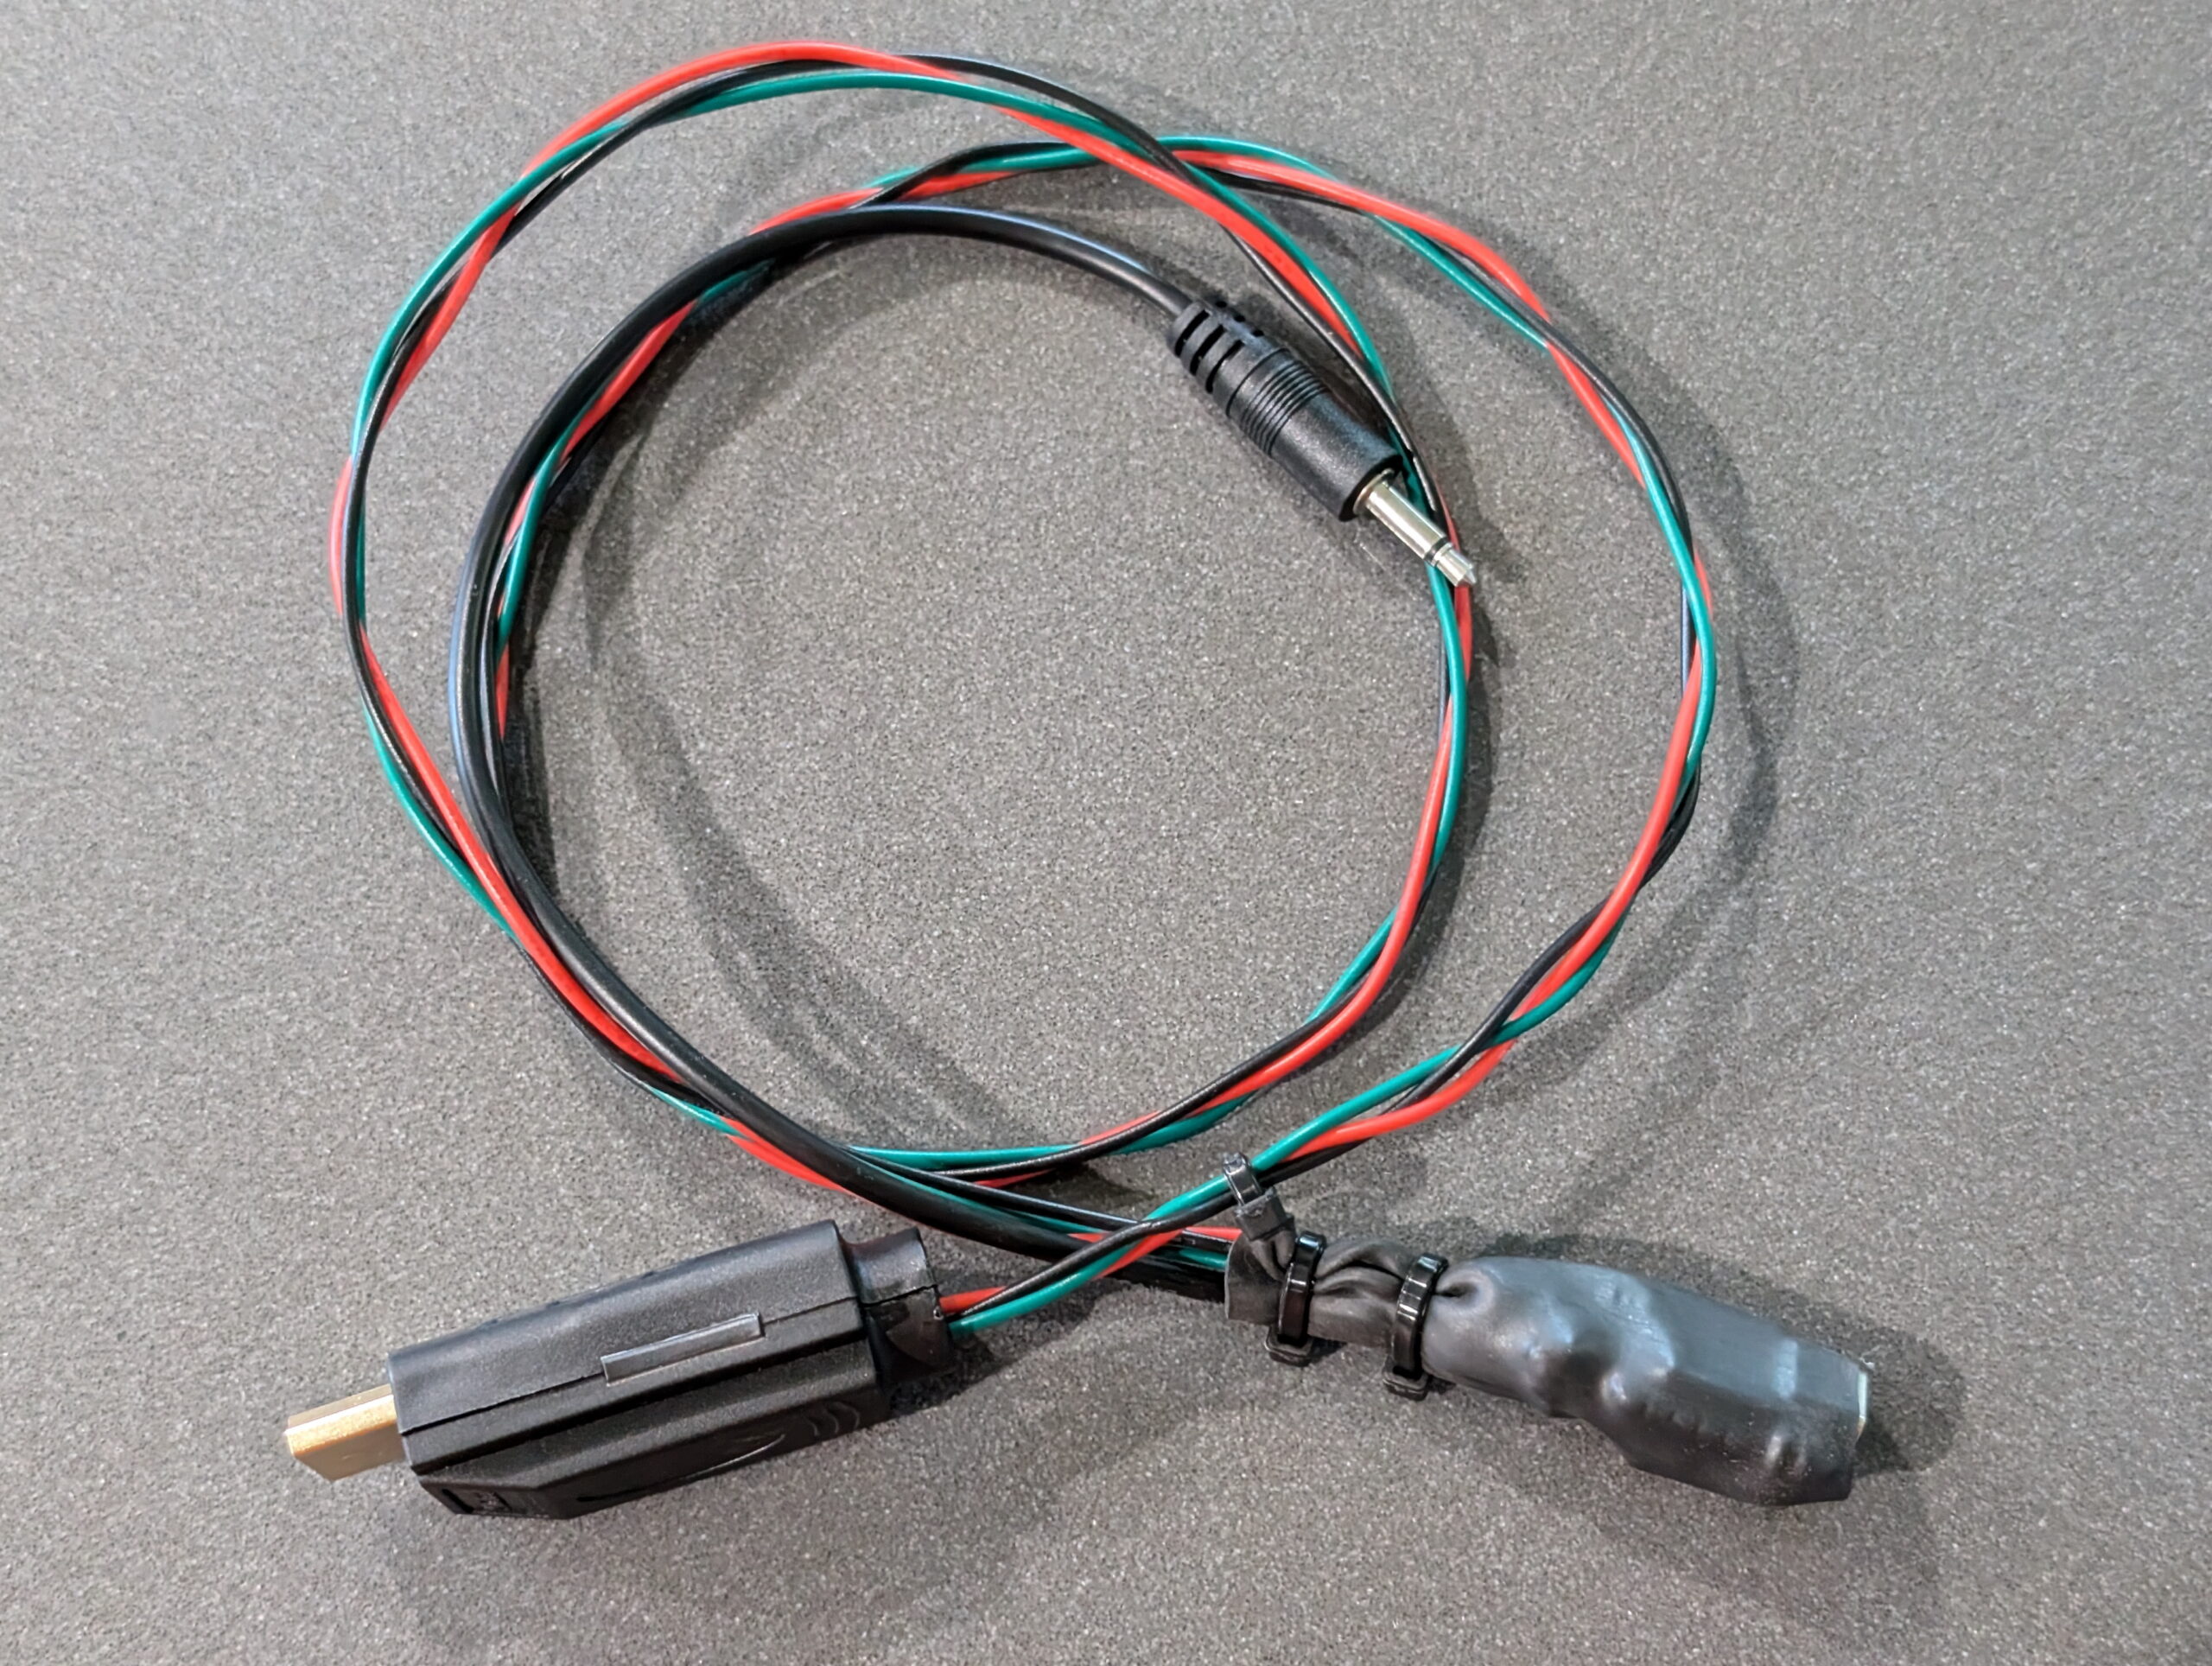
Hardware-wise, this was simple to do. All it required was getting an HDMI connector (I used this one), connecting pin 13 (CEC) to a GPIO, pin 17 to ground, and pin 18 to 5v (VUSB) as per the readme at Palakis/esphome-native-hdmi-cec. Since CEC uses 3.3v there was no need for a level shifter as with Onkyo RI. I was able to add this on to the previous adapter without a problem and everything just worked.
With this ESPHome configuration I changed things around a bit, both to simplify and secure the device and make things better overall. As I learned more about ESPHome and started thinking about securing IoT devices, I wanted to minimize the ability to do OTA updates, including via the web UI, and access the API. I also wanted to pull credentials out of my .yaml file so I could more easily share it. Changes to support this, and some other nifty things, are:
- Setting up a
secrets.yamlto holdwifi_ssid,wifi_password,ota_password, andapi_encryption_key.- Tip: All this involves is creating a
secrets.yamlfile in the same directory as the configuration.yamland putting lines such aswifi_ssid: "IoT"orapi_encryption_key: "YWwyaUNpc29vdGg3ZG9oazdvaGo2YWhtZWlOZ2llNGk="in it. Then in the main.yamlreference this withssid: !secret wifi_ssidor key:!secret api_encryption_keyor so. - Generating an API key can easily be done with something like:
echo -n `pwgen -n 32 1` | openssl base64
- Tip: All this involves is creating a
- Setting a password for OTA updates.
- Note: Once this password is set, changing it can be a bit complicated (see ESPHome OTA Updates for more information). I suggest picking one password from the get-go and sticking with that.
- To further minimize unapproved access, I did not enable the fallback access point mode, the captive portal, and disabled the web server component (because it’s unauthenticated and allows firmware uploads). I’m still thinking about disabling safe mode.
- Set
name_add_mac_suffix: trueto add the MAC address suffix to the device name. This makes it easier to use one config on multiple devices on the same network, such as when doing development work with multiple boards. (See Adding the MAC address as a suffix to the device name.) - Because my Onkyo RI PR has not been merged (as of 2024-Sep-01), I had been manually patching to add it. It turns out that some PRs can automatically be incorporated into the config via external_components, and this works great for my needs until this gets merged:
external_components:
# Add the HDMI-CEC stuff for ESPHome
- source: github://Palakis/esphome-hdmi-cec
# Add PR7117, which is my changes to add Onkyo RI. Had not been merged as of 2024-Sep-01.
- source: github://pr#7117
components:
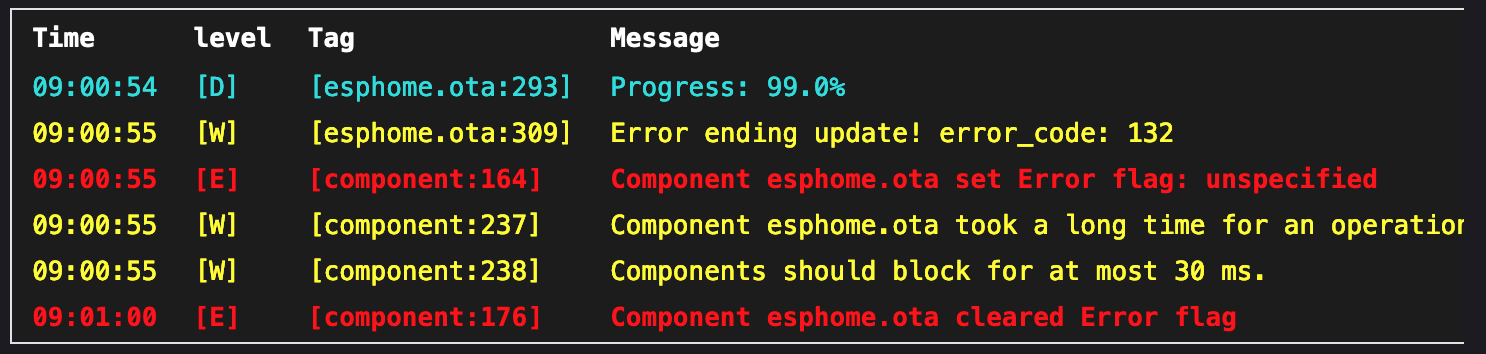
- remote_baseDespite stripping the configuration back a bit to secure it better, which in turn removes on-device overhead, I still have problems with the OTA update on the Seeed Studio XIAO ESP32S3. This is irritating because it means any changes require connecting a cable to flash it via USB, but I can also keep using the breadboarded SparkFun ESP32 Thing Plus for any future development.
The configuration I’m using can be found here: hdmi-cec-onkyo-ri-bridge_2024-sep-02.yaml
Note that this includes some development HDMI-CEC buttons, such as sending EF:90:00 and EF:90:01. This is part of some experimenting in attempts to wake up the Apple TV via CEC, but thus far doesn’t do anything. However, they serve as good examples of how to send multiple bytes to the bus. It also includes commented sections for the different ESP32 boards I’ve used and will likely need to be changed for your purposes.
Update on November 2, 2024
After using this for a while I ran into a couple quirks, so I’ve some updates to both the device config and ensuring it builds under the current dev version (ESPHome 2024.11.0-dev, as of about 10am EDT on 2024-Nov-02). Unfortunately this hasn’t solved the problem of uploading a new version via OTA on the Seeed Studio XIAO ESP32S3.
The current version of the device config can be found here: onkyo-a-9050_seeed_xiao_esp32c3_v1.2.0.yaml
The main changes here are the ESPHome device no longer takes action based on the received HDMI-CEC commands (via Onkyo RI), and I cleaned up and clarified the events. There are three distinct events that can be acted upon:
- HDMI-CEC: Report Power Status: On: Something reported its power status as On.
- HDMI-CEC: Report Power Status: Standby: Something reported it’s power status as Standby.
- HDMI-CEC: Standby Command: Something sent a Standby command.
I now use Home Assist to trigger on HDMI-CEC: Report Power Status: On and turn on some lights and press Onkyo RI: On button, turning the amplifier on. For shutting things down I trigger on HDMI-CEC: Report Power Status: Standby and turn the amplifier and lights off. This is more dependent on HA, but it also gives me more flexibility.
(I’ve not (yet) started looking into waking the Apple TV via HDMI-CEC.)
Comments closed