How ASUS and a Microsoft Bug Almost Broke Remote Work
A couple of years after it happened I’m sharing this story about the intersection of an OS bug, a network hardware quirk, and a global pandemic. A chain of semi-esoteric things aligned and only caused noticeable problems in a very specific — dare I snarkily say unprecidented — situation.
I found this issue both fascinating and maddening and I hope you will as well. This does not contain code-level details of the bug (I don’t have them), but I’m sharing it both to document this problem and share a little story of what goes on behind the scenes in supporting a big enterprise IT environment.
In March 2020, when Stay Home, Stay Safe began in Michigan, most of my fellow employees began working from home (WFH). For years we’d been building IT systems to allow most people to work from anywhere, and the shift to WFH was going great. Between VPN connections back to the corporate network, lots of things in the cloud, and Azure Active Directory (AAD) to handle Single Sign-On (SSO) for almost every company application, all most folks needed for remote work was their standard laptop and an internet connection. The computing experience of working from home was effectively the same experience as working in the office.
Sure, we had some bumps with home internet connections not being robust enough, but we helped people through those. Mostly we’d find that what someone thought was a good home internet connection — because their phone or video streaming worked fine — wasn’t great for things like moving big files around or video calls. [1] Generally those having network performance issues had fine service from their ISP, but their home routers were old and not up to task. We would recommend upgrading the router, they’d go buy something new, and all would be good.
In early autumn we began receiving reports of users getting the notorious You Can’t Get There From Here (YCGTFH) message when trying to access anything that used AAD for SSO. This generic message is displayed when AAD authentication fails and access is denied. Because so many things were behind AAD SSO this interrupted a lot of work. These computers either were no longer joined to AAD or had an expired token, and it seemed tied to internet access.
Digging into it, there would be errors shown by dsregcmd /status (the AAD CLI utility) and Test-DeviceRegConnectivity.ps1. This script checks internet access as SYSTEM to the AAD public endpoints would fail on all three connection tests, implying the lack of connectivity to Microsoft endpoints was keeping AAD registration (and token refresh) from working properly. But the user still could browse the web and hit those URLs and we hadn’t changed anything internet access-wise since the WFH began.
We found that manually setting a proxy server for the whole of the system (via netsh winhttp set proxy) would allow AAD registration (dsregcmd /join) to succeed and SSO would then work. We also found that restarting the WinHTTP Web Proxy Auto-Discovery Service (WinHttpAutoProxySvc), which handles WPAD, would sometimes fix the problem, but only sometimes.
Even more confusingly sometimes a reboot would fix it. Or, sometimes if a user drove into the office and used the network there, it would work. But not always. [2]
Simply, we had some computers whose SYSTEM account couldn’t access the internet for so long that an AAD token had expired, this broke SSO and users were being told You Can’t Get There From Here.
Typical for a lot of large organizations we have authenticating proxy servers sitting between the client network and the public internet. All requests bound for the internet need to go through them, and these proxies are located by a Proxy Auto-Config (PAC) file that is found either by a direct setting (AutoConfigUrl) or Web Proxy Auto-Discovery (WPAD), via DNS, both of which send the same file. We directly set the PAC file URL on a per-user basis and leave WPAD at its default of enabled. Thus for the end user and things running under their account, WPAD is used, falling back to the PAC file setting if that fails. For the SYSTEM account a direct PAC file setting is not used, relying solely on WPAD to find the path to the internet. [3]
Looking at a network capture when AAD registration would fail instead of the normal chain of events requests we’d see no DNS requests for WPAD, and no PAC file download. Instead we saw the client attempting to resolve the AAD endpoints via DNS, and then would attempt to reach out directly to them, which would be blocked by the company firewall. The proxy was not being used; WPAD wasn’t working. This was weird because every piece worked when tested independently (DNS resolution for WPAD hostnames, invoke-webrequest http://x.x.x.x/wpad.dat, specifying the WPAD PAC file in AutoConfigUrl), but as a whole it just didn’t work.
This went on for quite a while, supported by a Premier case with Microsoft. We could see that WPAD was frequently failing, but struggled with getting a consistent reproduction and going down dead-ends. We bandaged the problem with manual, direct proxy settings and AAD registration. This was mostly fine short-term, but caused overhead for our support folks and was a ticking bomb.
Then one day, thanks to a fortuitous conversation with a very smart lead Microsoft engineer while working another issue I found out about a bug with Microsoft’s WPAD implementation that was just discovered and was being patched in the next round of patches. The description exactly explained our problem and I was elated.
It turned out that if Windows 10 received a blank DHCP option 252, the WinHttpAutoProxySvc service would not query DNS for WPAD, and — the broken part — it would never do so again until the service was restarted. Directly configured PAC files would be used, but WPAD was broken. Here in our environment the SYSTEM account would not have internet access and this meant AAD registration, Test-DeviceRegConnectivity.ps1, the Microsoft Store, and all such internet-needing SYSTEM-level things didn’t work.
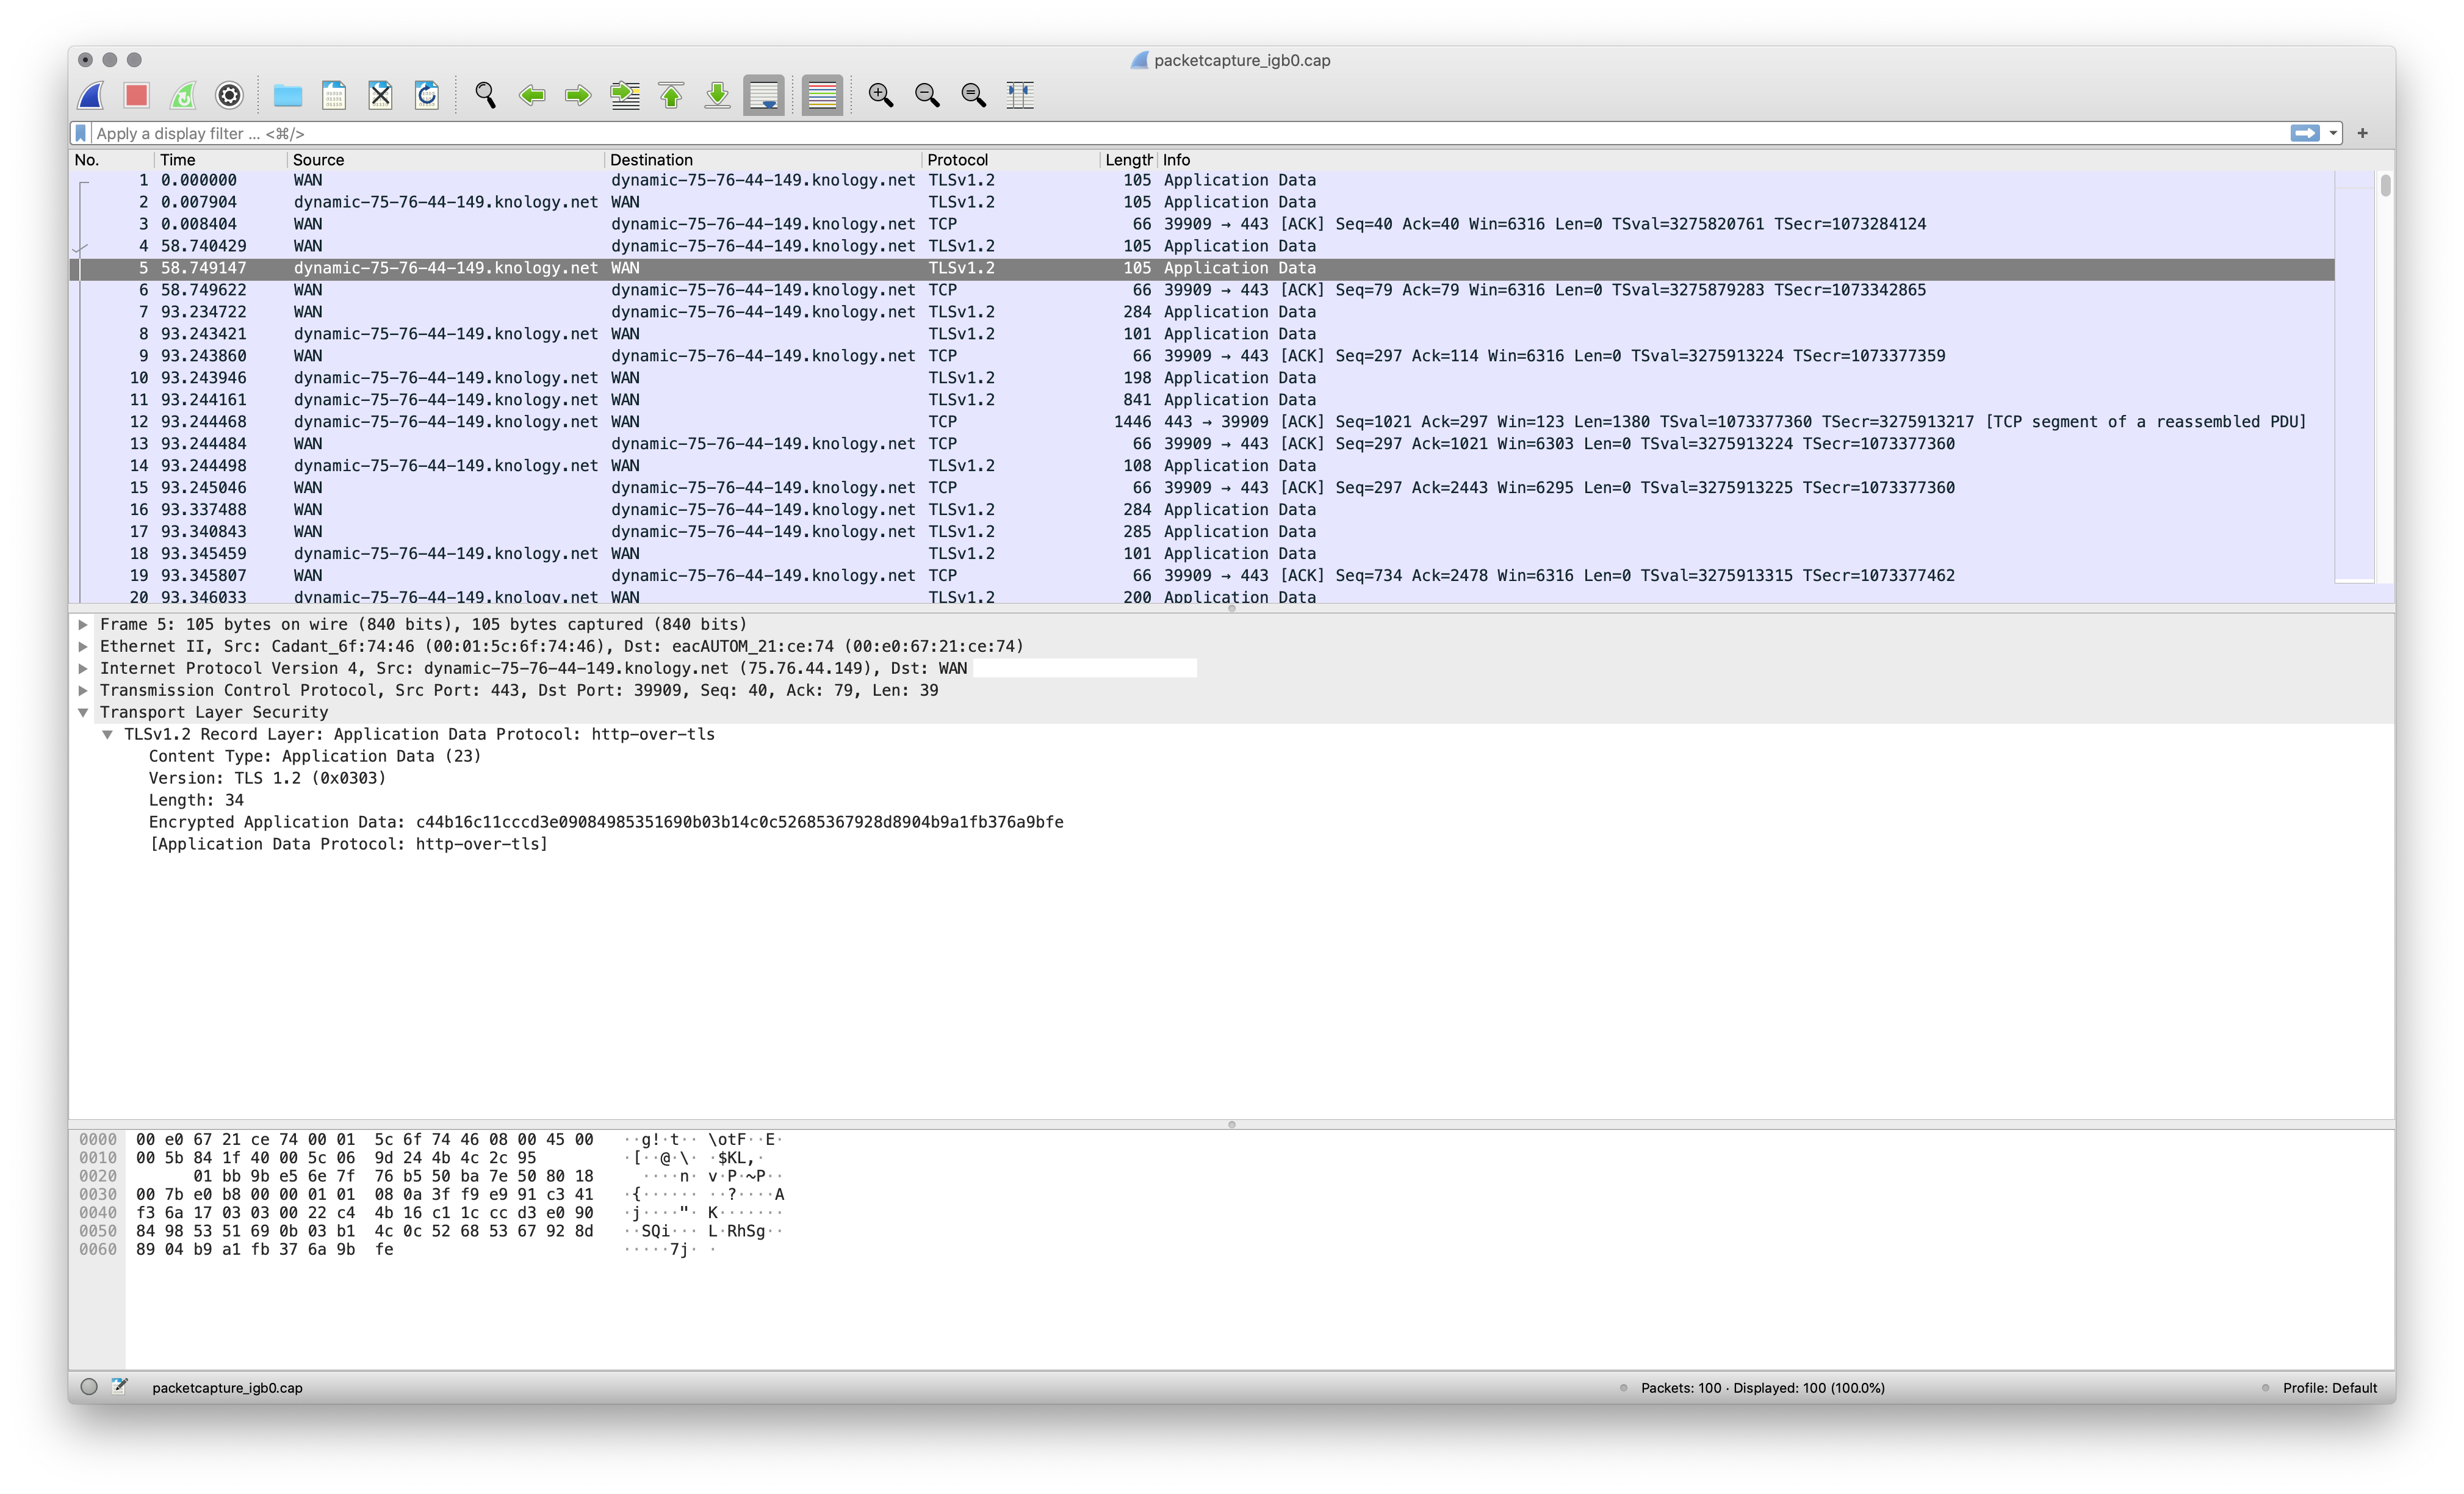
Apparently some home router vendors — most notably the hugely-popular ASUS [4] — would send option 252 but leave it blank because they found doing so reduced name resolution requests from clients. This is seen in Wireshark as:Option: (252) Private/Proxy autodiscovery
Length: 1
Private/Proxy autodiscovery: \n
Windows, which has WPAD enabled by default, will try a number of name resolution queries (DNS for wpad/ wpad.local.tld.com/wpad.local.com, NetBIOS, LLMNR, etc) to locate a PAC file server if it does not see a DHCP option 252. Because WinHttpAutoProxySvc looks to DHCP then only tries DNS if that fails, by setting this option but leaving it blank the name resolution steps would not occur. I can only guess as to why these vendors find it desirable, but perhaps they like reducing the load on the built-in DNS forwarders, or they saw it as a security benefit or… who knows. Either way, the result of this blank option and the Windows bug was that WPAD — via DHCP and DNS — didn’t work.
So what is option 252? In WPAD there are multiple discovery mechanisms for finding the PAC file server. Beyond DNS there is also a Dynamic Host Configuration Protocol (DHCP) method where, along with the typical network address settings, the client receives the URL for downloading the PAC file. This is done via option 252, but isn’t widely supported, it’s normally not used, and we don’t use it it either.
While WPAD is core OS function, it unfortunately never left draft RFC status. Implementations have no formal standard to target; it’s just a guideline. Additionally, because it never left draft status, DHCP option 252 also remains unallocated and without a standard, simply part of the Reserved (Private Use) range. So, setting it but leaving it blank is not unacceptable, OS’ should be able to accommodate.
In a network capture I was then able to clearly see this happen, and it was simple to replicate on a test network. And then it finally all came together…
COVID-19 WFH resulted in a bunch of people upgrading their home networks, with lots of them buying new home routers, including the very-popular ASUS brand. If someone booted up their Windows 10 computer and the blank option 252 sending DHCP server was the first thing it saw, WPAD would break, with all the downstream consequences, including our AAD connectivity issues. And if they’d have AAD connectivity issues for long enough — until a token expired — they would start getting You Can’t Get There From Here messages.
If they went in the office or somewhere else which doesn’t set 252 and fully rebooted (which restarts the WinHttpAutoProxySvc service), WPAD would work and AAD registration would work. But if the service never restarted — if they never actually rebooted — WPAD was stuck not doing anything. [2]
Testing a pre-release version of the patch showed it fixed the problem, and then a few weeks later KB4601382 was released, with the detail “Improves the ability of the WinHTTP Web Proxy Auto-Discovery Service to ignore invalid Web Proxy Auto-Discovery Protocol (WPAD) URLs that the Dynamic Host Configuration Protocol (DHCP) server returns.”. We deployed this patch and the reports of AAD registration / You Can’t Get There From Here issues collapsed.
That was it, it was fixed. A popular home router vendor did something weird (but not against standard), the OS implemented something poorly, and people were working for so long in one of those environments that a credential expired, couldn’t be renewed, and they lost access to SSO.
[1] Mobile apps and a lot of modern websites are fairly asynchronous, sending requests in the background while still working nicely, because they are built to be tolerant of the blips that happen while on wireless networks. Video streaming specifically caches (or buffers) the video locally so that hiccups in the network connection don’t make the video pause and stutter. More real-time-ish things like Remote Desktop or video calls or copying files via SMB are considerably more sensitive to poor network connections.
[2] Retrospectively I suspect confusion around what it means to shut down or restart a computer led to many of the reports of reboots/shutdowns/driving into the office fixing the problem or not and the difficulties in getting a reliable reproduction. Different sleep modes, some of which result in the BIOS displaying the POST when waking from sleep even if the OS doesn’t restart, leads some to believe the operating system was restarted when it may not have been. Or other folks believe that closing the lid is “shutting down”.
It was also unfortunately common for users to have a flexible version of “home”. Sometimes home meant where they’d been working for the last six months and had the problem, sometimes it meant a vacation home with a different ISP they’d gone to the day before but failed to mention, sometimes it meant the other side of the world. Teasing this information out was difficult, as many used “home” to mean anywhere but their normally assigned desk. “I’ve only been at home” frequently meant “I continue to be not at the office”.
[3] We use WPAD because Windows 10 requires internet access for a lot of OS level things that run as SYSTEM, including the Microsoft Store and AAD device registration. If proxy servers are used, the SYSTEM account needs to find the proxy servers. Early on in our Windows 10 deployment Microsoft told us either direct internet access or WPAD was required. WPAD via DHCP doesn’t work with most VPN clients, because they configure their virtual adapters directly and not via DHCP. Thus, to have similar connectivity when in the office or remote, DNS for WPAD is the the choice.
[4] I’ve been told multiple brands do this, but ASUS only vendor where I personally observed it.