Press "Enter" to skip to content

Month: February 2014

Nexus 5 Protection Efforts

After soundly breaking my Nexus 4 (it’s now listed for auction on eBay for parts) I ended up purchasing a Google Nexus 5 as a replacement. On the recommendation of my friend Laurence (and after lots of research) I chose to add a case and screen protector in efforts to keep it from breaking when I drop it. With the Nexus 4 I’d used a neoprene pouch when carrying it in my pocket, but this had the flaw of leaving the phone exposed around the times when I’m using it, which is how I broke it.

The protection chosen is a cheap ($9.89 via Amazon) Diztronic thermoplastic polyurethane (TPU) case that covers five sides of the phone and a Skinomi TechSkin screen protector ($9.95 via Amazon). The screen protector seems a bit expensive, but Laurence has found it to provide a great deal of protection, so I’m giving it a go. Hopefully this will keep the phone looking and functioning nicely for a few years.

For a few years I’ve been using Pelican plastic cases to keep my phones safe when biking. A Pelican 1015 kept the Nexus One safe and dry and a Pelican 1020 took care of the Nexus 4. The Nexus 5 is larger than both of these and won’t fit in either case that I have, so I’m hoping that the more traditional cycling protection of a thick plastic bag, coupled with the case and screen protector, and stashed a bit more deeply into my pack, will keep everything intact. The lack of plastic box should make the phone more audible when ringing, something that Danielle will surely like when she tries to call me.

While it’s only been a few hours since application, thus far I’m happy with the screen protector and case. The case fits snugly, doesn’t interfere with connectors, and the buttons are easily usable through it. One small scuff from my finger nail is visible when the screen is off, but turned on it’s invisible. It also is sufficiently slick in use to not have the traditional dragging-a-finger-on-plastic-wrap feeling that other screen protectors suffer from. I’m quite sure that more of these small scuffs will appear with daily use. This case also has the upside of keeping the camera’s lens or screen from resting on whatever surface the phone is set down on, hopefully keeping them nice for longer.

Now to hope I don’t break this one…

1 Comment

Breaking My Phone

This evening while changing in the bathroom the BK Training facility I dropped my phone, a 13 month old Google Nexus 4, shattering the outer glass / digitizer. It appears that the phone fell screen down, with one side landing slightly before the other, and the non-slip rough surface tile in the bathroom did a fine job ensuring the screen was ruined. I’d had problems with the slipperyness of the phone before, but usually my hand was moist enough to keep a good grip on it. A couple times this winter the dry skin on my hand has contributed to my dropping it, but previously it’d only been on soft surfaces. This time it was done in.

At this point the touchscreen doesn’t work, so I’m shopping for a new phone. I may replace the screen then sell the phone, but at this point I’m most concerned with getting a working phone quickly. I guess it’s time to get shopping for a new phone, see if its available locally, give screen protectors some thought, and dig into wiping my phone without use of the touchscreen.

2 Comments

Hozan C-356 Inner Wire Pliers

After weighing my options for cable tensioning tools I settled on the Hozan C-356 Inner Wire Pliers. These were recommended to me by a few folks, including Daniel Stewart over at Custer Cyclery, and I’m very happy with them. This is a seemingly simple tool that grabs a cable (or cable tie) and pulls it snug. The fairly simple action, but it makes snugging down cables and ties considerably easier than I’d expected; much better than my previous techniques using pliers.

For cables I’d previously used a set of locking pliers to hold the cable, pulling on that while tightening down the bolt. This works, but is a bit quirky and damages the cable more than I care for. Cable ties were handled with regular adjustable pliers and fingers, a two handed job that worked well but was is prone to breaking small ties.

The only difficulty I’ve run into thus far is when trying to use the C-356 to snug down the cable on a 2012-ish SRAM X9 rear derailleur, as the cable’s termination point isn’t really accessible with the tool. Otherwise, it’s been very handy. Most of my uses with it have involved cable ties, but it’s made tightening them down (especially in tight spaces, like inside of fork legs while a wheel is fitted) a breeze.

Leave a Comment

Four Fresh Kegs


Since the beginning of the year I’ve been brewing a batch of beer roughly once per week. This evening I kegged all four and now the beers are sitting in the garage chilling before I begin force carbonating them. I’m still trying to decide if I should purchase the ~$25 of extra fittings required to inject CO2 via the outlet tube — something which will likely decrease carbonation time — or just go with the previous method of pressurizing the head of the keg and waiting. The former should have the beer soundly ready to go within a week, the latter has taken 2-3 without occasional shaking.

The four beers shown here are an Double IPA and Dunkelweizen, both Brewer’s Best kits, a Chocolate Stout (a Cap ‘N’ Cork kit), and Hopeful Pale Ale, a slightly smokey and citrus-y idea that I put together with the help of one of the folks up at Cap ‘N’ Cork. After tasting them during kegging I’m pretty happy, and I’m particularly looking forward to trying the Hopeful IPA because it seems to have been a success.

2 Comments

2014 Fat Bike Series: Addison Oaks

This past Saturday, February 8th, 2014, was the Addison Oaks race in Fun Promotions Fat Bike Series. Being near home and at one of my favorite parks I entered, racing in the B class. The course for this race was a groomed two track-ish surface, following the Buhl Lake Loop out to the campground, on paths along Drahner and Walker roads, then returning to the main parking lot via the campground access road.

I really enjoyed the route, but due to late grooming the snow was still fairly loose and once the solid upper layer was disturbed the loose snow below made riding treacherous. I believe that this may have been the most technical race I’ve ever done.

The photo above was taken by Steve Balough using a helmet camera facing backwards. In this photo I’m somewhere just after the start of a lap, following one of the two firm paths, and breathing heavily. Behind me is Ron Caitlin (307) who won the race overall. It was not long after this point, after going down a slight hill and into the most chewed up part of the course, that I fell over, landing just off the side of the path. I’ve mirrored one more of Steve’s photos of me here (this one from the start of the race), and his photos from this day can be seen here.

In the end I wound up finishing eight laps in just over two hours, placing third in the B category, and receiving a nice plaque as an award (photo). I like this more than getting a medal, as there’s something about it which feels a bit more solid. Sure, it’s just third in a B class race, but it still feels nice. I believe this is also the highest position I’ve placed in any non-beginner race. (Next was 4th at the CRAMBA Addison Oaks race in 2013, and a 5th place at the Tailwind Stony Creek XC in 2012.)

Full results from the race can be found here (mirrored from here on Fun Promotions website).

Strangely, this is the first fatbike only race that I’ve done, even I’ve done more races on the Salsa Mukluk 2 than any of my other bikes, both summer and winter. Fatbike specific races are still fairly new, and I’m glad there was one so close to home, something I didn’t have to drive a couple hours for.

Leave a Comment

Salsa CroMoto Grande 29″ Tapered Fork w/ 15mm Thru Axle (QBP FK0851)

Every since getting the Salsa El Mariachi Ti last April I’ve been interested in trying it out with a rigid fork, but due to the lack of availability of reasonably priced, readily compatible forks I hadn’t been able to. The (very nice looking, but expensive) Whisky Parts Company No. 9 Carbon Thru Axle 29er Fork would have worked, but at $595 (MSRP) it’s too pricy for my part-time rigid fork desires.

As of last week QBP began shipping part FK0851, a 15mm thru axle tapered steerer tube version of their CroMoto Grande 29er fork, the same one which ships on the 2014 Salsa El Mariachi Single Speed. I have the non-tapered 9mm quick release version for my steel El Mariachi Single Speed (photo) and like it there, and with a MSRP of $209 I figured it’d be a good fork for the El Mariachi Ti. Ryan over at Apto Cycling ordered the fork for me the day it was available, I picked it up on Thursday, and this evening I got it installed.

At 2.8 pounds (versus 3.7 for the Fox) it only saves 0.9 pounds, but it should give me everything I wanted in a rigid fork on that bike: a stiff, reasonably-priced, not-squishy front end that’s drop-in compatible with the suspension fork and easy to switch to. The Whisky fork would have saved another 1.3 pounds, but at nearly $400 more, I don’t think it’d have been worth it.

I’m quite happy with how the fork looks, with the gloss black goes great with the titanium frame, and the overall setup was as easy as I could have hoped for. I’m not as keen on the Rock Shox Maxle design as I like Fox’s lever type a bit more, but it does work as advertised. Sitting still bike has a slightly more aggressive posture than with the suspension fork, right about equal to the proper sag setting while riding it.

I’m really looking forward to getting that bike back out and riding it… That’ll still have to wait for a thaw and nicer weather.

More photos of the fork are available here: 1 · 2 · 3 · 4 · 5

2 Comments

PVC 1.5″ Crown Race Setter

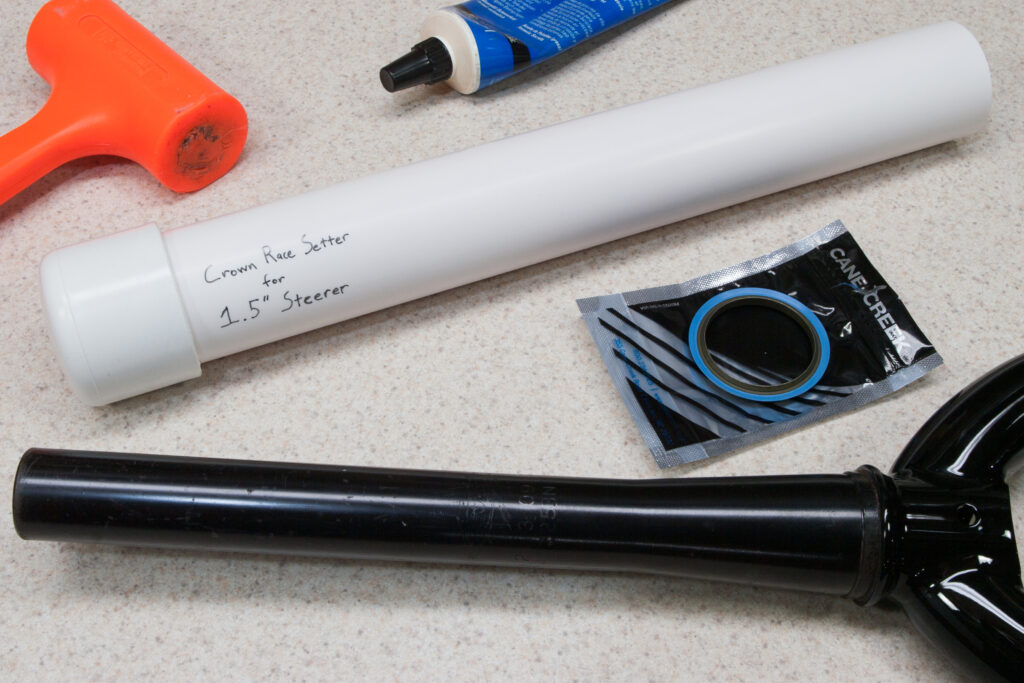
The Salsa El Mariachi Ti has a headset for a tapered fork, thus when I picked up a rigid fork for it (more on that later) I wanted to be sure to get a tapered one. Lacking a proper setter I decided to make one out of PVC pipe. Schedule 40 PVC pipe, 1.5″, has an average inside diameter of 1.590″, which is perfect for fitting over the 1.5″ bottom of a tapered steerer tube.

Home Depot sells 2′ sections of pipe, so this, plus a cap, were purchased for making the setter. I cut the pipe to 14″ long (same as a Park Tool CRS-1) to ensure a nice, square end then fitted a cap on the other end. After cutting a slight inside bevel on the pipe this worked fairly well for hammering on the Cane Creek 40-CrownRace-52/40-Steel race (really, a bearing seat and seal) which is the matching part for the headset on the bike.

This did not work as easily as setting a traditional 1-1/8″ headset using a metal tool, but after a few false starts it did eventually work. The PVC felt somewhat flexible and I believe was absorbing some of the force from the hammer. The steerer is also has a 33% greater circumference, so on a 1.5″ steerer there’ll be more friction than with a 1-1/8″, so it’ll take more force overall to set the race in place.

That all said, at less than $5 for making one yourself versus ~$70 (online prices) for buying a steel one, and still ending up with an effective tool, this is worth making.

1 Comment

¡Ay CRAMBA There’s Signs!


Sunday’s ¡Ay CRAMBA It’s Cold Out! event is going to feature both a hard and easy route, and to support this I needed to make signs. Here they are, made from white Coroplast (liberated from a roadside) covered with green gaffer tape, and nailed to wooden stacks from the Massive Fallout marking supplies. Marking was done by hand, but seems to have worked out fairly well.

I anticipate it being fairly easy to push these into the snow, allowing the bright green 6″ x 9″ signs to guide people along the routes. They bundle up small enough that I should have no difficulty fitting them all in one backpack, making for an pre-event trail marking session.

(The easy route will cut off the hilliest parts of the trail; a section which many find too frustrating to ride in deep snow.)

2 Comments

Microsoft Network Monitor Filter for Hidden Attribute

Today I had to troubleshoot how some files/folders on a share are ending up hidden, so this took some digging into SMB and display filters in Microsoft Network Monitor. Since this wasn’t particularly easy to find I wanted to share it here. This is the filter for displaying when a file or folder is having its hidden attribute set (check box via Properties in Explorer or via attrib +h) over SMB:

SMB.CTransaction2.FileBasicDataBlock.Attributes.Hidden == 0x1

This can be combined with a search through the Description to find specific file or folder names. For example:

SMB.CTransaction2.FileBasicDataBlock.Attributes.Hidden == 0x1
AND
Contains(Property.Description, “handle.exe”)

For SMB2 the filter string is as follows:

SMB2.CSetInfo.FileInfo.FileBasicInformation.FileAttributes.FSSCFileAttribute.Hidden == 0x1

Unfortunately, with SMB2 the file/path info will not be included in the frame shown by the aforementioned filter. This can be identified by looking up the session ID (SMB2.SMB2Header.SessionId == NNNN)  and filtering on that, looking at either the CREATE or CLOSE operations near the beginning and end of each session. So, I also capture the CREATE operations for the path I’m looking for, then manually correlate them (with a bit of filtering) after observing the issue. This results in the SMB2 portion of the filter looking something like this once combined with the related SMB filter:

( SMB.CTransaction2.FileBasicDataBlock.Attributes == 0x1
  AND
  Contains(Property.Description, “file_of_interest.txt”)
)
OR
SMB2.CSetInfo.FileInfo.FileBasicInformation.FileAttributes.FSCCFileAttribute.Hidden == 0x1
OR
( SMB2.SMB2Header.Command == 0x5
  AND
  Contains(SMB2.CCreate.Name, “file_of_interest.txt”)
)

1 Comment

A Fine Day


Despite being a bit frazzled at times, today has been a pretty productive day. Due to the snow this morning I worked from home, but I got a fair bit of stuff done all while being able to listen to good music, watch a snowstorm outside of my window, bisected by the tasty lunch shown above†. There are definitely less comfortable ways to work.

After this I was able to:

  • Wash the salt off of my fatbike and experiment with some different techniques for cleaning off salt residue (none of which were successful). Thoroughly cleaned the somewhat-rusty (thanks, salt and lazyness!) drivetrain.
  • Figured out a likely reason why the fatbike has been ghost shifting: a partially-separated plate on the chain. This was easily fixed with a chain tool.
  • Went snowshoeing with Danielle, Erik, and Kristi to pack down the mountain bike trails at River Bends. This was my first time using snowshoes somewhere other than near home, and thanks to the four of us the trails should now be fatbikable and mostly prepped for ¡Ay CRAMBA It’s Cold Out!.
  • Shoveled the excess snow out of the parking spaces that both our neighbor Rick and I regularly use. These had been plowed, but as the plow can’t get right to the curbs, hand-shoveling the final bits helps keep the spots nicely open and accessible. I don’t like shoving the grill of my car into a snowbank to fit in a spot.
  • Ate some really tasty chorizo nachos that Danielle made for dinner.
  • Mopped the laundry room floor in cleaning up from bike washing, then did a the dishes.
  • Get started on some new signage (Coroplast ordered, vinyl spec’d / requested) for River Bends and other CRAMBA trails. Frustratingly, someone has stolen a number of the signs at River Bends and they now need to be replaced.

So, while I felt a bit frazzled and frustrated at times, overall this has turned out to be a quite fine day.

† A hot smoked salmon topped with herbs and an English muffin (Bay’s, of course) topped with cheddar, butter, scrambled eggs, and harissa.

Leave a Comment