Recently I purchased a Honda Odyssey (2024 EX-L) to replace my aging Subaru Outback and get something a bit better for longer trips. Specifically, I wanted to be able to easily put two (or more) bikes inside, along with dogs and luggage. During winter we’d often drive to trails separately because that was the easiest way to keep both of our bikes clean on trips and this was irritating.
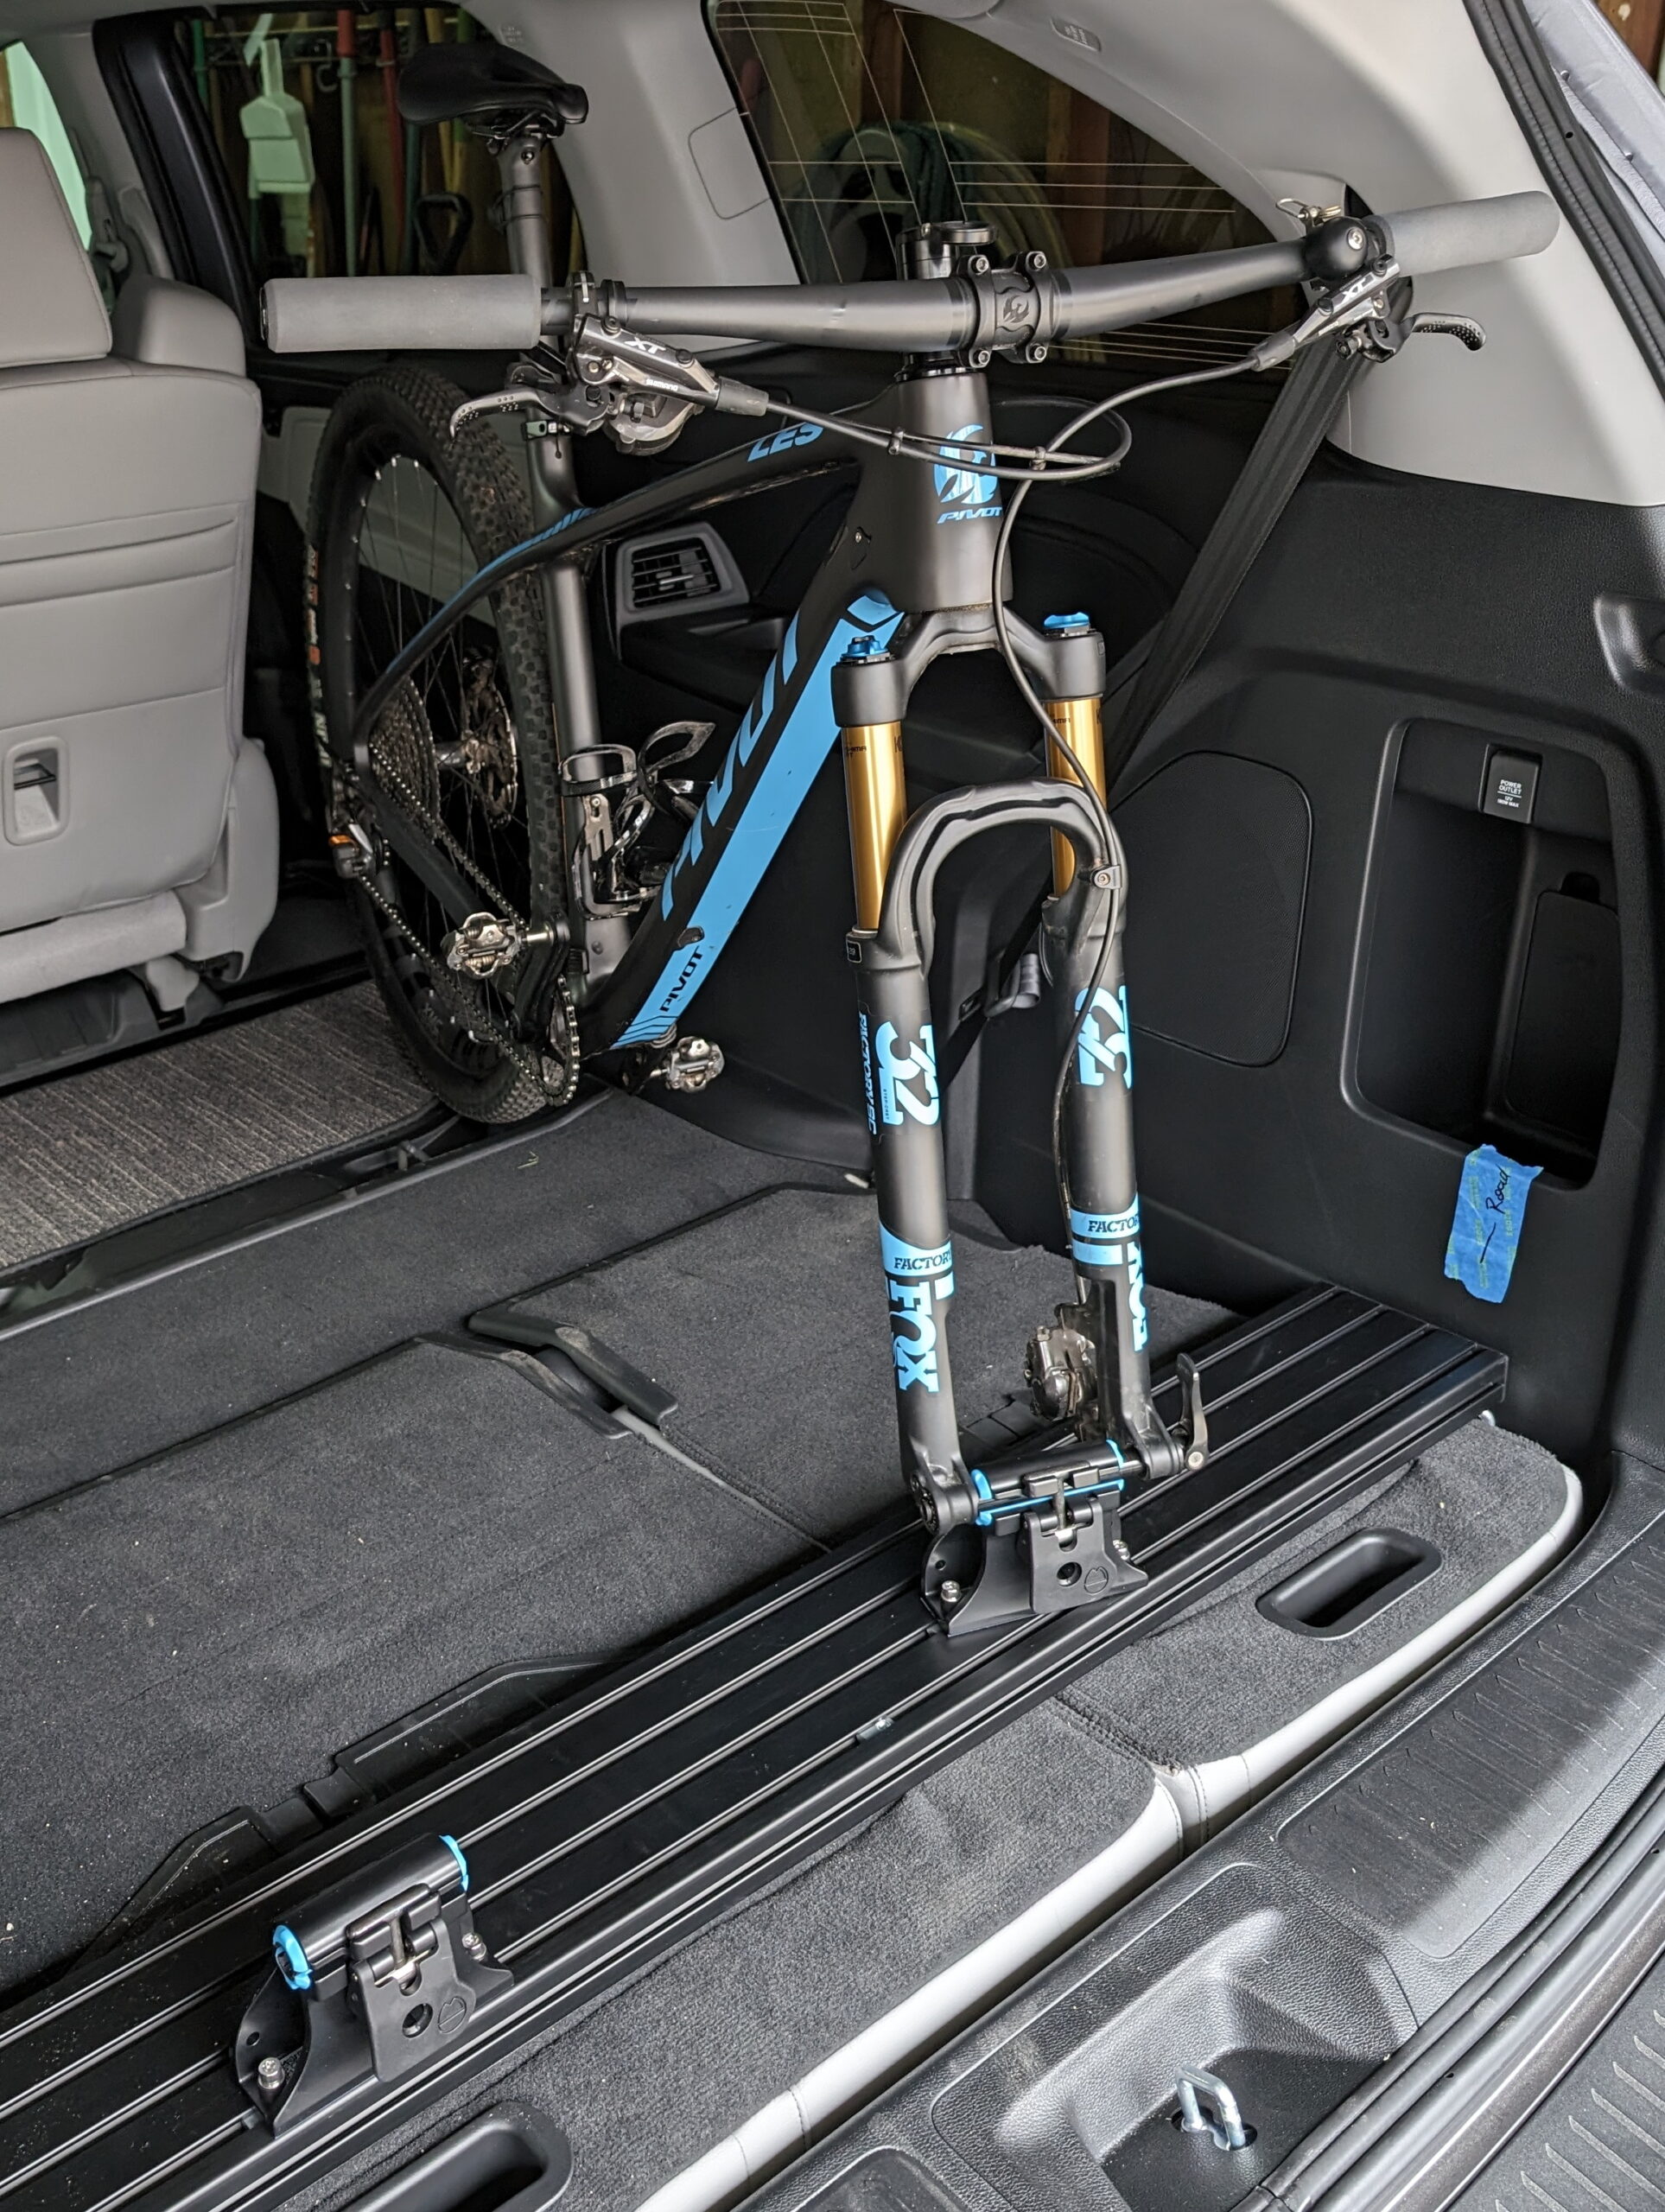
To securely hold the bikes inside I put together an adjustable, expandable rail system that holds bikes by their front through axles and is easy to adjust based on bike type, carrying needs, etc. The rail system is strapped to the rear seats as they sit folded into the floor, which provides solid mounting and easy access through the rear door. Combined with the adjustable, and outright removable, second row seats this works nicely for every bike in the house.
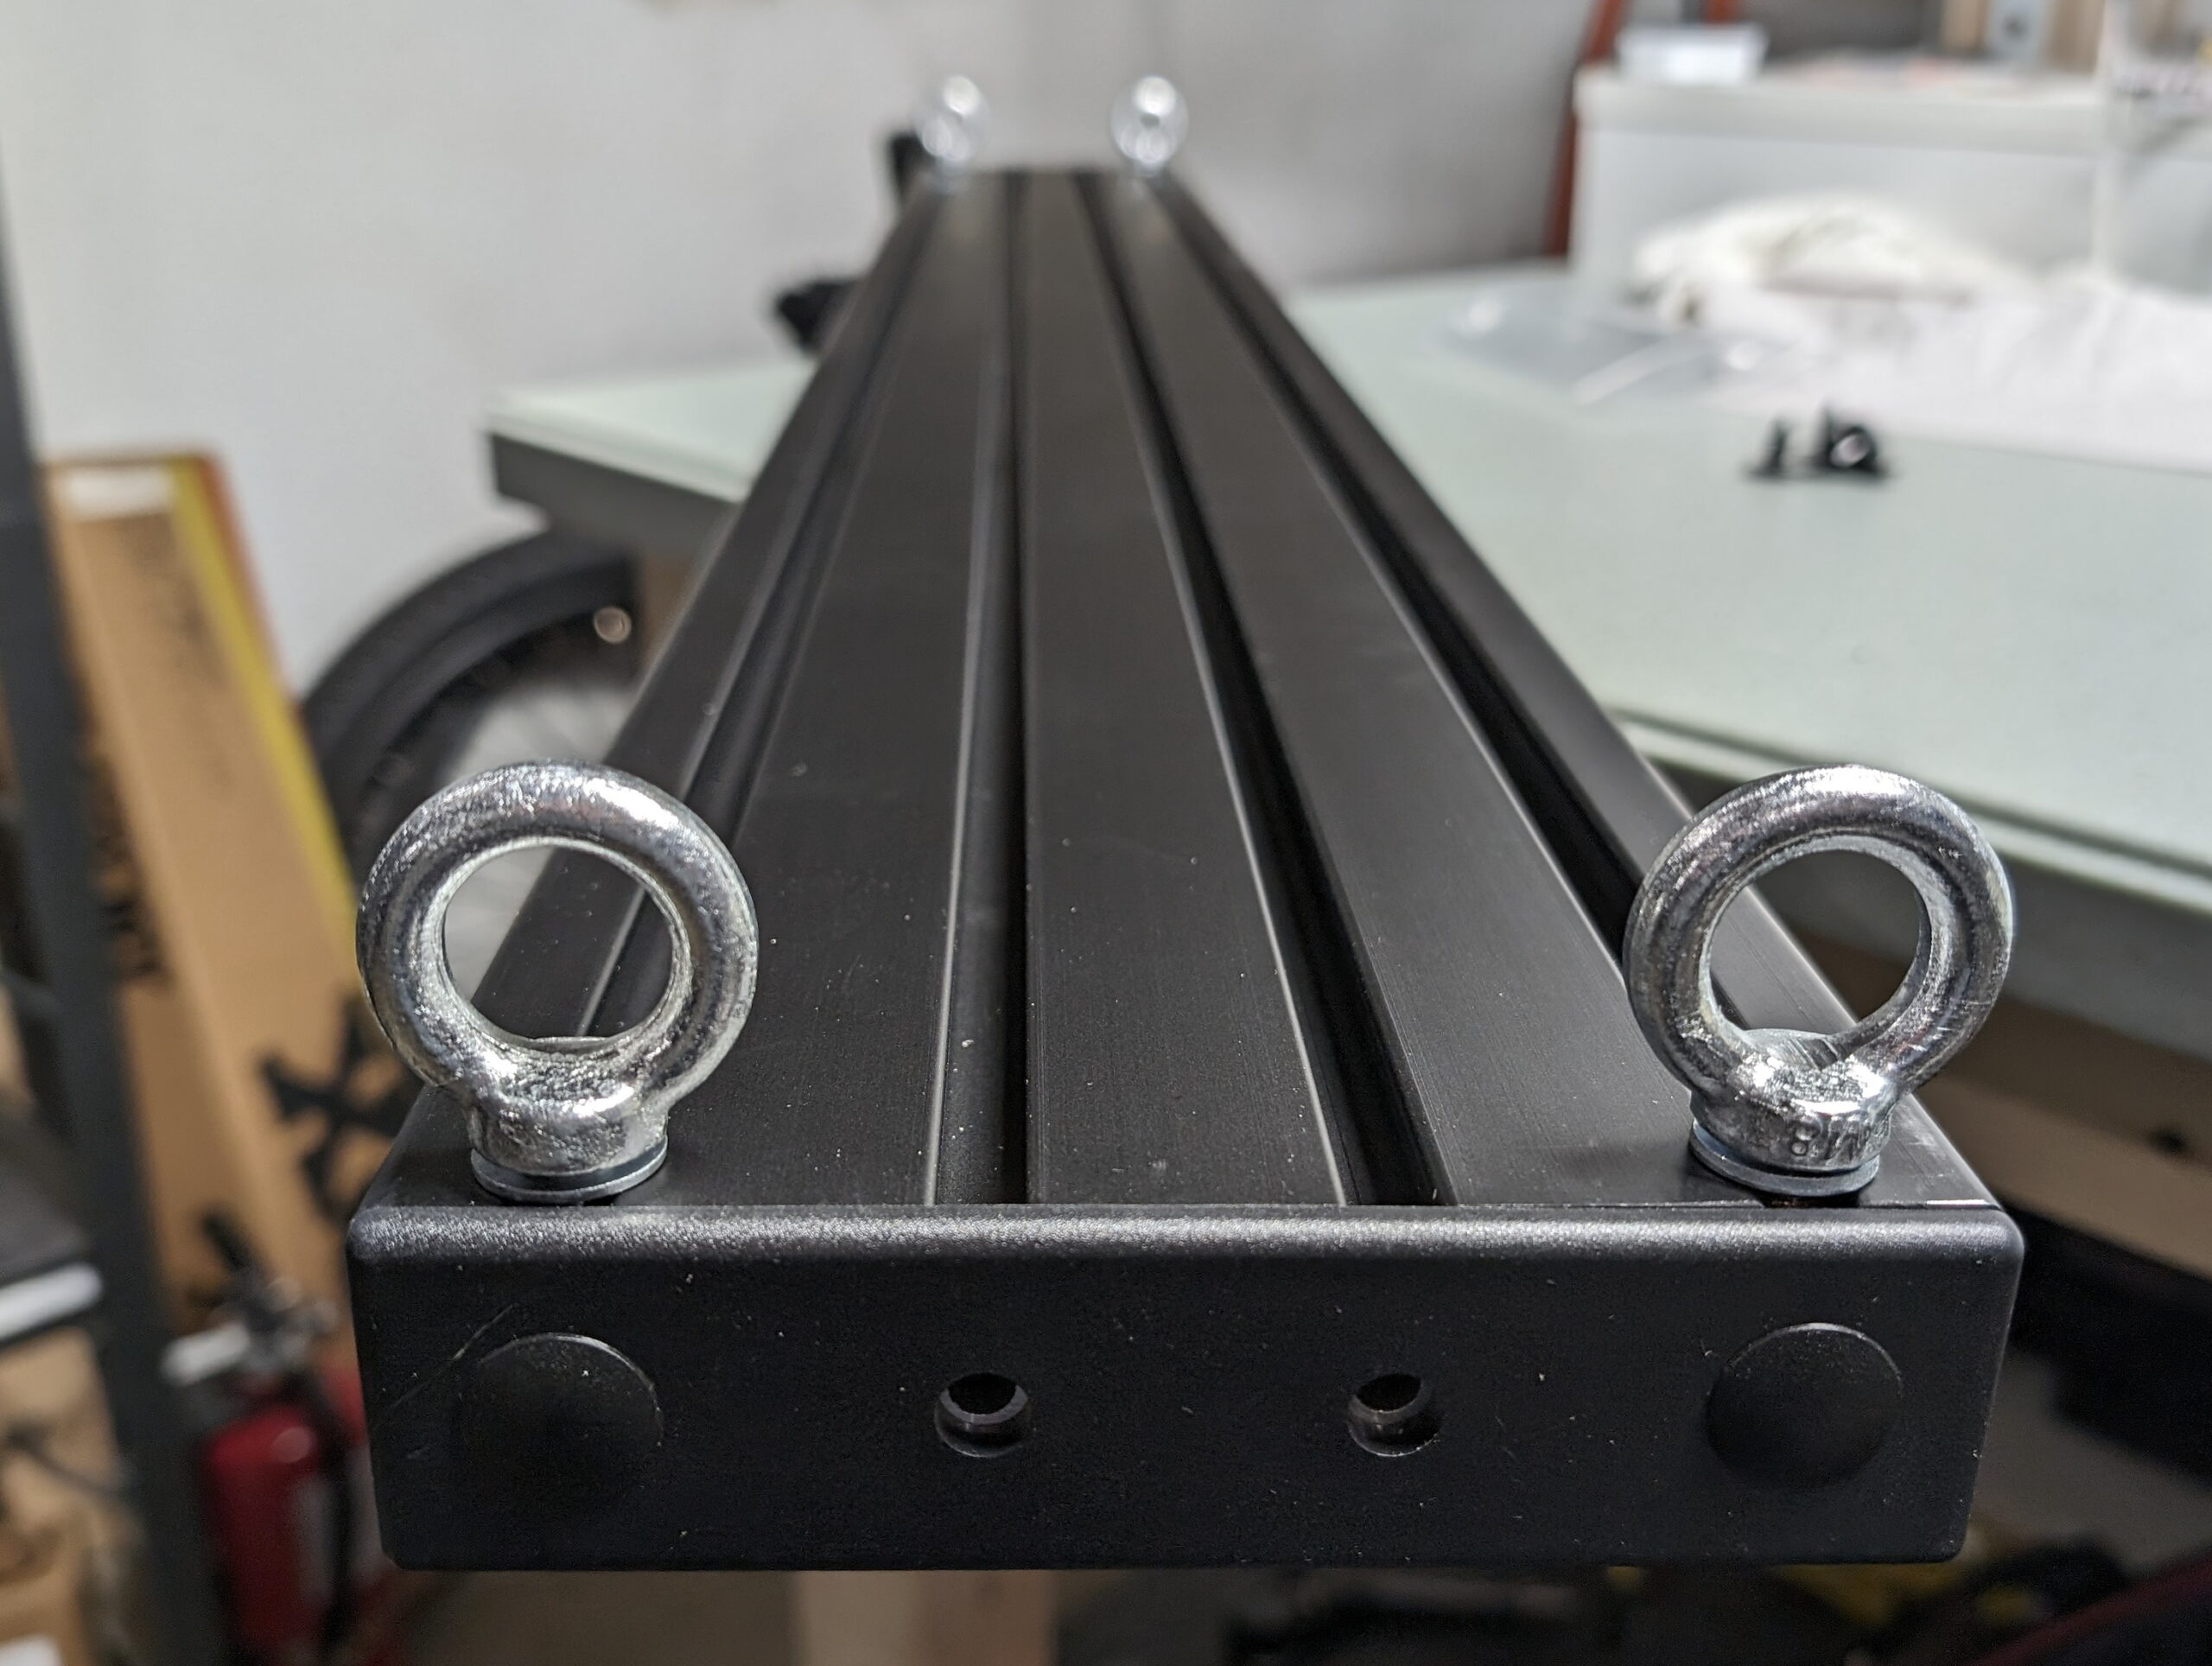
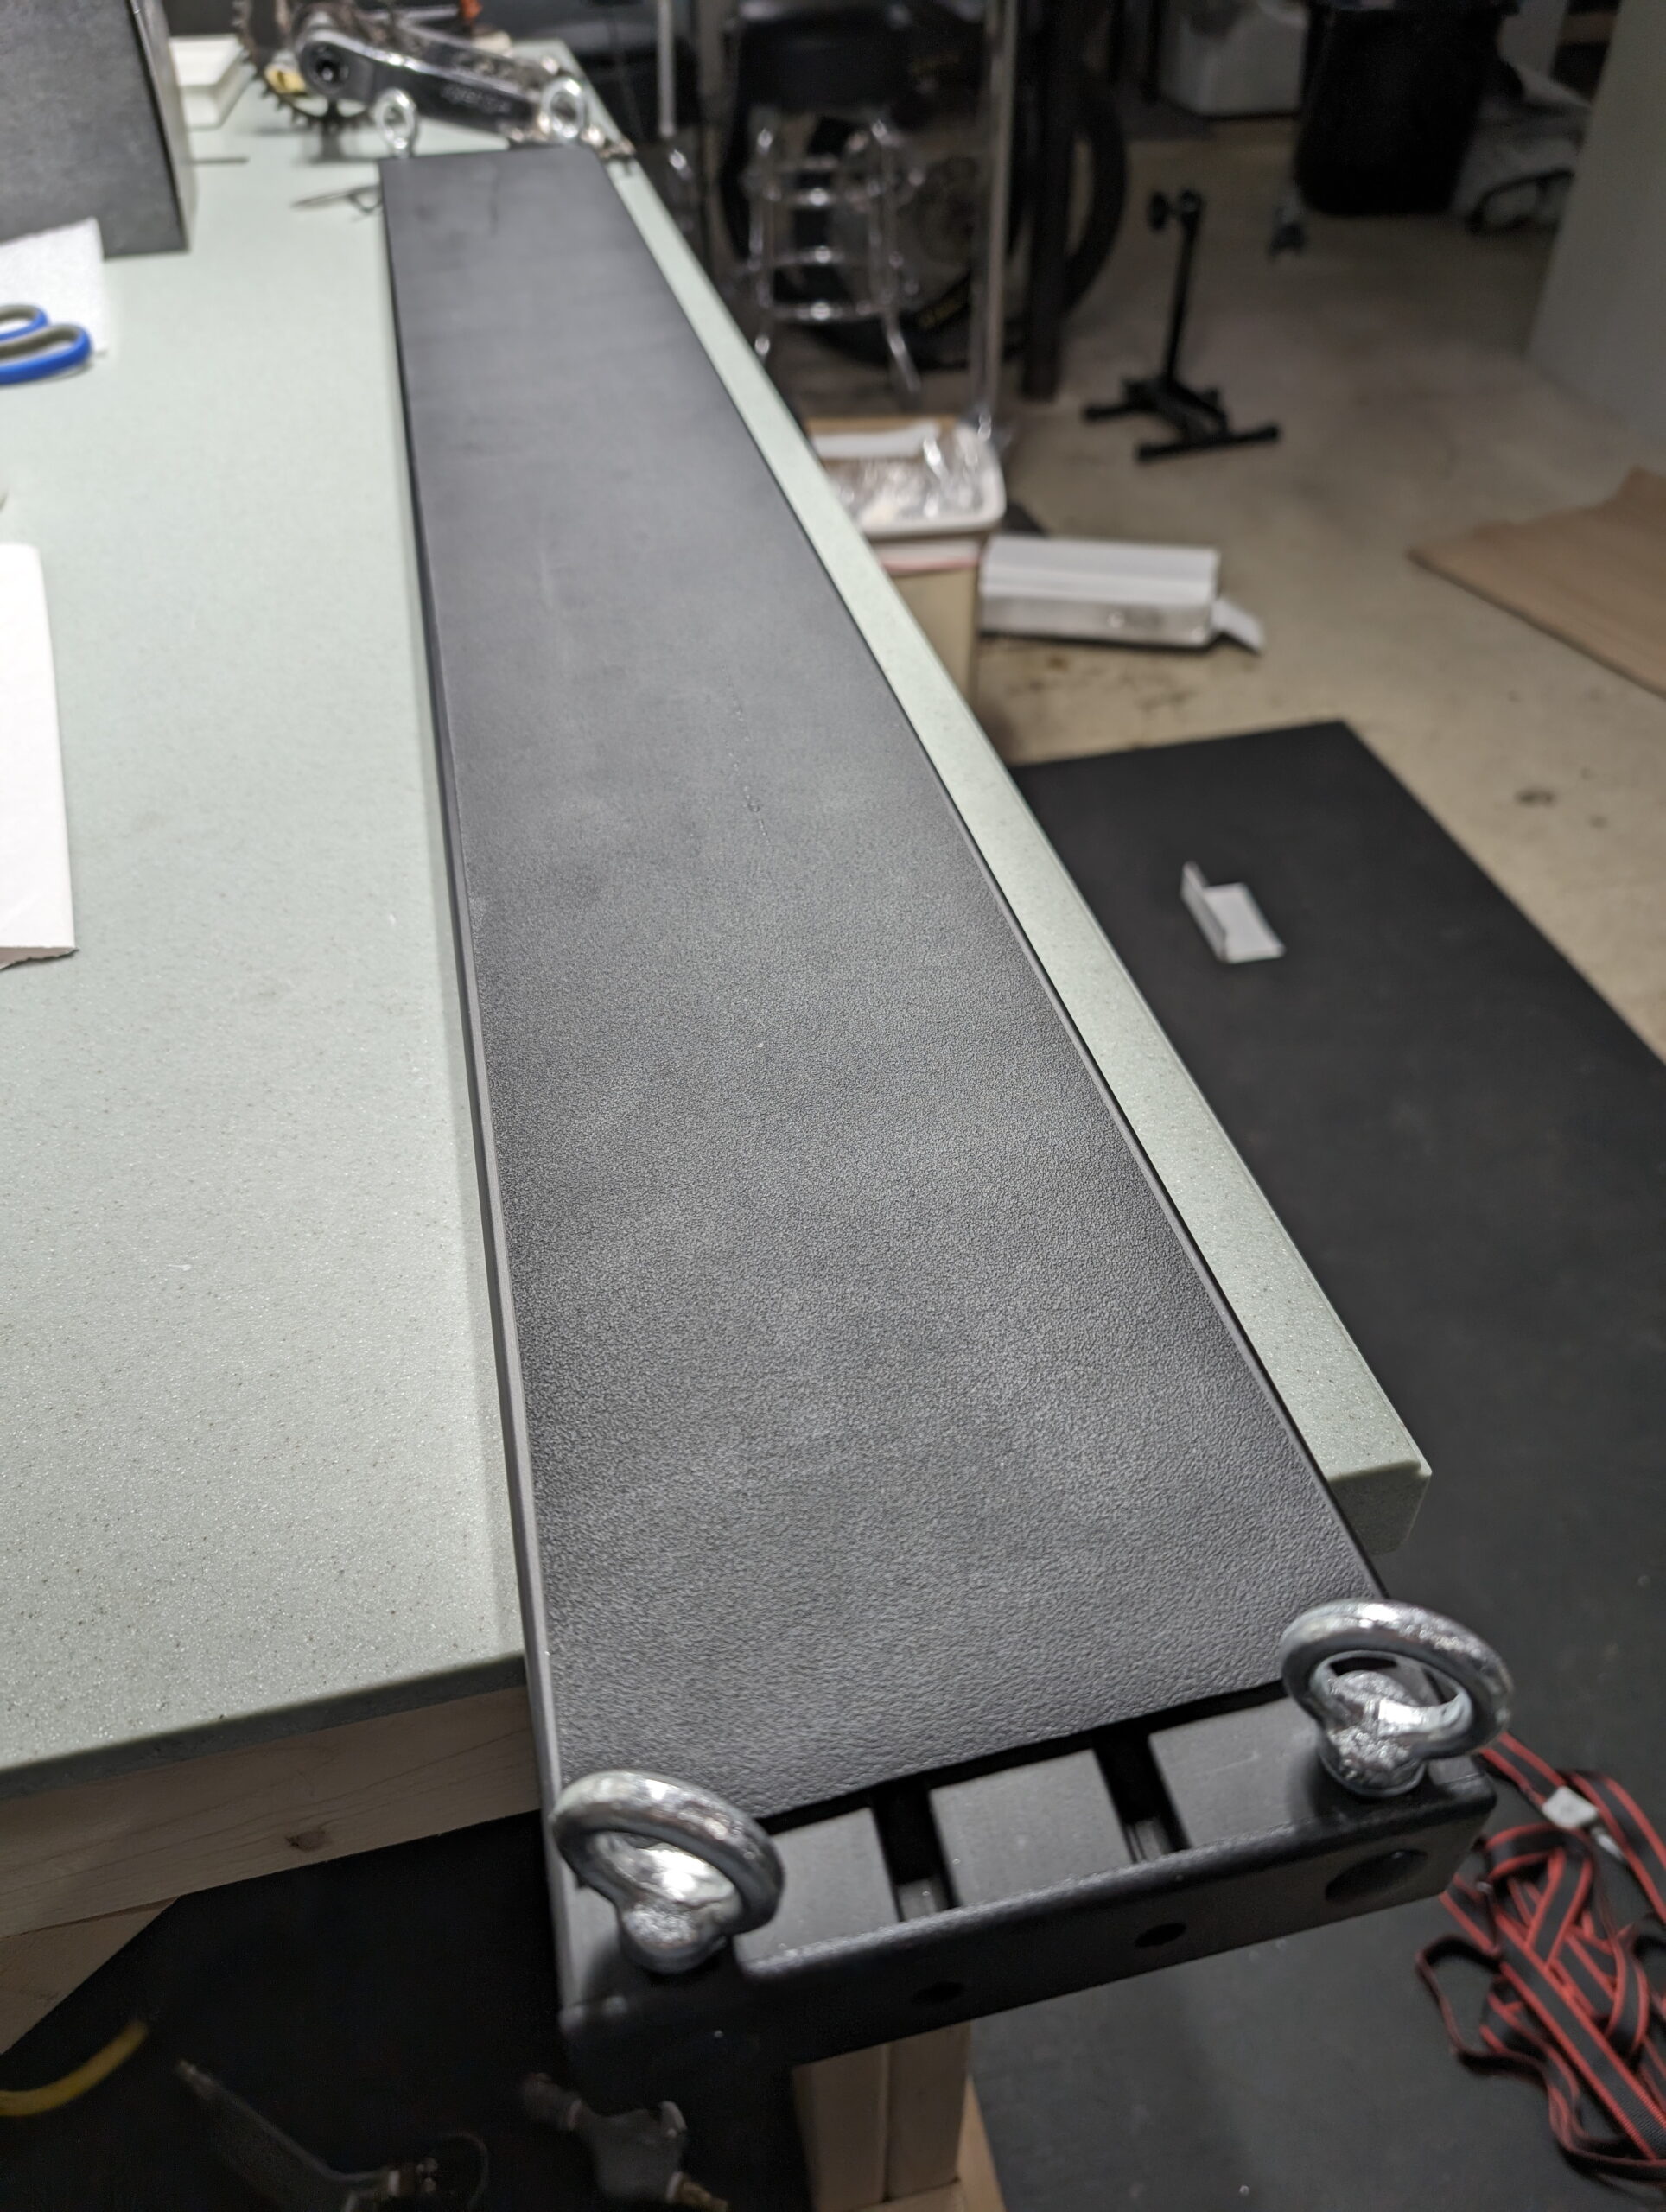
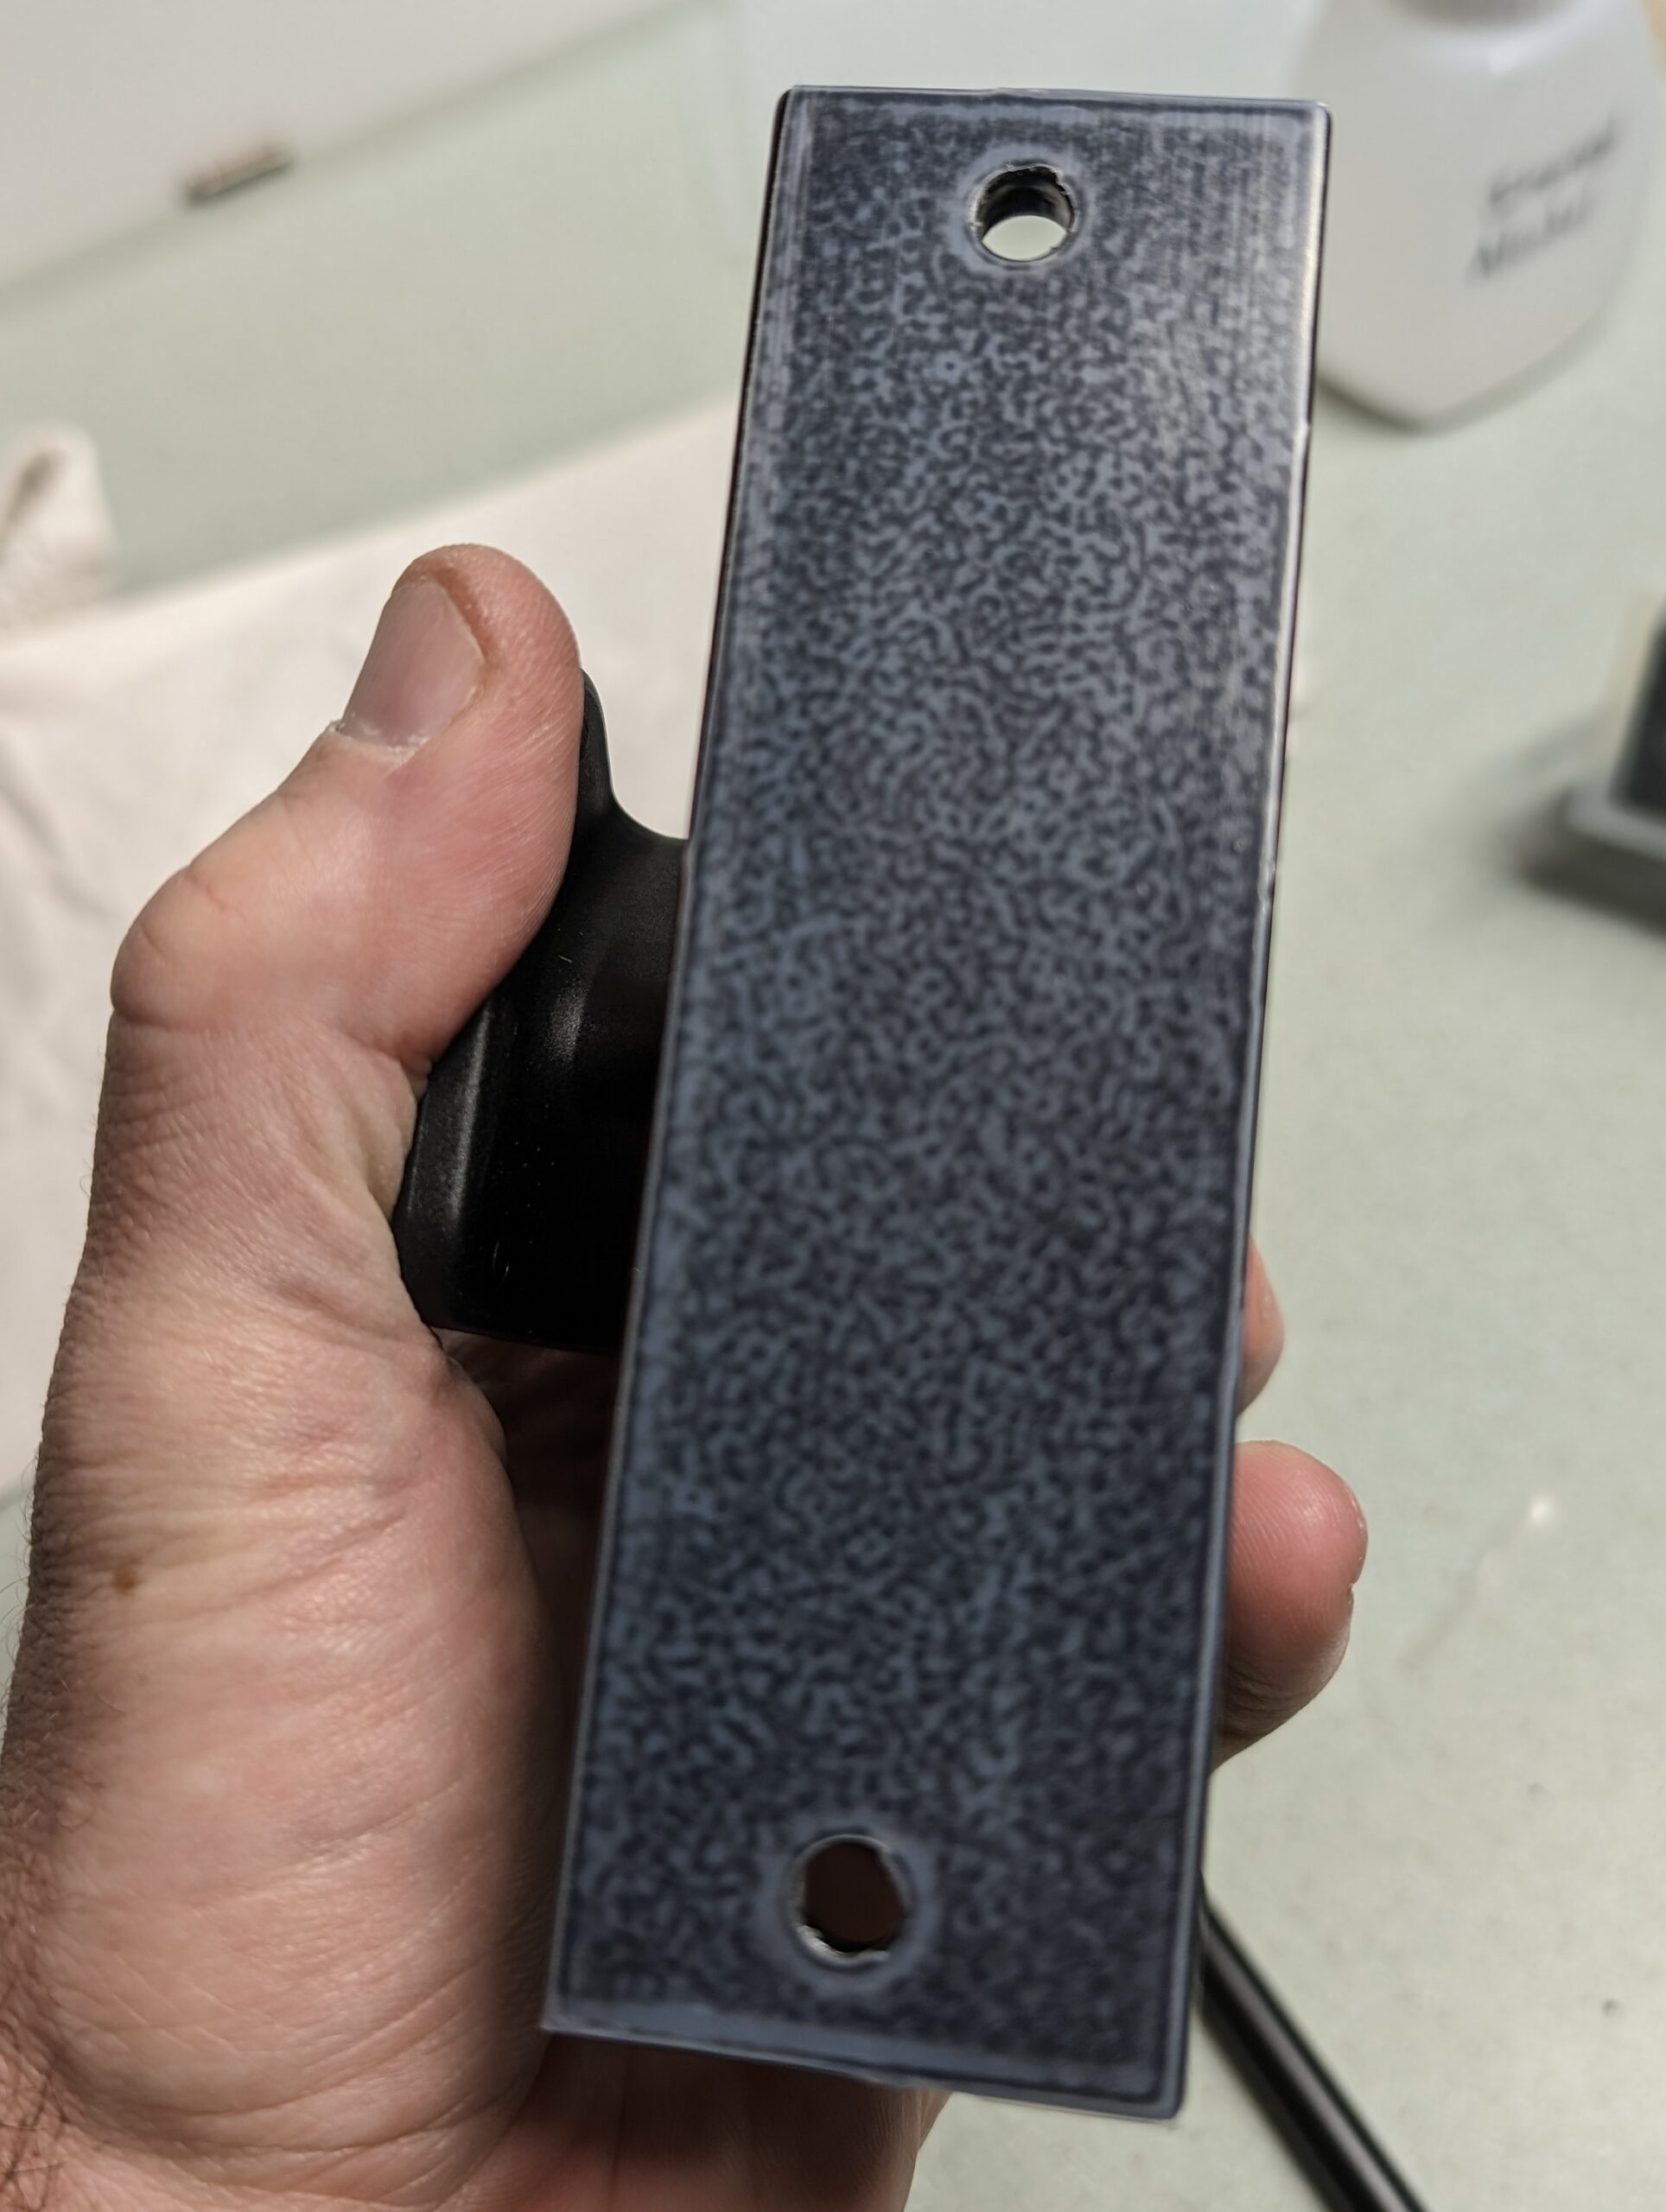
The main, base part of the rack is a 1.5″ x 6″ aluminum extrusion which has four slots on the larger faces. These slots are fitted with drop-in T-nuts to which the fork mounts can be fastened. To support easily repositioning the fork mounts I keep T-nuts in the unused slots, and chose ones with spring ball retention, which keeps them from rattling or sliding around while driving. While this style can be inserted or removed without removing the end caps, I keep spare ones in place because depending on the type of bike being fitted it is sometimes necessary to adjust the mount rotation or move them between slots.
Each end of the extrusion is capped with plastic face plates, and eyelets in slots on the underside are used with ratchet straps to hold the rail to the folded rear seats. A scrap of neoprene was stuck to the underside of the rail with small pieces of 3M VHB tape to help keep it from siding, and plastic corner protectors are used to keep the straps from digging into the seats.
Rocky Mounts DropTop mounts hold the bikes themselves to the rail, and the underside of each mount was covered with UHMW polyethylene tape to make side-to-side adjustment of the mounts smooth and avoid scratching the aluminum. The M6 bolts which came with the mounts were used to attach them to the T-nuts, but they are a bit long and bottomed out on the inside of the rail, so some nylon spacers are used beneath the heads of the nuts. I may eventually get some shorter bolts and avoid the spacers, but I really like the Torx head bolts that came from Rocky Mounts and I’m in no hurry to replace them. By varying the slot used the mounts can be angled at 0°, ~20°, or ~44° and can move forward or backward up to 4.5″. Coupled with easy side-to-side adjustment this makes staggering handlebars and fitting long mountain bike bars easy.
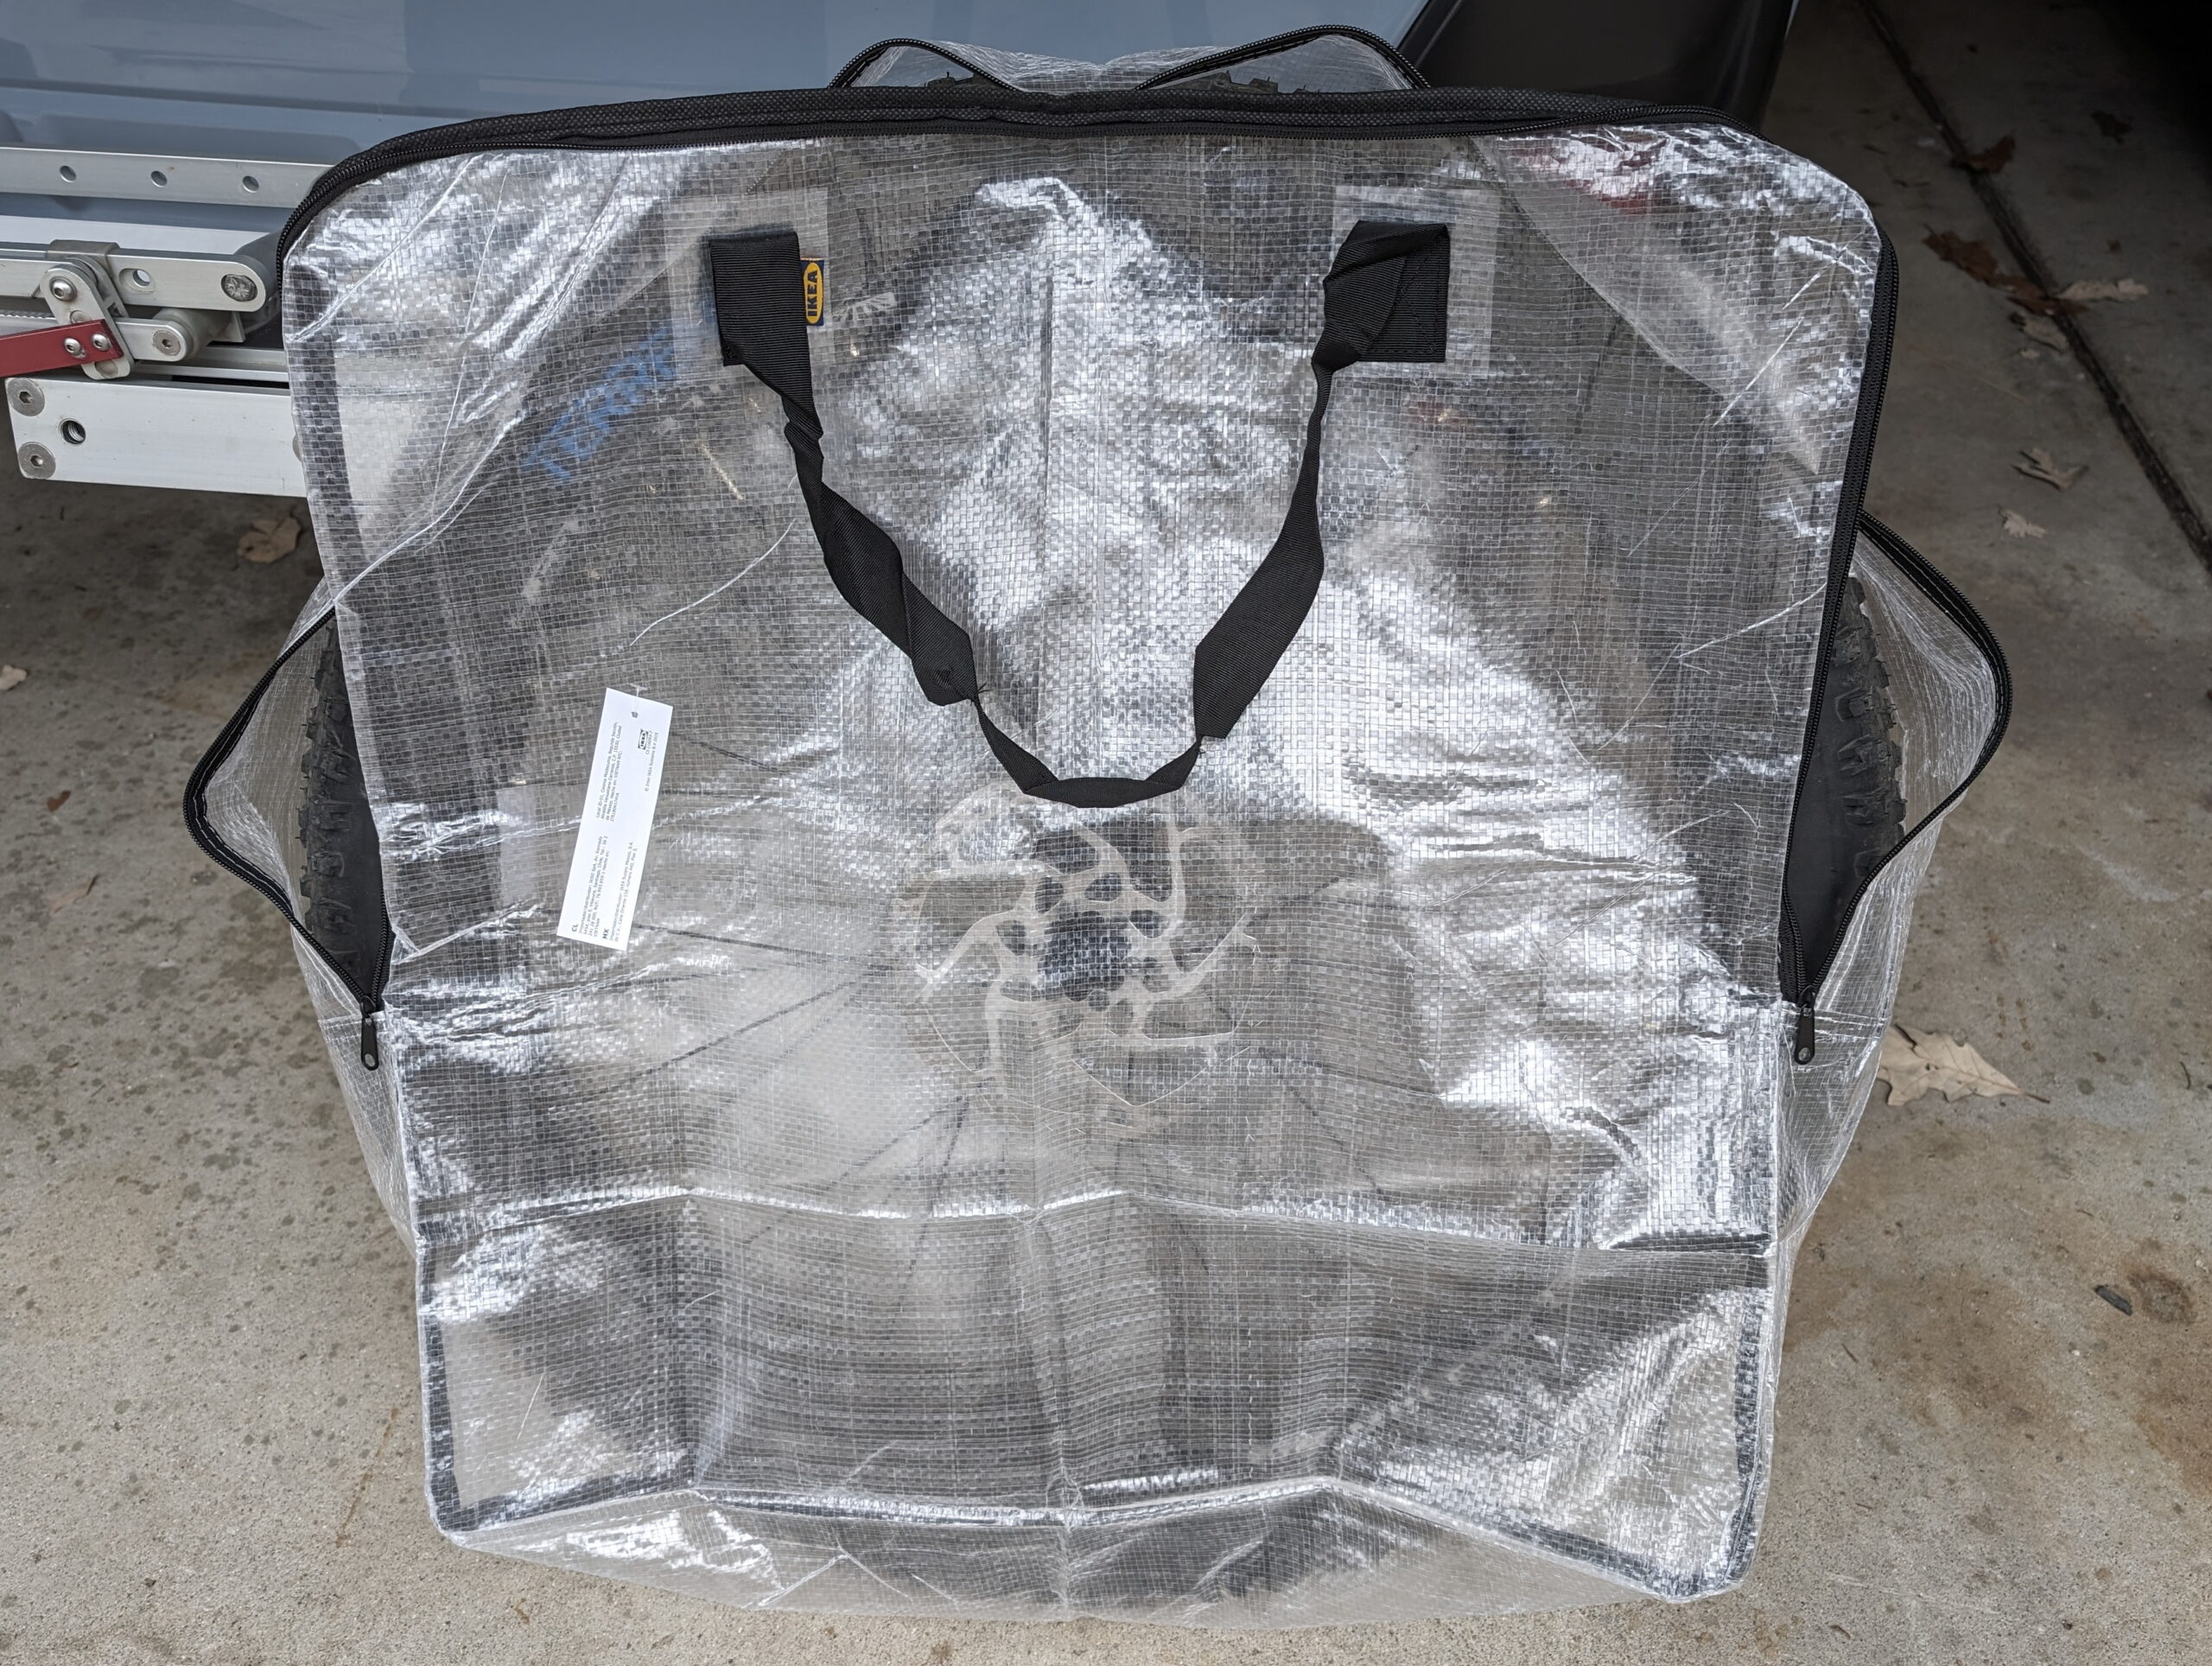
Finally, to hold the front wheels while they are off the bikes, IKEA DIMPA bags are working well. These aren’t always necessary, but with studded or potentially dirty tires and potentially setting them on other luggage, I like being able to drop the wheels into a bag before putting them in the car.
Plastic guards to protect the seats from the nylon ratchet straps.Pivot LES and Mach 4 SLUnderside of extrusion showing eyelets.IKEA DIMPA as Wheel BagNeoprene on the bottom of the rail.UHMW PE tape on the DropTopRocky Mounts DropTop attached to rail.
Comments closed
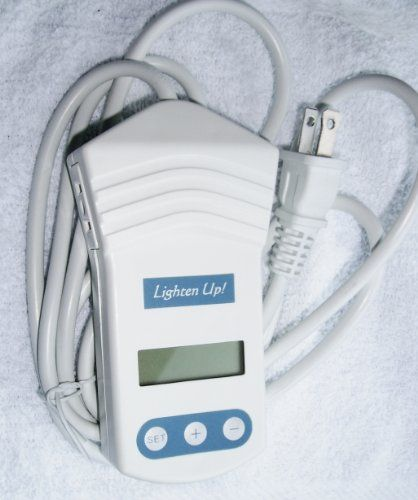
Quite a few years ago I came across Lighten Up!, which was a dawn-simulating alarm clock module that got connected between an incandescent lamp and used gently increasing light instead of noise. Coupled with a halogen bulb (that’d start out very yellow at lowest brightness) I had a wonderful sunrise-like alarm clock and it was much, much nicer than a beeping alarm.
The LCD displays in the Lighten Up! units began failing so I couldn’t change the programming, which was a hassle as the clocks in them drifted by a couple minutes per month. With a combination of COVID-19 remote work eliminating the need for an alarm clock and the devices dying, in the trash they went. (They also didn’t work right with LED bulbs, and now the person making them has closed down the business.)
I’ve been trying to use an alarm to stay on a more regular sleep schedule and while a bunch of other wake-up lights are available, they are dedicated units that are basically alarm clocks with built in lights. I really liked the elegance of the Lighten Up! and how it’d use an existing lamp, and outside of dedicated smart bulbs + an app I couldn’t find anything else like it. For a while I thought about developing my own hardware version that’d also work with LED bulbs, but never got around to it.
Lighten Up! (Image from Pintrest)
This winter I’ve been experimenting with Home Assistant (HA), and it turns out that with a couple cheap Zigbee parts (bulb and pushbutton from IKEA) it allows for a wonderful replacement/upgrade sunrise alarm idea. A next-generation Lighten Up!, if you will.
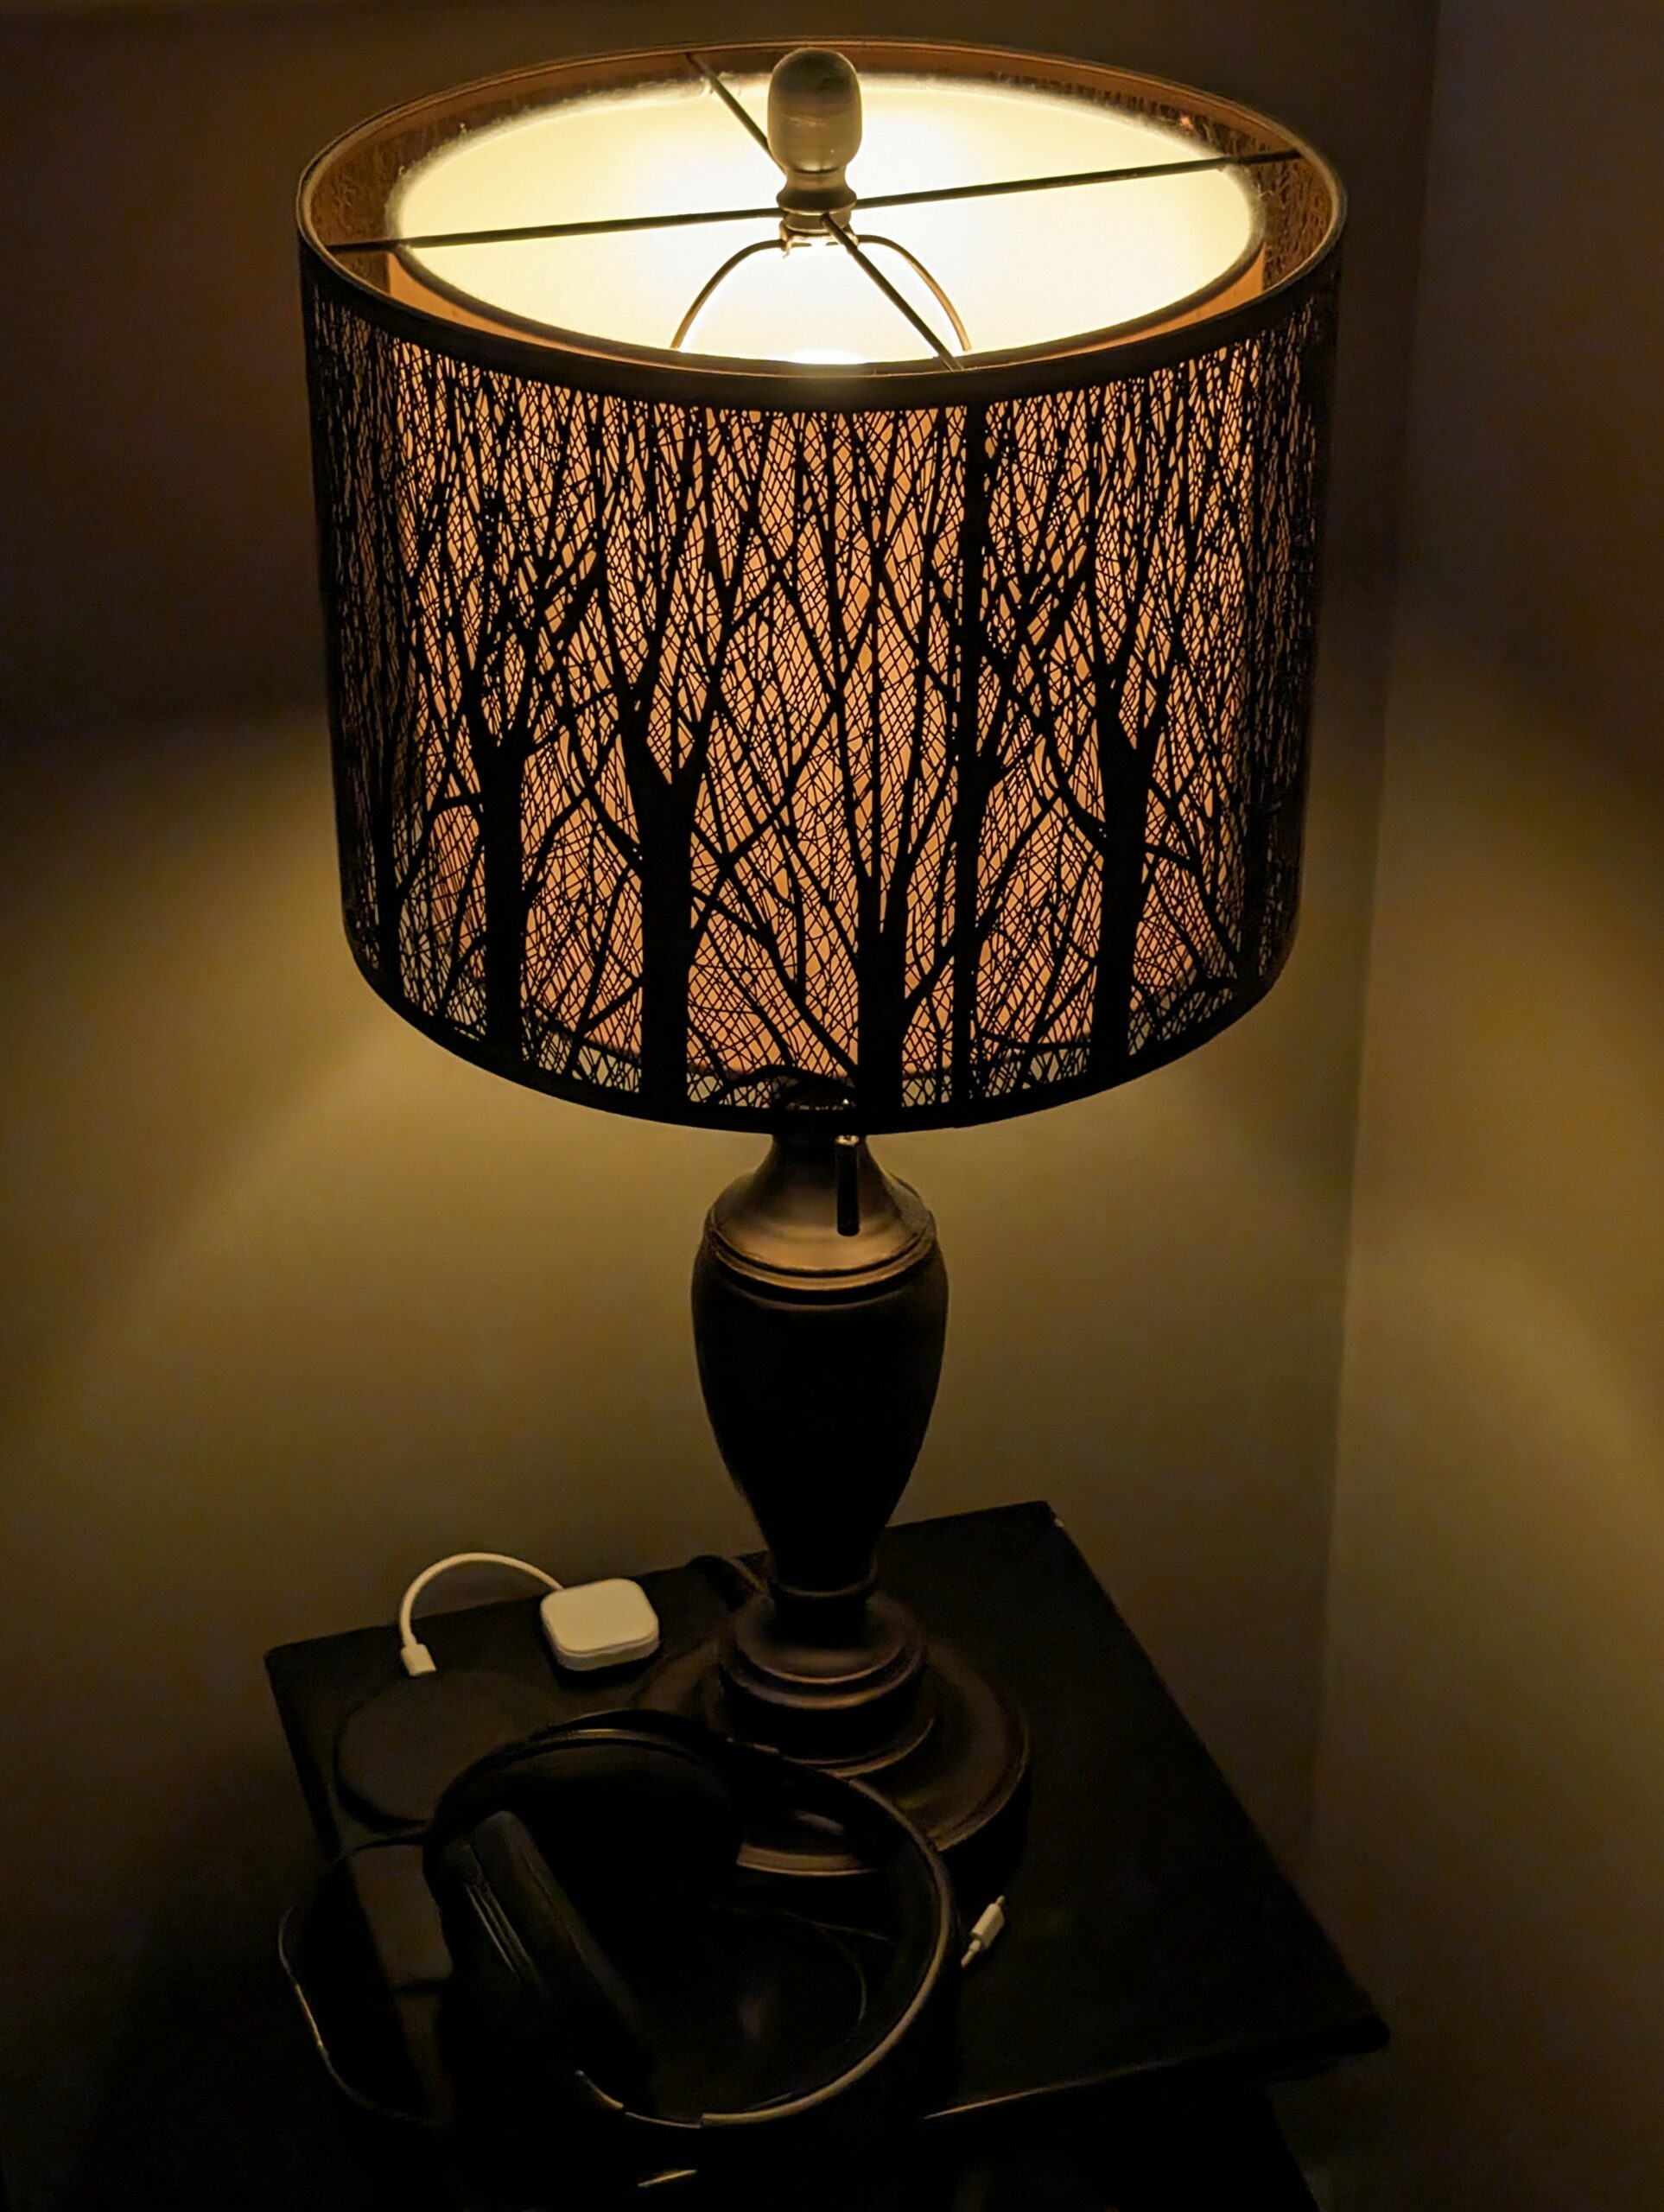
With everything put together the lamp next to my bed will now slowly come up to brightness 15 minutes before the wake-up alarm on my phone, reaching final as the normal alarm triggers. If I change the alarm time on my phone, or shut it off, the light-up alarm in HA will follow suit. Additionally, a physical button on the nightstand turns off the light off while replicating a sunrise alarm, or otherwise toggles the light on and off.
Even better, if I’m not home or if the alarm is set for other than between 3:00 AM and 9:00 AM (times during which I’d likely be in bed and wanting to wake up) the light won’t activate. This allows me to use alarms during the normal day for other things without activating with the light, or while traveling without waking Kristen.
Between this and the gently-increasing volume (and vibration) alarm built into the Android clock which triggers at the end of the sunrise cycle it’s a very nice, gradual wake-up system. And, all of this happens without any cloud services or ongoing subscriptions. My HA instance is local; the phone app communicates directly with it across either my home or the public networks. Communication between the physical controls and lights is a local, private network.
In this post I’ll document the major building blocks of how I did this so that someone else with basic Home Assistant experience (and a functioning HA setup, which is beyond the scope of this writeup) can do the same.
For reference, my Home Assistant hardware setup for this piece is:
With the Home Assistant Companion App for Android running on an Android phone, Home Assistant can get the date and time of the next alarm. After installing the app, go into Settings → Companion app → Manage sensors and enable the Next alarm sensor. My phone is named Pixel 8, so the alarm is now available as entity sensor.pixel_8_next_alarm. Note that this is not available if an iPhone (or other iOS device) is used. (ref: Next Alarm Sensor)
Part of setting up HA configures a Zone (location) called Home. This, combined with the default location information collected by the companion app, allows HA to know if my phone is at Home (or elsewhere), via the the state of entity device_tracker.pixel_8 (eg: home).
Note: While I give YAML of the automations for configuration reference, most of these automations were built using the GUI and involve the (automatically generated) entity and device IDs. If you are setting this up you’ll want to use the GUI and build these out yourself using the code for reference.
To make this all work, three community components are used and must be installed:
Ashley’s Light Fader 2.0: This script takes a light and, over a configured amount of time, fades from the light’s current setting to the defined setting (both brightness and color temperature) using natural feeling curves (easing). It will also cancel the fade if some conditions are met. I use this to have the light fade, over 15 minutes, using a sine function, to 70% brightness and 4000K temperature, and cancel the fade if the light is turned off or brightness changes significantly, the latter of which allows the button next to the bed to cancel the alarm.
To make this happen I turn on the bulb at 1% brightness and 2202K (it’s warmest temperature), then use the script to fade to 70% and 4000K over the course of 15 minutes. This does a decent job of replicating a sunrise or the results of the Lighten Up! with a halogen bulb.
This is configured as an automation I call Bedroom Steve Nightstand: Lighten Up! (Sunrise). Note that it has no trigger because it’ll be called from the next automation:
Adjustable Wake-up to Android alarm v2: This blueprint for an Automation takes the time from the next alarm sensor (alarm_source) to trigger an action before the alarm happens. I use this to initiate Ashley’s Light Fader 2.0 at 15 minutes before my alarm, only when my phone is at Home, and and the alarm is between 3:00 AM and 9:00 AM.
Part of configuring this is setting up a Helper or basically a system-wide variable, called Pixel 8 Next Alarm (entity id: input_datetime.pixel_8_next_alarm, type: Date and/or time).
This is configured as an automation called Bedroom Steve Nightstand: Lighten Up at 15 Before Alarm, set to only run if my phone is at Home and it’s between 3:00 AM and 9:00 AM:
I don’t want to get out a phone and dig into an app to manage the light, so next to the bed I have a TRÅDFRI Shortcut Button for controlling the light. If the button is pressed while the light is simulating sunrise, it turns off. If the light is off it turns it on, or visa versa.
Because turning the light off mid-dimming leaves it set at the current color and brightness, I use this instead of the normal Toggle action. In here I check the state of the bulb and either turn it off (if on), or turn it on to 100% brightness and 4000K if it is off:
alias: "Bedroom Steve Nightstand: Light Toggle"
description: >-
  Doesn't use the normal toggle because it needs to set the light color and
  brightness just in case it was left at something else when turned off
  mid-alarm.
trigger:
  - device_id: 12994a6c215ae1d4cfb86e261a2b2f3b
    domain: zha
    platform: device
    type: remote_button_short_press
    subtype: turn_on
condition: []
action:
  - if:
      - condition: device
        type: is_on
        device_id: e3421c7d54269752a371fe8443daf95f
        entity_id: 78599118c4ab8043cf03ce6532546b94
        domain: light
    then:
      - service: light.turn_off
        metadata: {}
        data:
          transition: 0
        target:
          entity_id: light.bedroom_test_bulb_light
      - stop: ""
    alias: On to Off
  - if:
      - condition: device
        type: is_off
        device_id: e3421c7d54269752a371fe8443daf95f
        entity_id: 78599118c4ab8043cf03ce6532546b94
        domain: light
    then:
      - service: light.turn_on
        metadata: {}
        data:
          color_temp: 153
          transition: 0
          brightness_pct: 100
        target:
          entity_id: light.bedroom_test_bulb_light
      - stop: ""
    alias: "Off to On: Full Brightness and 4000K"
mode: single
Finally, I also have this all displaying, and controllable, via a card stack in a dashboard. For the next alarm info I started with the template in this post but modified it to simplify one section by using now(), fix a bug in it that occurs with newer versions of HA, and then build it into something that better illustrates the start and end of the simulated sunrise. Because normal entity cards can’t do templating (to dynamically show data) I used TheHolyRoger/lovelace-template-entity-row and some Jinja templating to make it look nice.
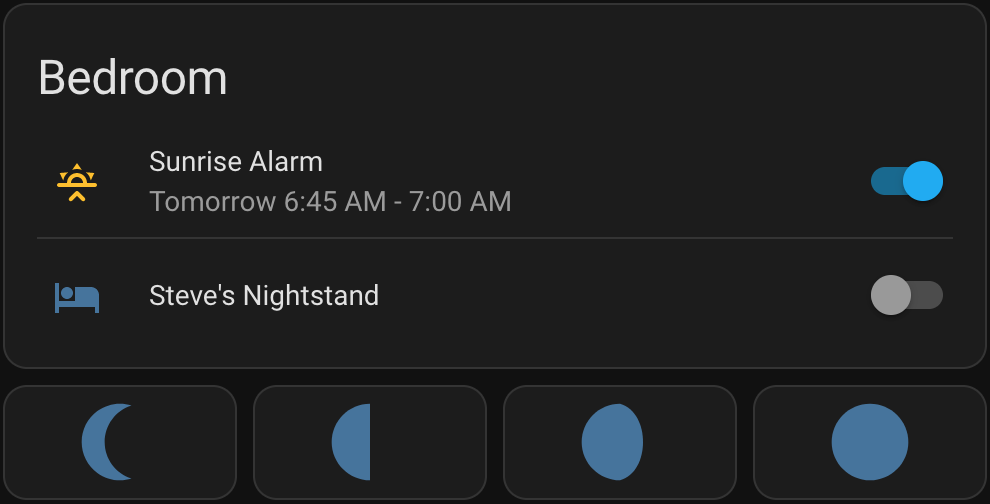
This gives me a row which shows the next alarm time (or “No alarm” if none set), nicely formatted, and has a toggle that can enable/disable the Bedroom Steve Nightstand: Lighten Up at 15 Before Alarm automation. Finally, I added a row of buttons to allow easy toggling between 1% / 454 mireds, 33% / 357 mireds, 66% / 294 mireds, and 100% / 250 mireds so I can manually set the light to some nice presets across dawn to full brightness.
The result of all of this is that, if my phone is at home and I have an alarm set between 3:00 AM and 9:00 AM, the light next to the bed will simulate a 15-minute sunrise before the alarm goes off. If the light is simulating a sunrise, pressing the button will turn it off. Otherwise, the button toggles the light on and off at full brightness, for normal lamp-type use. Finally, via the Home Assistant UI I can easily check the status of, or turn off, the sunset alarm if I don’t want to use it.
So far, this is working great. There’s two things I’m looking into changing:
First, the bulb I’m using, 405.187.36, is an 1100 lumen maximum brightness. This is a bit too bright for the final stage of the alarm, and it’s minimum brightness is a bit higher than I’d like and seems a little abrupt. (Ideally the initial turn-on won’t be noticable.)
Since IKEA bulbs are cheap and generally work well, I’ll likely try a few other lower brightness ones and see how they work out. Both 605.187.35 (globe) and 905.187.34 (chandelier) are color temperature adjustable, 450 lumen maximum, cost $8.99, and look like good candidates as I expect their minimum brightness to be lower.
There is also 104.392.55 ($12.99), but it is fixed at 2200K and has a maximum brightness of 250 lumens. I suspect this will be nicely dim for the start, but wouldn’t allow a color transition and might not have enough final brightness to make me feel ready for the day.
I may also try something like 204.391.94 ($17.99), which is adjustable color, as this could allow me to use something like the sunrise color pallete, but this would require moving to a different script for fading. The current script doesn’t support fading between colors (see here for discussion around this), so this would take a lot of work on my part. Probably more than would be beneficial, since varying color temp on white-range bulbs is pretty darn good already.
Second, the TRÅDFRI Shortcut Button (203.563.82) that I’m using has been discontinued. It’s a nice, simple button, and I can trigger on it using short or long press. It’s replacement, SOMRIG Shortcut Button (305.603.54), isn’t in stock at my local IKEA so I don’t have one, but I expect it to be two buttons that can each have short or long presses, and perhaps even double-click on each. If so, I may add something more like dimming the nightstand light to use as a reading light, or perhaps something to leave on for the dogs when we’re gone.
Thinking a bit bigger picture I could even do things like use an in-wall dimmer to have the adjacent closet lights serve as wake-up lights. But as all the quality ones of these are Z-Wave I’d have to get another radio for the Pi and… and…
The possibilities for this stuff are nearly endless, which is neat, because it becomes an engineering problem of what to do that provides sufficient benefit without complexity for complexity’s sake. This, at least, a Home Assistant-based replacement for the old, beloved Lighten Up!, is great.
Note: This post has been updated a few times since original posting to fix grammar, a bug in the Jinga2 template for displaying the next alarm, and to add buttons for setting lamp brightness.
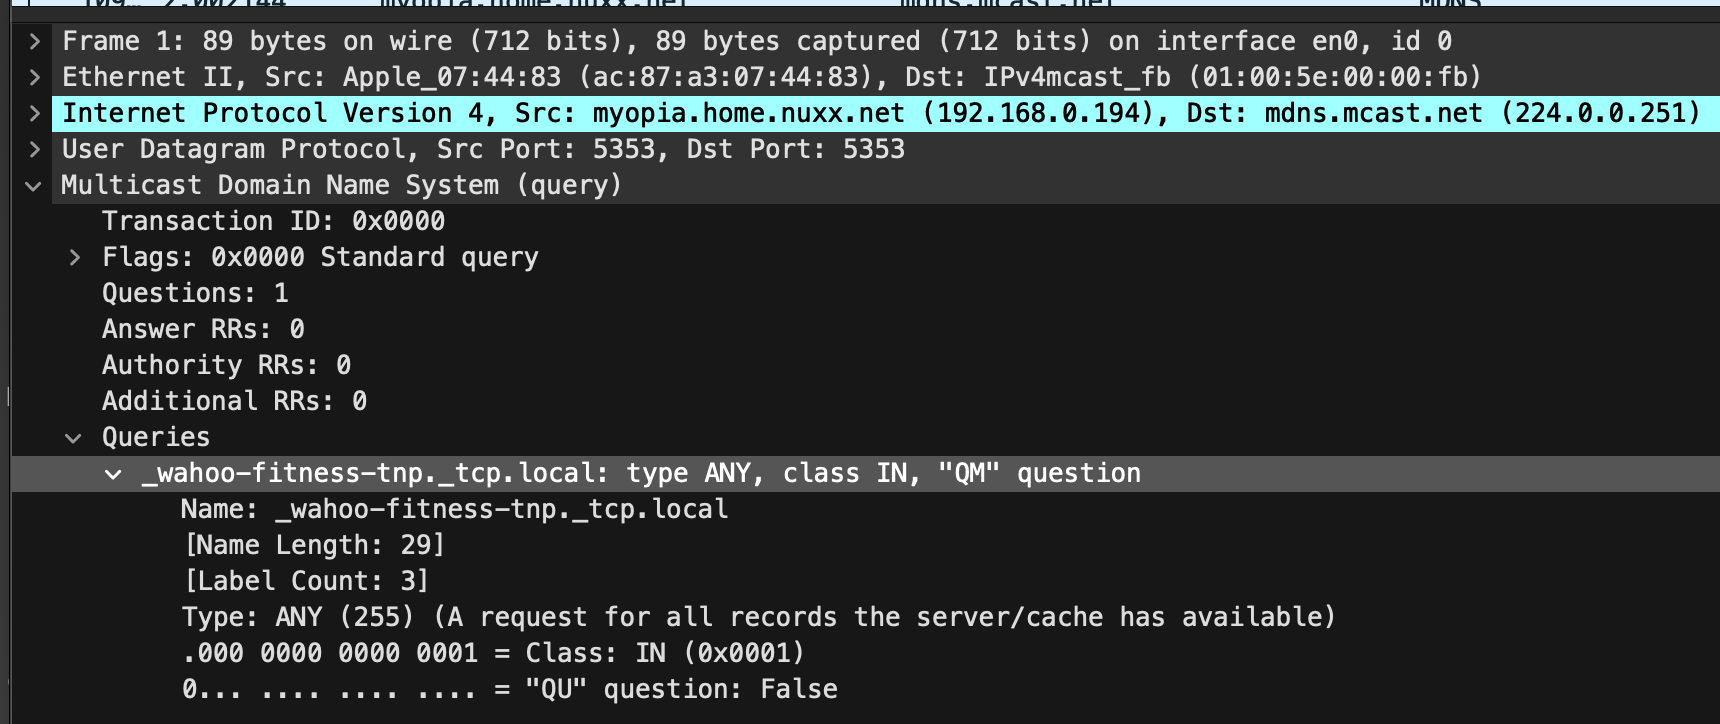
Wahoo smart trainers support network connectivity (instead of just the traditional Bluetooth or ANT+). Since I don’t have one I’d never bothered looking into how it works, but this morning while troubleshooting something with TrainerRoad running in the background I happened to see an mDNS query for _wahoo-fitness-tnp._tcp.local and realized this is how the smart trainers get discovered on the network.
Neat!
Maybe one day I’ll have a smart trainer that can use the network and I can dig further into how this all works.
I’ve been experimenting with Home Assistant (HA) for some temperature monitoring around the house. It has a great mobile client that’ll work across the public internet, but HA itself unfortunately it only does HTTP by default. It has some minor built in support for HTTPS by using the NGINX proxy and Let’s Encrypt (LE)Add-ons, but for a couple of reasons[1] I didn’t like this solution. I’m not about to expose something with credentials across the public internet via plain HTTP, so I wanted to do this proxying on my firewall instead of on the device itself.
My firewall at home runs OPNsense which has an NGINX Plugin, along with a full featured ACME client that I’m already using for other certificates, so it was perfect for doing this forwarding. After a bit of frustration, fooling around, and unexpected errors I got things working, so I wanted to share a simple summary of what it took to make it work. I’m leaving the DNS, certificate, and firewall sides of this out, as they’ll vary and are well documented elsewhere.
Here’s the steps I used:
Set up DNS so the hostname you wish to use is accessible internally and externally. In this example homeass.site.nuxx.net will resolve to 24.25.26.13 on the public internet, and 192.168.2.1 at home, which are the WAN and LAN interfaces on the OPNsense box.
Set up the ACME plugin to get a certificate for the hostname you will be using for, in this case homeass.site.nuxx.net.
On your Home Assistant instance, add the following to the configuration.yaml. This tells HA to accept proxied connections from the gateway. If you don’t do this, or specify the wrong trusted_proxy, you will receive a 400: Bad Request error when trying to access the site via the proxy:
In Configuration → Upstream → Upstream Server define your HA instance as a server:
Description: HA Server
Server: 192.168.2.23 (your Home Assistant device)
Port: 8123 (the port you have Home Assistant running on, 8123 is the default)
Server Priority: 1
In Configuration → Upstream → Upstream define a grouping of upstream servers, in this case the one you defined in the previous step:
Description: Home Assistant
Server Entries: HA Server
In Configuration → HTTP(S) → Location define what will get redirected to the Upstream:
Toggle Advanced Mode
Description: Home Assistant
URL Pattern: /
Upstream Servers: Home Assistant
Advanced Proxy Options → WebSocket Support: ✓
In Configuration → HTTP(S) → HTTP Server define the actual server to listen for HTTP connections:
HTTP Listen Address: Clear this out unless you want to proxy HTTP for some reason.
HTTPS Listen Address: 8123 and [::]:8123. Leave out the latter if you don’t wish to respond on IPv6.
Default Server: ✓
Server Name: homeass.site.nuxx.net
Locations: Home Assistant
TLS Certificate: Pick the certificate that you created early on with the ACME plugin.
HTTPS Only: ✓ (Unless for some reason you wish to support cleartext HTTP.)
Then under General Settings check Enable nginx and click Apply.
Finally, if needed, be sure to create the firewall rule(s) needed to allow traffic to connect to the TCP port you designated in the HTTP Server portion of the NGINX configuration.
[1] Reasons for doing the proxying on the firewall include:
The Let’s Encrypt Add-on won’t restart NGINX automatically on cert renewal as OPNsense can. This means I’d have to either write something to do it, or manually restart the add-on to avoid periodic certificate errors.
If NGINX is running on the same device as Home Assistant, then it needs to be on a different port. I prefer using the default port.
I’d prefer to run just one copy of NGINX on my network for reverse proxying.
While experimenting with NGINX and LE on HA I kept running into weird problems where something would start logging errors or just not work until I restarted the box. With everything running as containers, troubleshooting intermittent issues like these is painful enough that I preferred to avoid it.
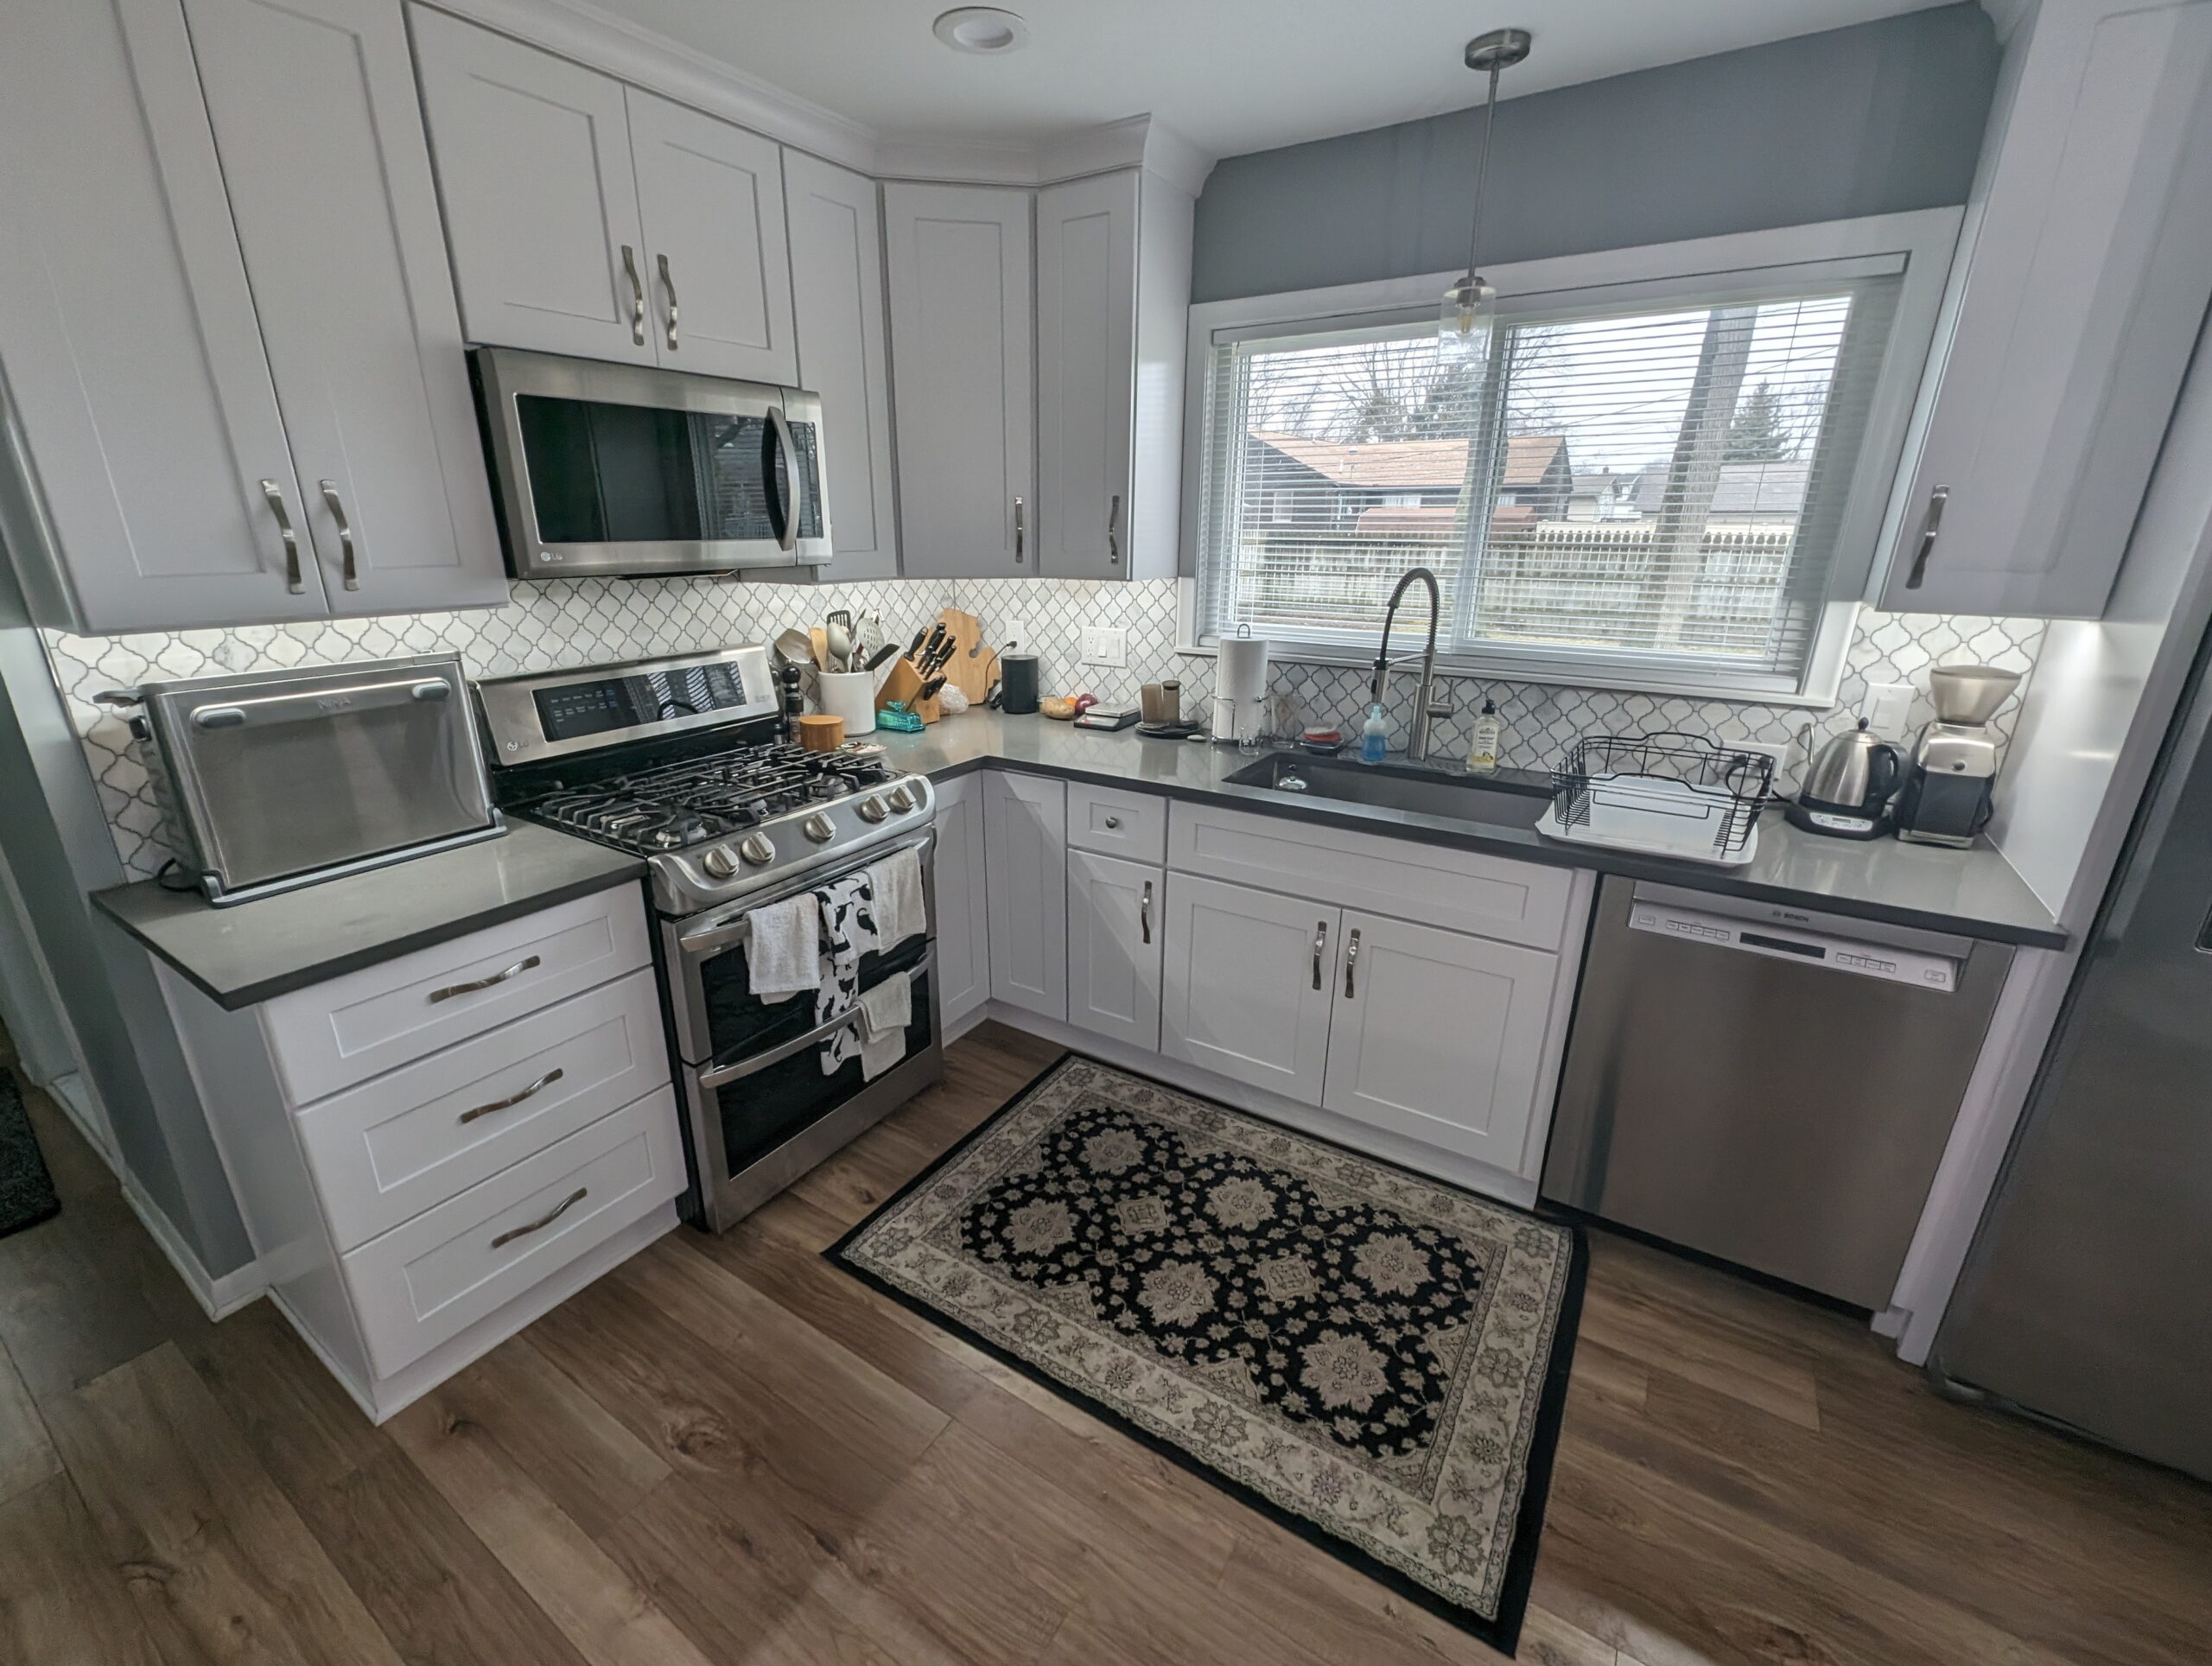
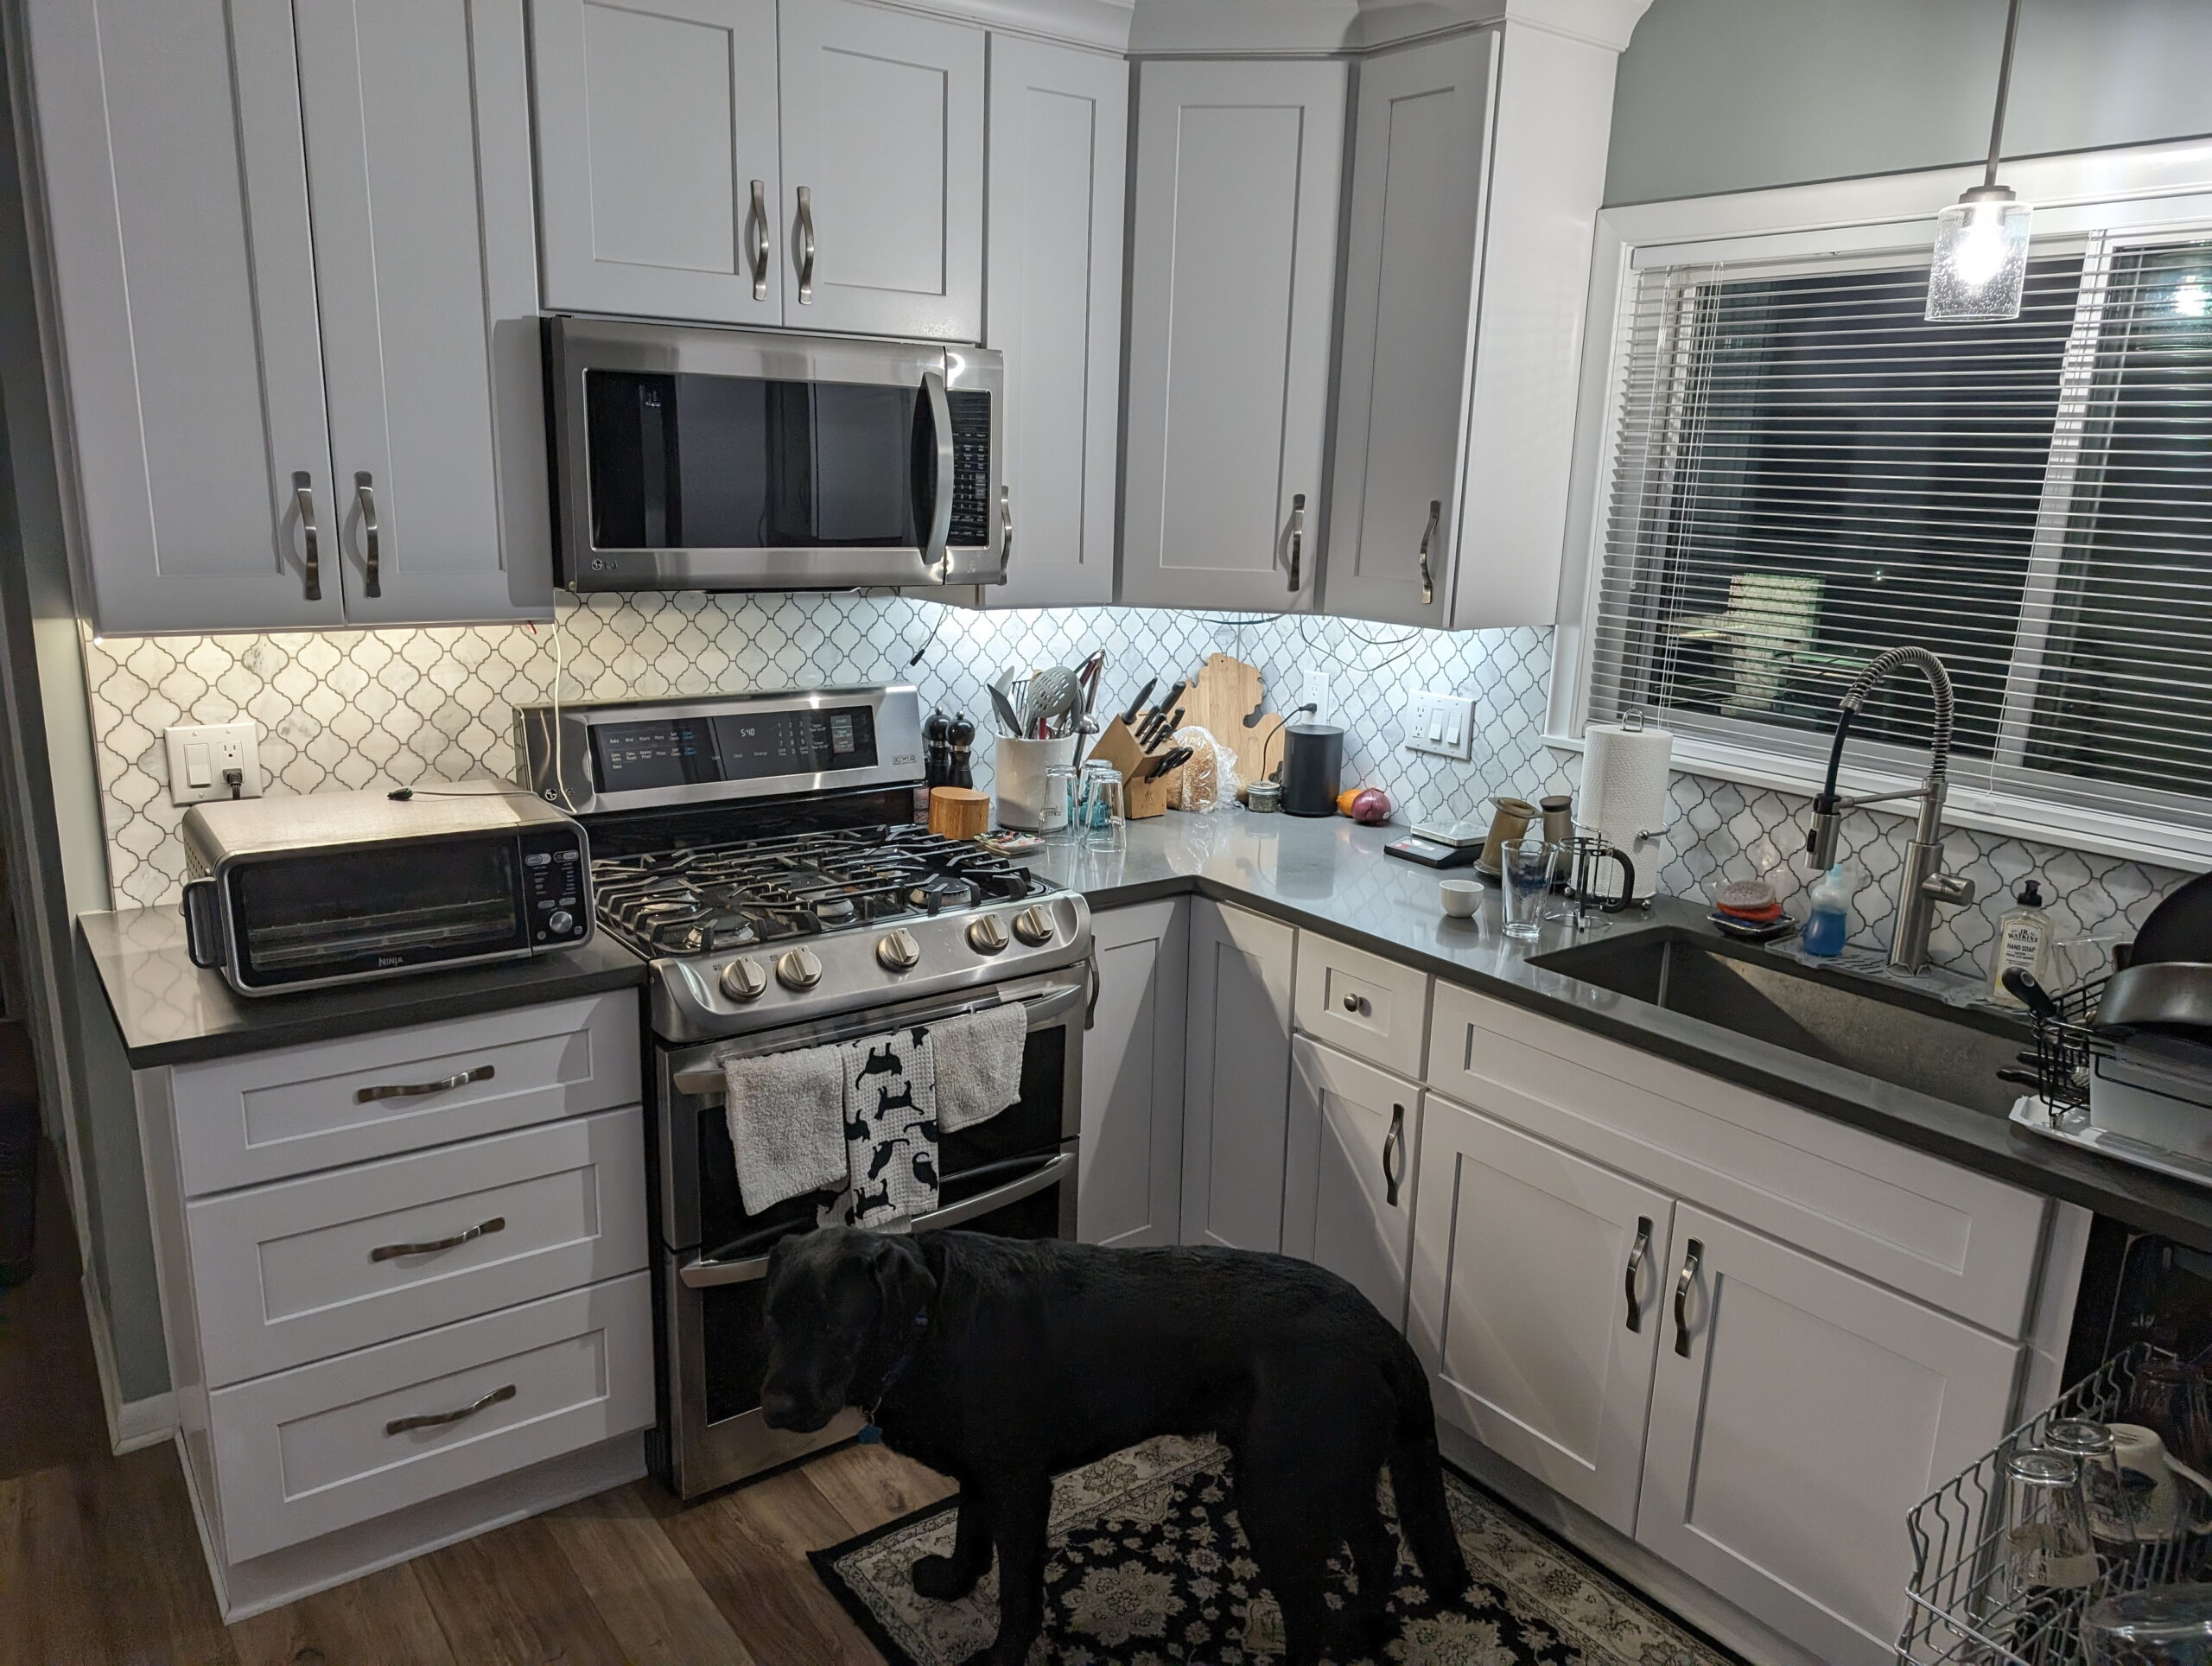
After the kitchen was redone in our new house, the under-cabinet space (where lights would go) was intentionally left unpopulated; something for me to finish later. The electrician had fitted an outlet per cabinet grouping, and a switch on the wall that toggles those outlets, but I’d asked him to skip the lights because I really wasn’t sure what style or color we wanted, nor how I wanted to wire things. Being low voltage with the outlets and switch already fitted, it would be fairly straightforward later on.
This winter, looking for a project, I decided to finally get this done. After talking with my friend Dan and some investigating, I finally got a solution together.
What I ended up doing was sourcing a handful of parts, flexible PCB LED strips, aluminum enclosures, wire, and wall wart power supplies on Amazon, assembling it, and sticking it to the underside of the cabinets. This has worked out well, so I wanted to share what I did.
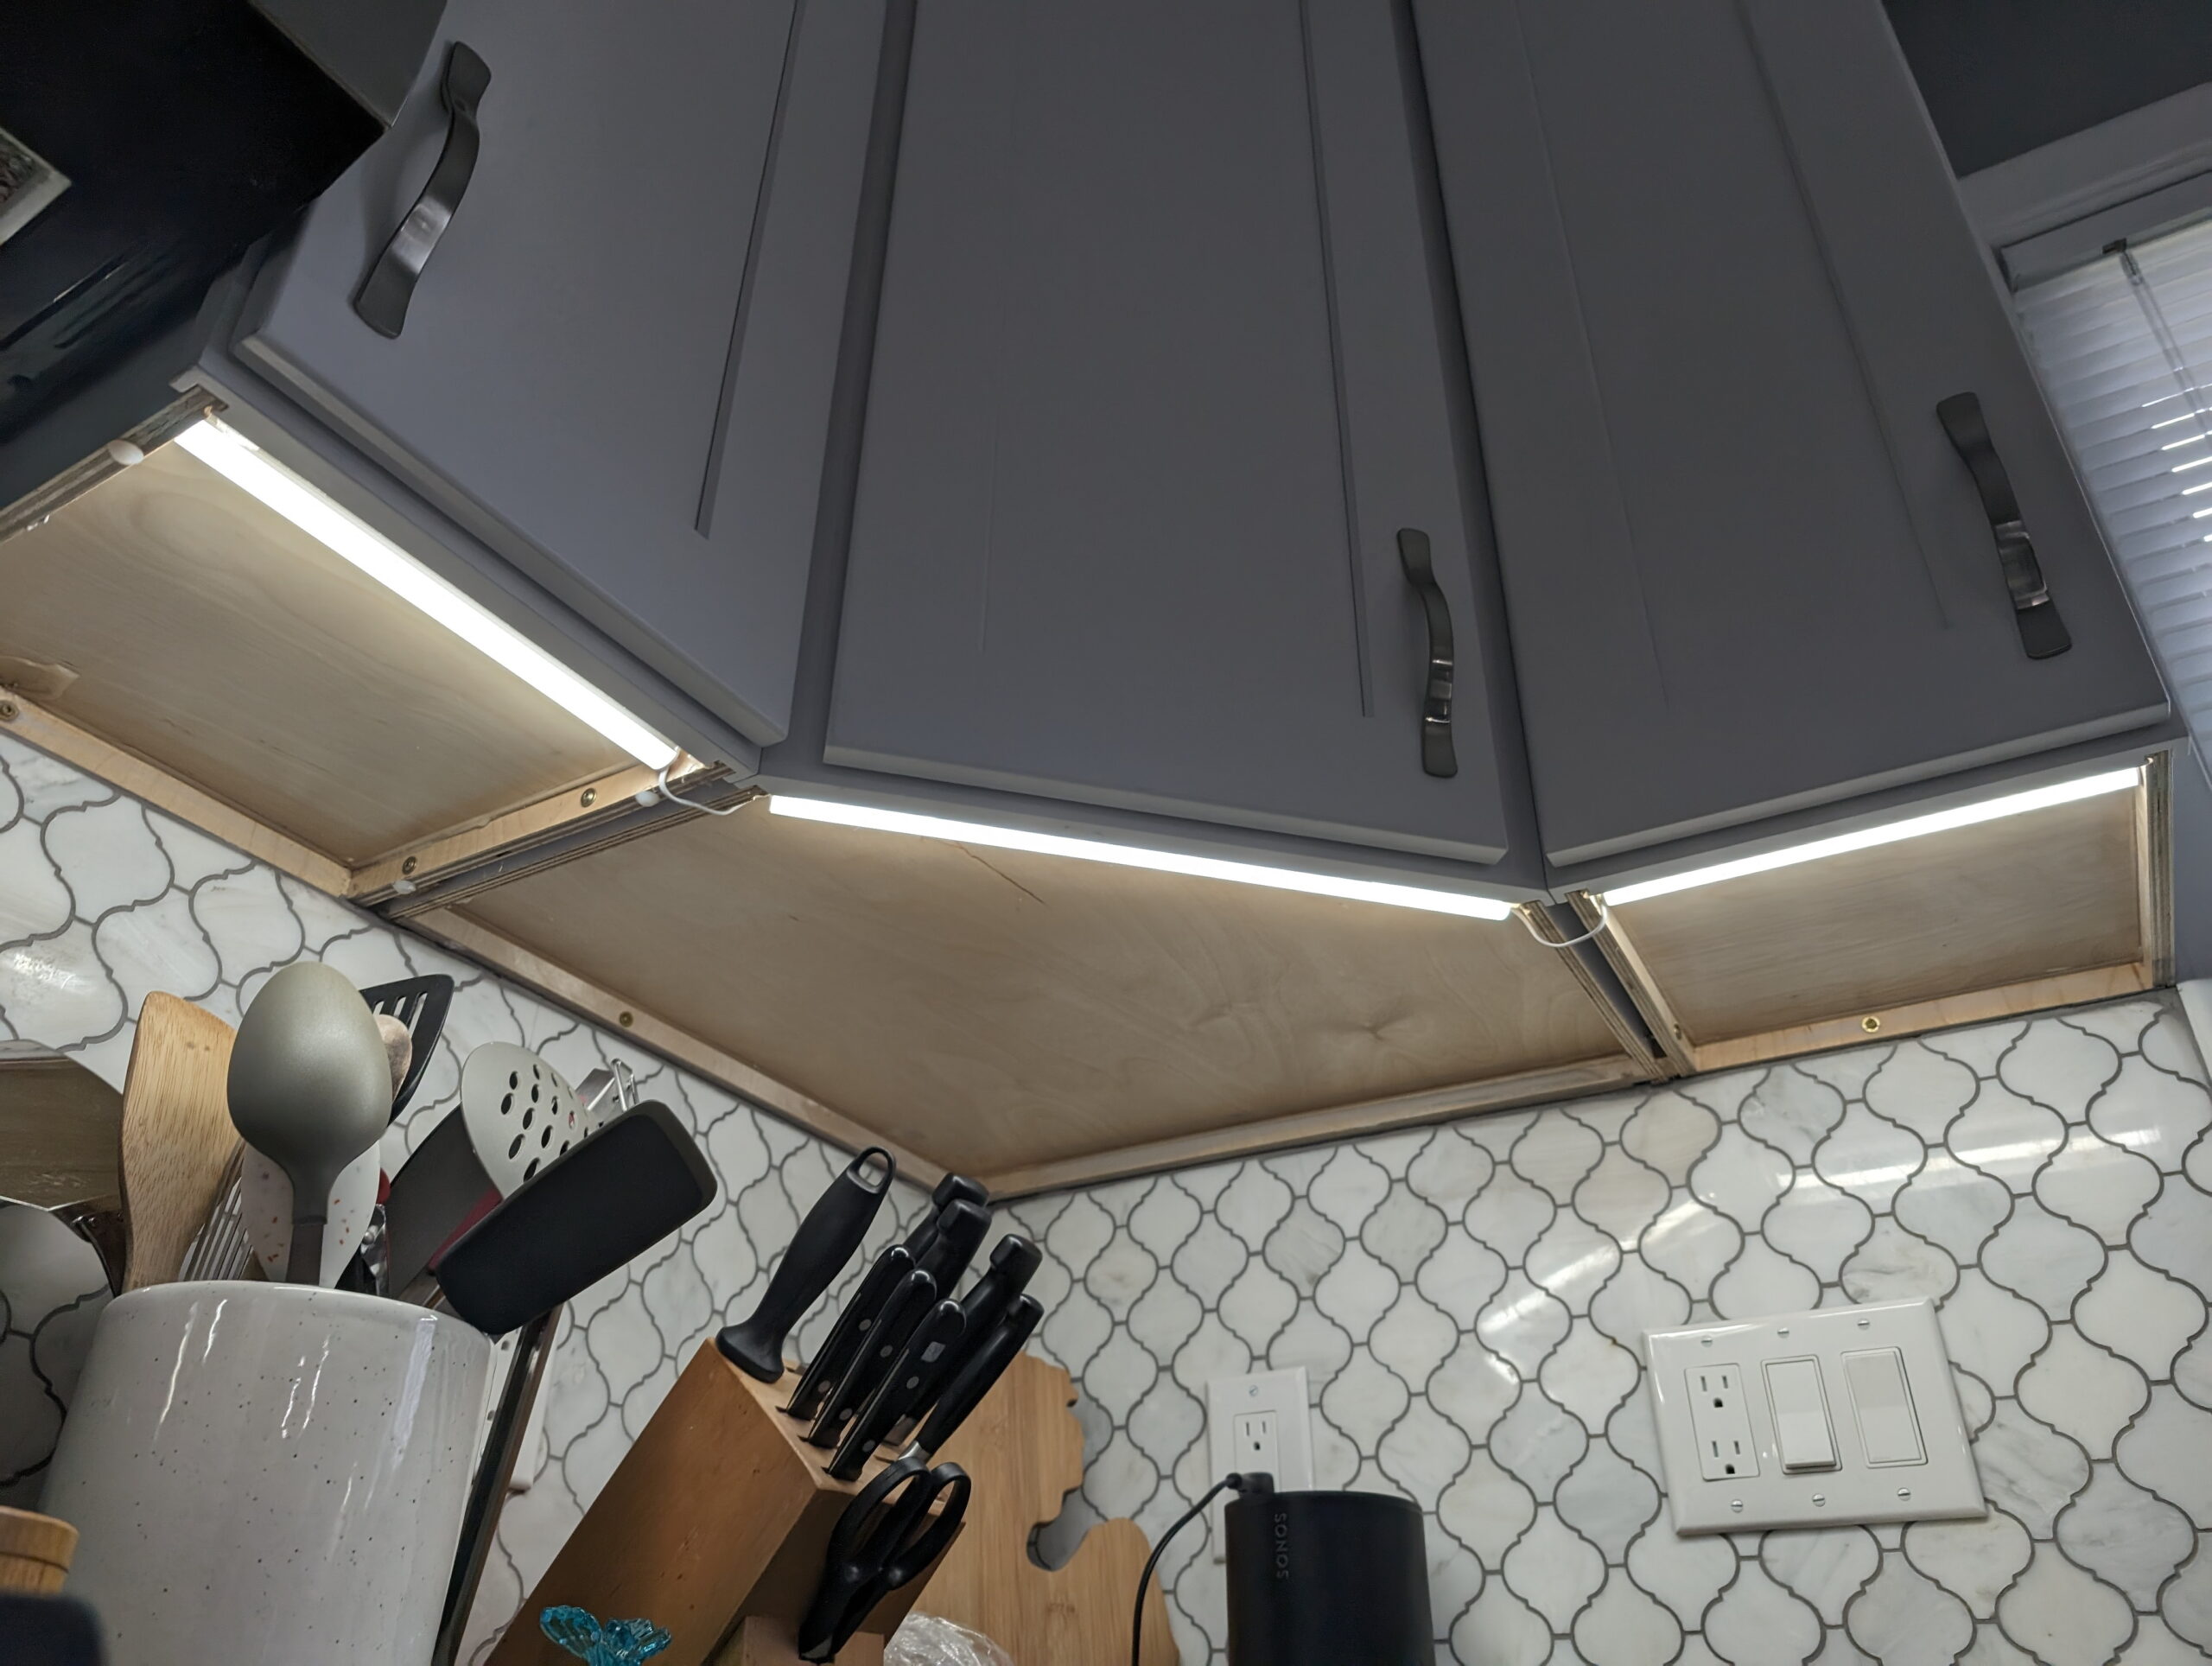
Our kitchen has three overhead cabinet groupings, the left-most has 22″ of face, the corner has 37″ of face (2x 10″ side cabinets and 1x 17″ center cabinet), and the right-most is a single 10″ cabinet. I had originally thought of ringing the underside of each cabinet with LED strip lights, but after some consideration I decided to do a single light assembly along the front edge of each cabinet, pointing down, with a wide-angle diffuser.
In the kitchen we have daylight (5000K) colored lights, but as the under-cabinet lighting is likely to be used as more of a night or secondary light, I figured on ~4000K lights. After buying strips of both 4000K and 6000K of to test, we ended up with some strips listed as Cool White 6000K. This matches pretty well whenever the overhead lights are on and it’s bright to cloudy day outside, and likely because of the grey-ish countertops it still looks fine when they are the only lights on.
It would have been possible to use a different type of strip that has multiple color temperature white LEDs and selectable color temperature, but doing this requires a controller external to adjust the light strips, which would have added around $60 just for the controllers, plus another $10 or so in LEDs, a remote control, more space taken up in the cabinets. This setup, with fixed color strips, is just AC-DC adapters plugged into the existing mains outlets, and the LED strips connected to the adapters. If we find that this isn’t good I may eventually go to controllers, but for now this is working nicely.
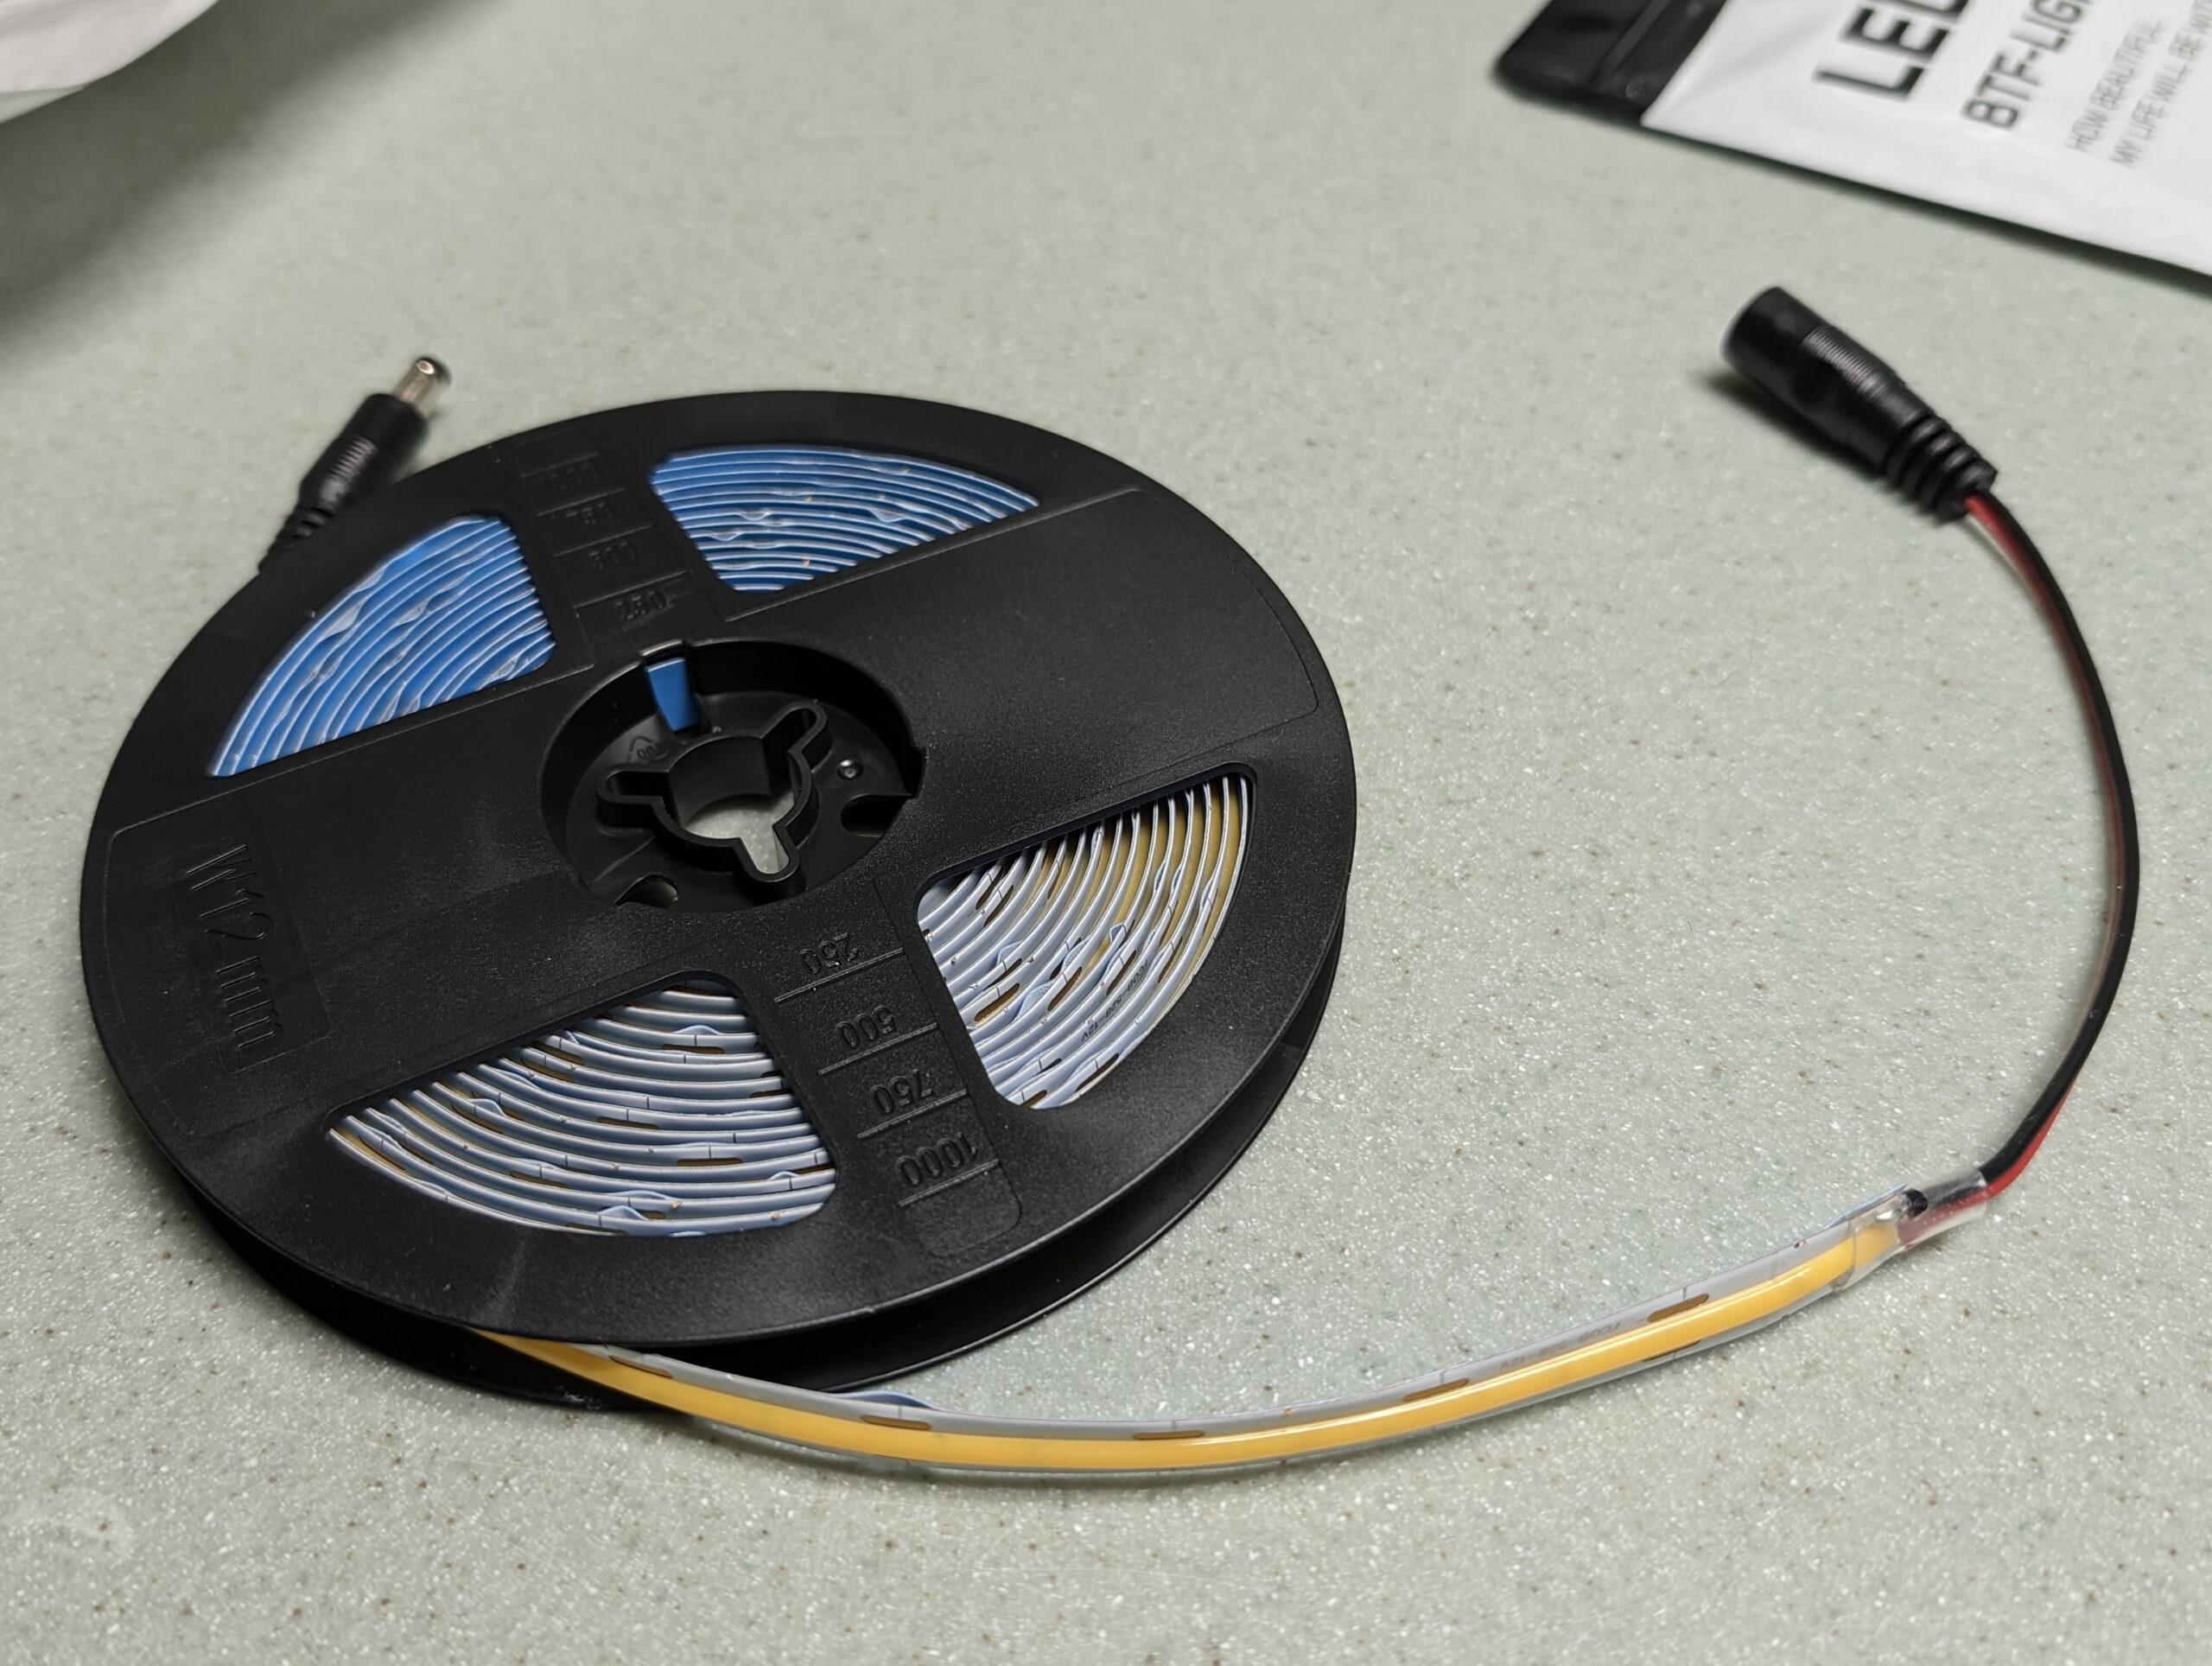
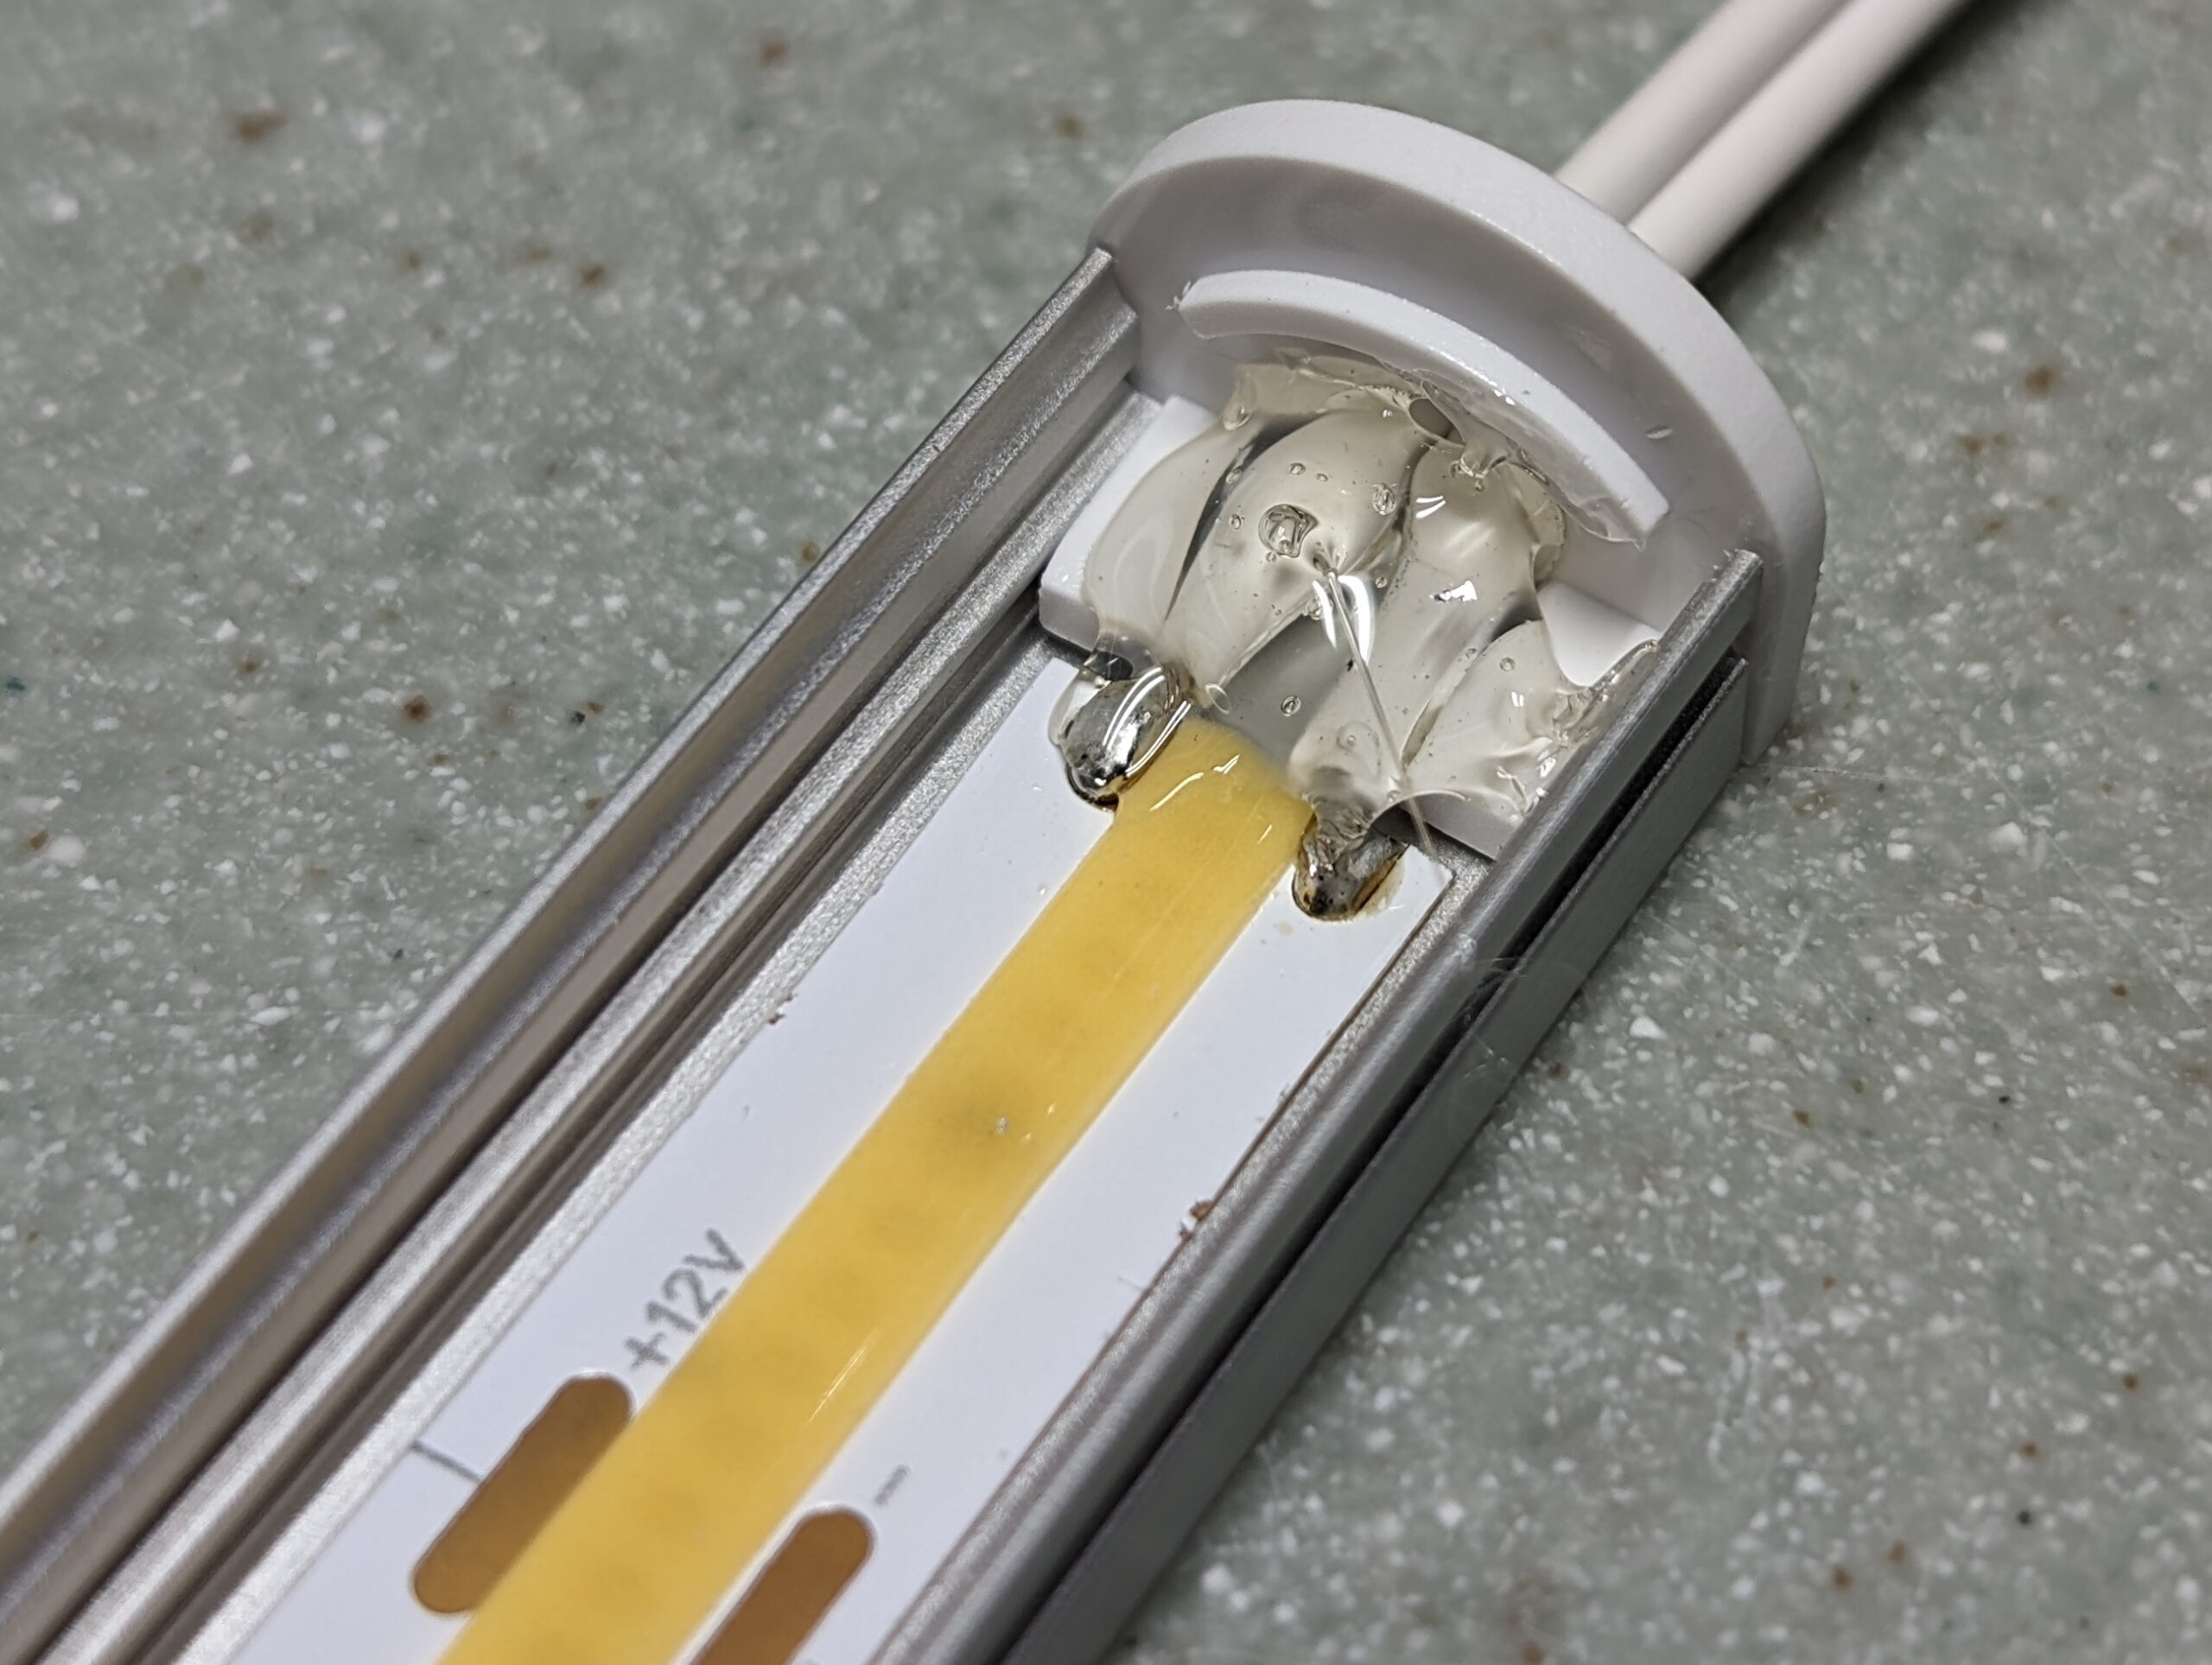
For the LED strips I chose FCOB LED strips from BTF-LIGHTING, 528 LEDs per meter, in 12V. With the heavy silicone coating over the LED chips it makes for a fairly even light. I chose the 12V variant of the lights because they have cut-points 22.83mm, which made it easy to make maximize the amount of LED strip under each cabinet. If the runs were longer it would have been wise to choose 24V to decrease the amperage, but at 14 watts per meter (W/m), the longest light segment will only take ~1.1 amps (A) so this should be fine. (Amazon Link)
For hookup wire I bought a simple coil of white 20 gauge copper clad aluminum (CCA) wire, again from Amazon. I already had some hookup wire, but I wanted white to blend in nicely with the cabinets. (Amazon Link)
For power supplies I picked up a basic five-pack of 12VDC / 2A wall warts. While I only needed three, the cost for five was $7 more than buying three, and since I’ll have LED strip left over and will likely build some more arrays for elsewhere in the house, I wanted spares. They also happened to come with (very cheap) barrel to screw terminal adapters that worked well enough. (Amazon Link)
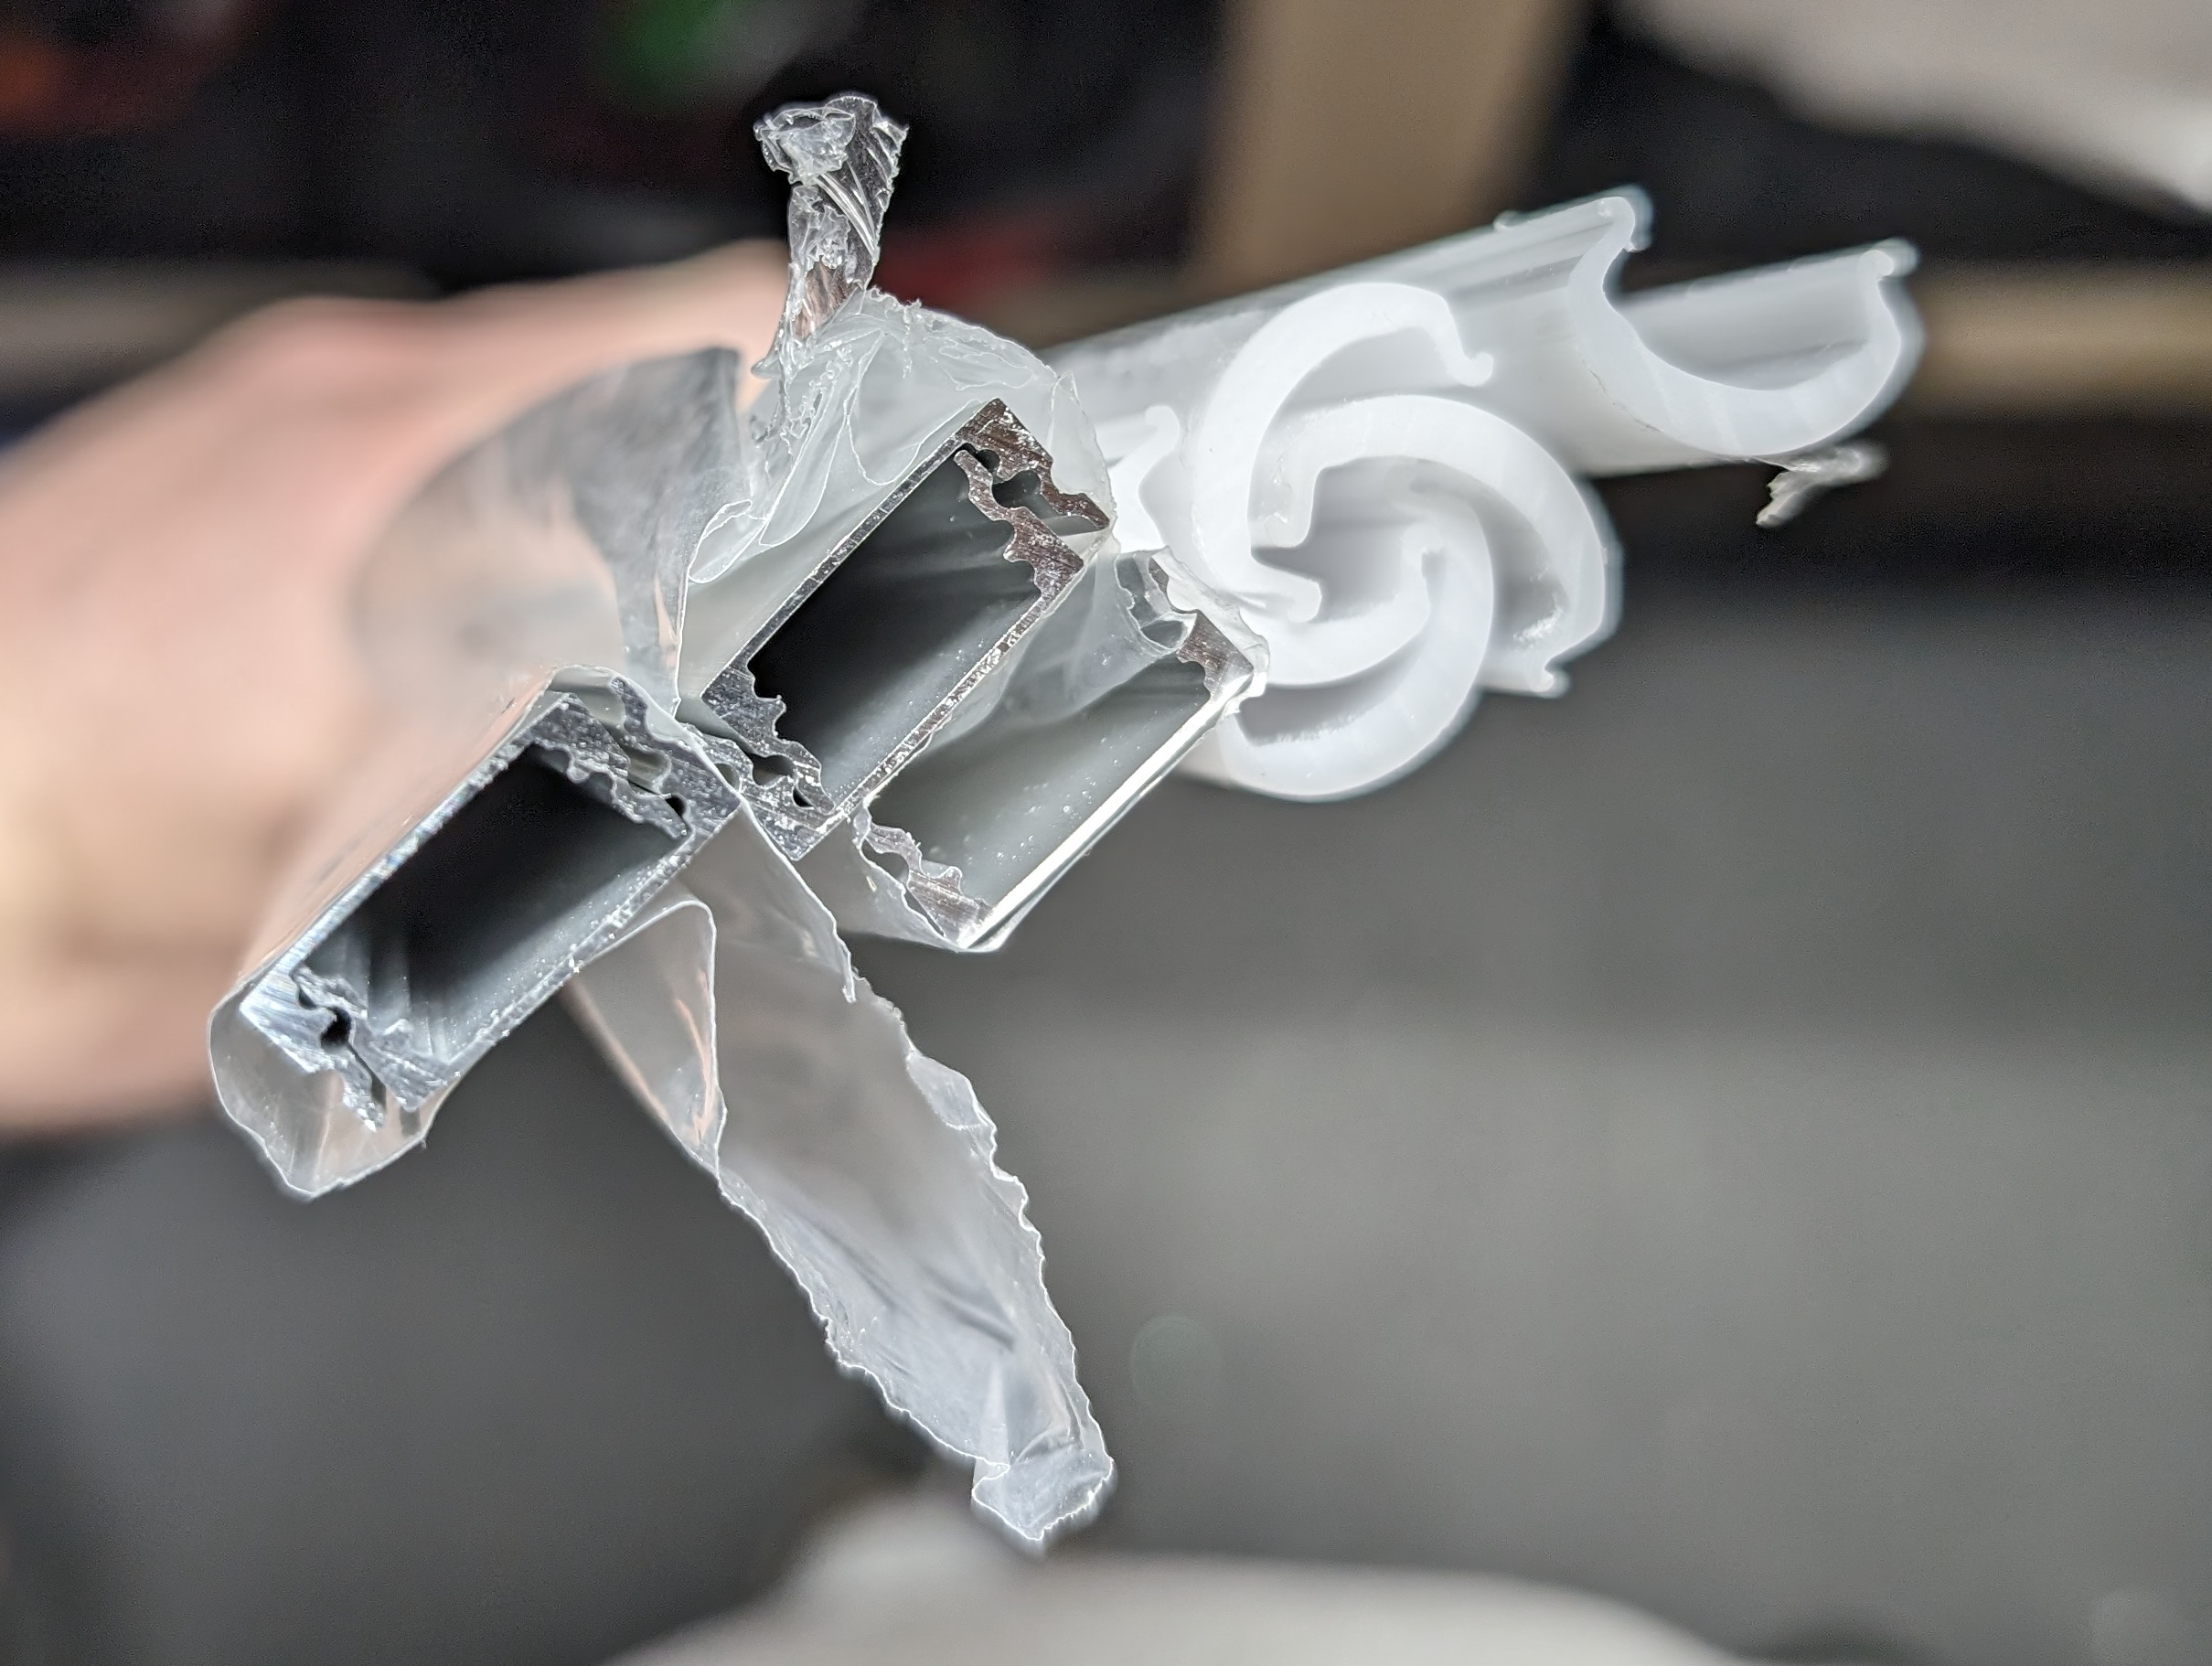
Initially I was going to mount the LED strips directly to the cabinets, but Dan convinced me that even while out of sight it would look much better in an enclosure, and he was right. The project feels properly finished this way and it looks tidy. The enclosures also add additional diffusion, making the light look smoother and more even and overall better. For this I chose some 1m long pieces of aluminum channel with a 60° milky white domed cover, then cut it to width for each cabinet section. (Amazon Link)
The light enclosures include screws and mounting clips, but I instead opted for tape, and picked up a 5 yard roll of 3M VHB 4910, which is specifically described as being good for Polycarbonate, Aluminum, and Acrylic/Polyurethane Paint; perfect for sticking these housings to the underside of cabinets. (Amazon Link)
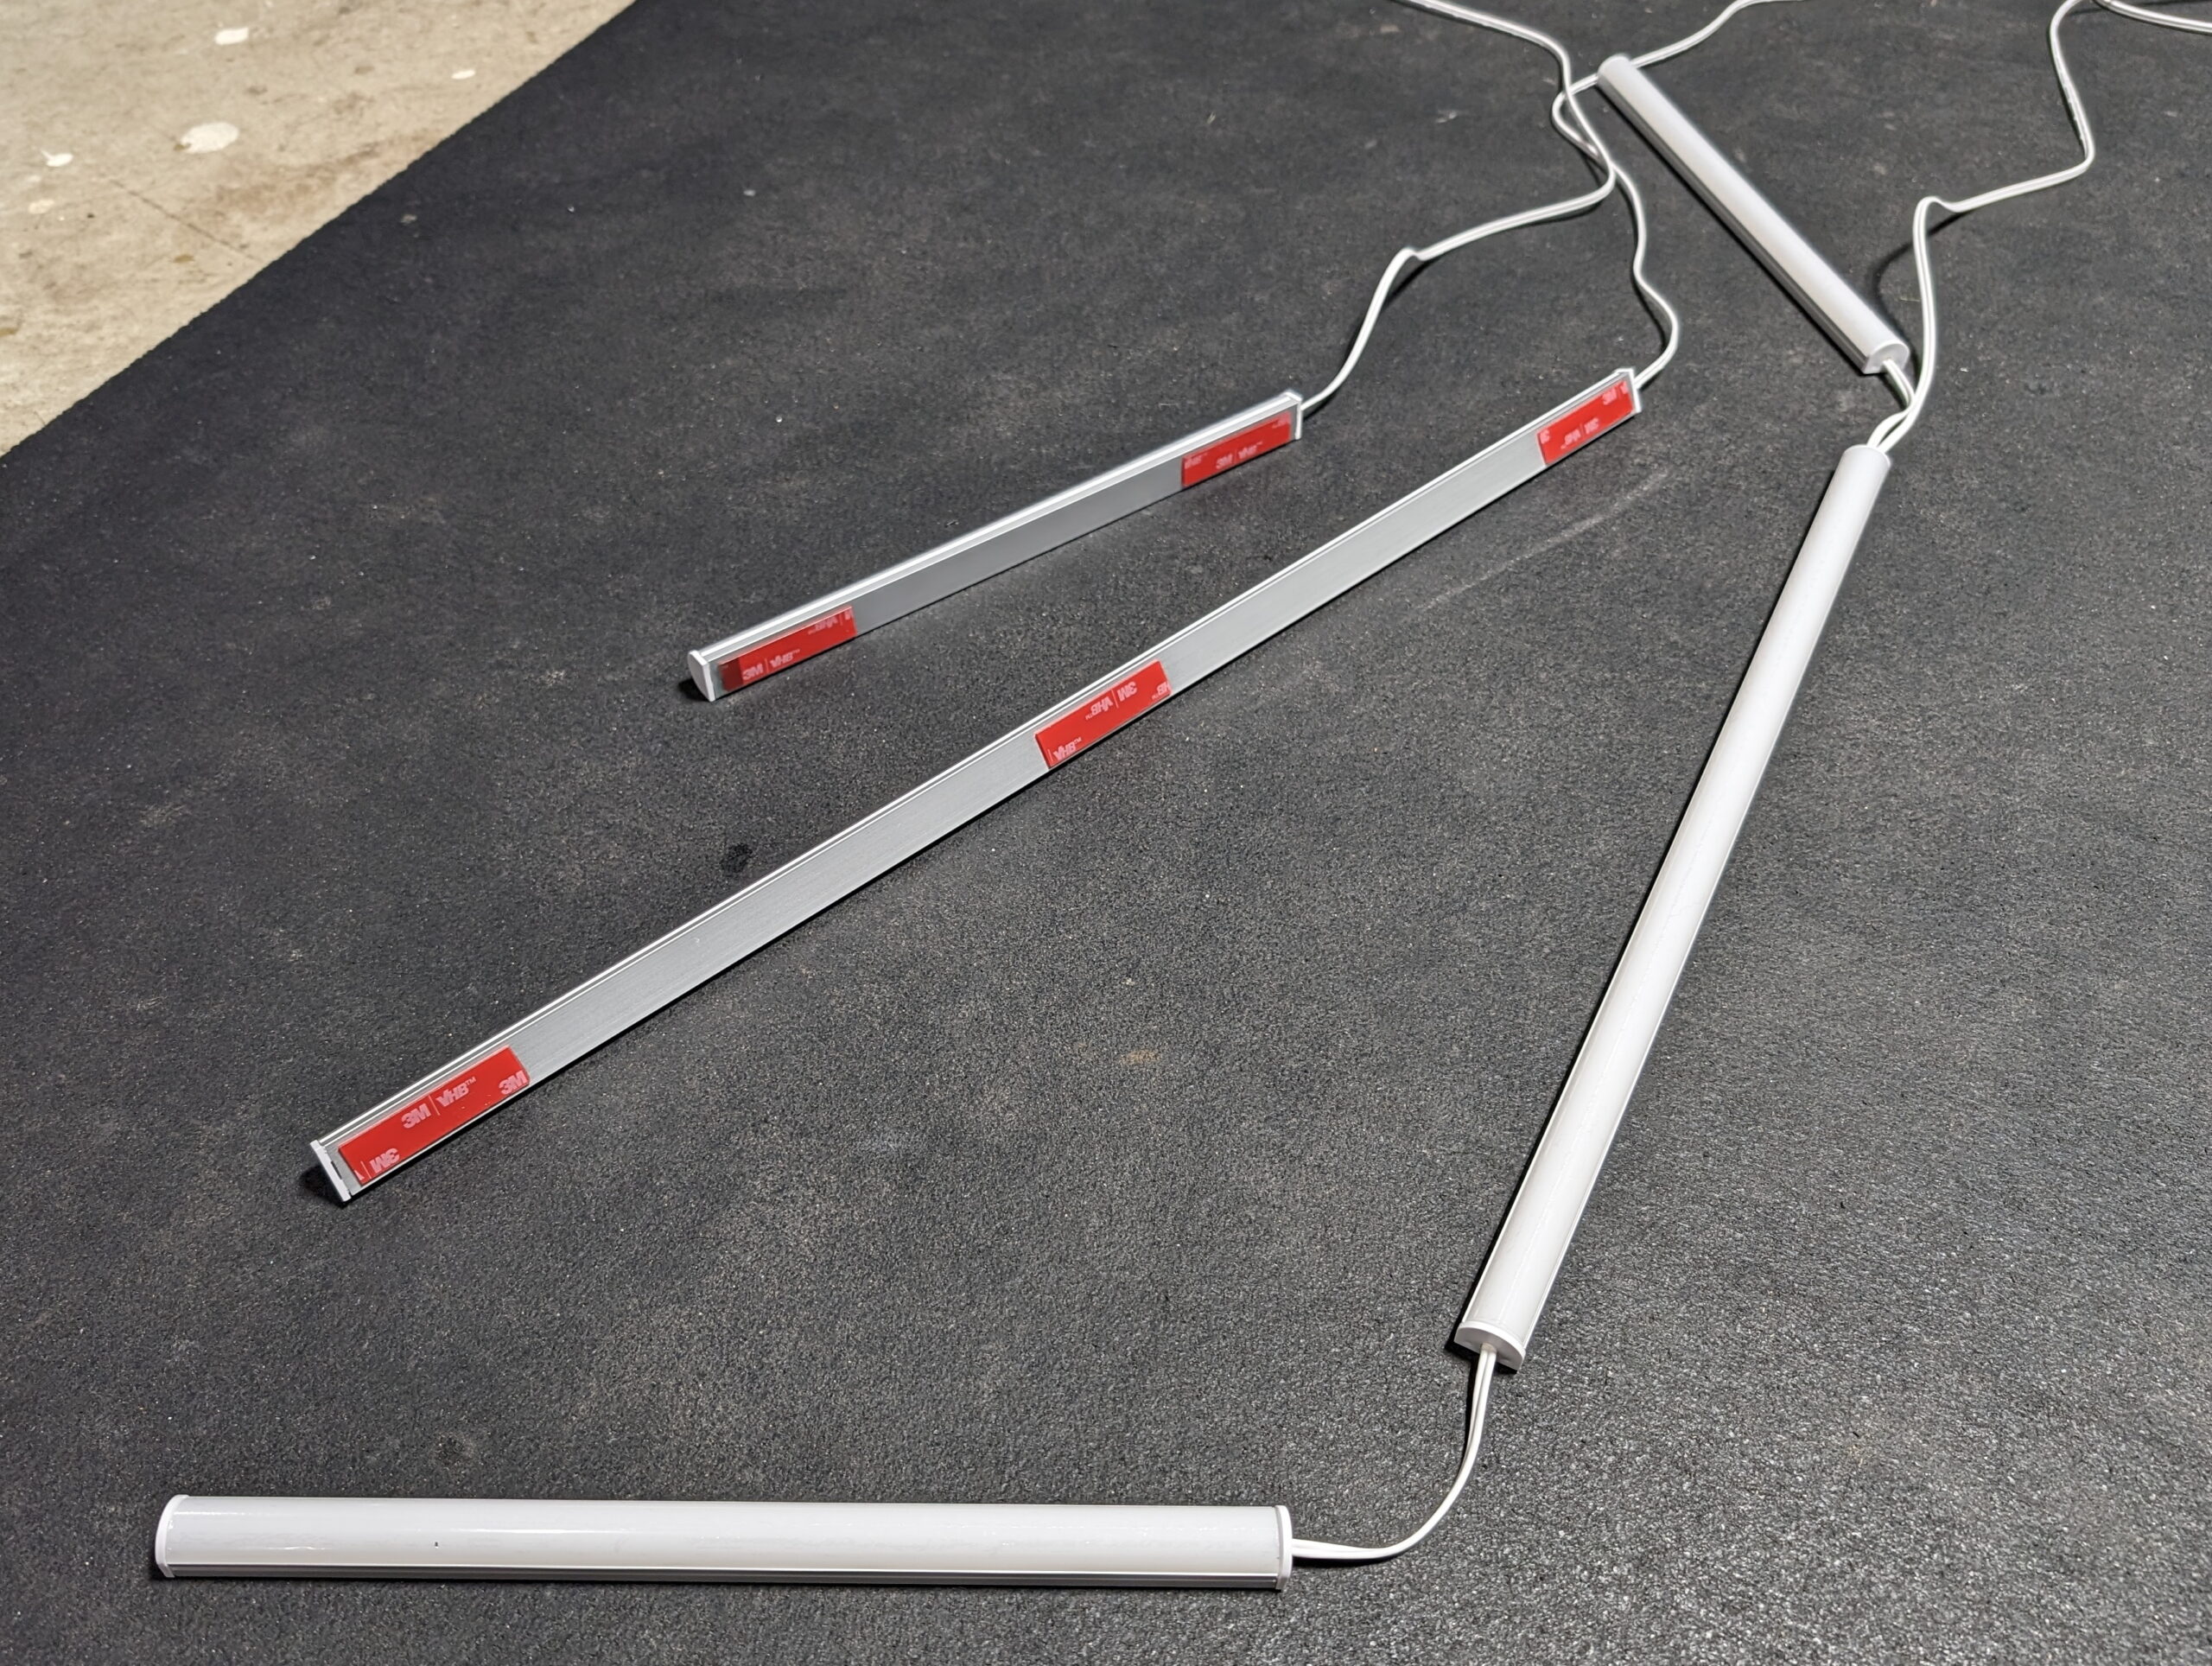
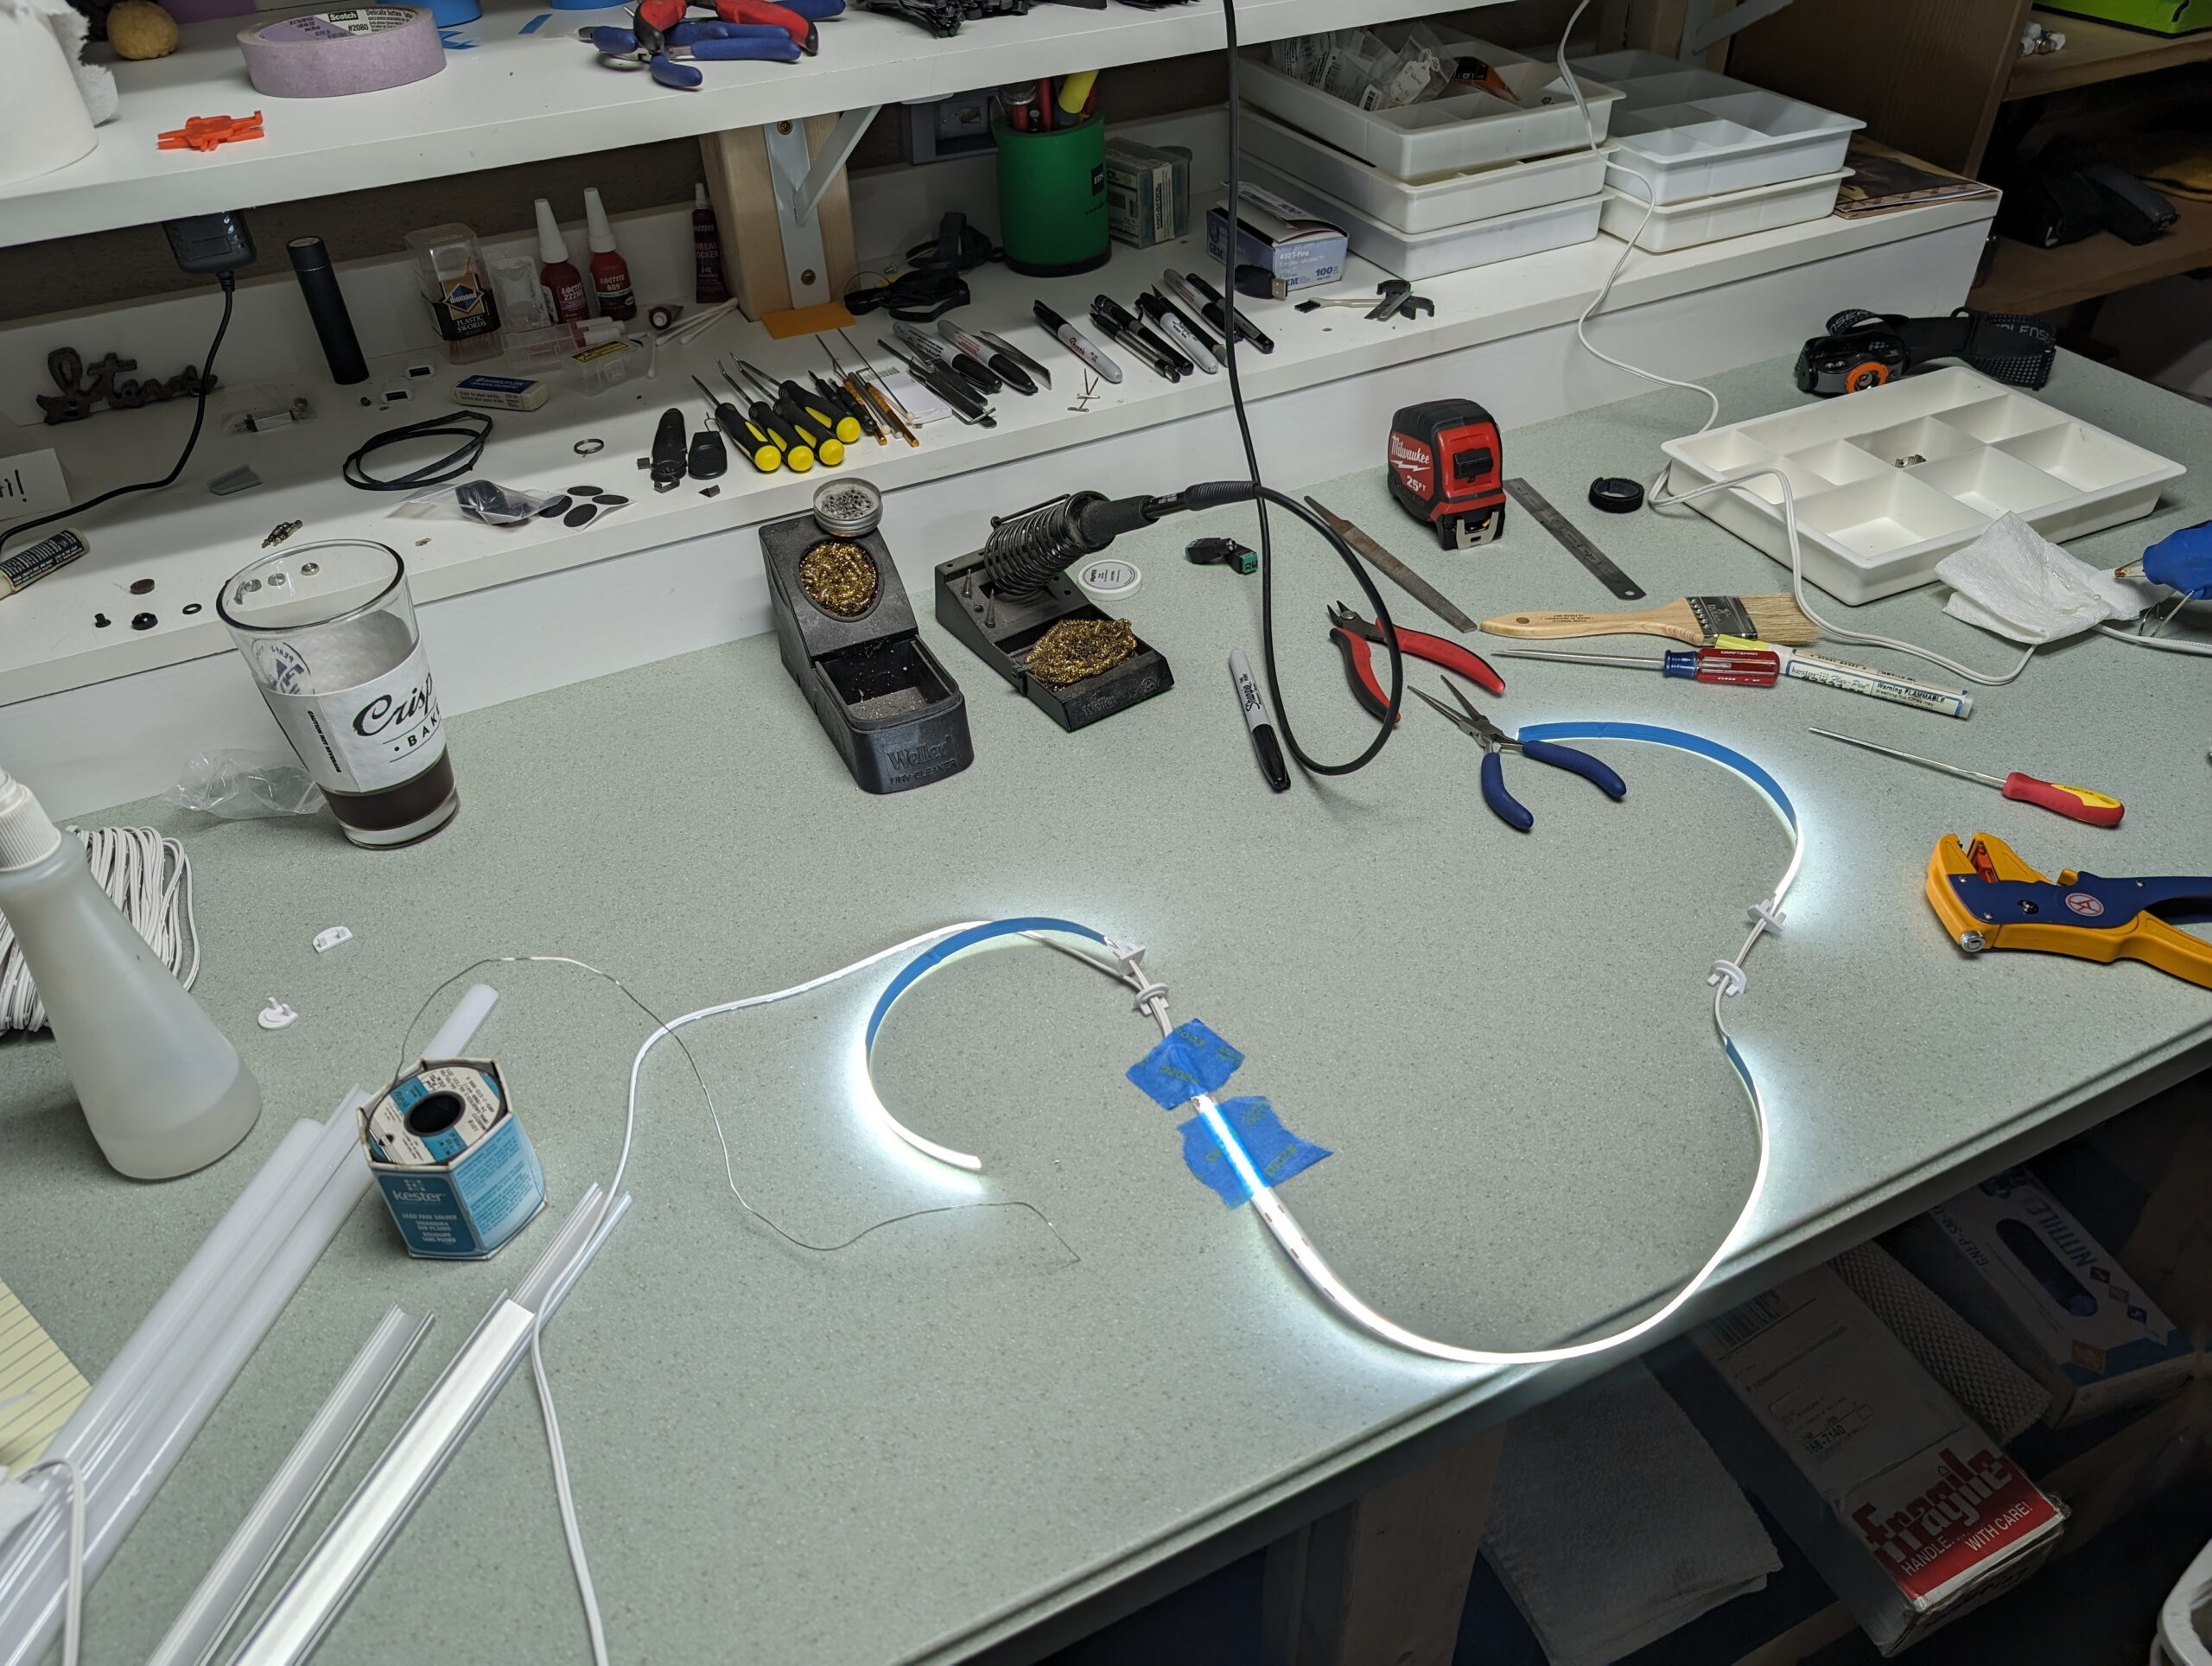
Assembly was done by first determining the width of the housings, so I went with even-inch sizes that are just slightly narrower than the underside of the cabinet. This resulted in five pieces: 1x 22″, 1x 16-1/2″, and 3x 10⁻¹/4″. With the cover snapped into the aluminum channel it all cut clean and easily using a circular miter saw with a fine tooth carbide blade.
I then cut LED strip to the next step shorter than the housing, soldered the supply wire, stuck the strip into the housing via it’s self-adhesive backing, fitted the endcaps, added hot-melt glue for strain relief at the solder area, and snapped the face on. For the corner cabinet lights I wired it in a T arrangement, with the two sides being fed from the center, and then a wire out of the center to head up to the cabinet. This arrangement was because the corner cabinet holds the outlet near the back left side and it minimizes wire distance. It may have also helped with voltage drop on a long-ish strip of LEDs, but I’m not sure the ~30″ total would be enough to actually cause a problem.
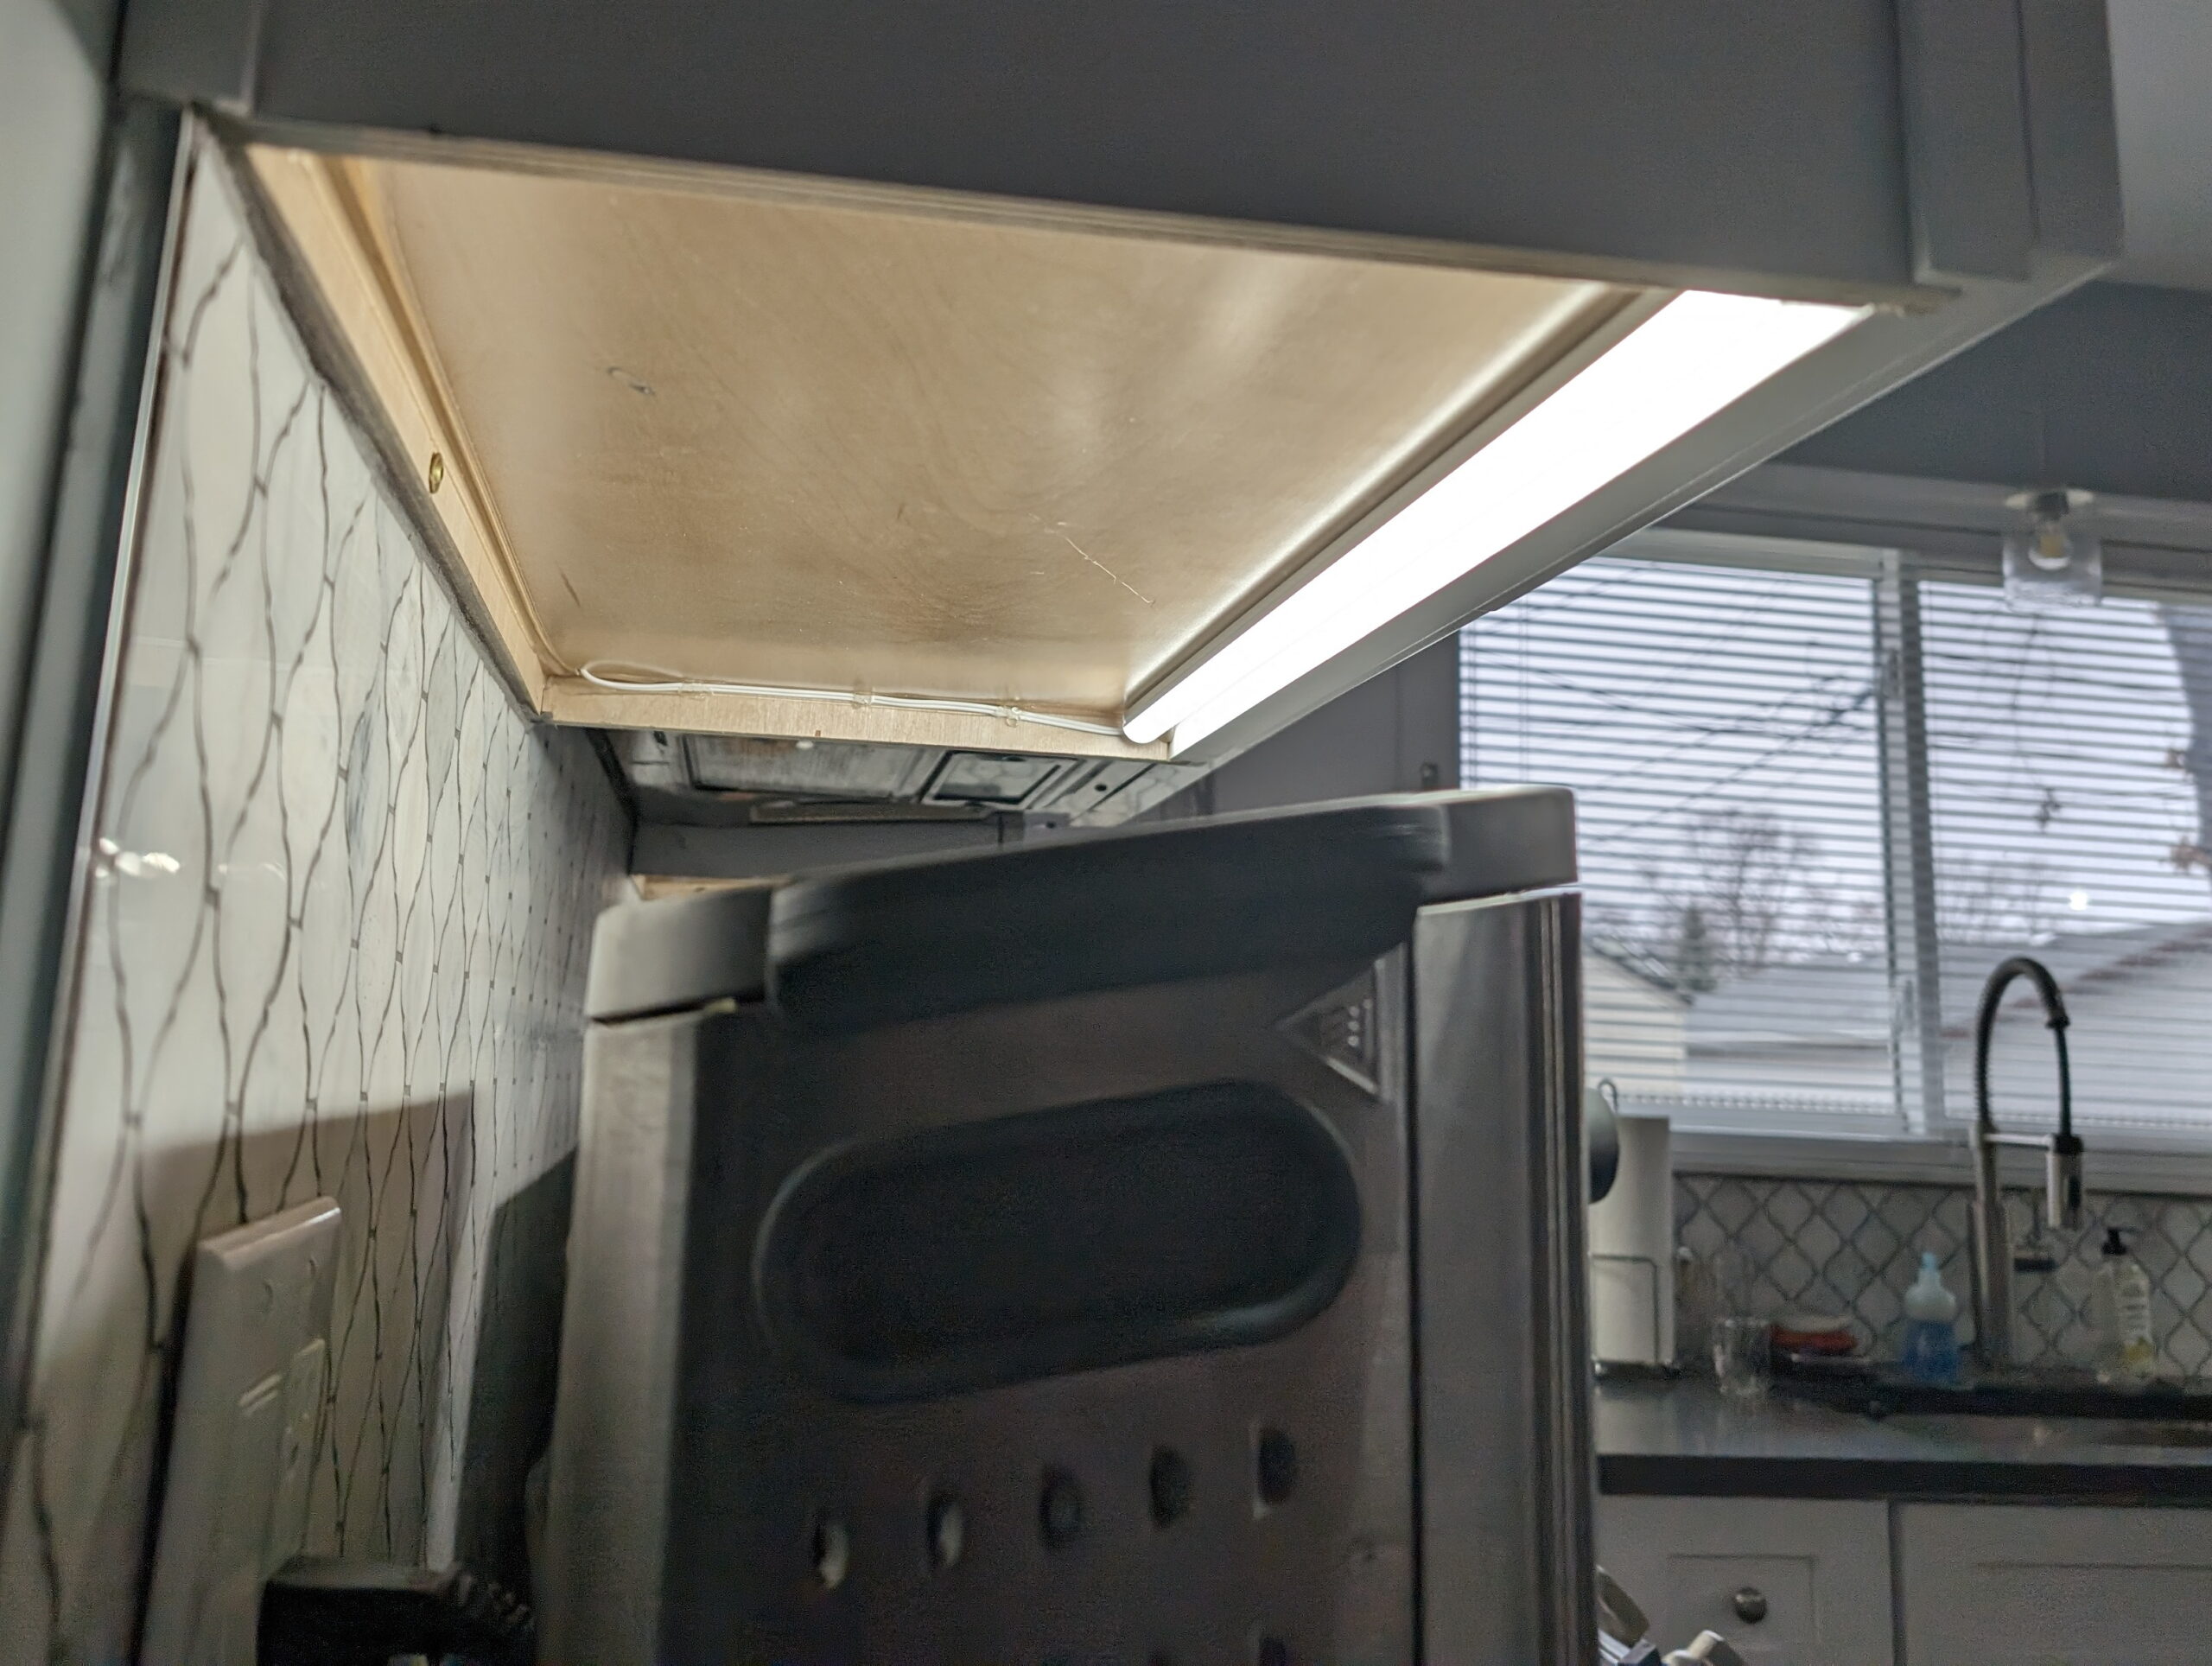
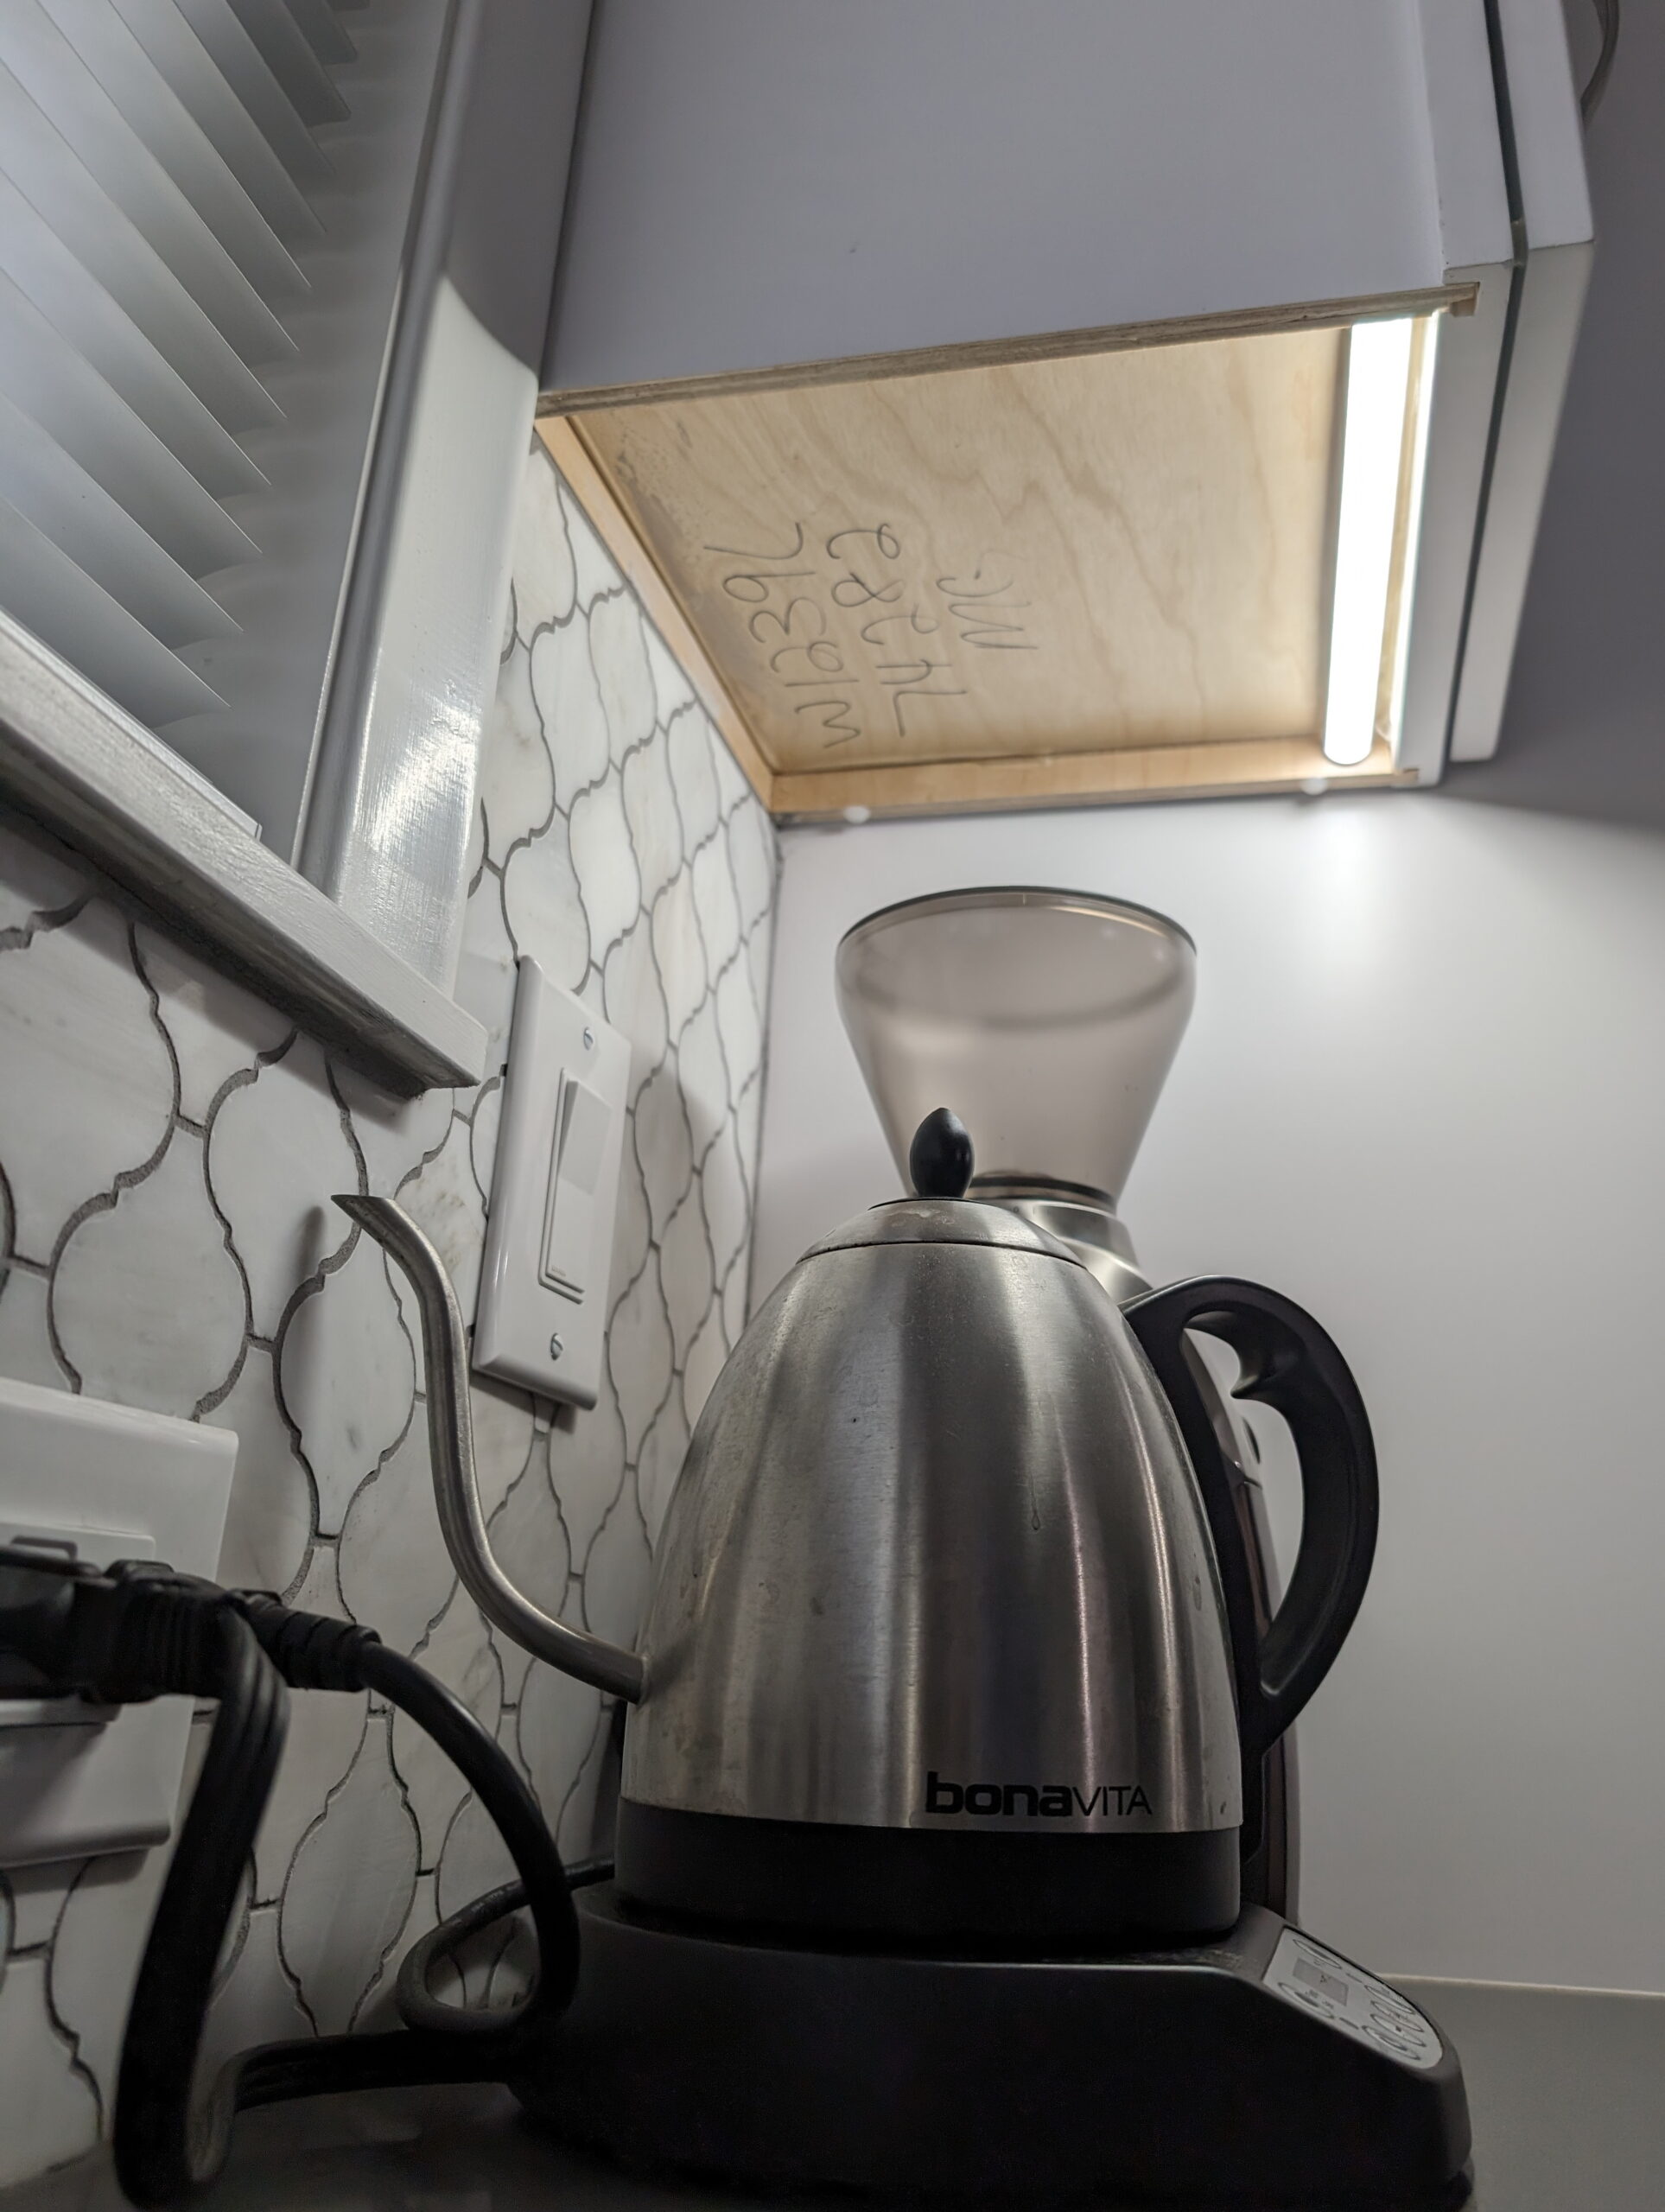
A small hole (3/16″) was drilled in the underside of the cabinet to run the wire up to the supply, cabinet undersides cleaned and strips stuck in place with VHB tape, wire was tacked in place with hot melt glue, and screw terminal to barrel adjuster adapters (which came with the power supplies) fitted. A bit of cable tying to tidy the cables in the cabinets and it’s all done.
Total cost for this project was $122.83, and that includes the unused 4000K strip that I bought as a test. There is enough extra left over to do at least another 10′ of enclosed light somewhere else in the house, so I might build some light strips for under my workbench shelves or perhaps where I have music gear in my closet.
Kristen and I are both really happy with how it came out. More than just filling in the room and serving as a night light it actually offers usable additional light when working on the counters, especially when cooking at the stove.
It’s been no secret that for years my favorite drop bar bike was my beloved 2019 Salsa Warbird Carbon 105 700. This bike has been with me on some of my most memorable rides, from remote parts of the UP and Canadian wilderness to silly northern LP bike path routes, from single track where it didn’t quite belong to long summertime wanders on dirt roads.
For years, and especially in 2023 after switching it to 1x, I’ve told numerous folks that there’s nothing I’d change on it and no reason to get anything new; it’s simply excellent. But then in late November while cleaning it up for winter I found a bit of a shock: a small starburst crack in the frame at the top tube/seat tube junction and a couple other hairline cracks on the seat tube. As things wear out and everything eventually fails I can’t say I was devastated, but I really was disappointed. I loved riding that bike and did not want to change anything. I even came to really like the white color.
After finding the crack I rode it a couple more times and things seemed fine. I have a long seatpost which extended well below the crack area, and I didn’t feel or hear anything when riding, but like any crack it’s best to be safe. The warranty for a carbon frame is five years, which was coming up, so I sent photos of the crack to the folks over at the venerable Tree Fort Bikes and Salsa to get things rolling. I wasn’t sure if it was problematic, and — honestly — I really didn’t want to replace the frame if it wasn’t needed, but I wanted to ask. I love how my Warbird looks with the white frame and reflective black vinyl that I added, and I wasn’t exactly keen on a matte black replacement, re-running brake lines, etc. And, it rode great!
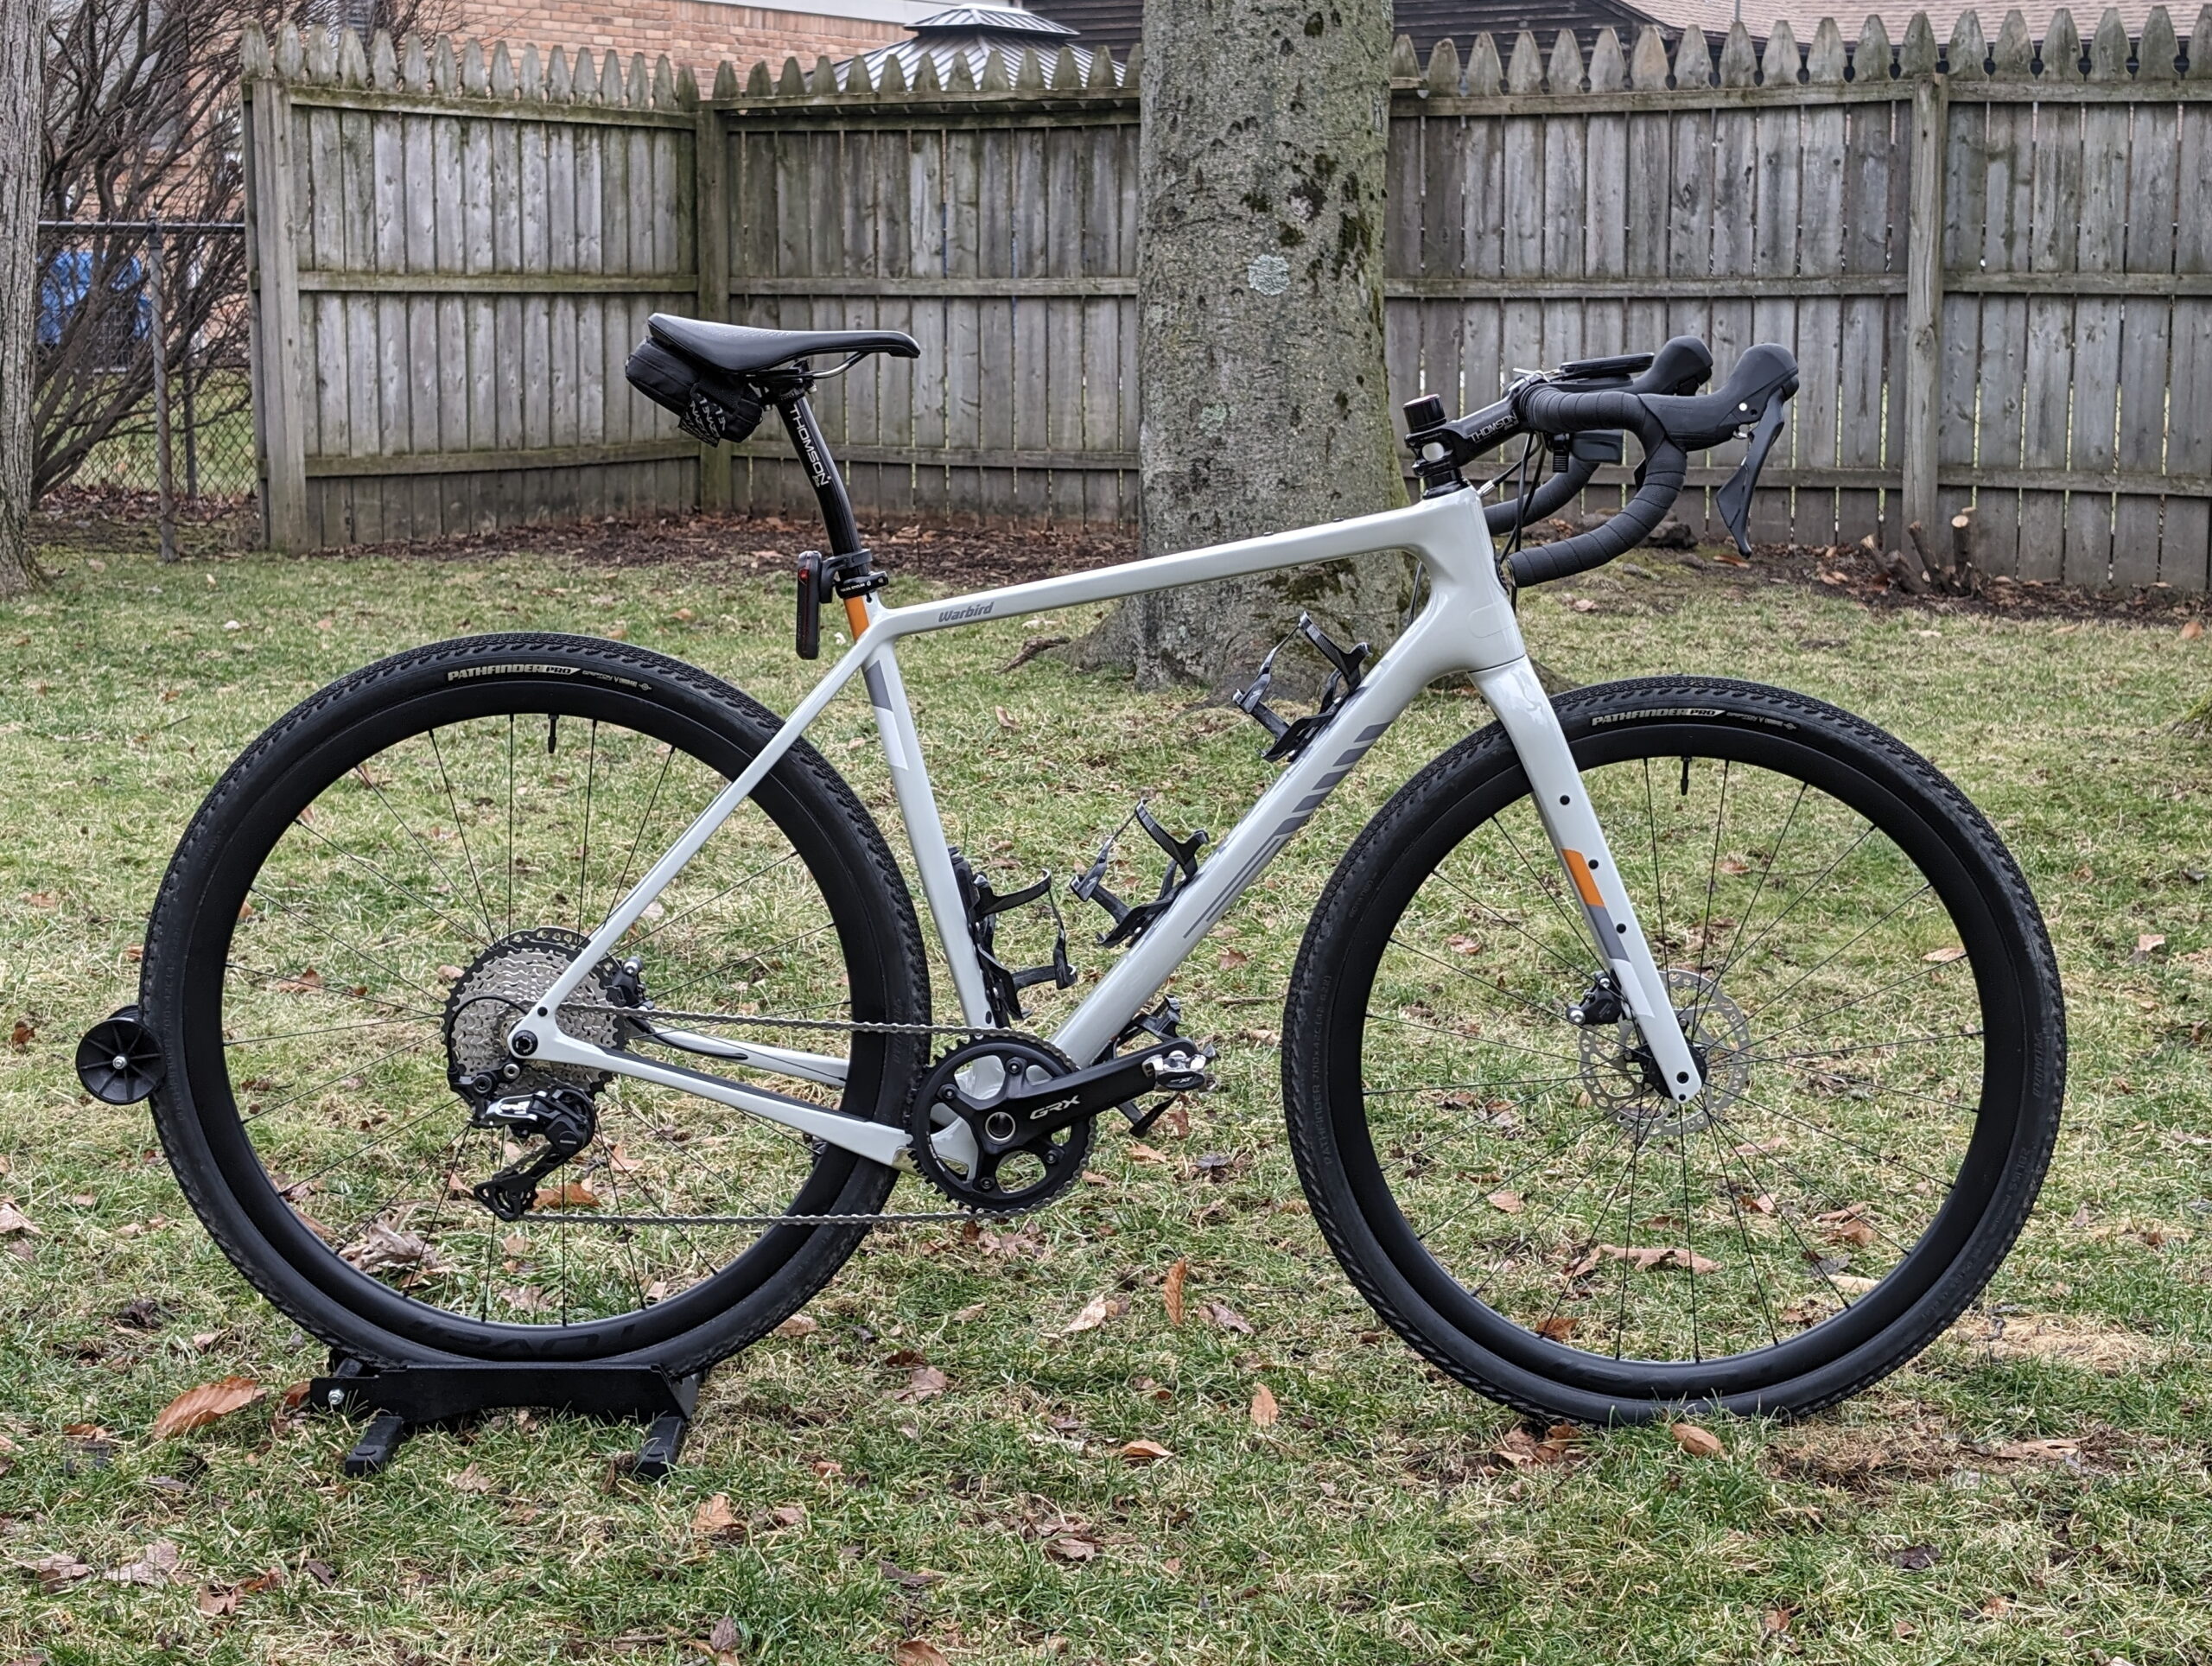
After just a handful of questions Craig emailed me with a massive surprise: Salsa is replacing my 2019 Warbird (v4) frame with a complete 2023 Warbird C GRX 1x bike, and instead of being a simple black warranty replacement it’s a nice clay-ish grey color! This was better than I could have possibly hoped for, because not only did it replace the problematic frame, it moved me to Shimano’s GRX drivetrain! And I also wouldn’t have to cut and re-run the brake lines, etc.
Back when my Warbird came out GRX wasn’t available, so it came with the (very good) 105 R7000 road groupset. This is an amazingly good drivetrain, but for rougher roads I switched to the Ultegra RD-RX800 derailleur, which was basically a high-end road derailleur with a clutch, originally intended for cyclocross use. Then in late 2022 I used a few Wolf Tooth Components parts and made it a sorta-hacky yet very functional 1x drivetrain because I wanted to get away from the problems inherent with 2x and riding in poor conditions, notably gunking up a front derailleur.
This setup worked great, but I felt a bit limited by maximum cassette size (40t) and my left brifter had a disconnected shift lever, which would rattle around on chattery roads. Minor, I know, and while I was proud of the semi-hacky drivetrain, improvements such as a full GRX drivetrain would have been nice, but I couldn’t justify it when things worked so well. But suddenly now I had it!
Last week I picked up the bike from Tree Fort, and over some unseasonably rainy, cold, and blah afternoons I shuffled parts around and now it’s ready. My new gravel bike, a 2023 Salsa Warbird C GRX 1x with a few upgrades!
Total weight for the bike, with everything but bottles (including lights, pump, saddle bag+tools, and computer), is 22.54 pounds. Removing the computer/lights/saddle bag/pump brings it down to 20.78 pounds, so I expect that without pedals, cages, or mounts (the usual way of weighing a bike) it’d be in the 19-pound range.
Build Choices:
Crank/Cassette Upgrade: After moving my previous Warbird to 1x a year ago I realized that I like having a 42t front ring. Since the bike came with a 40t ring I wanted to upgrade that, but it turned out that I could get a complete FC-RX810 crankset with a 42t ring for not much more than a stand-alone ring. Swapping from the stock FC-RX610 swap saved 84g while increasing the chainring size, makes mounting a cadence sensor easier, and opens up the possibility of getting a power meter on the bike.
At the same time I ordered an CS-M8000 cassette to replace the stock CS-M5100, which saved another 114g. While I originally was going to get an 11-40 to match my previous Warbird, my friend Ray convinced me that a 42, ending up with an even 1:1 in the lowest gear would be good, and I agreed. Between the two sizes the seven lowest cogs are the same, so typical flat/rolling stuff would feel the same with either, but when I do need a climbing/trail gear it’ll be there.
Chain Drop Protection: I was originally going to fit some chain drop protection, like the Wolf Tooth LoneWolf, but after thinking about how many times I’ve dropped a chain in the past, I opted against it. Mounting this would also require fitting a front derailleur mount which makes bottle cage mounting more fiddly and makes the bike harder to clean. I may still fit this later on, but for now I’m content continuing without.
Rotors: I am generally very fond of Shimano rotors with solid aluminum center carriers as they seem to be harder to bend and have an aluminum core (Ice Technologies) to help with heat dissipation. The bike came with some SM-RT64, and while they are a bit heavier per-rotor (~25g) than others, and just steel, it would have cost a fair bit (~$100) to replace them. I have similar rotors on my fatbike and they’ve been working well, so for now I’m going to stick with these rotors and see how it goes. They can always be upgraded later.
Frame Pump/Saddle Bag: On the previous Warbird I used a somewhat large Specialized saddle bag with a tiny 4″ pump tucked inside next to the tube. This worked well, but I began having problems with the pack Velcro no longer holding, so I also had a releasable cable tie holding it to the saddle.
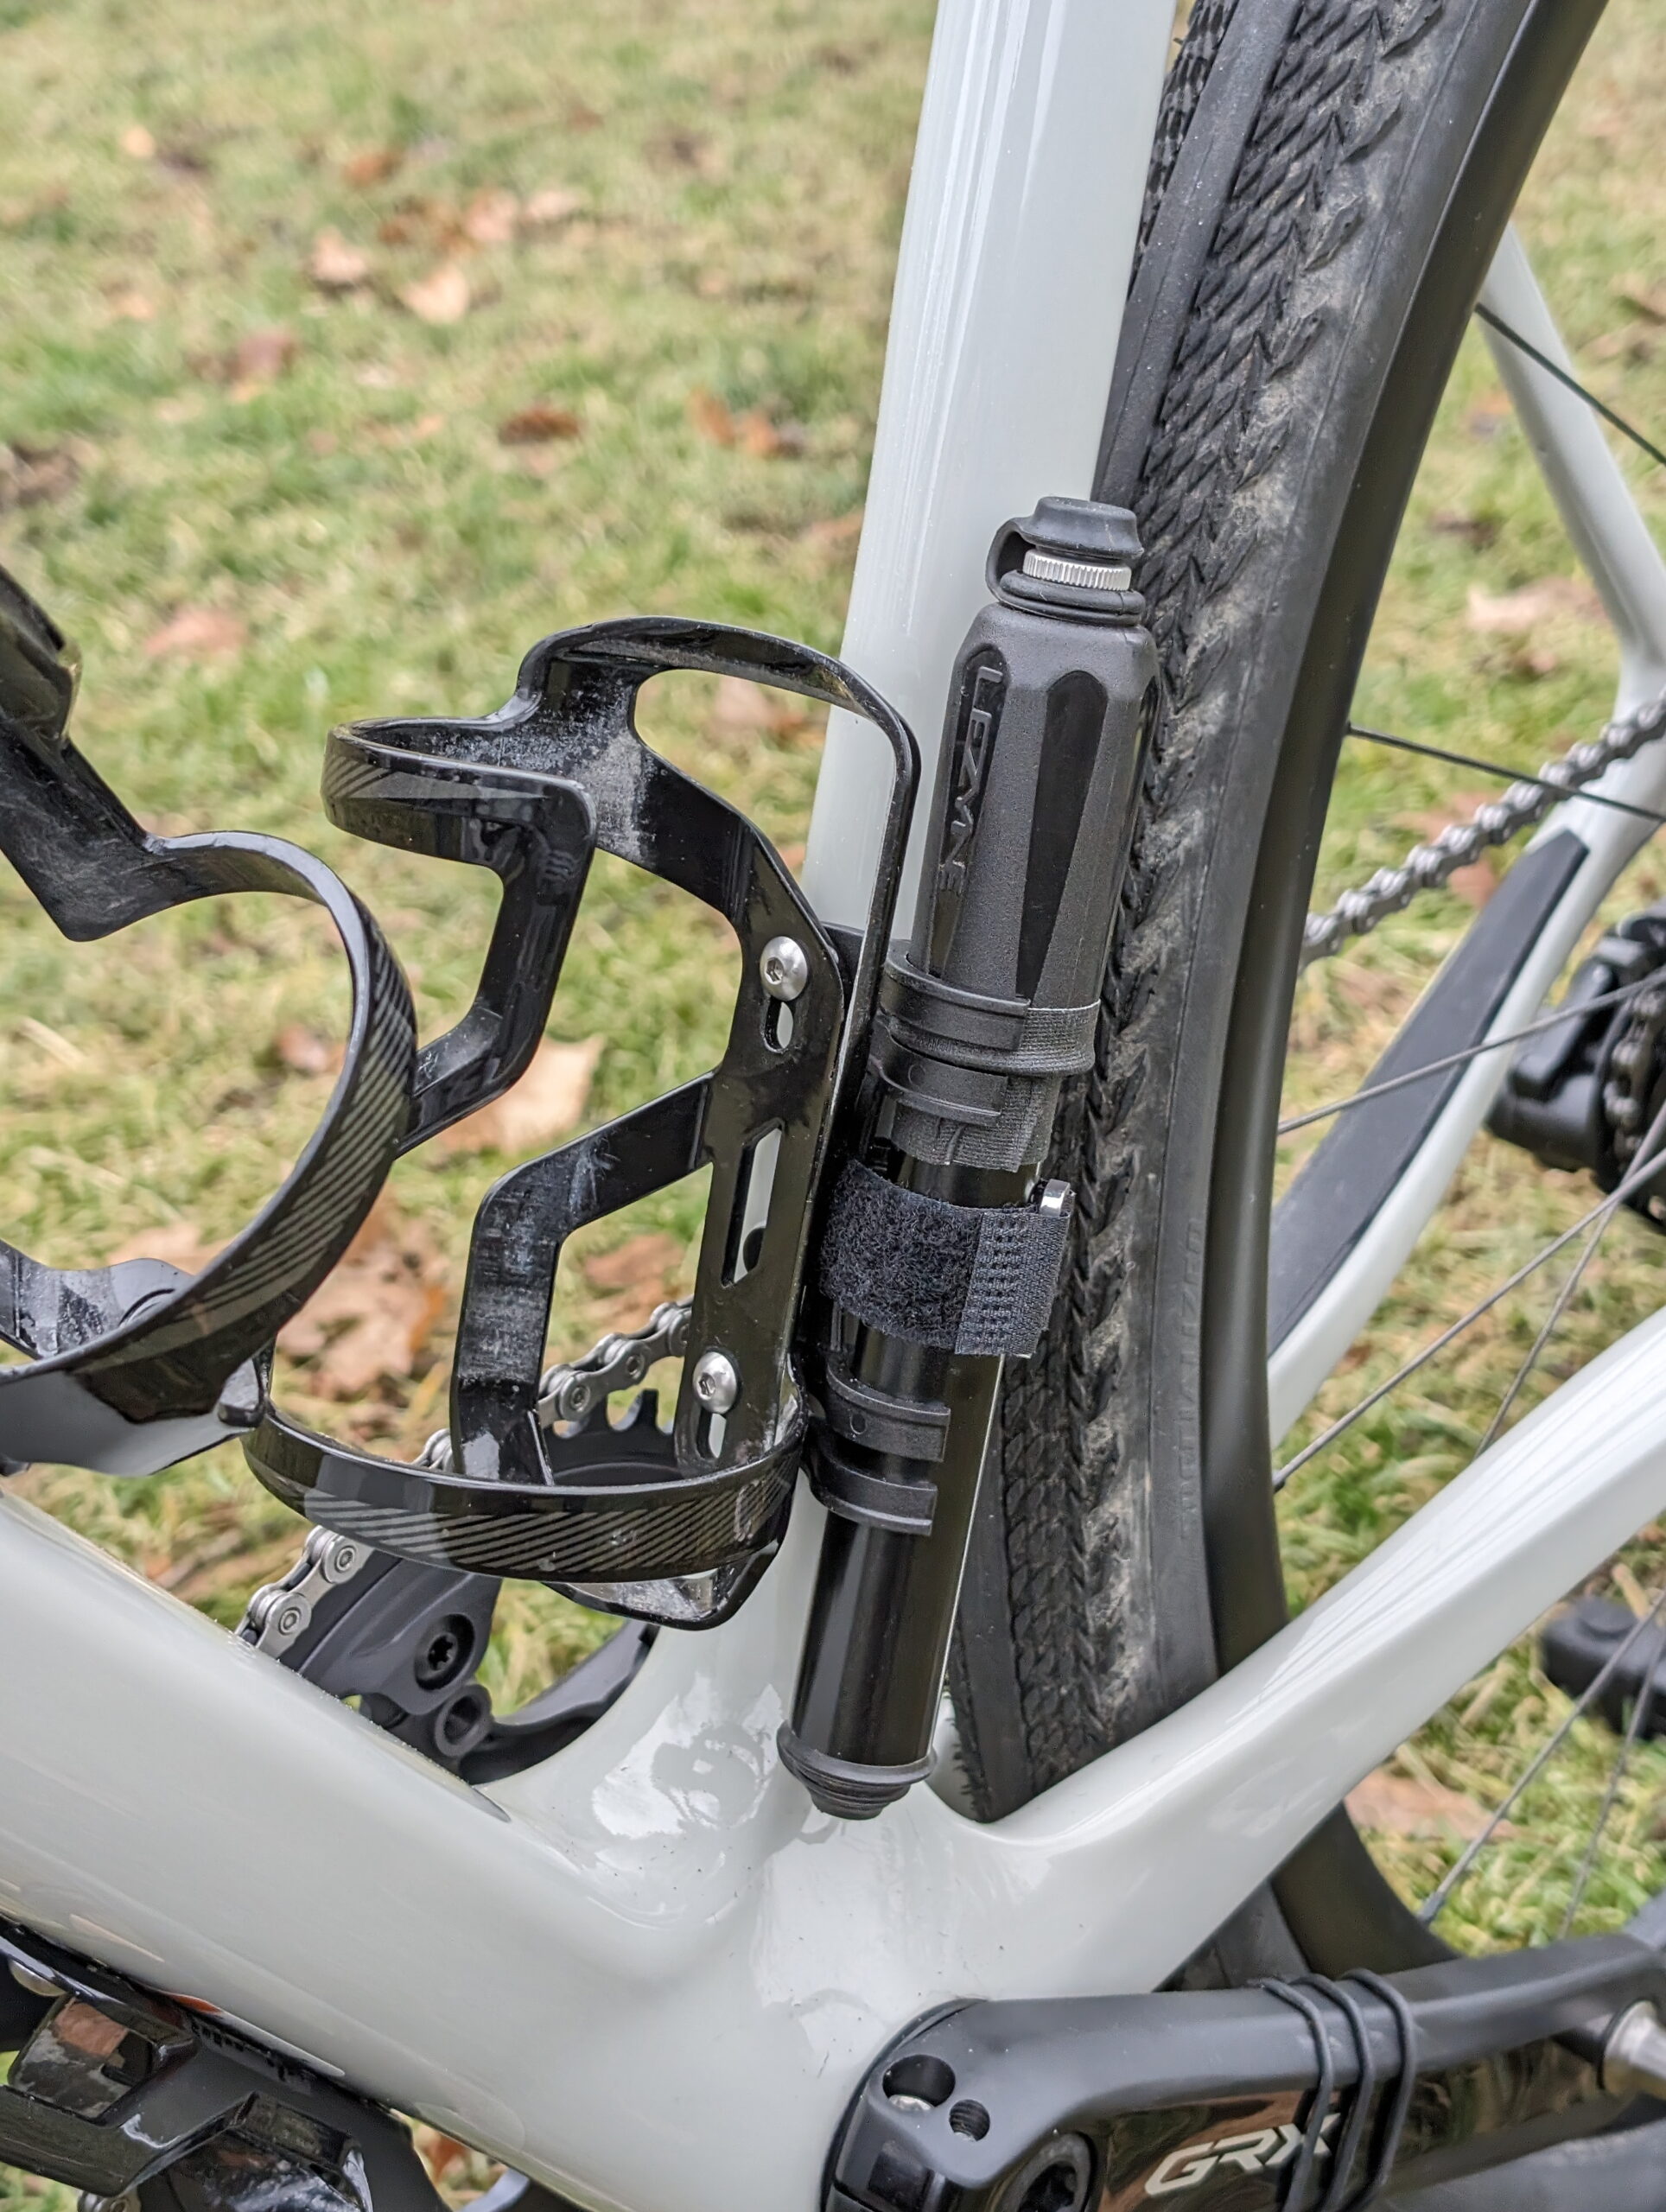
I’d also never needed — that is tested — the tiny pump in the field, so out of an abundance of caution (and some paranoia) I’d often tuck a second, larger pump in my jersey pocket for long rides. This other pump had been used a few times, so with the bike swap I’ve moved to mounting the beloved (and cheap) Lezyne Sport Drive HP to the frame behind the seat tube bottle cage. I’m wary of road spray causing problems with the pump, but if it does I’ll just start carrying it in my pocket.
By no longer needing room for a pump in the bag I was able to swap to the Lezyne Road Caddy, a small and elegant seat bag that I’ve had on my road bike for a couple years.
Bike Fit: This and my road bike, a custom built Salsa Warroad, are very very similar in geometry, but I’ve had it set up with the bars slightly lower than on the Warbird. Using my favorite stem comparison tool I found that by removing 10mm of spacers below the stem I can get the bar clamp to a nearly identical position on both bikes, so as a bit of an experiment I’m giving this a go, leaving the steerer tube uncut so I can go back if desired.
I’m slightly concerned about the fit when riding more technical trails, and I may have a harder time keeping my forearms near level while on rough surface, but it’s plenty easy to go back if needed.
Bottle Cage Screws: When using Specialized Zee Cages it’s important to have a low profile screw head, else they’ll rub on the bottle and make it hard to insert. The screws which come with the cages are a nice shape, but are a chromed steel that seems to corrode with sweat, sports drink, and road treatment chloride, so I prefer something else. I prefer something like 316 stainless, and I had some 20mm of these laying around from a previous project. For just-bottle-cages this is longer than the needed ~15mm, but the additional mass is across the three standard cages is only 6x 1/4 of the mass of a single screw (1.5x a single screw), or ~5g. It wasn’t worth spending $11+shipping to save that little mass.
Anti-Rub Tape on Head Tube: On my previous Warbird, and on the Warroad, I shortened the front brake hose so it’d take a clean path from the fork to the bar, not touching the head tube. This works, but also gets it the way of the light mount, and makes adjusting spacers difficult because I have to remove the bar from the stem to slide things upward.
The stock hose length on this model rubs the front of the head tube, but I’m not sure I want to shorten it yet. For now I simply put a strip of UHMW PE tape along the front of the head tube, below the Salsa logo, so the hose won’t rub on the frame/paint/carbon. Once I settle on spacers and work a bit more on accessory mounting I may shorten the hose, or I may just leave this alone.
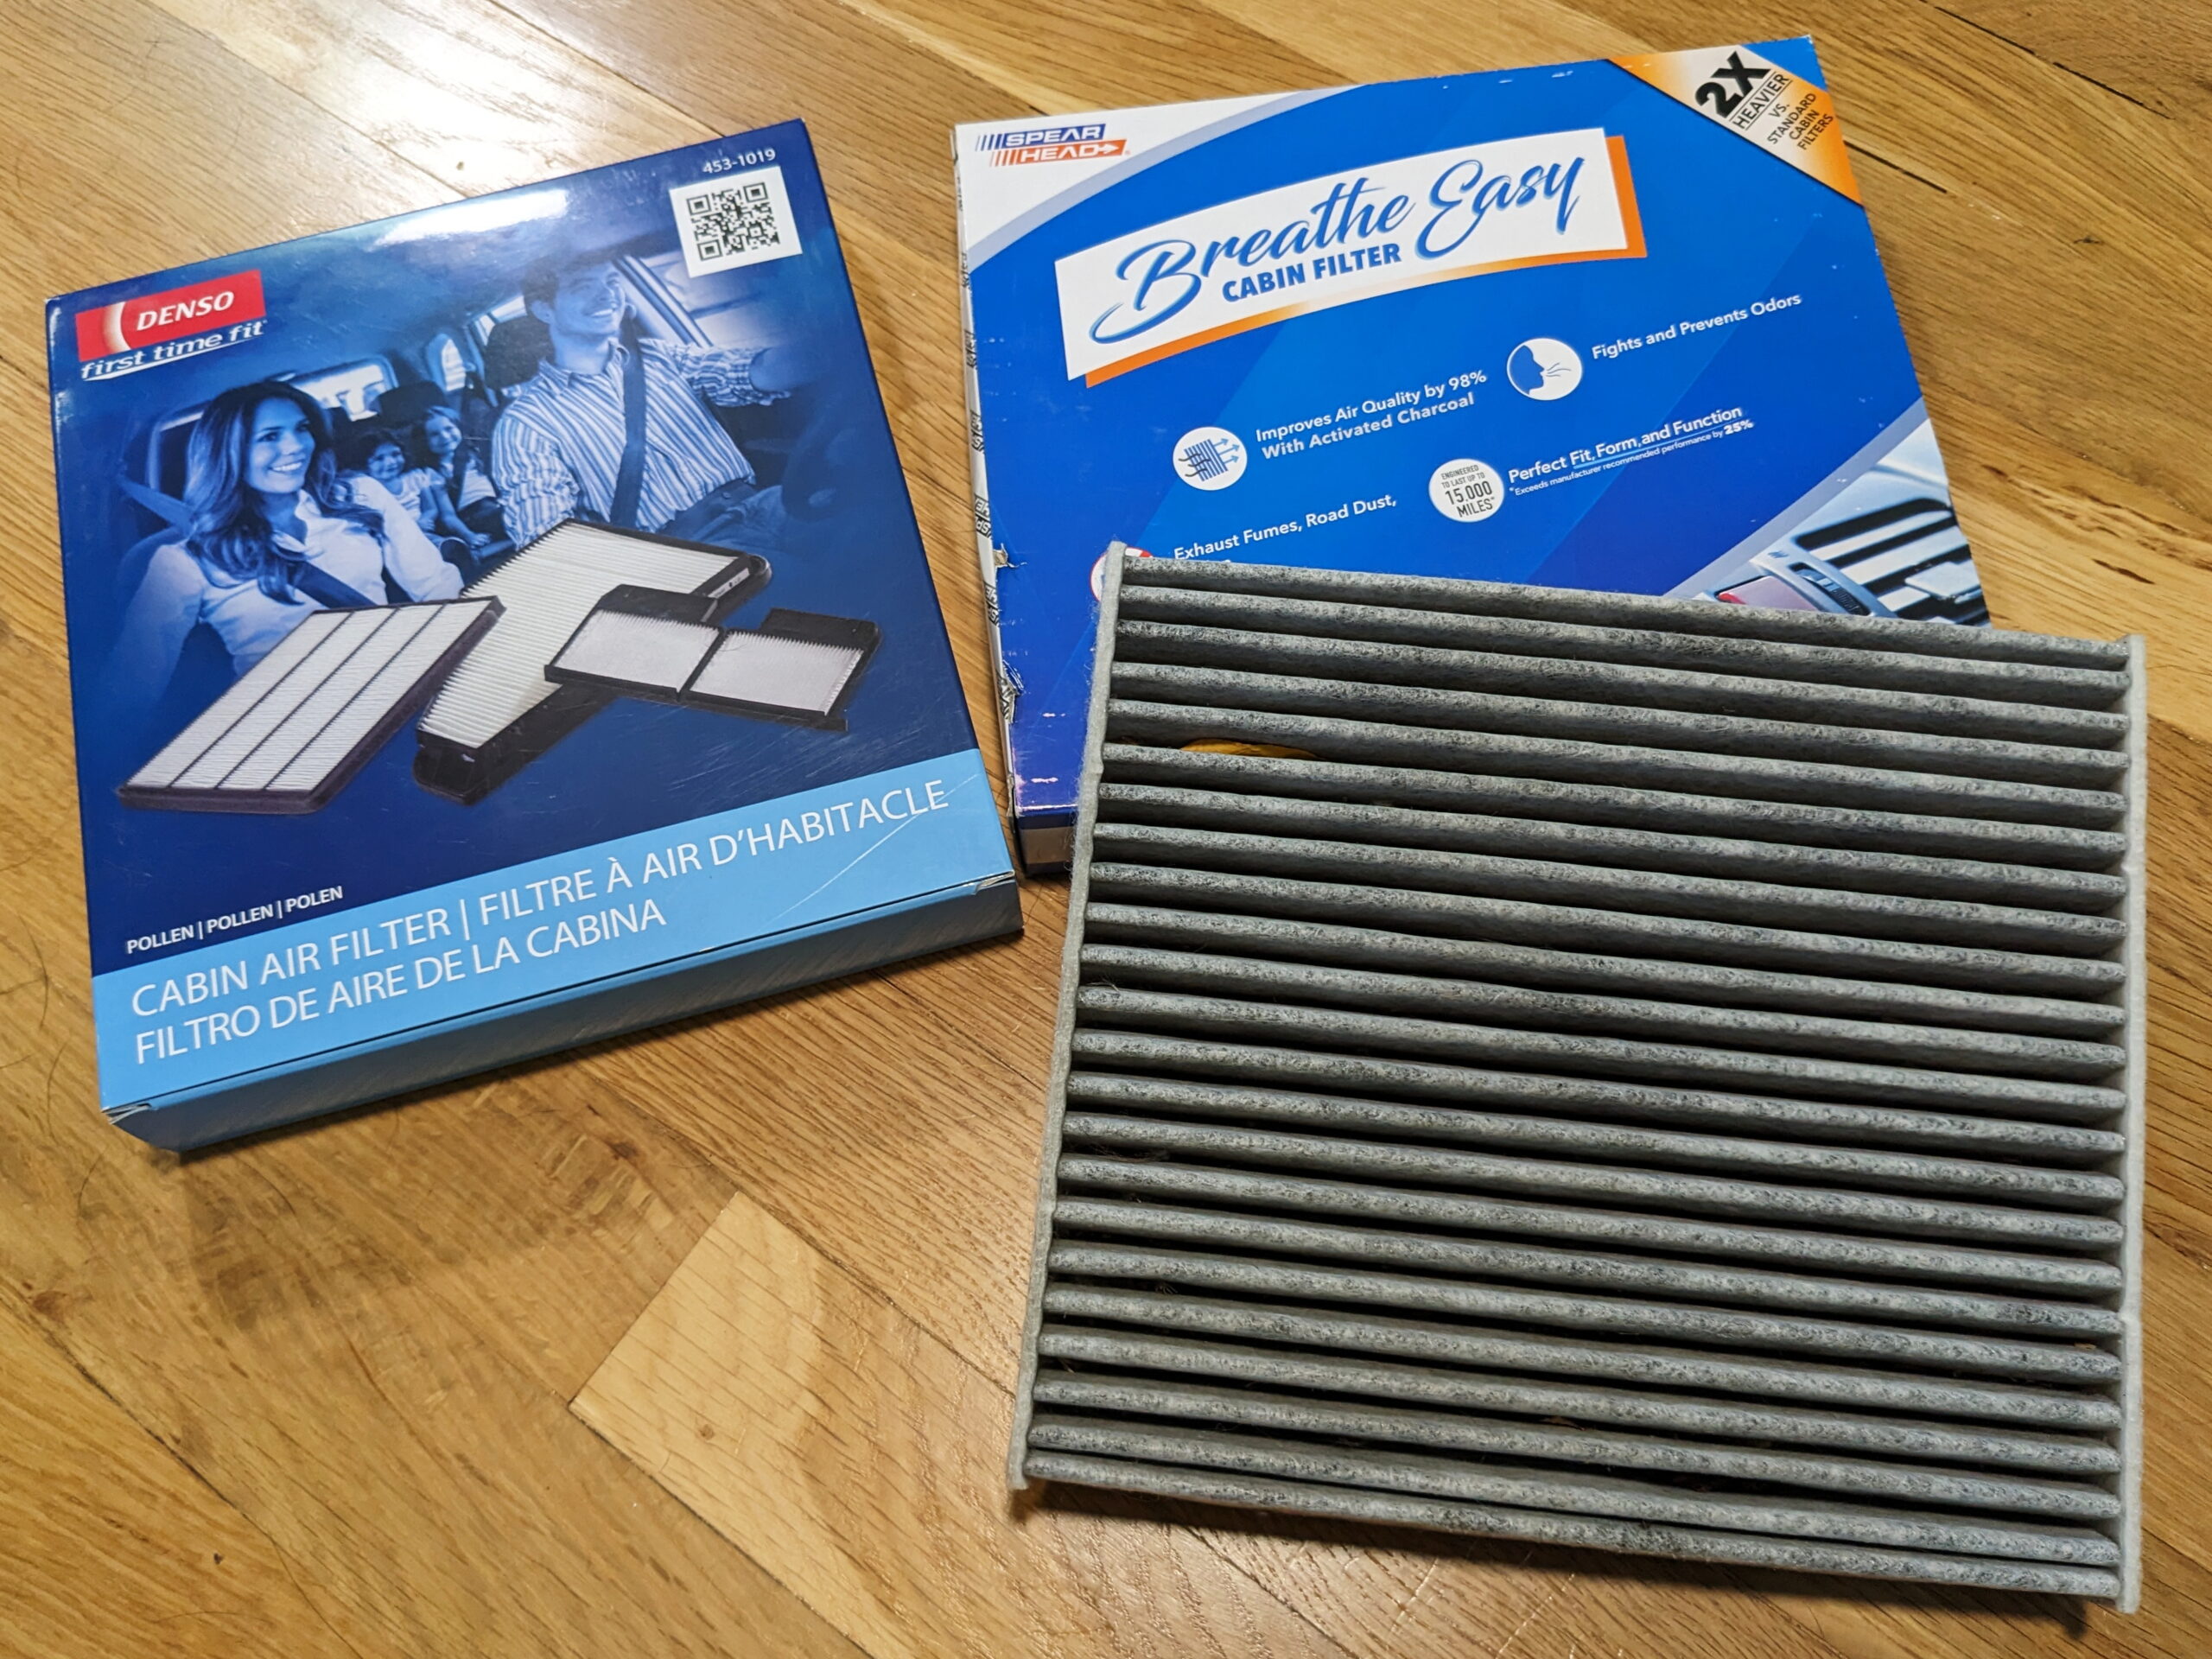
With autumn rolling in the HVAC blower in my Subaru Outback seemed to be acting up. Whenever I’d have the blower at a low speed for basic air circulation it just… didn’t seem to be doing much. It turns out this was caused by the cabin air filter. The heavier filter, the Breathe Easy seen on the right, was restricting flow so much that I’d only get noticeable air movement when the fan was at ~2/3 of maximum or higher.
I’d swapped this filter in over the summer, and at first I didn’t notice, because I normally run the air conditioning (cooling) on a pretty high speed or have the windows down with the blower off. With temperatures dropping I’ll often have fresh air flowing in through the vents, but with the fan at a low speed, just to keep a fresh-air feeling inside the car. On the normal low (one or two bar) setting I just… wasn’t feeling much.
My thoughts first went to problems with an HVAC damper, or perhaps a motor speed controller, but then I remembered the activated charcoal cabin filter I’d fitted and wondered if maybe it was so restricting that the blower wasn’t working right.
Yep, that was the problem. I fitted up a simple Denso paper filter for capturing pollen and everything is working fine again. I’m glad it wasn’t anything more expensive.
Because it supports monitor mode, a Macbook with the built-in WiFi adapter is one of the simplest ways to grab packets off the air. It’s not the most robust, but often all I need to do is grab data from a couple devices I’m near on a known channel, so fancy antennas and channel hopping and whatnot is overkill; I just need to grab packets. Using the Sniffer built into the Wireless Diagnostics captures in Monitor Mode has been fairly easy for a while, but I was stuck using the GUI.
For a while macOS has had a command line utility called airport to handle all sorts of wireless network manipulation, log gathering, and debugging. It also has a poorly documented command verb sniff, but until the release of macOS Sonoma (14.0) it was only possible to specifying the channel. Not being able to specify the width made it useless for most capturing I’d do in the real world.
Thankfully the airport command now works for channel and width, so now it’s possible to use remotely, in scripts, etc. It’s not well documented, but it works. For example, the following will capture on en0 on 5GHz channel 137 with 80MHz width:
airport en0 sniff 5g137/80
This will capture en1 on 2.4GHz channel 7 at 20MHz width:
airport en0 sniff 2g7/20
Output files end up randomly named in /tmp in pcap format with a name of /tmp/airportSniff??????.cap. They can be opened in Wireshark or your analysis tool of choice.
(I suspect that sniffing from 6GHz WiFi will follow the same pattern, but I don’t have access to a device with such a radio so I’m unable to test. It’d also be pretty nifty to see this somehow built in / better automated via Wireshark… That could be a neat project for later.)
The airport binary can be found at /System/Library/PrivateFrameworks/Apple80211.framework/Versions/Current/Resources/airport. I link this to ~/bin, with something like the following:
I recently was troubleshooting a problem with network authentication and suspected that the issue was around certificates and private keys not matching on a client. I had a .PEM file for the certificate and a .KEY for the private key, and I wanted to see if they matched.
Thankfully OpenSSL, the Swiss Army Knife of wrangling certs, made it easy. While this isn’t anything particularly secret, it took me a few to figure it out, so I’m re-documenting it here.
To see if the private key matches the certificate, use the following two commands and compare the Modulus section:
openssl x509 -in file.pem -noout -text
openssl rsa -in file.key -noout -text
If they match, the private key matches the certificate. If they don’t, they don’t.
In my case they didn’t match, which was causing the authentication problems. So we then solved what was happening during cert issuance and everything was then good.
Today I tried to connect my Garmin Edge 530 running the latest firmware (v9.73) to my home wireless network, and couldn’t get it working. my friend Nick dug up a solution, so I wanted to share it here.
The problem I had is that when trying to find the network to join, either in the Garmin Connect mobile app or right on the device, my WPA2-secured wireless network would be shown as Unsecured and I couldn’t join it. No matter what I tried, on device or in app, switching around network types, names, security, or bands, the Edge 530 always saw it as Unsecured. The one thing I didn’t try was making a non-secured network, but that’s not an option for me.
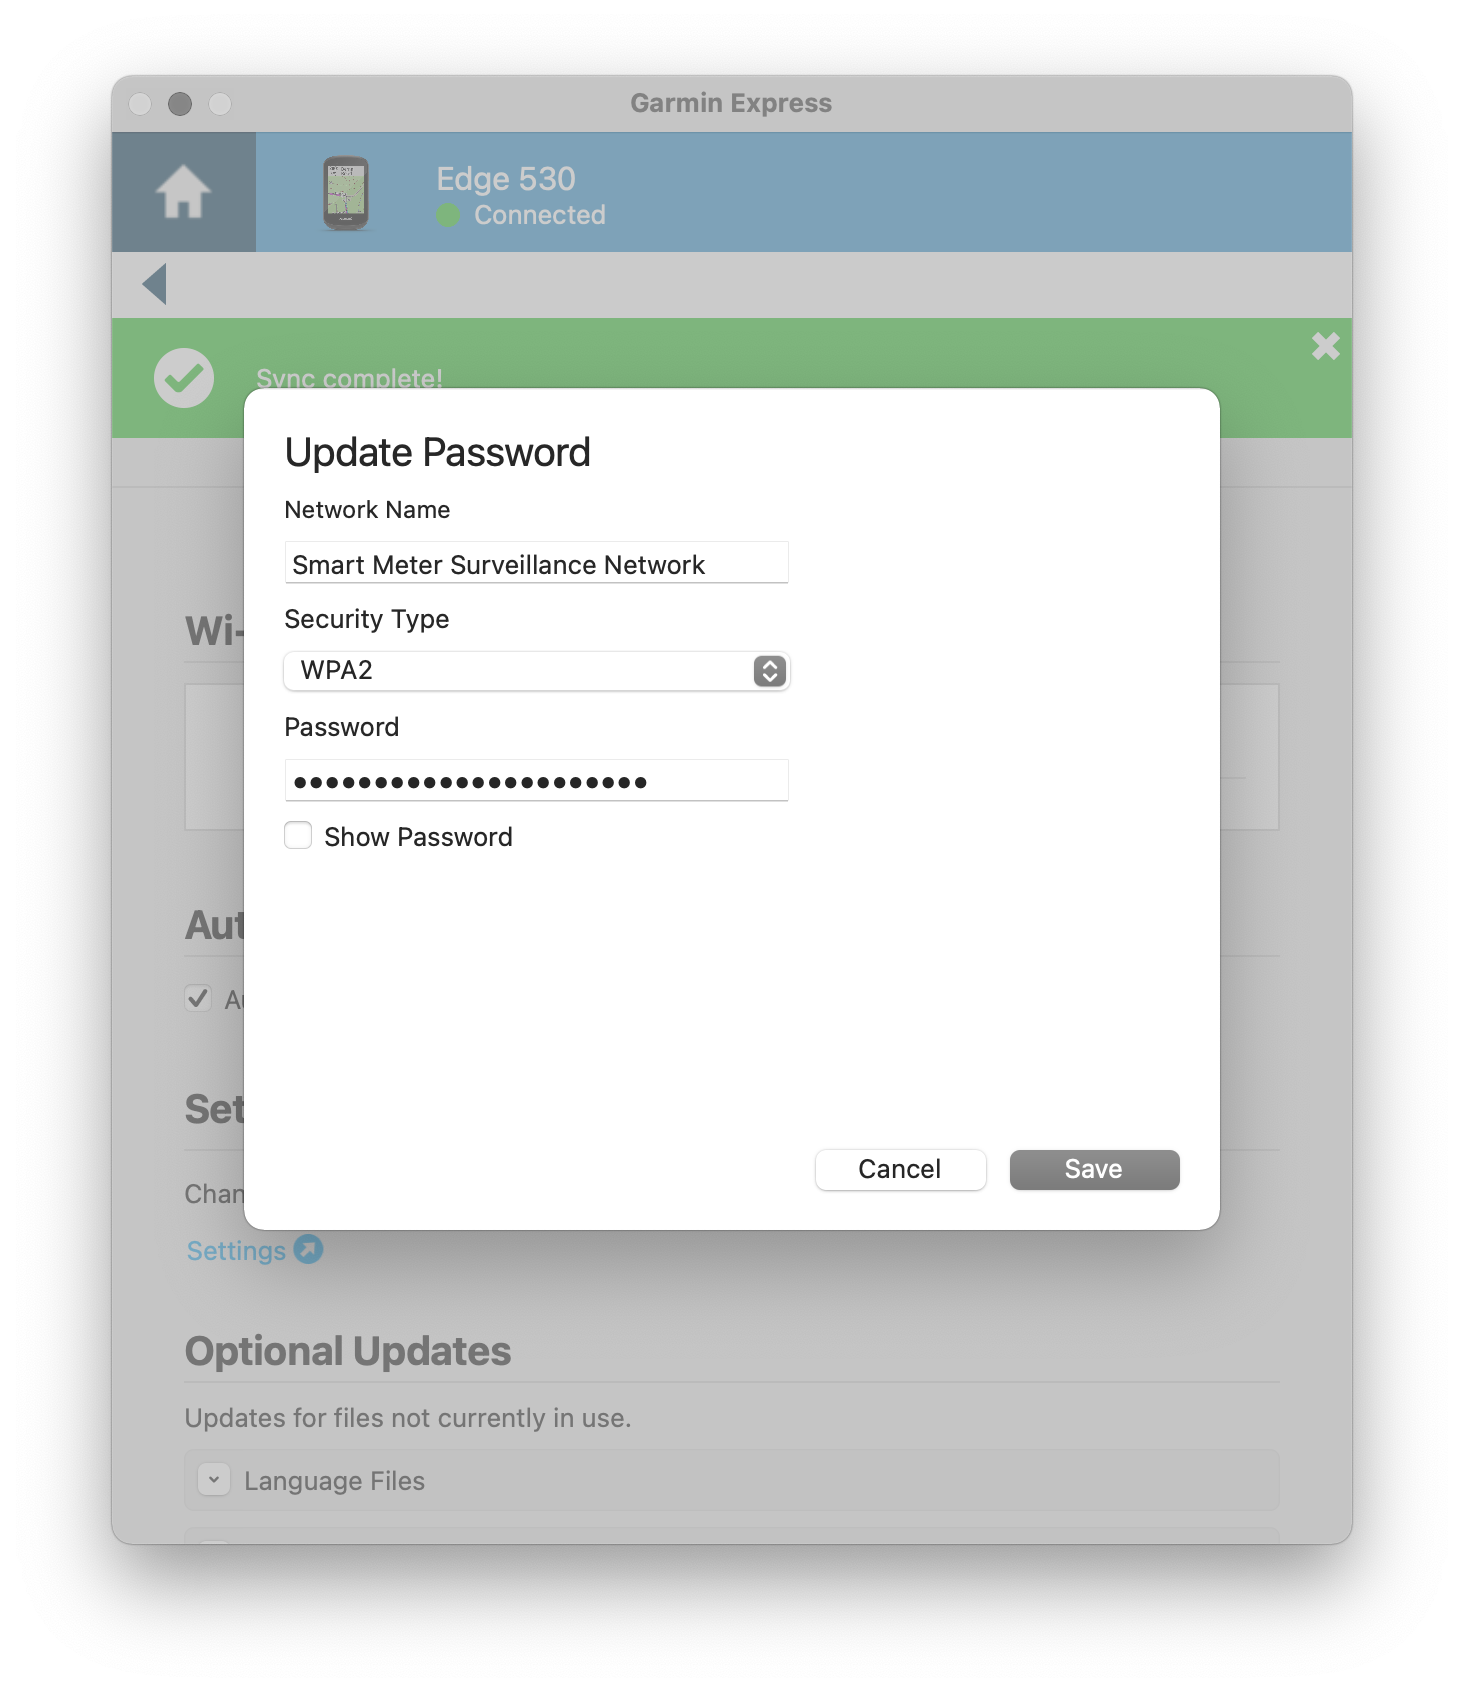
Turns out you can work around this by using the Garmin Express desktop app then going into the 530, Tools & Content, Utilities, then under Wi-Fi Networks manually adding the network with appropriate security, password, etc.
After saving settings and ejecting the device it joined my wireless network, as confirmed on the device, in the DHCP leases, and on the APs themselves. Now it’ll automatically sync rides whenever I get back home.
Something else odd is the Edge 530 truncates 32-character SSIDs. My network at home is Smart Meter Surveillance Network, which is 32 ASCII characters long. This is the maximum allowed by 802.11, which is 32 octets, or 32 sets of 8 bytes, or 32 ASCII characters. For some reason in much of the Garmin UI it’d drop the last character, truncating to Smart Meter Survellance Networ. Thinking this was the problem I first dug into network name as a problem but eventually found a shorter SSID didn’t help. Also, this isn’t the first device I’ve had with SSID length problems (see Bypassing Reolink SSID Length Limitation); thankfully in this case it only seemed to be a display issue.