Along with the static copy of the MediaWiki, I’ve been wanting to make a static, archival copy of the Gallery 2 install that I’ve been using to share photos, for 15+ years, at nuxx.net/gallery. Using HTTrack I was able to do so, after a bit of work, resulting in a copy at the same URL and with images accessed using the same paths, from static files.
The result is that I no longer need to run the aging Gallery 2 software, yet links and embedded images that point to my photo gallery did not break.
In the last few years I’ve both seen the traffic drop off, I haven’t posted many new things there, and it seems like the old Internet of pointing people to a personal photo gallery is nearly dead. I believe that blog posts, such as this, with links to specific photos, are where effort should be put. While there is 18+ years of personal history in digital images in my gallery, it doesn’t get used the same way it was 10 years ago.
On the technical side, the relatively-ancient (circa 2008) Gallery 2 has and the ~90GB of data in it has occasionally been a burden. I had to maintain an old copy of PHP just for this app, and this made updating things a pain. While there is a recent project, Gallery the Revival, which aims to update Gallery to newer versions of PHP, this is based around Gallery 3 and a migration to that brings about its own problems, including breaking static links.
I’m still not sure if I want to keep the gallery online but static as it is now, put the web app back up, completely take it off the internet and host it privately at home, or what… but figuring out how to create an archive has given me options.
What follows are my notes on how I used HTTrack, a package specifically designed to mirror websites, to archive nuxx.net’s Photo Gallery. I encountered a few bumps along the way, so this details each and how it was overcome, resulting in the current static copy. To find each of these I’d start HTTrack, let it run for a while, see if it got any errors, fix them, then try again. Eventually I got it to archive cleanly with zero errors:
Gallery Bug 83873
During initial runs, HTTrack finished after ~96MB (out of ~90GB of images) saved, reporting that it was complete. The main portions of the site looked good, but many sub-albums or original-resolution images were zero-byte HTML files on disk and displayed blank in the browser. This was caused by Gallery bug 83873, triggered by using HTTPS on the site. It seems to be fixed by adding the following line just before line 780 in .../modules/core/classes/GallerySession.class:
GalleryCoreApi::requireOnce('modules/core/classes/GalleryTranslator.class');
This error was found by via the following in Apache’s error log:
AH01071: Got error 'PHP message: PHP Fatal error: Class 'GalleryTranslator' not found in /var/www/vhosts/nuxx.net/gallery/modules/core/classes/GallerySession.class on line 780\n', referer: http://nuxx.net/gallery/
Minimize External Links / Footers
To clean things up further, minimizing external links, and make the static copy of the site as simple as possible, I also removed external links in footer by commenting out the external Gallery links and version from the footer, via .../themes/themename/templates/local/theme.tpl and .../themes/themename/templates/local/error.tpl:
<div id="gsFooter">
{*
{g->logoButton type="validation"}
*{g->logoButton type="gallery2"}
*{g->logoButton type="gallery2-version"}
*{g->logoButton type="donate"}
*}
</div>
Remove Details from EXIF/IPTC Plugin
The EXIF/IPTC Plugin for Gallery is excellent because it shows embedded metadata from the original photo, including things like date/time, camera model, location. This presents as a simple Summary view and a lengthier Details view. Unfortunately, when being indexed by HTTrack, selecting of the Details view — done via JavaScript — returns a server error. This shows up in the HTTrack UI as an increasing error count, and server errors as some pages are queried.
To not have a broken link on every page I modified the plugin to remove the Summary and Details view selector so it’d only display Summary, and used the plugin configuration to ensure that every field I wanted was shown in the summary.
To make this change copy .../modules/exif/templates/blocks/ExifInfo.tpl to .../modules/exif/templates/blocks/local/ExifInfo.tpl (to create a local copy, per the Editing Templates doc). Then edit the local copy and comment out lines 43 through 60 so that only the Summary view is displayed:
{* {if ($exif.mode == 'summary')}
* {g->text text="summary"}
* {else}
* <a href="{g->url arg1="controller=exif.SwitchDetailMode"
* arg2="mode=summary" arg3="return=true"}" onclick="return exifSwitchDetailMode({$exif.blockNum},{$item.id},'summary')">
* {g->text text="summary"}
* </a>
* {/if}
*
* {if ($exif.mode == 'detailed')}
* {g->text text="details"}
* {else}
* <a href="{g->url arg1="controller=exif.SwitchDetailMode"
* arg2="mode=detailed" arg3="return=true"}" onclick="return exifSwitchDetailMode({$exif.blockNum},{$item.id},'detailed')">
* {g->text text="details"}
* </a>
* {/if}
*}
Disable Extra Plugins
Finally, I disabled a bunch of plugins which both wouldn’t be useful in a static copy of the site, and cause a number of interconnected links which would make a mirror of the site overly complicated:
- Search: Can’t search a static site.
- Google Map Module: Requires a maps API key, which I don’t want to mess with.
- New Items: There’s nothing new getting posted to a static site.
- Slideshow: Not needed.
Fix Missing Files
My custom theme, which was based on matrix, linked to some images in the matrix directory which were no longer present in newer versions of the themes, so HTTrack would get 404 errors on these. I copied these files from my custom theme to the .../themes/matrix/images directory to fix this.
Clear Template / Page Cache
After making changes to templates it’s a good idea to clear all the template caches so all pages are rendering with the above changes. While all these steps may be overkill, I do this by going into Site Admin → Performance and setting Guest Users and Registered Users to No acceleration. I then uncheck Enable template caching and click Save. I then click Clear Saved Pages to clear any cached pages, then re-enable template caching and Full acceleration for Guest Users (which HTTrack will be working as).
PANIC! : Too many URLs : >99999
If your Gallery has a lot of images, HTTrack could quit with the error PANIC! : Too many URLs : >99999. Mine did, so I had to run it with the -#L1000000 argument so that it’ll then be limited to 1,000,000 URLs instead of the default 99,999.
Run HTTrack
After all of this, I ran the httrack binary with the security (bandwidth, etc) limits disabled (--disable-security-limits) and used its wizard mode to set up the mirror. The URL to be archived was https://nuxx.net/gallery/, stored in an appropriately named project directory, with no other settings.
CAUTION: Do not disable security limits if you don’t have good controls around the site you are mirroring and the bandwidth between the two. HTTrack has very sane defaults for rate limiting when mirroring that keep its behavior polite, it’s not wise to override these defaults unless you have good control of the source and destination site.
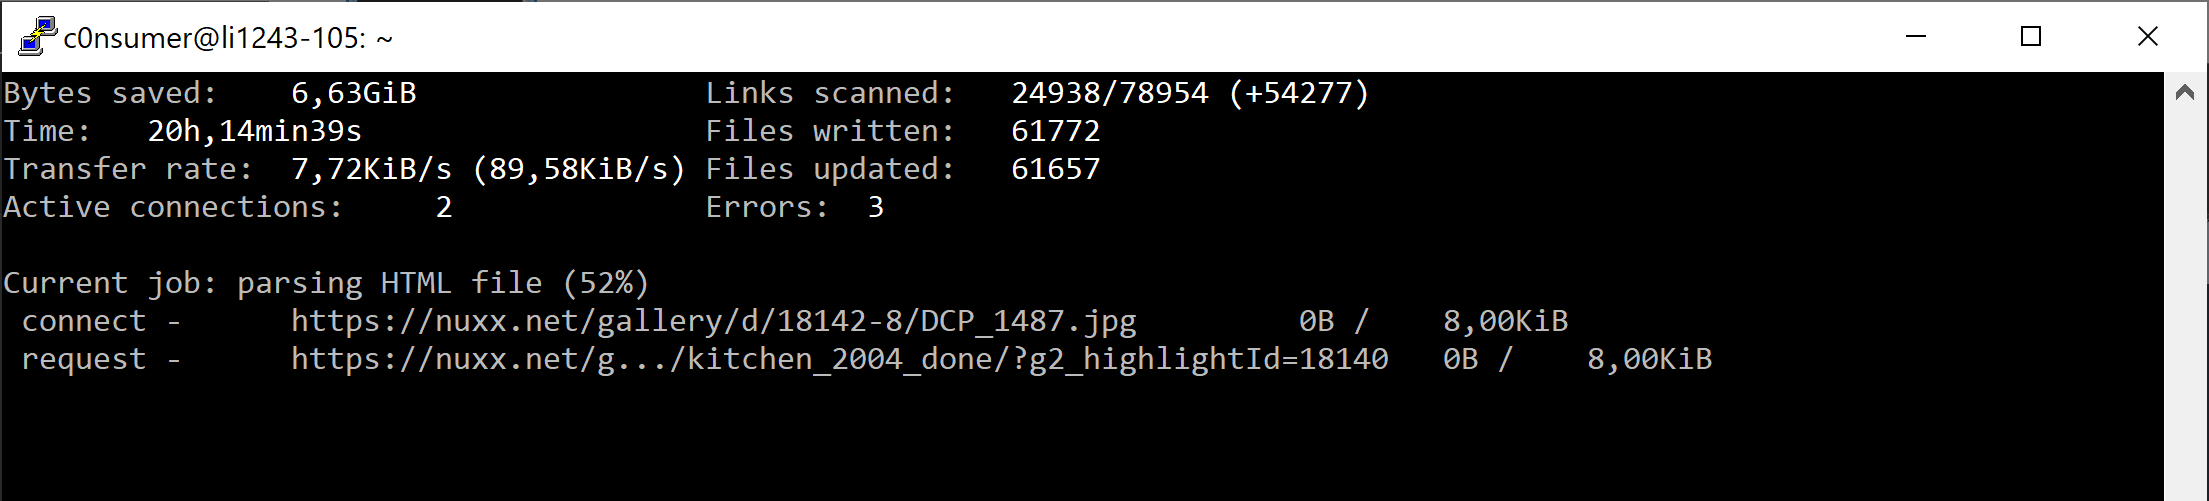
When httrack begins it shows no progress on screen, so I quit with Ctrl-C, switched to the project directory, and ran httrack --continue to allow the mirror to continue and show status info on the screen (the screenshot above). The argument --continue can be used to restart an interrupted mirror, and --update can be used to freshen up a complete mirror.
Alternately, the following command puts this all together, without the wizard:
httrack https://nuxx.net/gallery/ -W -O "/home/username/websites/nuxx.net Photo Gallery" -%v --disable-security-limits -#L1000000
As HTTrack spiders the site it comes across external links and needs to know what to do with them. Because I didn’t specify an action for external links on the command line, it prompts with the question “A link, [linkurl], is located beyond this mirror scope.”. Since I’m not interested in mirroring any external sites (mostly links to recipes or company websites) I answer * which is “Ignore all further links and do not ask any more questions” (text in httrack.c). (I was unable to figure out how to suppress this via a command line option before getting a complete mirror, although it’s likely possible.)
Running from a Dedicated VM
I ran this mirror task from a Linode VM, located in the same region as the VM hosting nuxx.net. This results in all traffic flowing over the Private network, avoiding bandwidth charge.
Because of the ~90GB of images, I set up a Linode 8GB, which has 160GB of disk, 8GB of RAM, and 4 CPUs. This should provide plenty of space for the mirror, with enough resources to allow the tool to work. This VM costs $40/mo (or $0.06/hr), which I find plenty affordable for getting this project done. The mirror took N days to complete, after which I tar’d it up and copied it a few places before deleting the VM.
By having a separate VM I was able to not worry about any dependencies or package problems and delete it after the work is done. All I needed to do on this VM was create a user, put it in the sudoers file, install screen (sudo apt-get install screen) and httrack (sudo apt-get install httrack), and get things running.
Wrapping It All Up
After the mirror was complete I replaced my .../gallery directory with the .../gallery directory from the HTTrack output directory and all was good.

")

