Press "Enter" to skip to content

Category: cycling

First Ride of the Year from Home

It’s pretty common for me to start from home for bike rides, and in previous years I’d done a number of winter rides which set out from home, over to River Bends or so, and back. With the abnormally heavy snow falls of 2013/2014 my first from-home ride didn’t take place until today, March 2nd.

For today’s ride I left home with River Bends as my destination. The Rochester Bike Shop team was having a get together / training event at the park, so I figured I’d swing by and say hello. The route up to the park was so difficult that the normally 3-4 mile route took me nearly 50 minutes (moving time) as I dealt with impassible sidewalks, ice, and three inches of freshly fallen snow. After arriving at the park I rode one pass through the entrance trail, but as my tires were at path-riding pressure I had a hard time. I could have dropped pressures to something more appropriate for riding trails, but I didn’t want to pump them back up later. So, after a bit of talking I left the park and headed back home.

For the route home I conjured up my best residential street memories from back when I was first exploring the area, and I found a route which only required me to walk one spot, a frustrating piece of sidewalk along Shelby which was mostly icy footprints and plow piles covered in a gentle blanket of snow (photo). Riding along the deceptively named Powers Court (map – it’s the only Van Dyke to Shelby through-road in the neighborhood and decidedly not a court) I happened across some deep icy ruts, one of which (photo) put me on my side. Like most winter falls it was uneventful, but likely amusing to anyone watching.

The closer I got to home the more the residential streets and sidewalks had thawed, and it wasn’t long until I was riding through swaths of icy, grey slush. This left a giant pile of muck on the downtube of the bike. Unfortunately the largest chunk (about two fists in size) fell off just before I grabbed this photo. A few watering cans of hot tap water rinsed it all off, and an hour in front of the fan had it looking shiny and clean again.

Strava data for this ride can be found here, but the result is 1:46:11 moving time, about 30 minutes stopped (when talking at River Bends and at traffic crossings), and only 12.34 miles. I’m really looking forward to longer rides once the weather is nice again. Hopefully this year will be at least as successful as last in that regard.

Leave a Comment

Hozan C-356 Inner Wire Pliers

After weighing my options for cable tensioning tools I settled on the Hozan C-356 Inner Wire Pliers. These were recommended to me by a few folks, including Daniel Stewart over at Custer Cyclery, and I’m very happy with them. This is a seemingly simple tool that grabs a cable (or cable tie) and pulls it snug. The fairly simple action, but it makes snugging down cables and ties considerably easier than I’d expected; much better than my previous techniques using pliers.

For cables I’d previously used a set of locking pliers to hold the cable, pulling on that while tightening down the bolt. This works, but is a bit quirky and damages the cable more than I care for. Cable ties were handled with regular adjustable pliers and fingers, a two handed job that worked well but was is prone to breaking small ties.

The only difficulty I’ve run into thus far is when trying to use the C-356 to snug down the cable on a 2012-ish SRAM X9 rear derailleur, as the cable’s termination point isn’t really accessible with the tool. Otherwise, it’s been very handy. Most of my uses with it have involved cable ties, but it’s made tightening them down (especially in tight spaces, like inside of fork legs while a wheel is fitted) a breeze.

Leave a Comment

2014 Fat Bike Series: Addison Oaks

This past Saturday, February 8th, 2014, was the Addison Oaks race in Fun Promotions Fat Bike Series. Being near home and at one of my favorite parks I entered, racing in the B class. The course for this race was a groomed two track-ish surface, following the Buhl Lake Loop out to the campground, on paths along Drahner and Walker roads, then returning to the main parking lot via the campground access road.

I really enjoyed the route, but due to late grooming the snow was still fairly loose and once the solid upper layer was disturbed the loose snow below made riding treacherous. I believe that this may have been the most technical race I’ve ever done.

The photo above was taken by Steve Balough using a helmet camera facing backwards. In this photo I’m somewhere just after the start of a lap, following one of the two firm paths, and breathing heavily. Behind me is Ron Caitlin (307) who won the race overall. It was not long after this point, after going down a slight hill and into the most chewed up part of the course, that I fell over, landing just off the side of the path. I’ve mirrored one more of Steve’s photos of me here (this one from the start of the race), and his photos from this day can be seen here.

In the end I wound up finishing eight laps in just over two hours, placing third in the B category, and receiving a nice plaque as an award (photo). I like this more than getting a medal, as there’s something about it which feels a bit more solid. Sure, it’s just third in a B class race, but it still feels nice. I believe this is also the highest position I’ve placed in any non-beginner race. (Next was 4th at the CRAMBA Addison Oaks race in 2013, and a 5th place at the Tailwind Stony Creek XC in 2012.)

Full results from the race can be found here (mirrored from here on Fun Promotions website).

Strangely, this is the first fatbike only race that I’ve done, even I’ve done more races on the Salsa Mukluk 2 than any of my other bikes, both summer and winter. Fatbike specific races are still fairly new, and I’m glad there was one so close to home, something I didn’t have to drive a couple hours for.

Leave a Comment

Salsa CroMoto Grande 29″ Tapered Fork w/ 15mm Thru Axle (QBP FK0851)

Every since getting the Salsa El Mariachi Ti last April I’ve been interested in trying it out with a rigid fork, but due to the lack of availability of reasonably priced, readily compatible forks I hadn’t been able to. The (very nice looking, but expensive) Whisky Parts Company No. 9 Carbon Thru Axle 29er Fork would have worked, but at $595 (MSRP) it’s too pricy for my part-time rigid fork desires.

As of last week QBP began shipping part FK0851, a 15mm thru axle tapered steerer tube version of their CroMoto Grande 29er fork, the same one which ships on the 2014 Salsa El Mariachi Single Speed. I have the non-tapered 9mm quick release version for my steel El Mariachi Single Speed (photo) and like it there, and with a MSRP of $209 I figured it’d be a good fork for the El Mariachi Ti. Ryan over at Apto Cycling ordered the fork for me the day it was available, I picked it up on Thursday, and this evening I got it installed.

At 2.8 pounds (versus 3.7 for the Fox) it only saves 0.9 pounds, but it should give me everything I wanted in a rigid fork on that bike: a stiff, reasonably-priced, not-squishy front end that’s drop-in compatible with the suspension fork and easy to switch to. The Whisky fork would have saved another 1.3 pounds, but at nearly $400 more, I don’t think it’d have been worth it.

I’m quite happy with how the fork looks, with the gloss black goes great with the titanium frame, and the overall setup was as easy as I could have hoped for. I’m not as keen on the Rock Shox Maxle design as I like Fox’s lever type a bit more, but it does work as advertised. Sitting still bike has a slightly more aggressive posture than with the suspension fork, right about equal to the proper sag setting while riding it.

I’m really looking forward to getting that bike back out and riding it… That’ll still have to wait for a thaw and nicer weather.

More photos of the fork are available here: 1 · 2 · 3 · 4 · 5

2 Comments

PVC 1.5″ Crown Race Setter

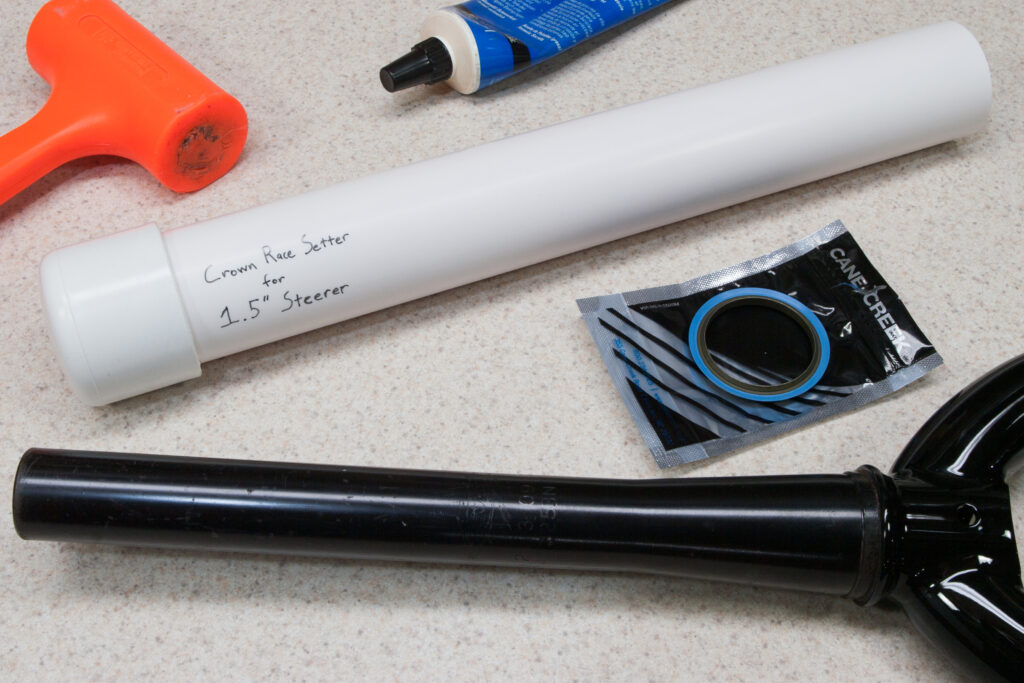
The Salsa El Mariachi Ti has a headset for a tapered fork, thus when I picked up a rigid fork for it (more on that later) I wanted to be sure to get a tapered one. Lacking a proper setter I decided to make one out of PVC pipe. Schedule 40 PVC pipe, 1.5″, has an average inside diameter of 1.590″, which is perfect for fitting over the 1.5″ bottom of a tapered steerer tube.

Home Depot sells 2′ sections of pipe, so this, plus a cap, were purchased for making the setter. I cut the pipe to 14″ long (same as a Park Tool CRS-1) to ensure a nice, square end then fitted a cap on the other end. After cutting a slight inside bevel on the pipe this worked fairly well for hammering on the Cane Creek 40-CrownRace-52/40-Steel race (really, a bearing seat and seal) which is the matching part for the headset on the bike.

This did not work as easily as setting a traditional 1-1/8″ headset using a metal tool, but after a few false starts it did eventually work. The PVC felt somewhat flexible and I believe was absorbing some of the force from the hammer. The steerer is also has a 33% greater circumference, so on a 1.5″ steerer there’ll be more friction than with a 1-1/8″, so it’ll take more force overall to set the race in place.

That all said, at less than $5 for making one yourself versus ~$70 (online prices) for buying a steel one, and still ending up with an effective tool, this is worth making.

1 Comment

¡Ay CRAMBA There’s Signs!


Sunday’s ¡Ay CRAMBA It’s Cold Out! event is going to feature both a hard and easy route, and to support this I needed to make signs. Here they are, made from white Coroplast (liberated from a roadside) covered with green gaffer tape, and nailed to wooden stacks from the Massive Fallout marking supplies. Marking was done by hand, but seems to have worked out fairly well.

I anticipate it being fairly easy to push these into the snow, allowing the bright green 6″ x 9″ signs to guide people along the routes. They bundle up small enough that I should have no difficulty fitting them all in one backpack, making for an pre-event trail marking session.

(The easy route will cut off the hilliest parts of the trail; a section which many find too frustrating to ride in deep snow.)

2 Comments

A Fine Day


Despite being a bit frazzled at times, today has been a pretty productive day. Due to the snow this morning I worked from home, but I got a fair bit of stuff done all while being able to listen to good music, watch a snowstorm outside of my window, bisected by the tasty lunch shown above†. There are definitely less comfortable ways to work.

After this I was able to:

  • Wash the salt off of my fatbike and experiment with some different techniques for cleaning off salt residue (none of which were successful). Thoroughly cleaned the somewhat-rusty (thanks, salt and lazyness!) drivetrain.
  • Figured out a likely reason why the fatbike has been ghost shifting: a partially-separated plate on the chain. This was easily fixed with a chain tool.
  • Went snowshoeing with Danielle, Erik, and Kristi to pack down the mountain bike trails at River Bends. This was my first time using snowshoes somewhere other than near home, and thanks to the four of us the trails should now be fatbikable and mostly prepped for ¡Ay CRAMBA It’s Cold Out!.
  • Shoveled the excess snow out of the parking spaces that both our neighbor Rick and I regularly use. These had been plowed, but as the plow can’t get right to the curbs, hand-shoveling the final bits helps keep the spots nicely open and accessible. I don’t like shoving the grill of my car into a snowbank to fit in a spot.
  • Ate some really tasty chorizo nachos that Danielle made for dinner.
  • Mopped the laundry room floor in cleaning up from bike washing, then did a the dishes.
  • Get started on some new signage (Coroplast ordered, vinyl spec’d / requested) for River Bends and other CRAMBA trails. Frustratingly, someone has stolen a number of the signs at River Bends and they now need to be replaced.

So, while I felt a bit frazzled and frustrated at times, overall this has turned out to be a quite fine day.

† A hot smoked salmon topped with herbs and an English muffin (Bay’s, of course) topped with cheddar, butter, scrambled eggs, and harissa.

Leave a Comment

Welcome to the LW Coaching 100 mile Finishers Training plan.

For the last two years I’ve followed the LW Coaching 100 Mile Mountain Bike Race — Finisher Plan for the 12 weeks prior to Lumberjack 100 (LJ). I purchased the TrainingPeaks version of this plan in 2012 and it’s worked well for me, so I’m going to do the same this year. However, there is something about the TrainingPeaks site — maybe it’s the visibility of weeks of stuff-to-do at a time — that feels very daunting.

Today I applied the plan to the 2014 calendar, set to finish on Sunday, June 22, the day after LJ. While the first day of actually doing stuff isn’t until April 1st (this is an LTHR test), just seeing the calendar again is a little intimidating. However, it means that nice bicycling weather shouldn’t be too far away… Even if it is structured and training, I tend to really enjoy the rides. Here’s to that continuing this year.

Leave a Comment

Another Elegant Cadence Sensor Magnet Option

I’m apparently on a quest to find ideal neodymium magnets for triggering the cadence side of ANT+ speed/cadence sensors such as the Garmin GSC-10 and Wahoo Cycling Speed/Cadence Sensor. I’d previously tried wide/thin (10mm wide, various thickness) magnets such as the one seen here on the Salsa El Mariachi Ti which sit on the end of the pedal spindle. This works well on the El Mariachi Ti where the crank boot supports it from the side, but on bare cranks it’s not difficult to knock the magnet off. My friend Jeremy has lost at least one magnet this way.

A few days ago I received some 8mm x 10mm (diameter x height) neodymium magnet cylinders via eBay and these seem like an even better solution. On Crank Brothers pedals with 8mm hex sockets in the end of the spindle, these magnets slide snugly into the 8mm hole, with a bit over 2mm poking out. This works great for triggering the reed switch inside the cadence sensor, and unlike other magnets which simply stuck to the end of the spindle, roughly 75% of the magnet is inside of the pedal so it won’t be possible to knock this one off.

Removing the magnet as needed is pretty easy, too. Because there is no flat surface at the bottom of the hex socket the magnet is relatively easy to remove. It can easily be pulled out with another magnet, by sticking a flat piece of steel to the top, or grasped firmly (say, with pliers or some strong finger tips) and slid out. While getting to this fastener outside of a shop isn’t usually needed, it’s good to have the option.

Leave a Comment

New Helmet Pads for Giro Xar

After ~2 years (and maybe four months of need) I finally replaced the pads on my daytime helmet†, a Giro Xar. I’ve been quite happy with this helmet, and it’s done well for me, but the soft pads inside were soundly compacted and some parts were starting to delaminate. This meant that there would be large lumps inside the helmet if I didn’t put it on very carefully.

At $4.99/set for the pads I should have done this a while ago. The replacement is as simple as pulling out the old pads and sticking the new ones to the velcro.

† At night I wear my old helmet, a Giro Phase. This one isn’t quite as comfortable as the Xar, so I keep a light mount on top and use it mostly at night. It’s also a backup in case something happens to the Xar.

1 Comment