nuxx.net
Making, baking, and (un-)breaking things in Southeast Michigan.

Category: making things

iSight Tripod Adapter

Well, I just sent off payment for 40 15′ long Firewire cables. On the way home from the dentist’s office tonight (I’m going by there to do some computer work) I’ll grab some more PVC pipe, some endcaps, some tee nuts, some paint, and get started on things. Hopefully within two weeks I’ll actually have them ready for sale…

electronicsmaking thingsmoved from livejournal

iSight Tripod Adapter

[Cross posted to and …]

So I’ve been thinking of manufacturing about 40 of those iSight tripod adapters and selling them. I’m thinking of making them a bit shorter than the one I have (there’s a lot of air space in there) and painting them black or so.

Price would be US$35 shipped within the US, slightly more to elsewhere.

I’m curious, do you all think this is a good idea? And, would you be interested in buying one?

Here is a shot of the device itself, similar to what would be for sale. Except the ones I sell will likely be painted black.

Right now I’m trying to get prices on Firewire cables, but I’m thinking I’d end up with 15′ cables, leaving about 14.5′ hanging out of the adapter. The extra length is there so that it’s possible to have the iSight mounted on the tripod, and the computer a goodly ways away.

So, interested? Your thoughts?

electronicsmaking thingsmoved from livejournal

rez.nuxx.net

(For some reason I’m not interested in posting the pictures themselves to LJ tonight.)

This is what I made to hopefully correct the problems with the new webserver, rez.nuxx.net. It allows me to mount a spare 2U power supply inside of a normal ATX power supply space in my mid-tower server case.

I don’t mean to brag, but I personally think it came out pretty damn good. After mounting everything, this is how it came out. In doing this I ended up moving the fan guard and mains power connector to the outside of the case. Personally, I think it came out pretty good.

As can be seen here, there is also a good bit of room now, plenty of space for the bundling of the cables. Additionally, here is the first shot of the inside of the case, parts installed. This may change around a bit before I install it in the colo facility, but it’s the exact hardware config I hope to use.

computersmaking thingsmoved from livejournal

El-Cheapo Water Filter

[Cross posted to and …]


Click for huuuuuge….

So today I was going to brew some beer, and I decided that the best way to dechlorinate my water would be to run it through an activated charcoal filter. Well, ~US$20 and a visit to Home Depot later, and I had what you see above. A 2000-gallon activated charcoal inline water filter for a fridge, garden hose connectors, and enough 1/4″ line to reach easily into the carboy / pot / whatever. It’s really easy to use, and I’d have to strongly suggest that anyone looking to filter their water before brewing do something similar. Or, if you just need a portable filter it works as well.

Now, off to keep this brew going! The water is just coming to a boil now…

beermaking thingsmoved from livejournal

Power… Control!

Rawr. So it looks like the new webserver is having power supply issues. I’ve got six disks in there, and I think the power supply isn’t hacking it. When attempting to sync over data to it, it keeps rebooting.

Time to go purchase something much larger.

I’d think it could maybe be something else, but the machine isn’t dumping core (no vmcore* files found on the box) and this is the first time it’s happened. It’s also nicely reproducable…

Blah.

UPDATE: Also, something seems to have happened when the box crashed, and I have an empty directory that I can’t delete. (It’s part of the set that was being sync’d over.) I need to get the box into single user mode, but I can’t really do that remotely. At least it’s at home…

Well, time to price out power supplies.

UPDATE2: I may have an appropriate power supply at home… So long as it’s not too physically long, and I can fit it inside the case, it’ll definitely power the machine. It’s just meant for a 2U/3U/Whatever case, so I’ll have to build a bracket to hold it. Ah well.

computersmaking thingsmoved from livejournal

iSight Car Mount

[Cross posted to and …]


Click for more…

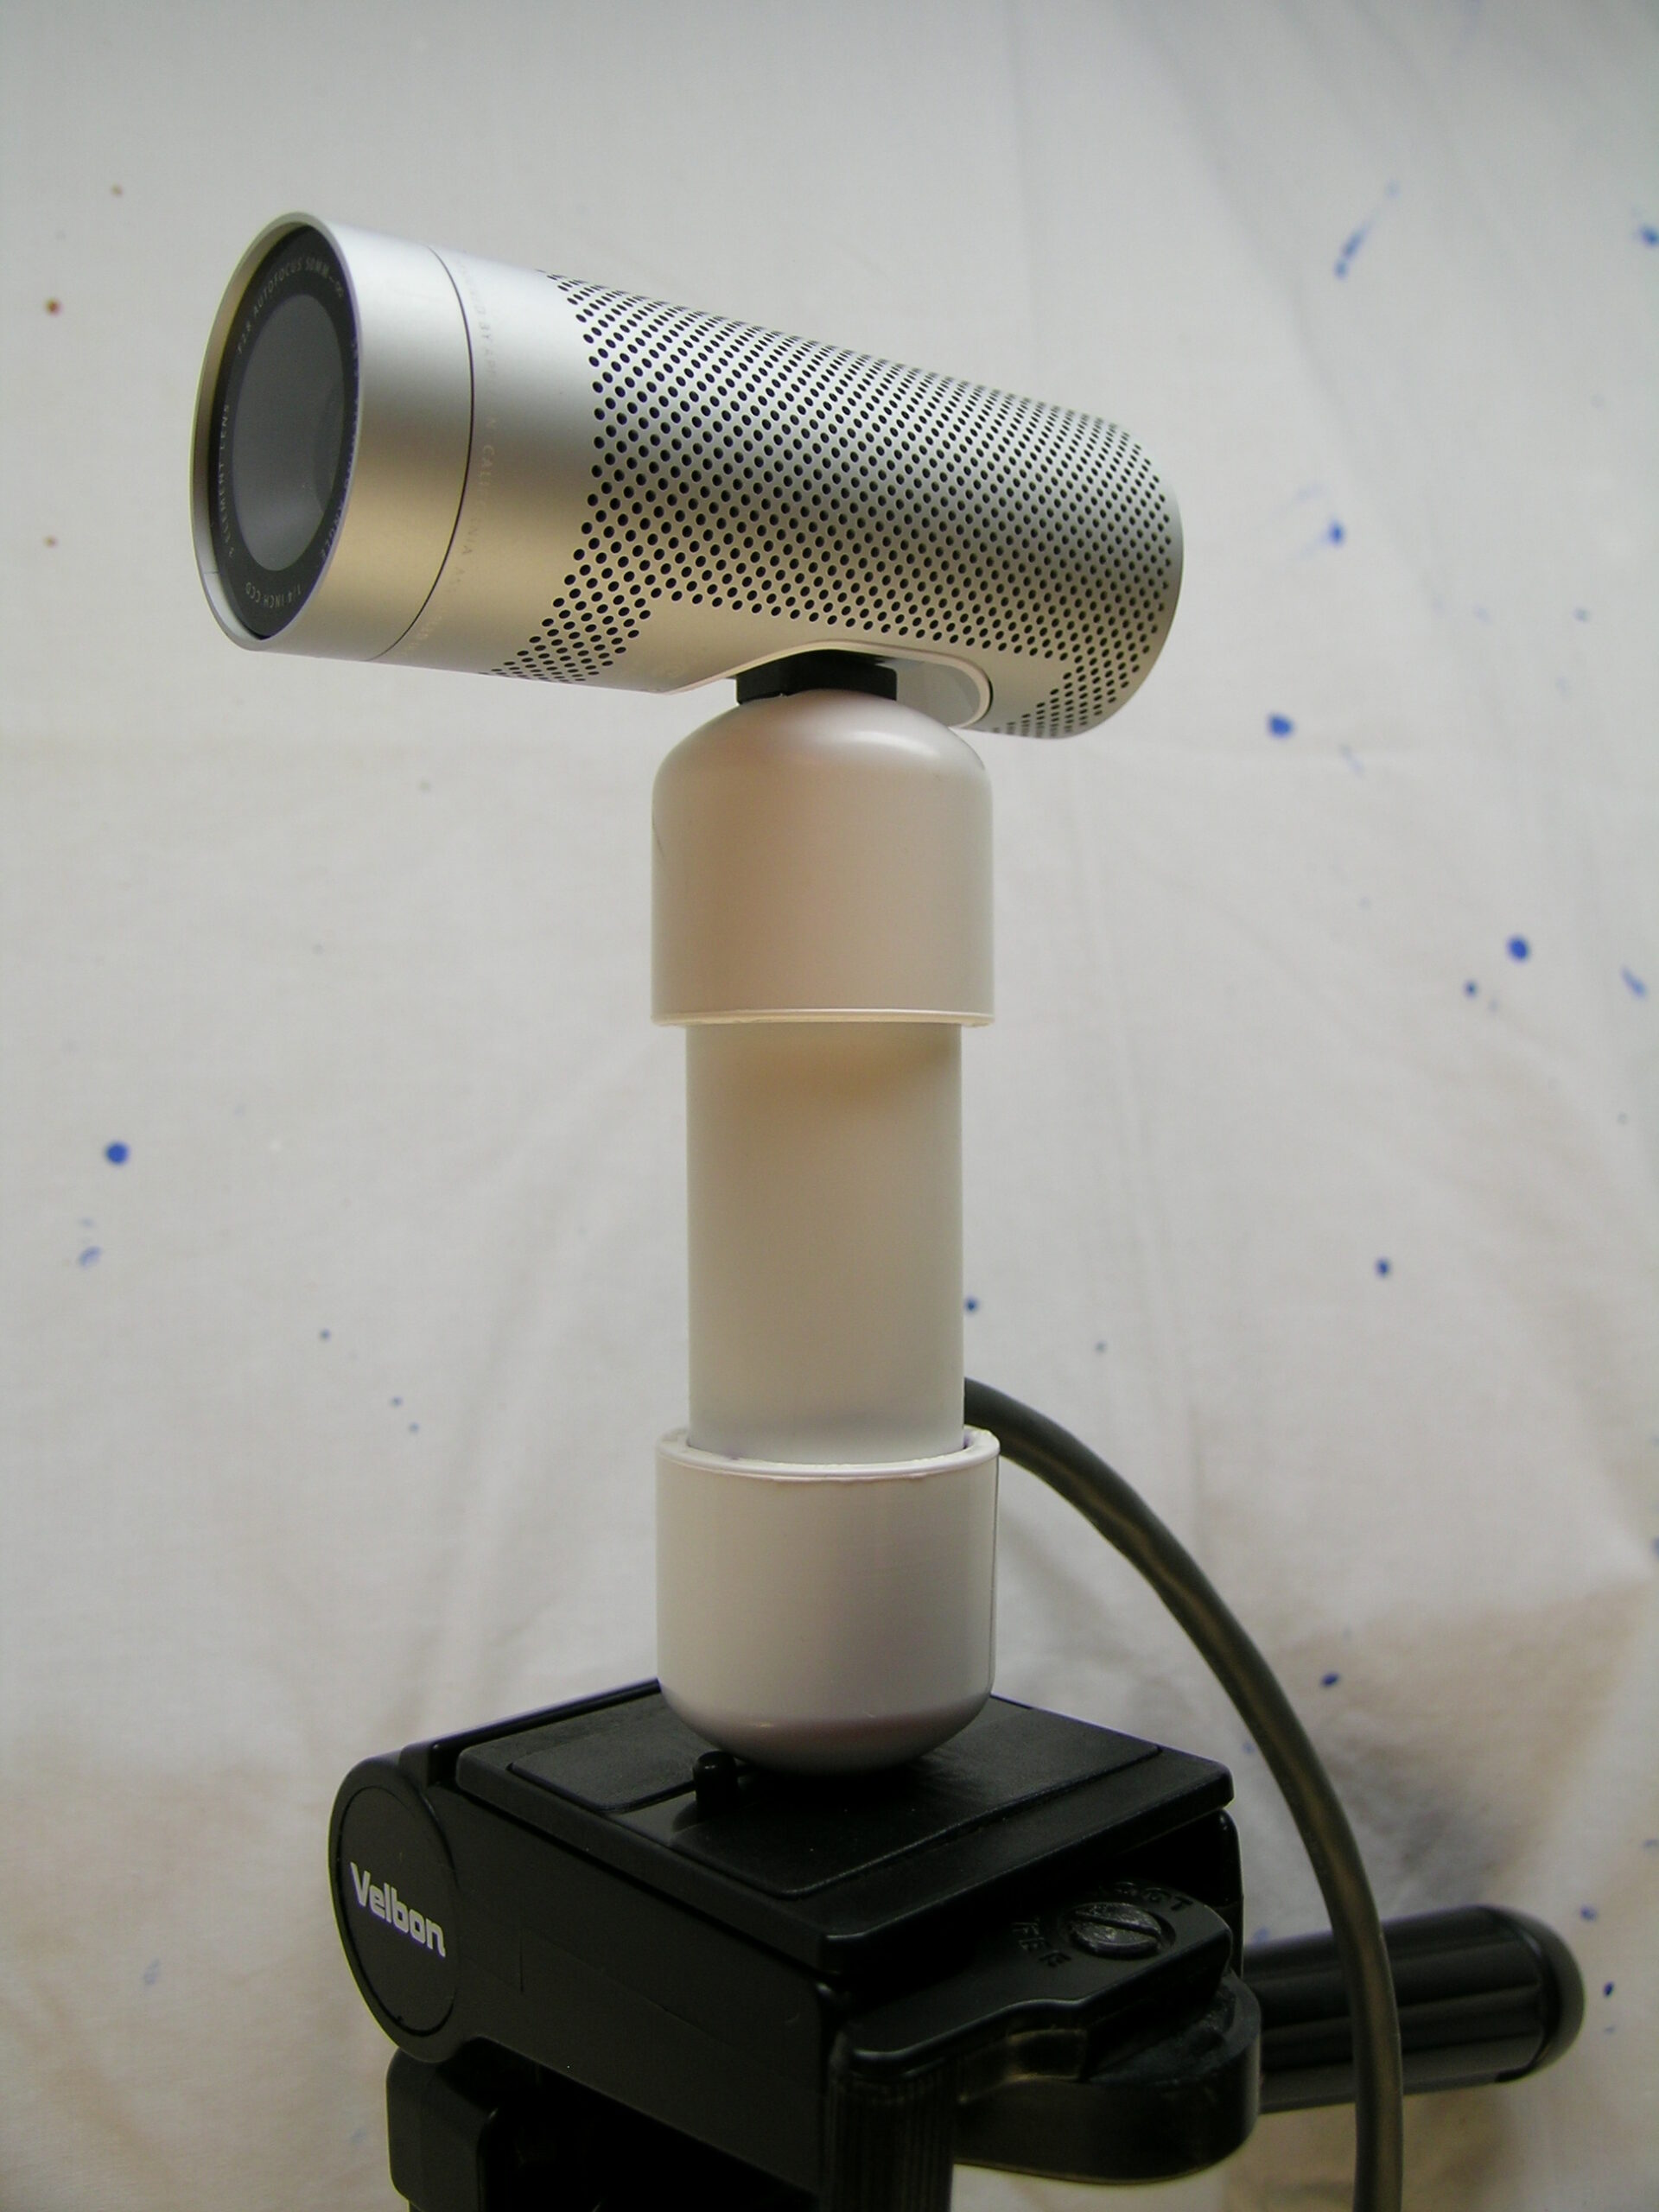
While at work yesterday I decided that I’d build a mount for my Apple iSight for my car. This way I could transmit photos of wherever I’m currently at, do stop motion video of driving, and all sorts of other things which the especially nifty iSight allows one to do.

So, as you can see in the picture above, I’ve got a mount built. This is more of my design test / proof of concept mount. I may build another that has a more polished look to it, as well. Probably some matte black paint, etc.

I’ve posted three videos which are the result of testing of the mount. There are two full motion tests which I took last night, and one stop motion of my drive to work. The mount seems to hold the camera very stable, and the full motion videos almost have a video game feeling to them. Perhaps this weekend I’ll do a stop motion driving around highways somewhere Downtown Detroit, in and out of parking garages, etc.

Regardless, it seems to work as desired. Enjoy the videos. They are encoded with QT7 in 512kbps H.264, so you’ll need QT7 or some other compatable player to view them:

· Car Mount Test 1 – At night, on M-59 crossing old Van Dyke, entering the sunken concrete cavern highway area.
· Car Mount Test 2 – Driving through the parking lot on the southwest corner of Hall Rd. and Schoenherr, ending up on Schoenherr heading north.
· Stop Motion Test 1 – My favorite vid. One of the routes I take to work, start to finish. Each frame taken two seconds apart, played back at 15 frames per second.

Stop motion footage created by:
1) Use EvoCam to capture a video with no compression, best quality, and best bit depth at .5 frames per second which makes for two seconds between frames.
2) Open resulting .MOV in QuickTime Pro.
3) Export .MOV to image sequence.
4) Open image sequence with QuickTime Pro set to the desired frame rate. In this case I found that 15fps looked best. 30fps was just too quick.

It may be possible to simply change the frame rate at which the QuickTime file is presented, but I was having difficulty figuring out how, so I did it this way.

automotiveelectronicsmaking thingsmoved from livejournal

iSight Capsule

[Cross posted to and …]


iSight Capsule — Click for step-by-step pictures…

As some of you might remember, I posted last Friday about the iSight Tripod Adapter that I pieced together in order to mount my iSight on a standard 1/4″ camera mount on a tripod.

Since making it, I’ve decided that the hot glue spilling from the top and the cable hole in the back were rather unsightly, and the whole iSight Tripod Adapter had an overall low-quality feel.

Because of this I went ahead and built another this evening, putting into practice the ideas I had for various improvements. As part of building this, I took pictures of most every step along the way and added captions so that it can serve as a tutorial. So, if you are interested in a tripod mount for your iSight, be sure to give this series of photos for what I call the iSight Capsule a look. It has all the important steps for manufacture and assembly detailed in text and high resolution photos. Someone who is fairly mechanically inclined should have no problem building one based on this. It really is a simple, fairly low-cost project.

I held off for a few hours on posting this for a few hours as I debated selling them, but I just don’t feel like doing the work, and I think that everyone (in LJ and beyond) can benefit better from having the text and photos out there and available.

So, I hope everyone enjoys this, and that if you make one, it comes out well. I personally think that the iSight Capsule looks a whole lot better than the original iSight Tripod Adapter. (Old iSight Tripod Adapter · New iSight Capsule)

Enjoy this project. I know I had fun making it. To begin, just click this link and keep clicking >> to step through the pictures one at a time. Or you can just click here to hop right into a JavaScript slideshow of all the images.

I can imagine that it wouldn’t be unfair to ask $25-$30 (USD) for these. People already charge pretty steep prices for crap products (DVForge, I’m looking at you, especially after my experience with the build quality of the SightFlex), so this would work well for hand-made small lot products. For the time being, though, I’m not going to consider selling the iSight Capsule.

electronicsmaking thingsmoved from livejournal

iSight Tripod Adapter

[Crossposted to and …]


Click for more…

As a number of people who own an iSight know, there really is no easy way to mount it to a tripod. While there are a number of hacks out there for doing this (eg: 1 · 2 ), I wanted something a bit more stable. There is a commercial product sold as part of the Kaidan Accessory Kit, but that requires one to use a thin Apple FireWire cable, and those are prohibitively expensive.

This morning while laying in bed I decided that I wanted to solve this problem so I could use my iSight on a tripod. So, I came up with the idea you see above and stuck one together this afternoon. In short, it’s a piece of 3/4″ PVC, a domed cap, a 14-20 tee nut, a 3m Belkin FireWire cable, and some hot melt glue. The PVC and hot melt glue were just laying around the basement, and I had originally purchased ten of the 3m FireWire cables on eBay about two years ago for $20 shipped. The tee nut cost $0.25/ea at Home Depot (read: overpriced) when purchased four at a time in a small plastic bag. PVC is cheap, so for a total of less than US$5 and about an hour’s worth of planning and building (and waiting for the glue to cool) I had the adapter.

There’s a good bit of room for improvement. If I were to make another, the first thing I’d change is the hot melt glue. While it works well, it’s hard to control. I’d try to find a way to apply it more smoothly, or I may dump it for a very thick epoxy. Second is the large hole cut in the back. I’d instead cut a slot and run the cable up through that, hiding all of the slot beneath the cap, leaving only a bit at the top where the cable comes out. It might also have been nice to use a cap on the top as well, with a simple cut-out for the FireWire connector. This may also allow me to use less hot melt glue / epoxy overall.

Hopefully people will find this useful. I know the iSight isn’t anything new, but being able to finally point it wherever I want and having a reasonably long cable should be extremely useful.

I’ve got a few more pictures up here which should be useful if anyone here wants to build one for themselves, or if you just want to look around:

· The iSight tripod adapter and cable.
· Detail of the back of the adapter.
· The bottom of the adapter showing how the tee nut is mounted inside the PVC cap.
· The FireWire connector end of the iSight tripod adapter.
· A tee nut, just like the one used in the adapter.
· My iSight mounted on the tripod adapter.

electronicsmaking thingsmoved from livejournal

·····


Click for huuuuuge…

To satisfy my desire to make something tonight, I pieced together some component video cables for a coworker. This is two sets of cables, one 18″ and the other 36″. The connectors are Neutrik NY352G’s and the cable is Belden 9259 copper shield / copper core / polyethylene foam coax. Heatshrink is random 3M stuff, and all parts were purchased from Parts Express, except the cable which is from the local Anixter location.

Off the top of my head I figure these cost about US$25 total to make plus about two hours of time. I’d put quality up there against the best commercially available component video cables.

And, it’s fun and gave me something to do.

Oh, I know the heat shrink looks like butt, but I didn’t take the time to trim the edges of it perfectly, and being adhesive-lined leaves gunk. Also, as the metal shells of the connectors heat, they keep shrinking the tubing long after I remove the heat, so some continue shrinking long after the heat gun is removed. This doesn’t matter, though, as all the solder points are dead on, and the heat shrink tubing is just there to look pretty, keep the connector together, and provide strain relief.

Yeah, I’m done babbling about cables now. Time to water the plants. Oh, that reminds me… New flower photos here and here and here. Yes, I know that the pansies are starting to look like butt. They’ve grown, but there are fewer flowers. Maybe there’ll be more flowers in a month or so. :(

electronicsmaking thingsmoved from livejournal