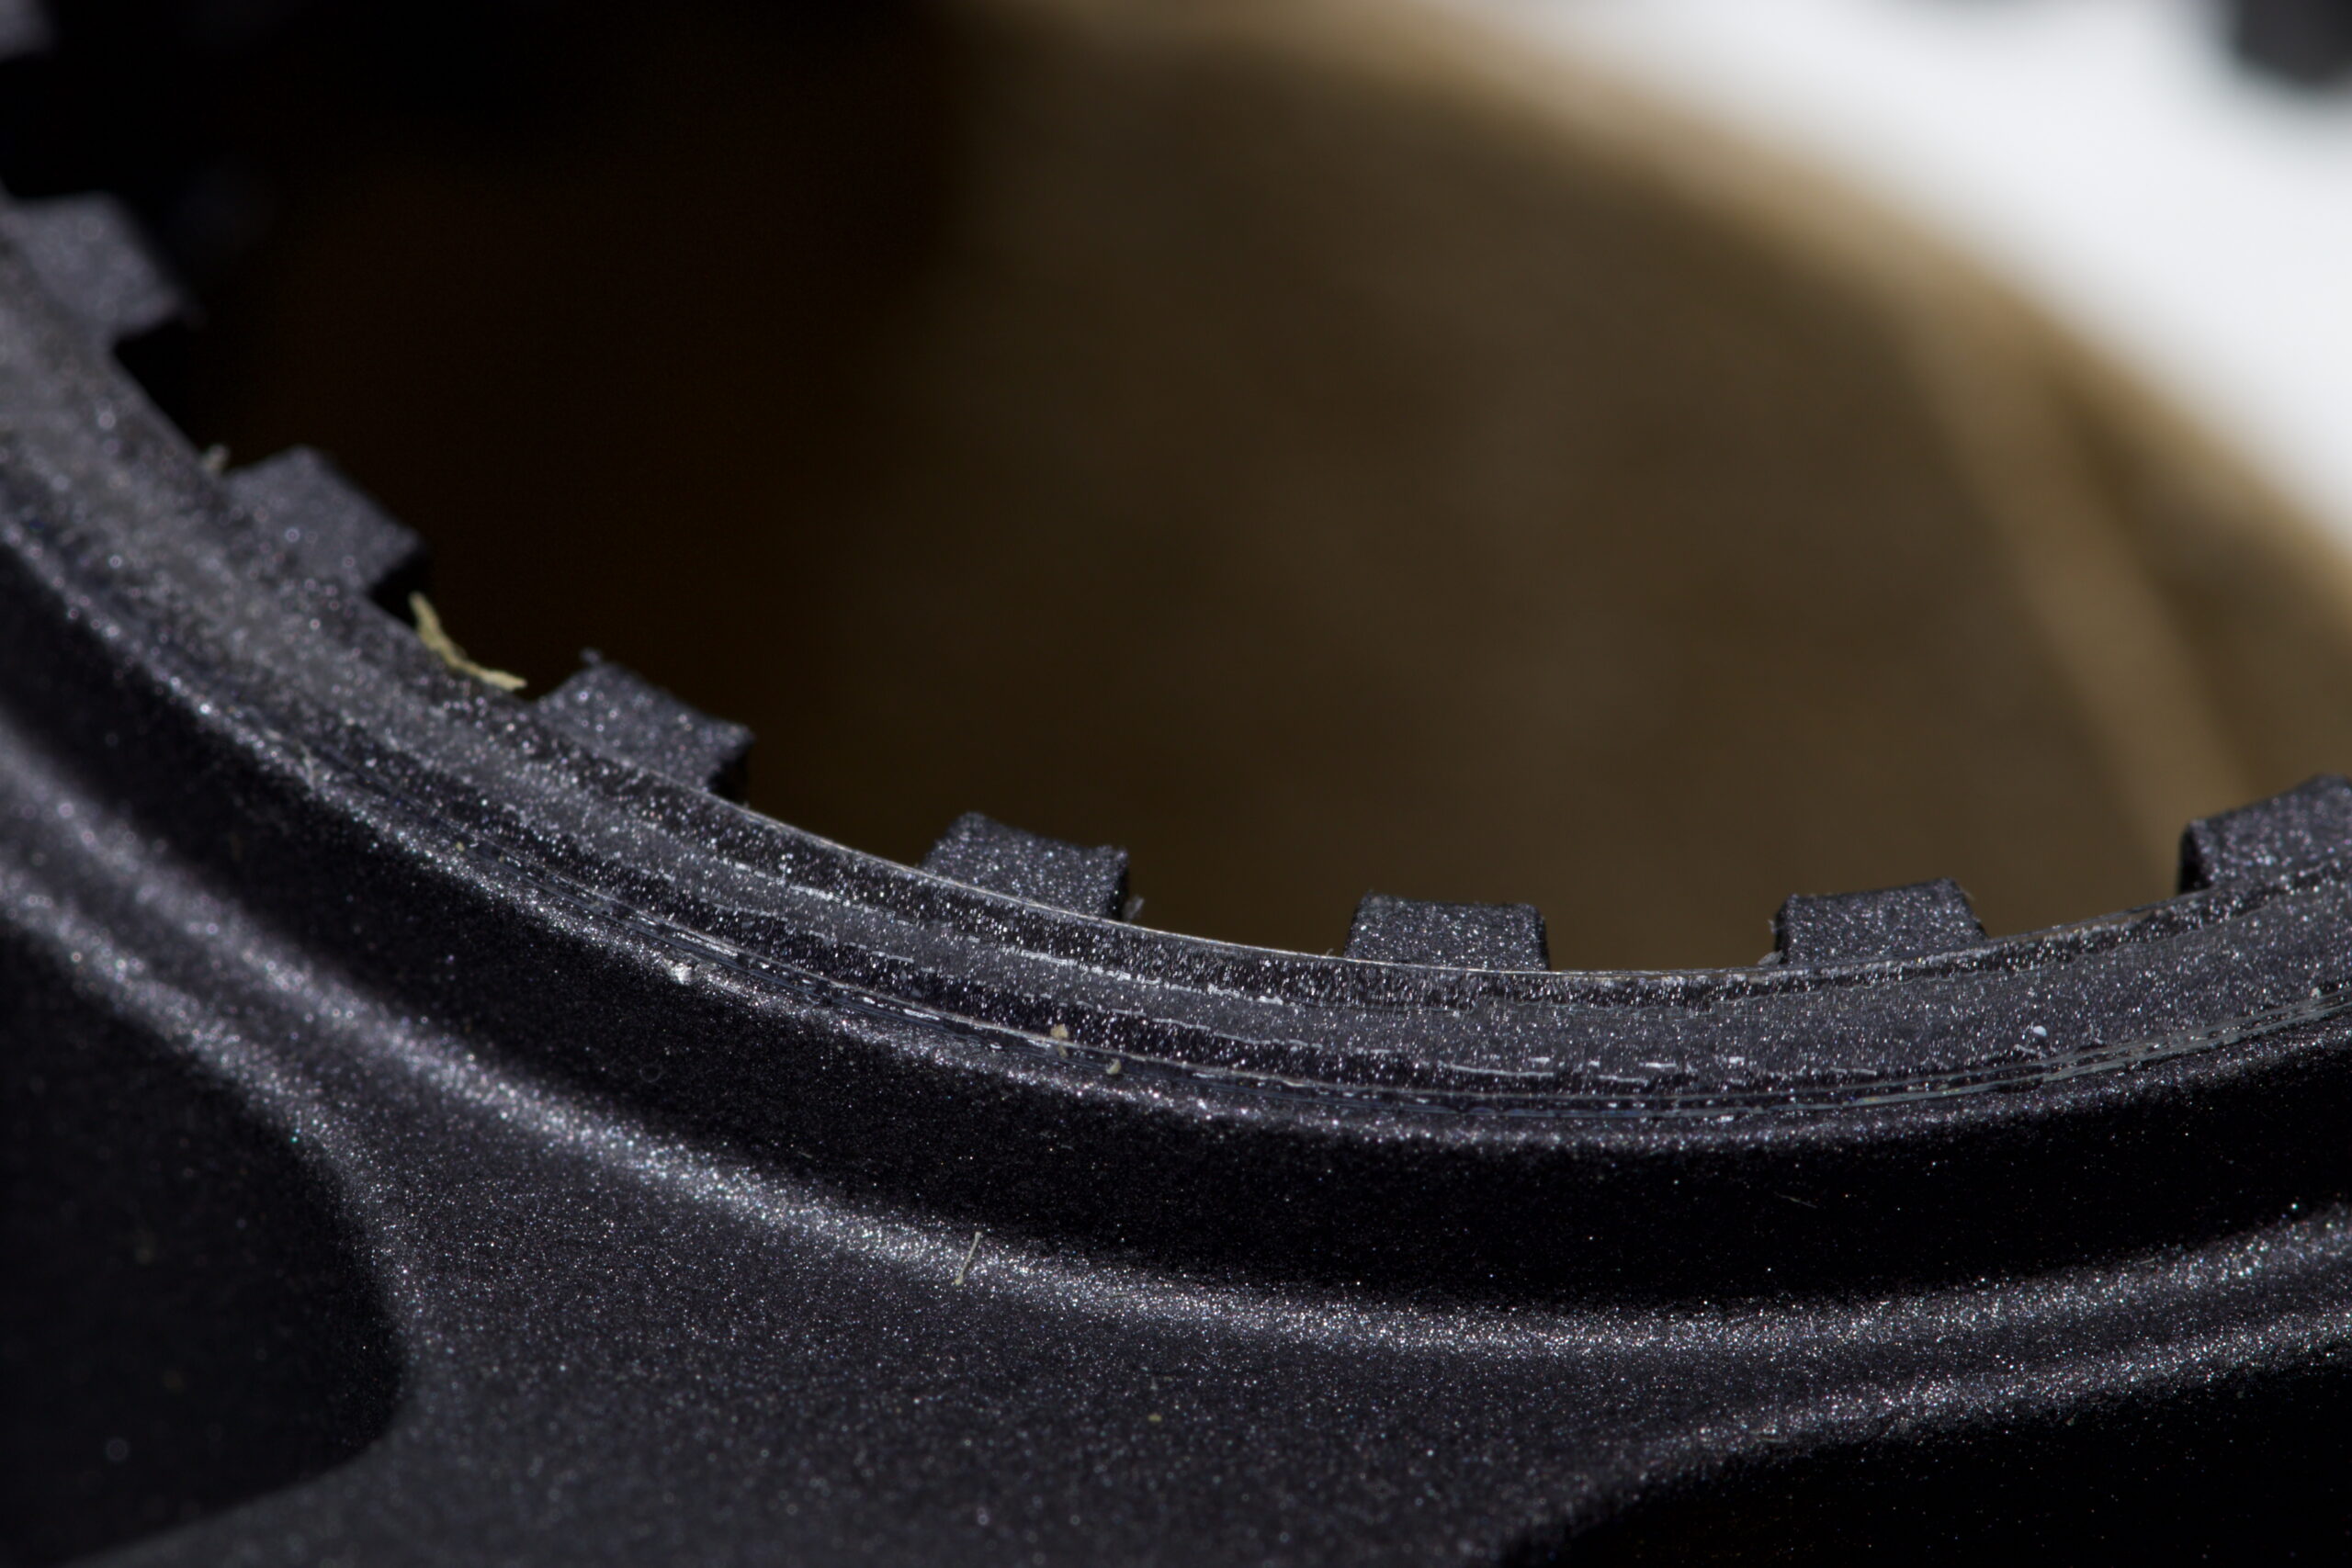
UHMW PE replacement ring applied to a CS-M8100-12 cassette.
Stock Y0GX01500 on a CS-M8100-12 cassette.
Many Shimano cassettes, such as the CS-M8100 (XT, 12 speed) have a thin adhesive ring (part number Y0GX01500) on the back side, where it sits against the Microspline freehub body.
Unfortunately, these can easily be lost as they tend to stay on the freehub body when removing the cassette. Which is exactly what happened when I sent the NOBL wheels from my Mach 4 SL‘s in for a warranty rim replacement. Some folks advocate for removing them, believing them to cause cassette wobble, but the main purpose seems to be eliminating noise and fretting between the cassette and freehub bodies.
Since I don’t like bike noises, I wanted another. They can be bought online for something like $9/ea before shipping, but that seems like a lot… So a better solution? Make one!
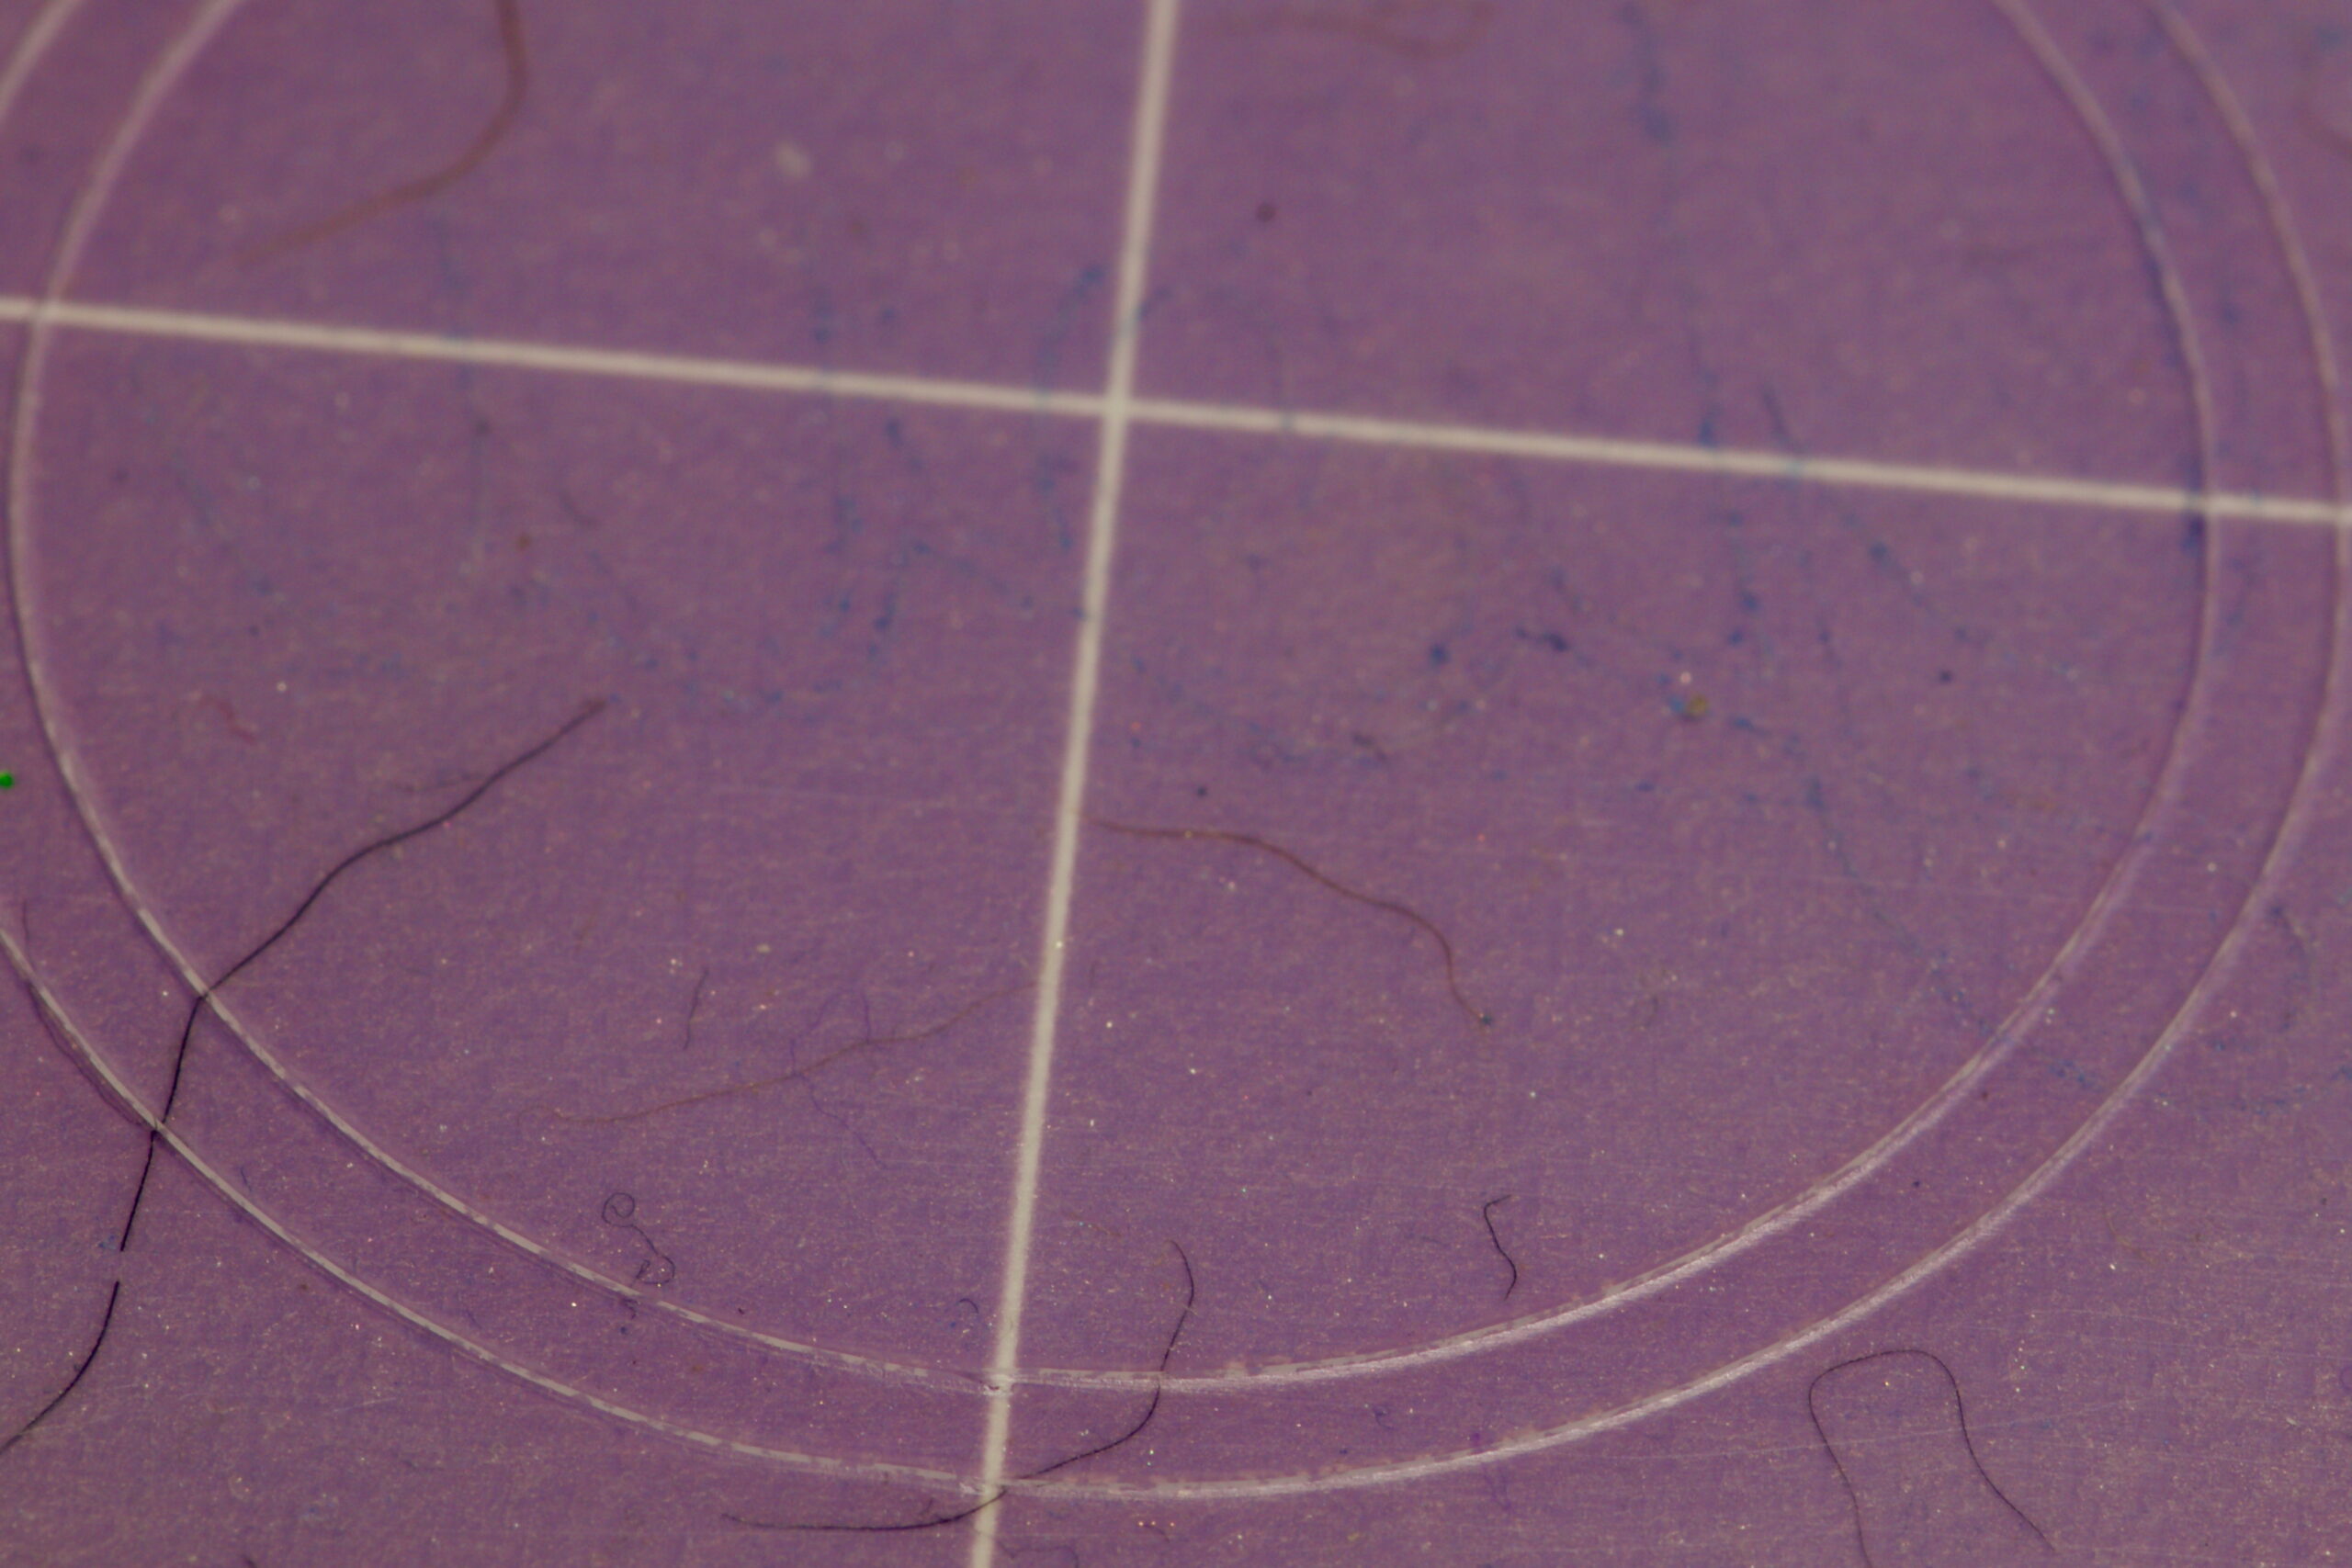
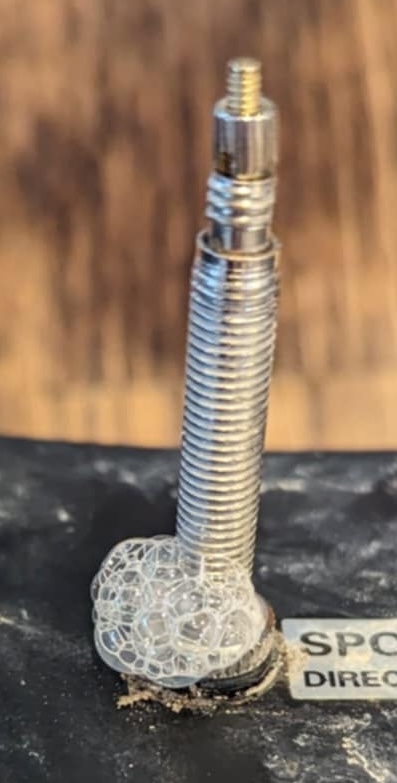
37mm x 33mm ring cut from UHMW PE on a Cricut.
Measuring a new ring on a spare cassette showed it to be 37mm OD x 33m ID, roughly 0.2mm thick. I have some 0.0115″ / ~0.29mm (Ultra High Molecular Weight Polyethylene (UHMW PE) tape from McMaster-Carr (part 76445A764) that I use for rub on bike frames, so that seems perfect. Kristen cut a ring out with her Cricut (with a Deep Point Blade, set to “thin cardboard”), I stuck it to the cassette, and that was that. Much better than spending $9 and waiting for it to arrive.
I had originally tried to print one with PETG filament, but when the first of two broke coming off the build plate I figured it probably wasn’t the right material and would come apart under load, leading to a loose cassette, noise, etc. UHMW PE tape is very malleable and often used to stop noise between rubbing parts, so it seemed like the better choice.
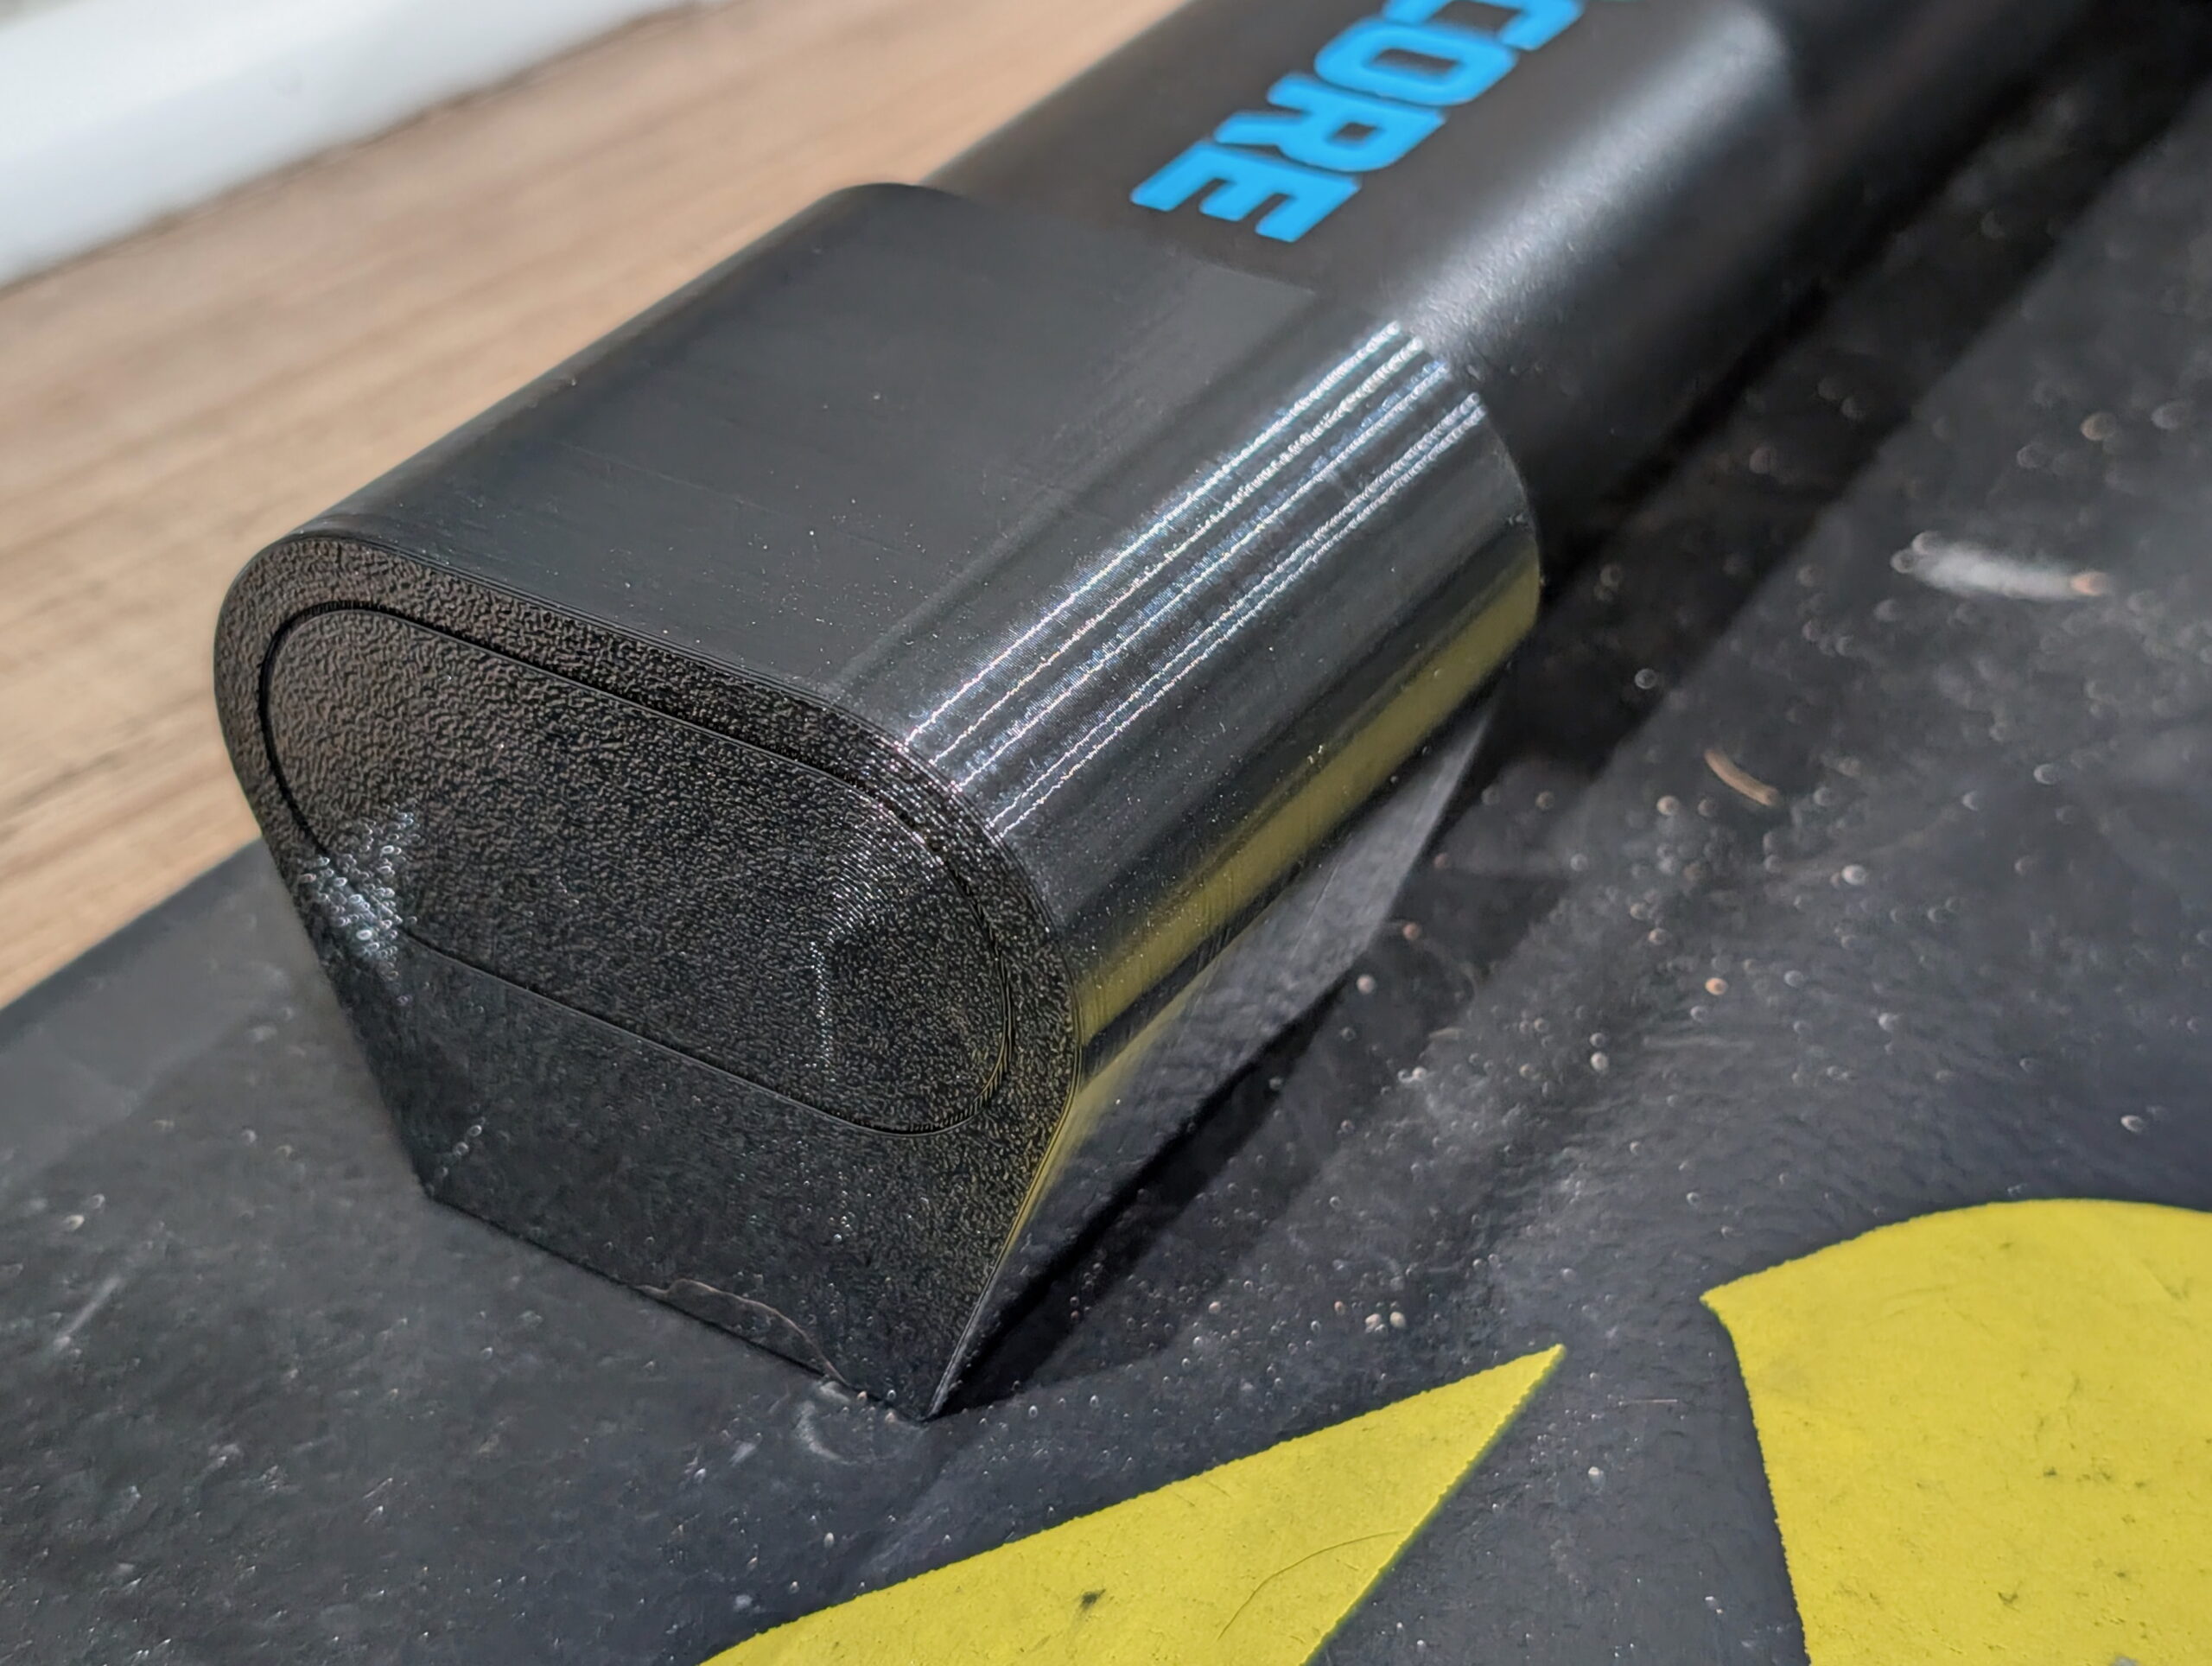
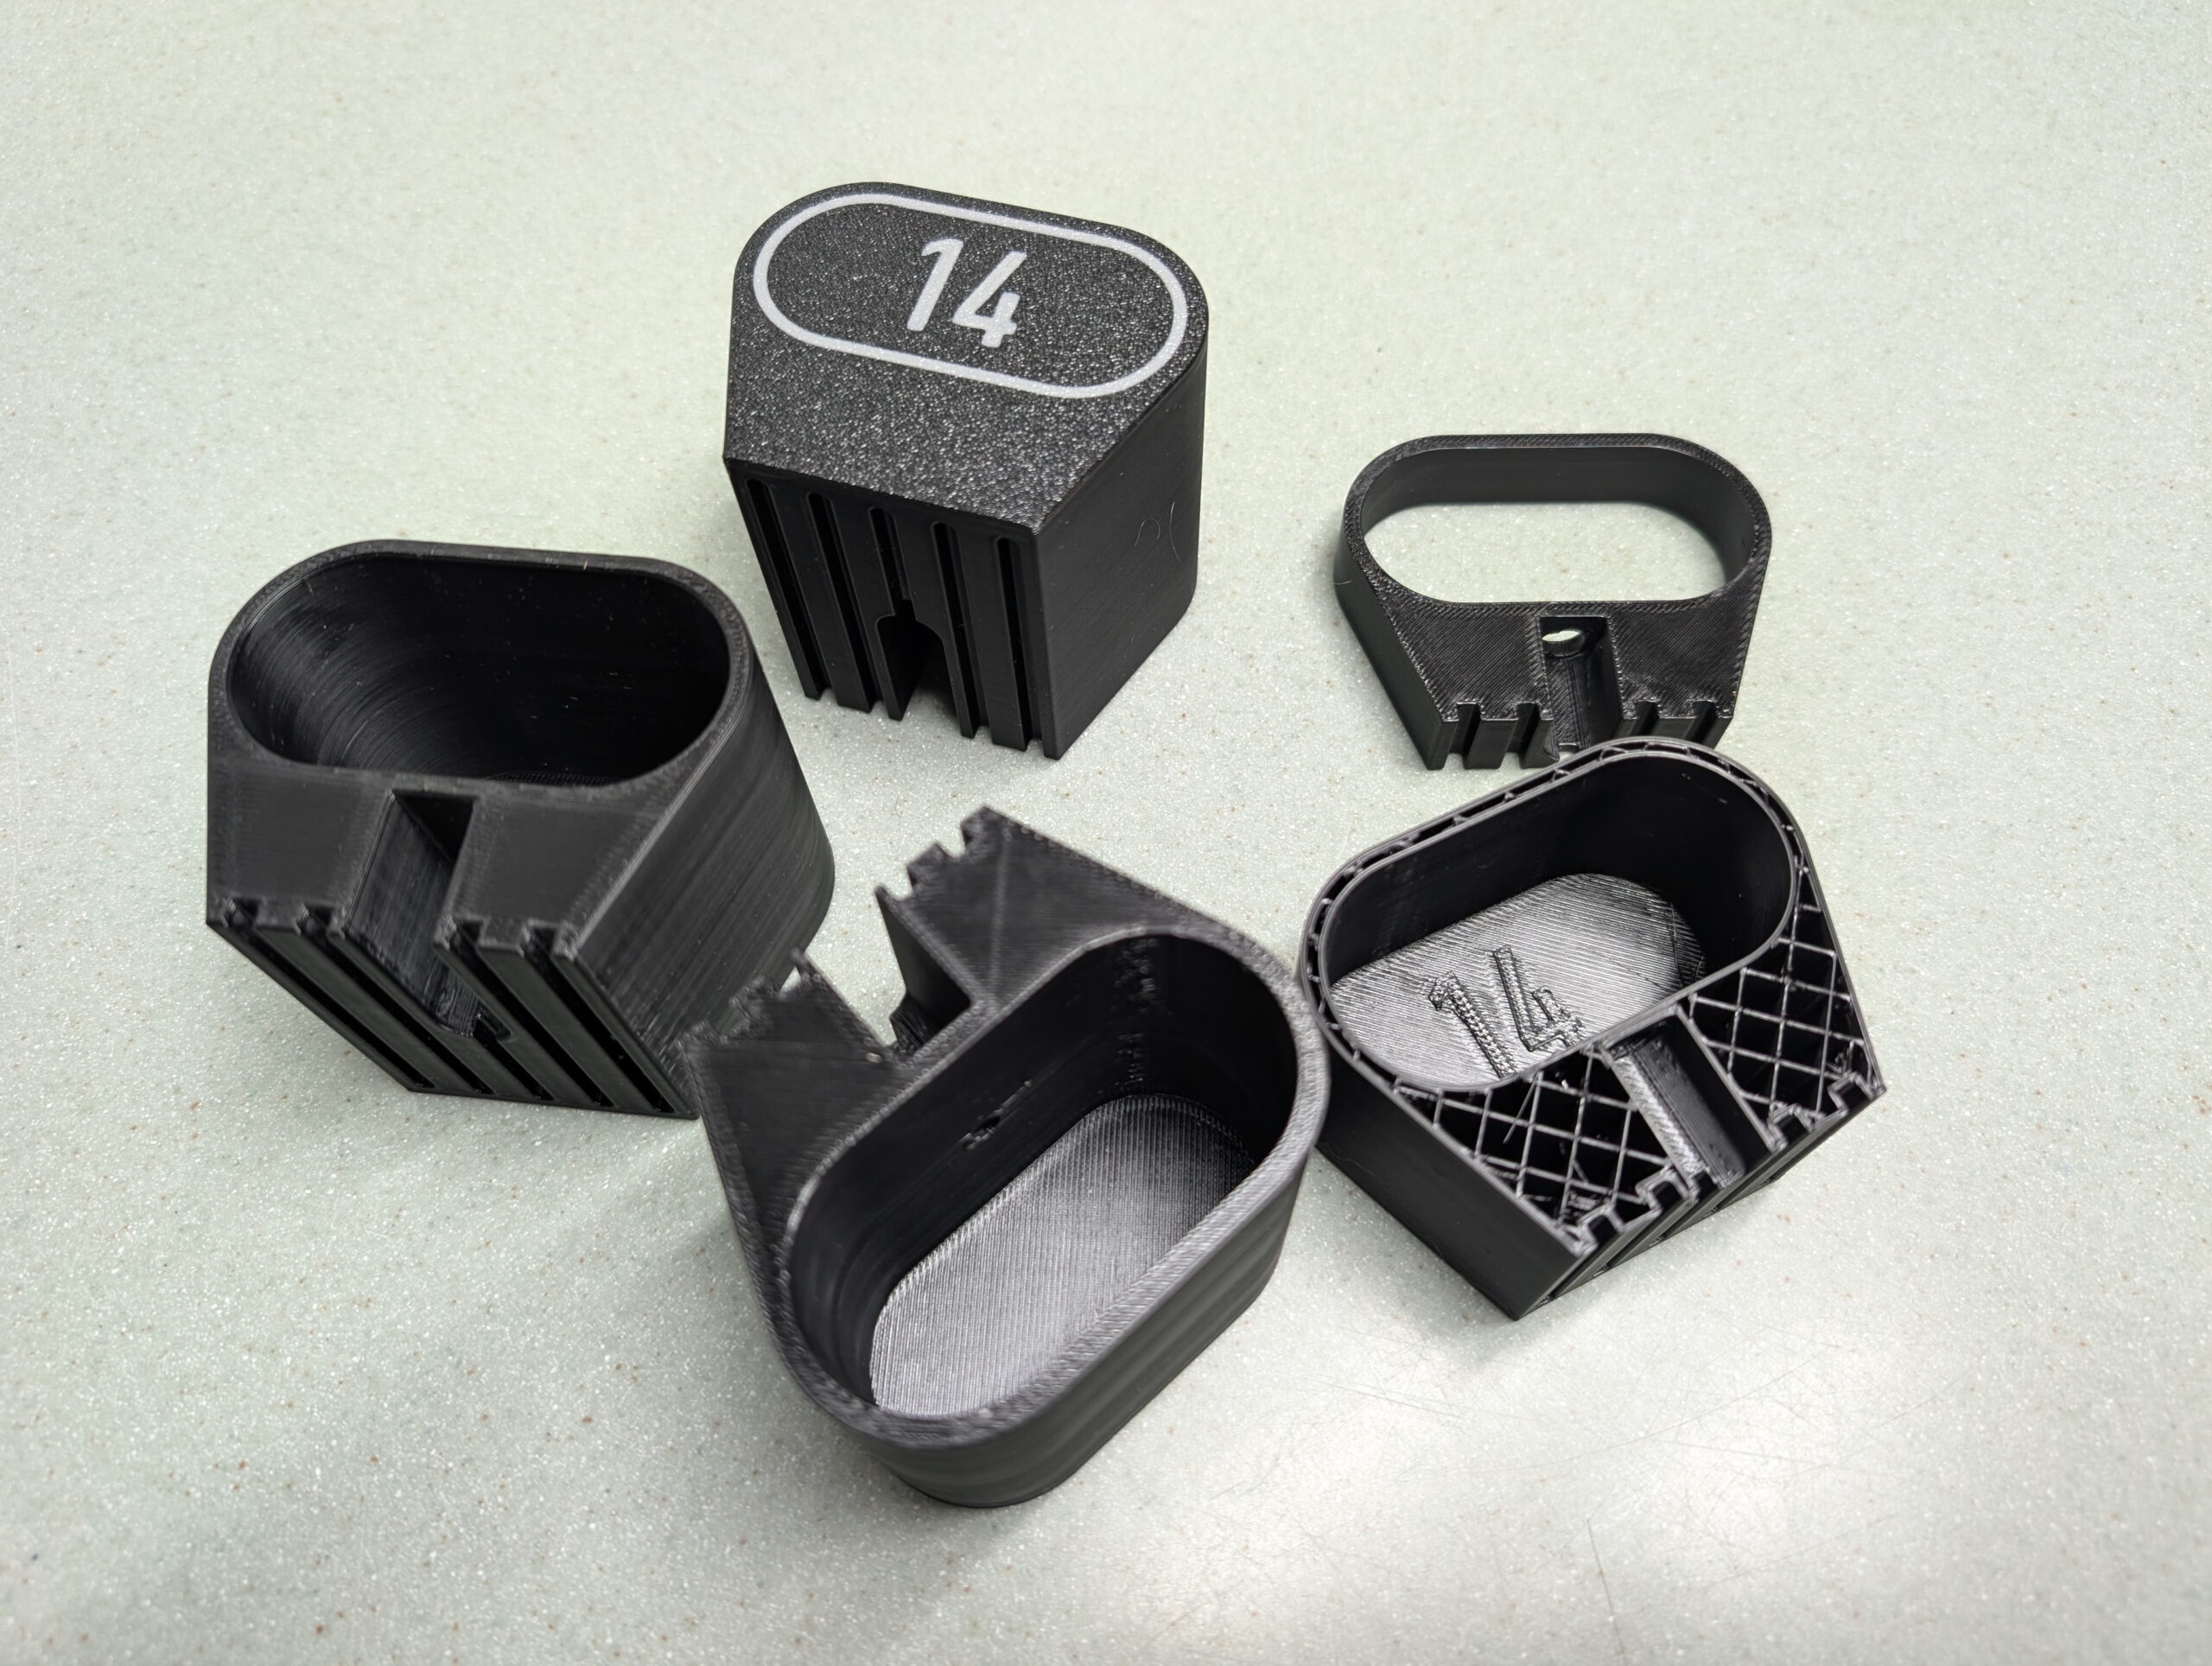
+14mm custom-made riser foot on my Wahoo KICKR CORE 2.
The Problem and Solution
My new trainer, a Wahoo KICKR CORE 2, has the rear axle that’s ~322mm above the floor. With anything larger than a 700c x 25mm front tire this puts the front wheel higher off the ground, which screws with the bike’s geometry including the all-important saddle position. After a bit of measuring I found that raising the trainer ~14mm would make things level on our floor, and having a 3D printer and a wee bit of design skill, I decided to make replacement feet that’d put it at the height I wanted.
This is the result, 3D printable feet which replace the stock rubber ones, securing in place with the same set screws, and can be printed in whichever height is needed.
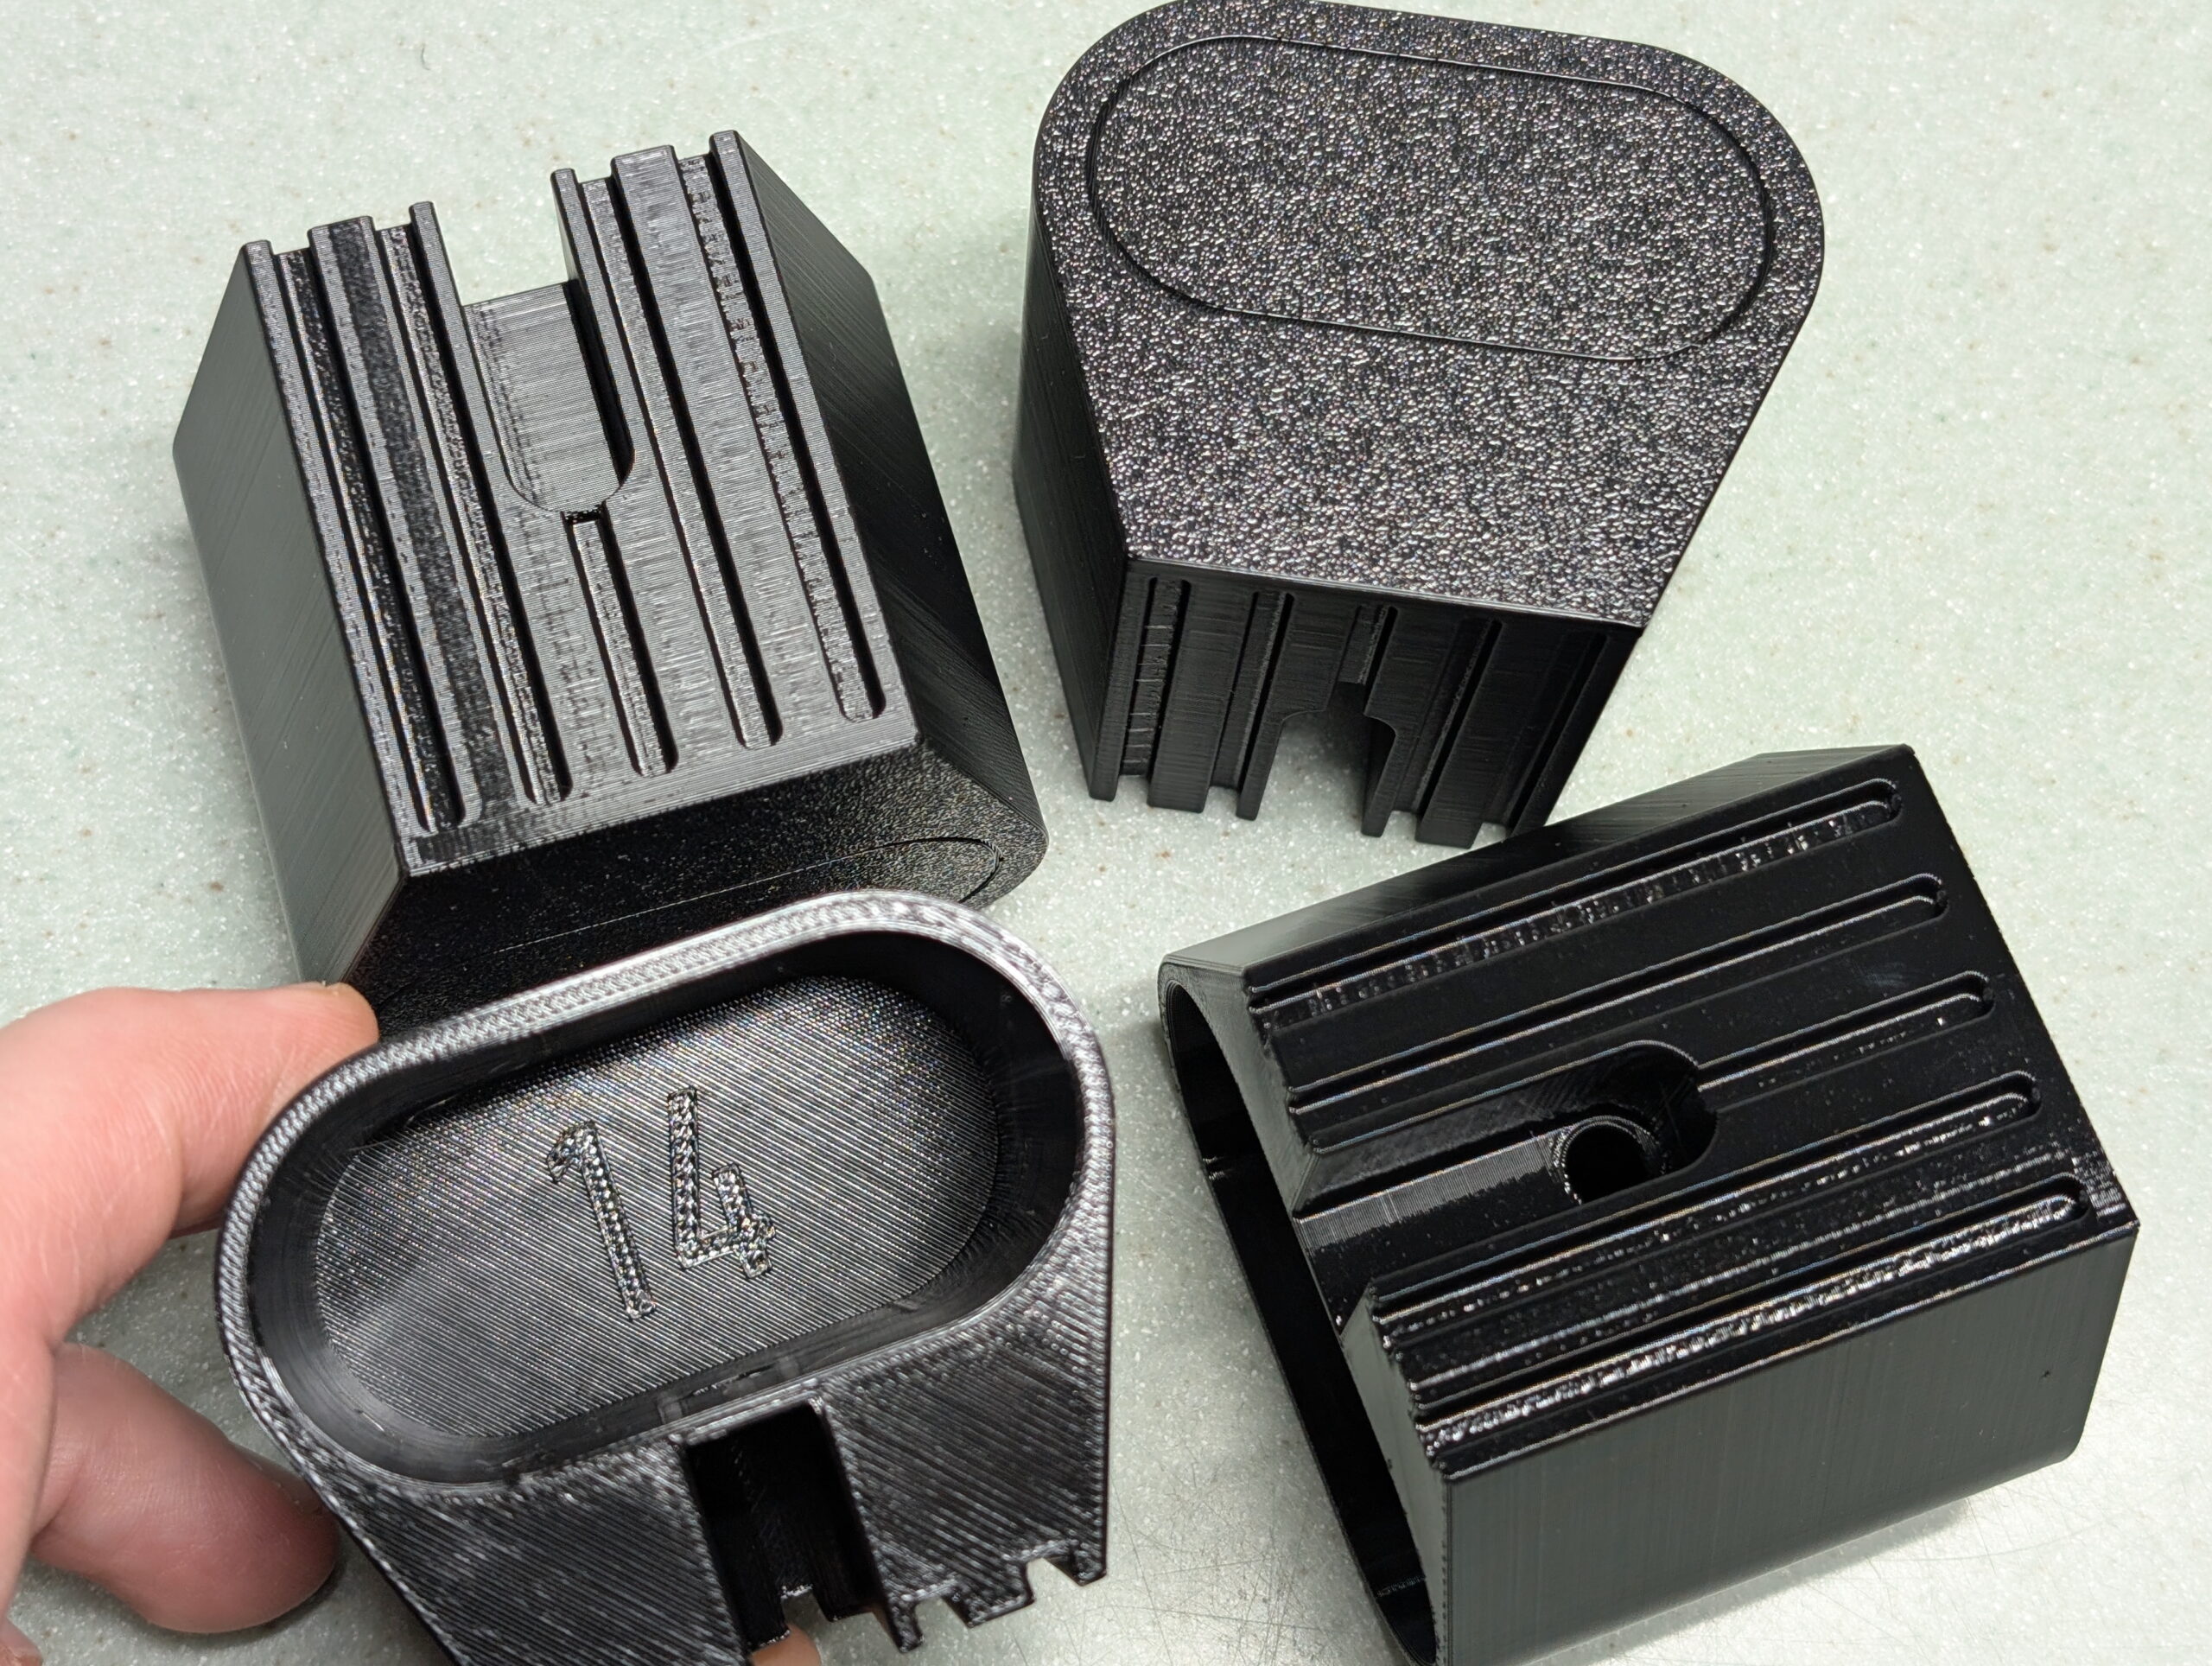
Final prints of the four riser feet for my trainer.
You can find the .STL files for +5mm to +50mm in 5mm steps, a Bambu Studio project containing all the sizes, and a parametric Autodesk Fusion project allowing you to generate your own custom height riser feet. (Just change liftAdditional.)
This is all licensed CC BY-NC so one can make them, change the design, whichever… You just can’t sell them:
(If you really do want to sell them, email me and we’ll work something out.)
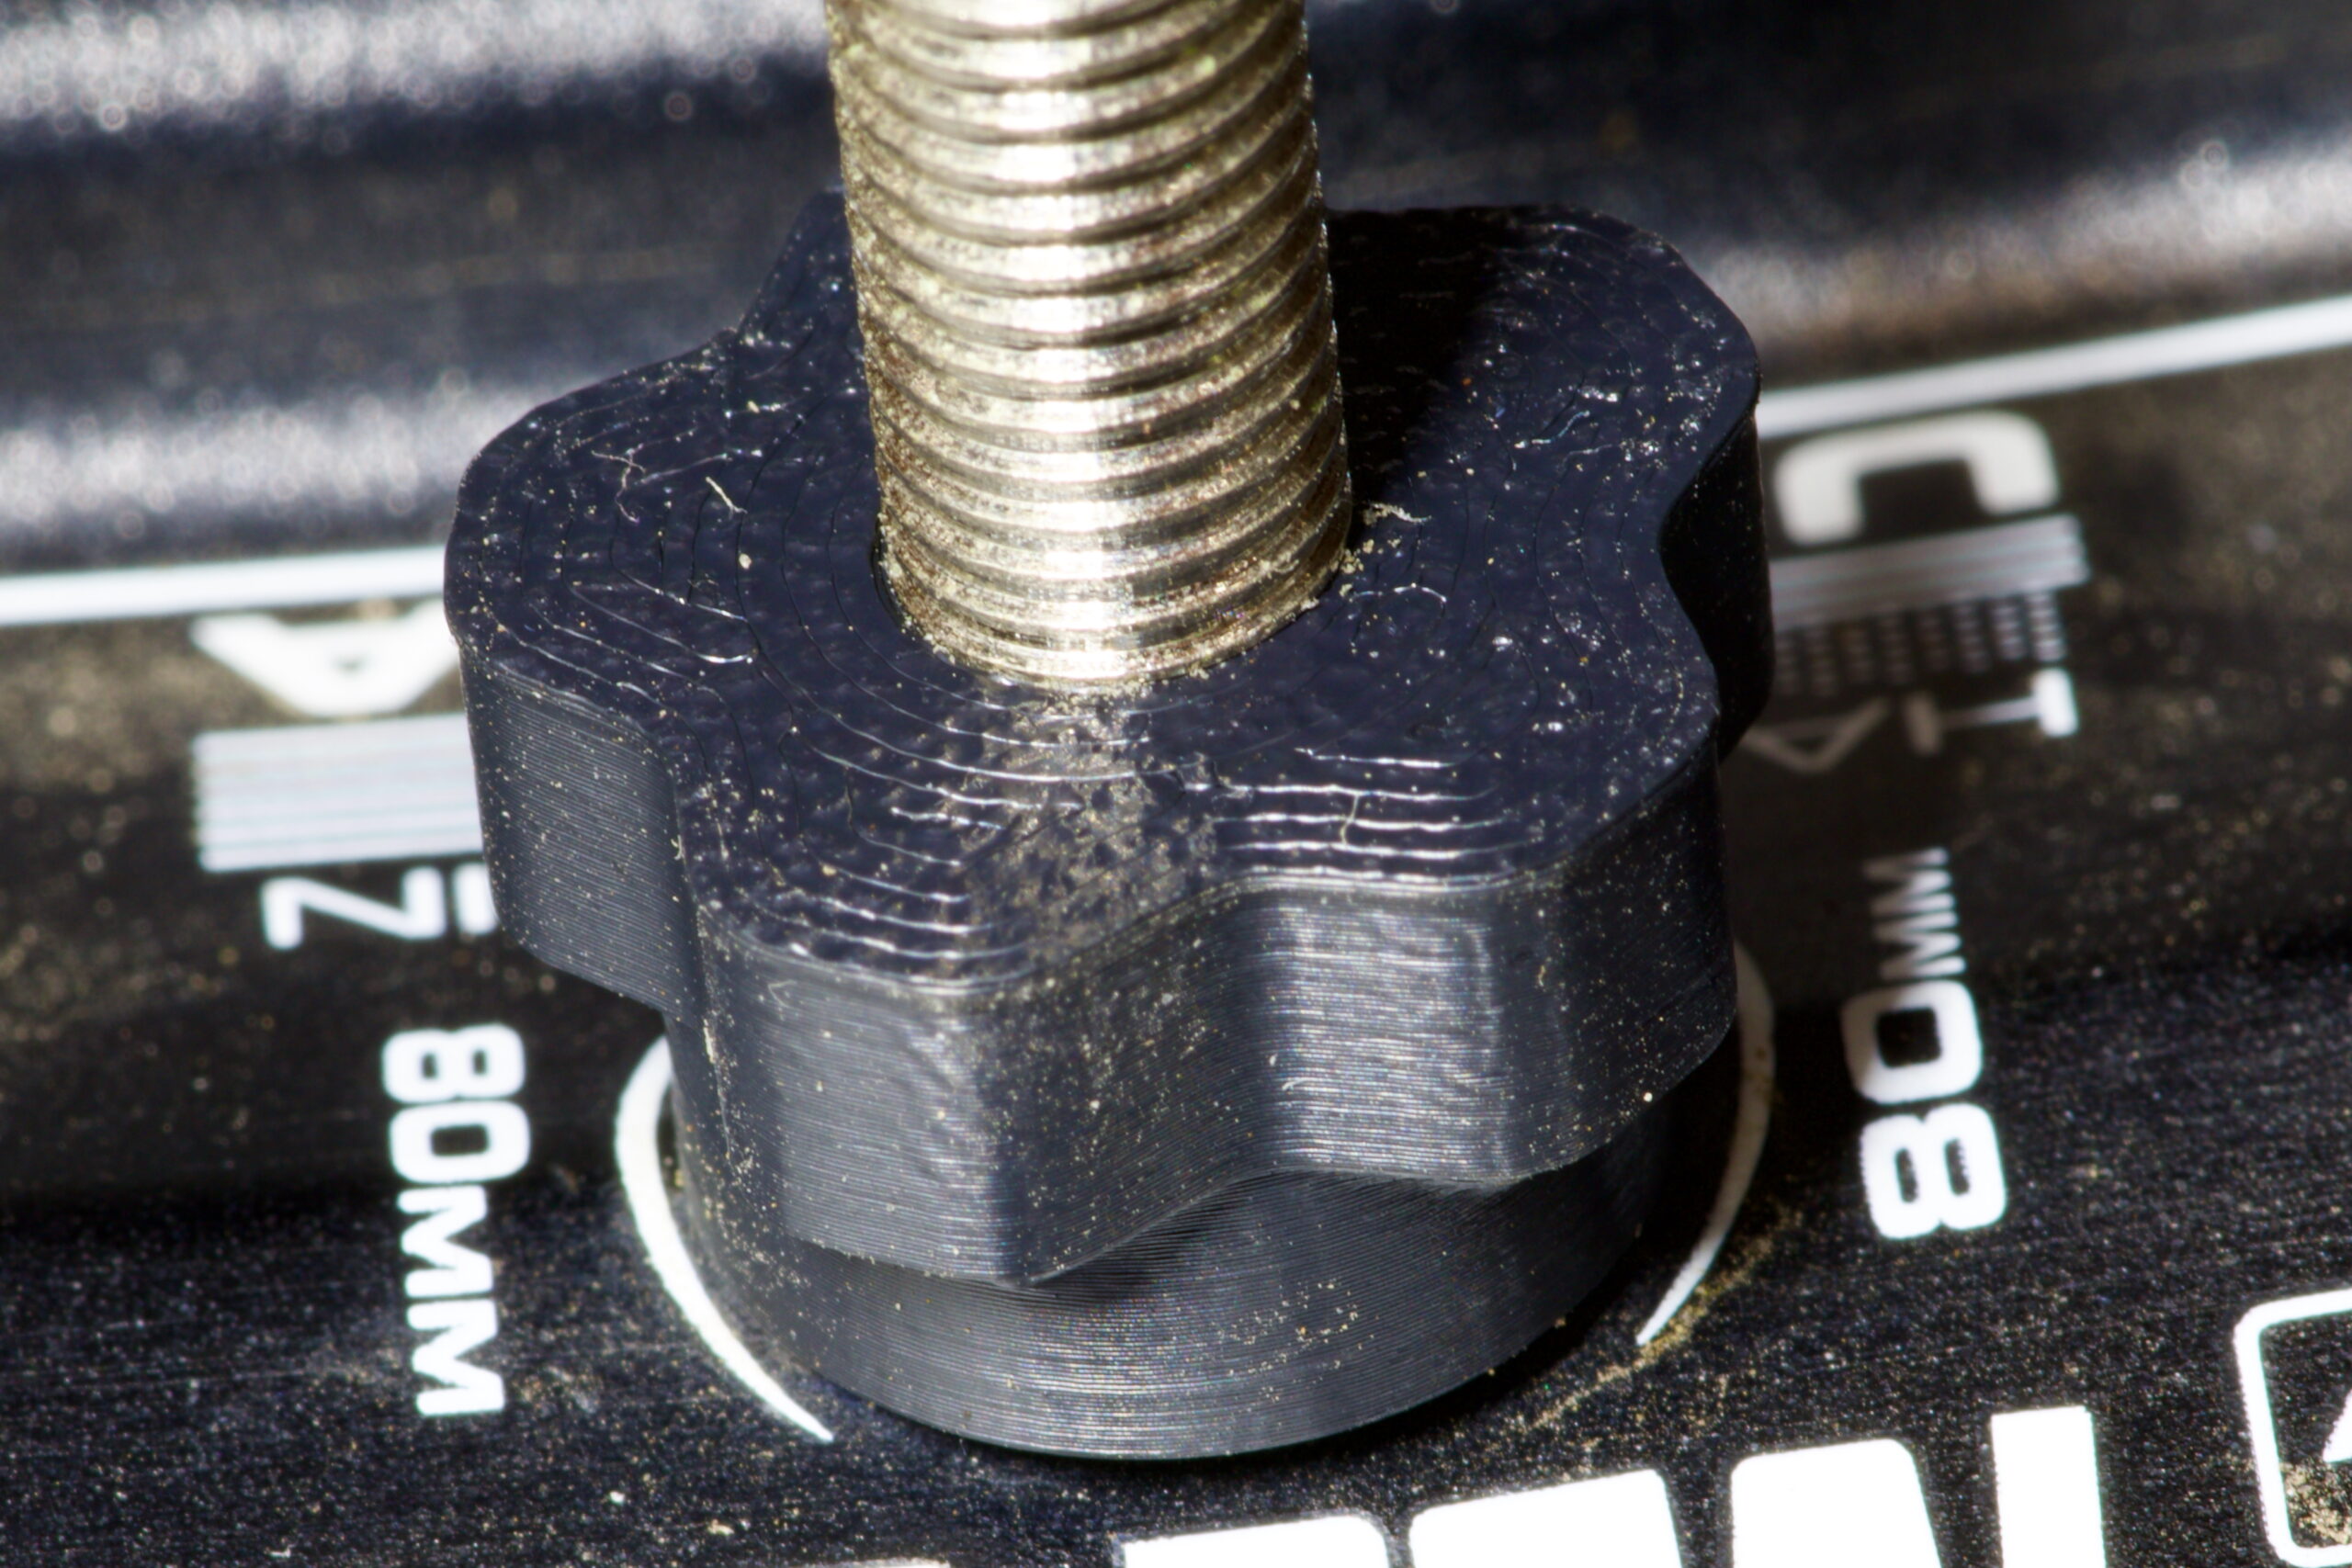
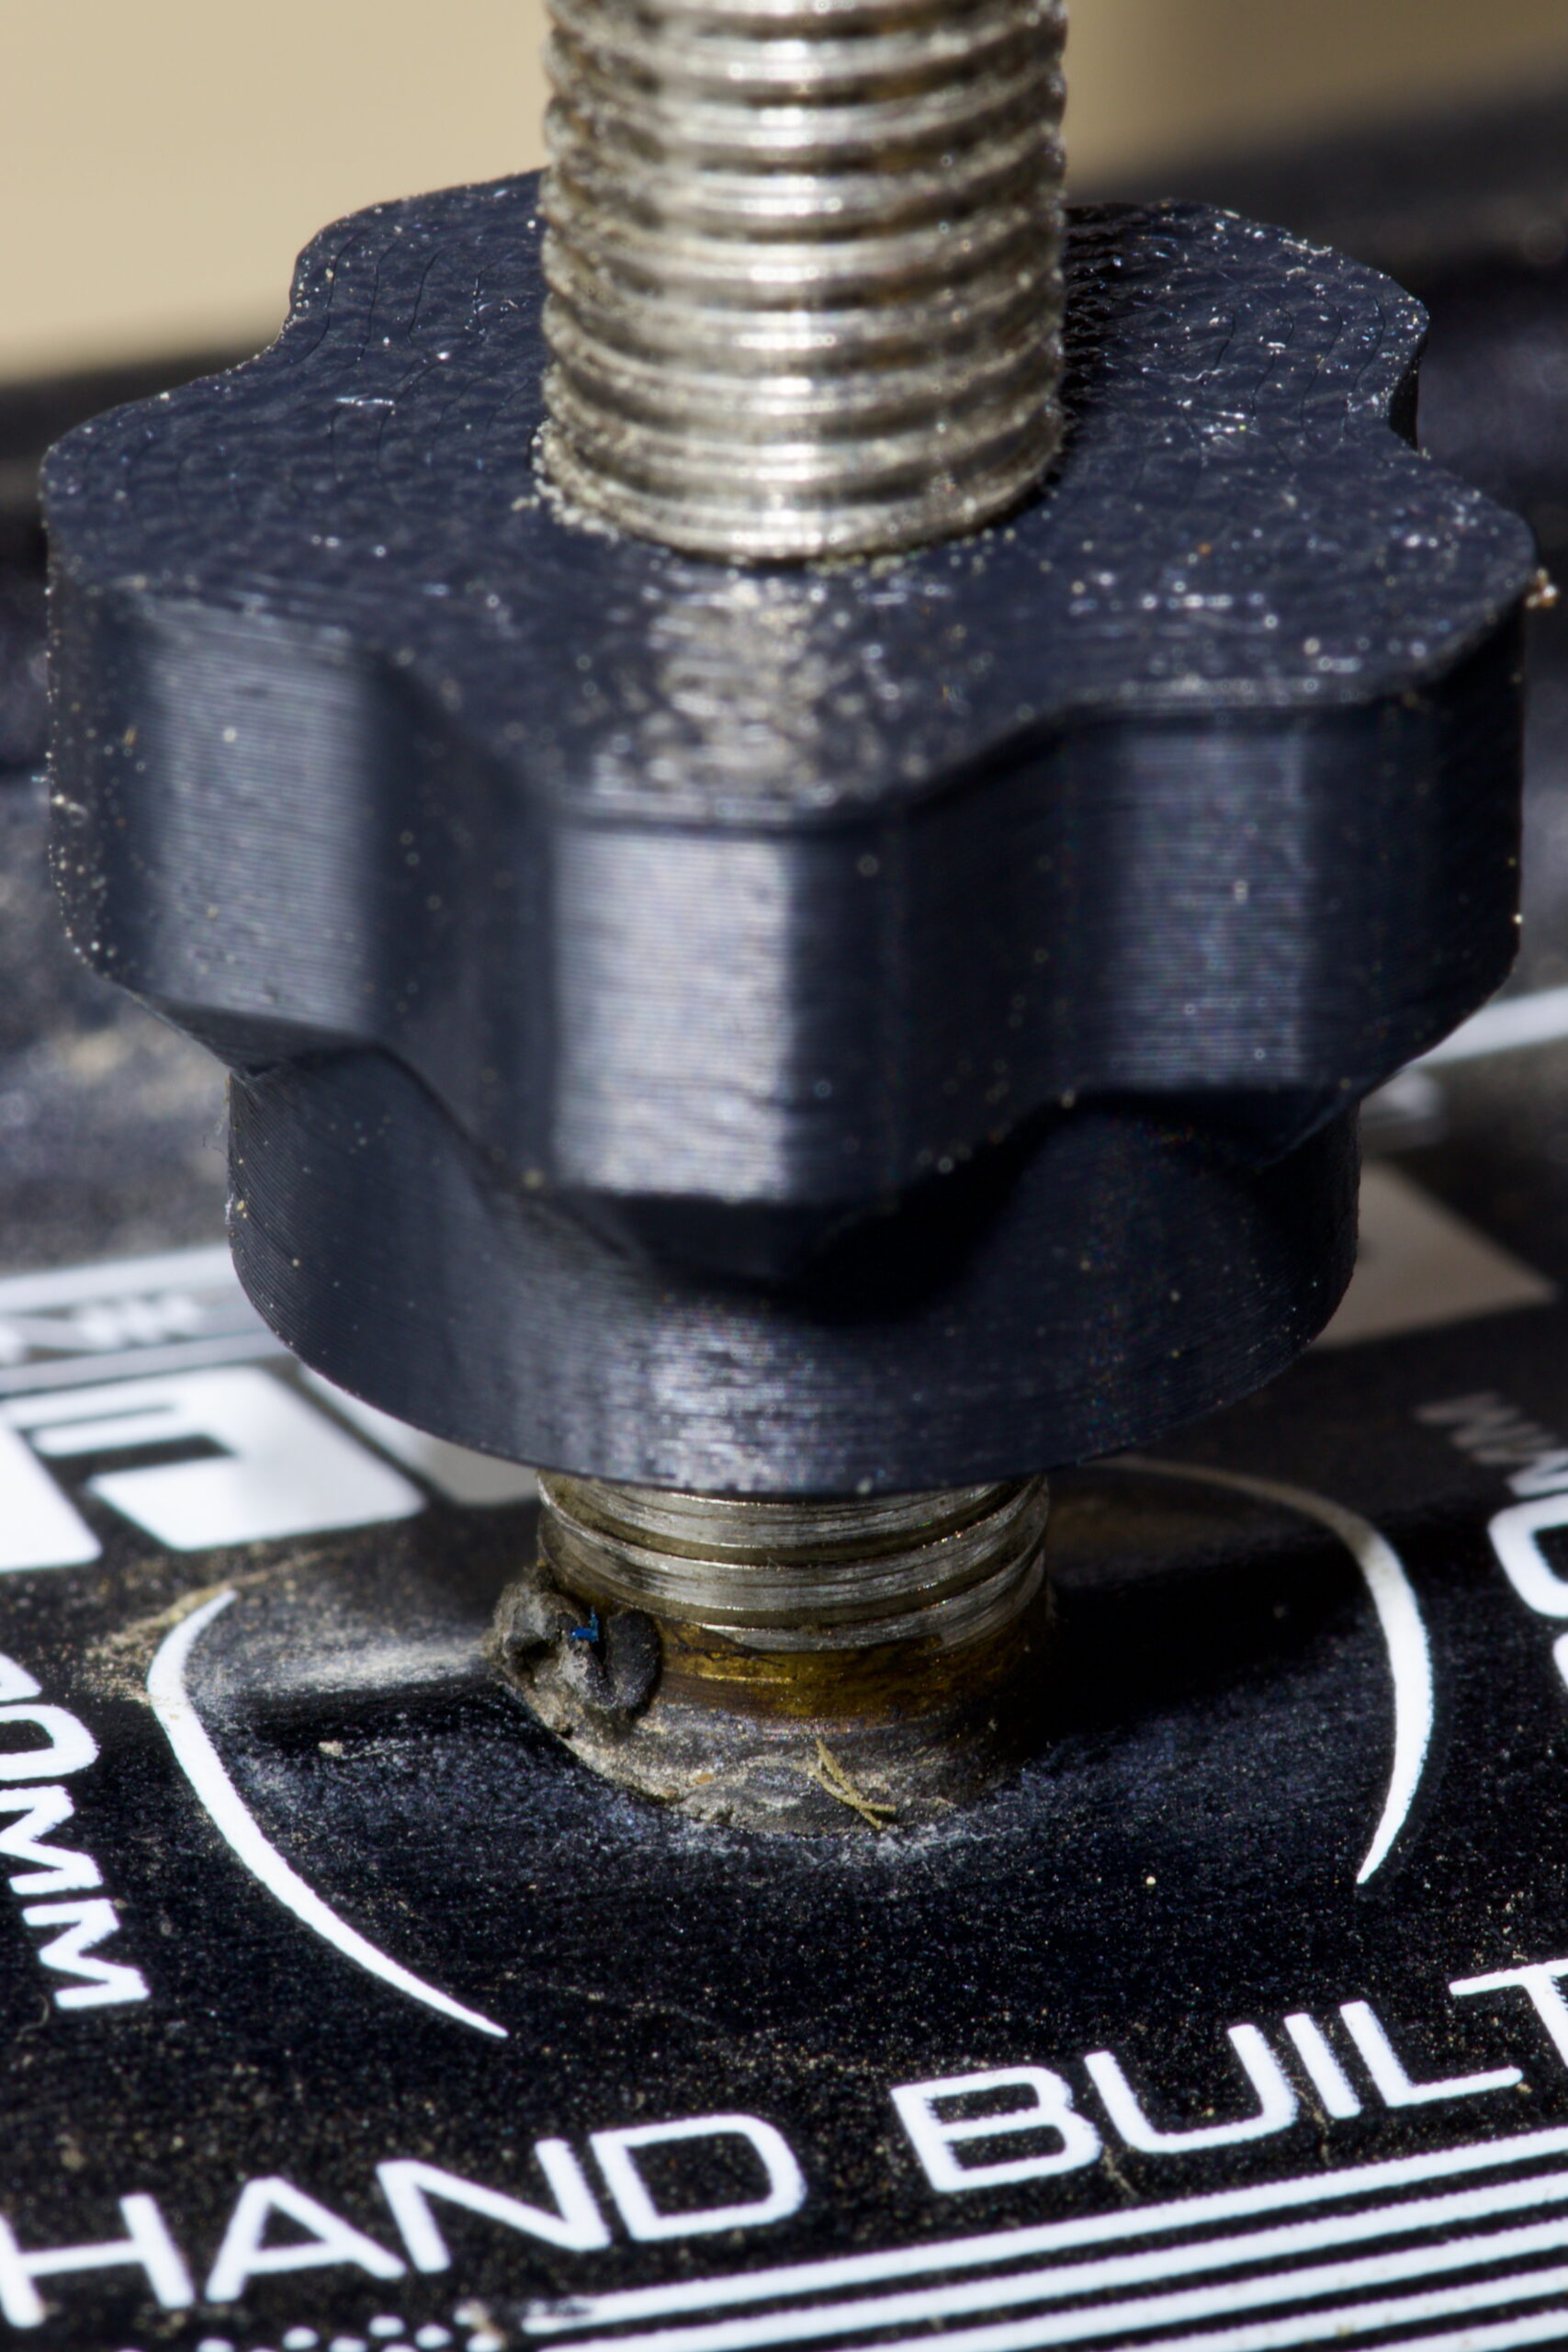
These printed wonderfully using Overture PETG at slow print speeds (50mm/sec) in a Bambu Lab P1S with all fans off and temperatures on the high end of the specified ranges. (I am curious how TPU would work out for printing these as it should be more rubber-like…)
Design Lessons
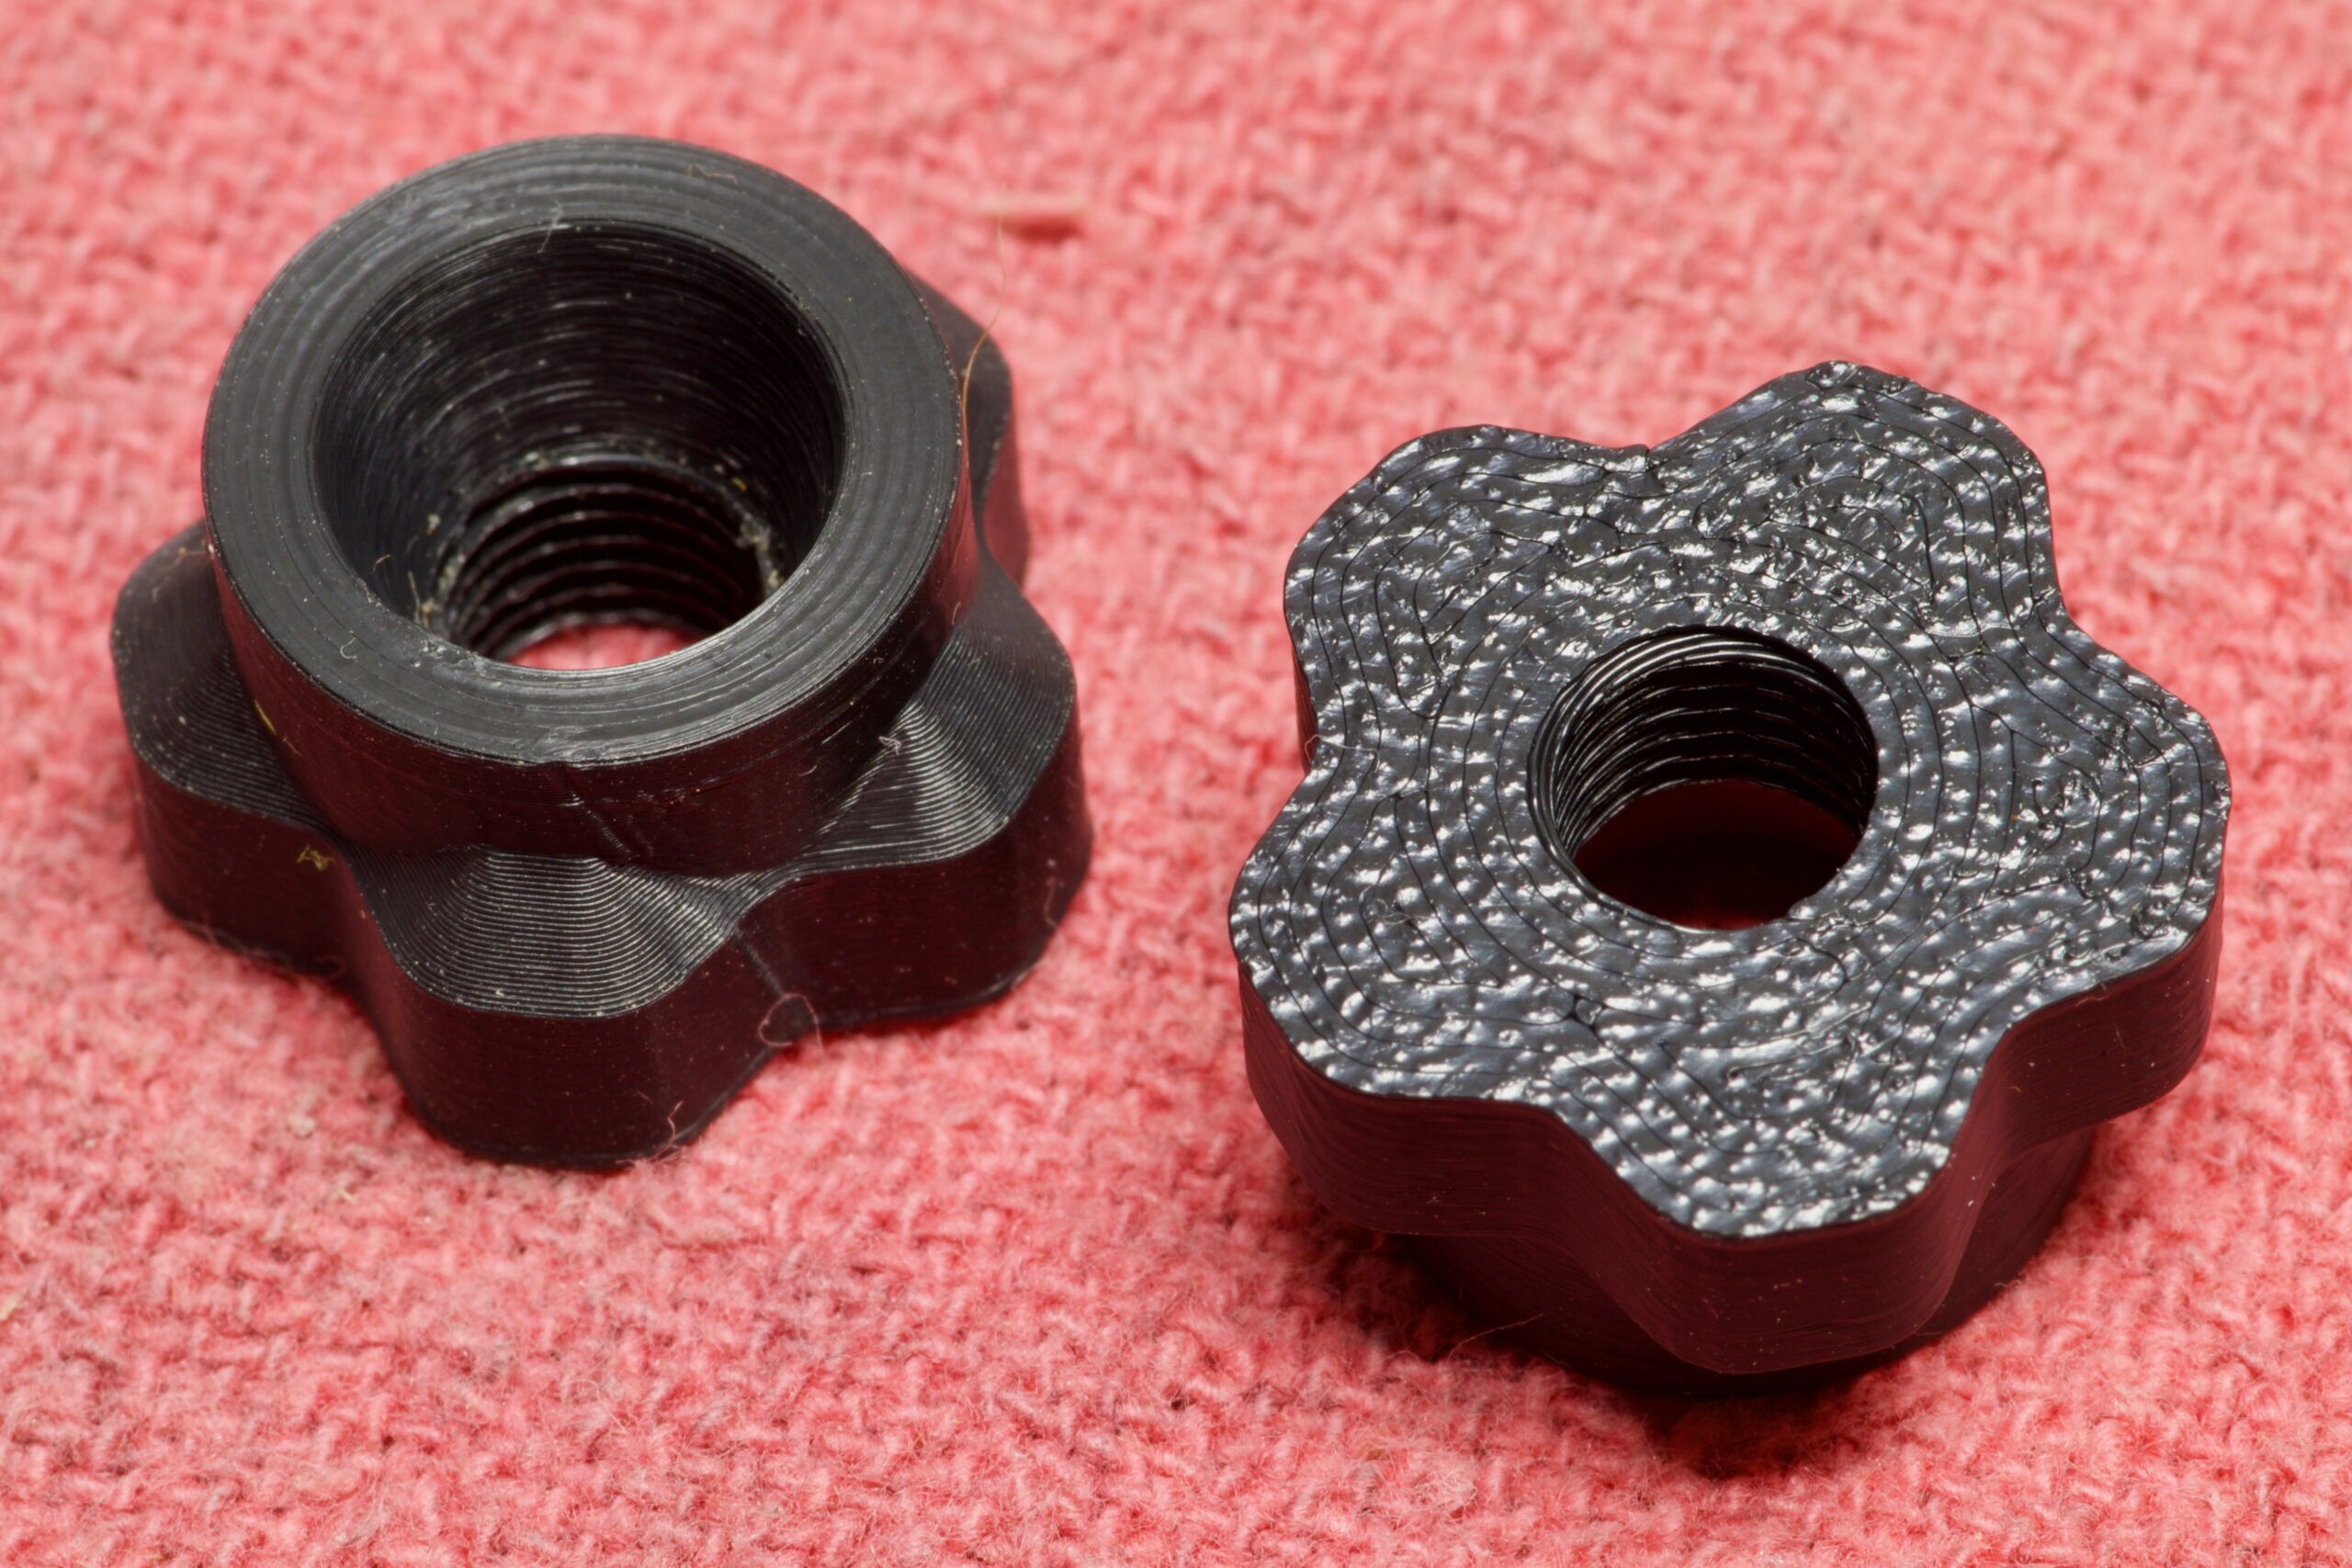
Development prints, including tests of screw hole size and size indicator types.
The main point of this post is to document a few things I learned while designing this. Big, big thanks to my friend Jake Drews — who sells a number of similar products on Etsy as Cycl3dCo — for talking through some design ideas with me.
So what did I learn?
I wanted to have parametric text on the bottom of the printed surface to show the lift. After experimenting with a second color for style and indication — which was not a great way to go — I settled on using a groove for design, and wanted a single line font as a similar groove. (These print well, akin to a 45° chamfer.) It turns out that single line fonts in Fusion need to be exploded before they can be swept to make a groove. Exploding a font makes it no-longer parametrically controlled.
The simpler solution ended up being putting the height inside the leg as 0.5mm raised text, sized to sit inside the tube of the leg, and leaving the groove on the outside as a decorative feature. After all, one doesn’t need to see the height all the time, but it is good to have the parts marked. This works out better all around. Leaving the end just blank looked boring.
If you can avoid multi-color printing, it’s probably better, as it’s less wasteful, many people don’t have multi-color printing setups, etc.
Adding an inset of 0.01mm will make it easy to color in the slicer (OrcaSlicer or Bambu Studio), but if not colored, is small enough that it’ll be ignored by the slicer. This is a good way to make optionally-multi-colored designs. (Note that my final design didn’t use this, but it’s a good-to-remember technique.)
New trainers?
A few months back there was a great sale on the Wahoo KICKR CORE 2 trainers, and while Kristen and I had some problems with Wahoo in the past, the price was low and the new features would solve some problems, so we both decided to buy them. Specifically:
Wi-Fi Connection / Kickr BRIDGE: Kristen and I both use an Apple TV (ATV) for Zwift, and the number of Bluetooth (BT) connections on the ATV is limited to two. This meant we could use Trainer + Cadence, or Trainer + Heart Rate Sensor (HR), or Trainer + AirPods. All very limiting. With the CORE 2 it can communicate via Wi-Fi and also bundle the HR data in, freeing up the ATV’s BT channels for other things, such as the Zwift Click controllers and AirPods. It also feels more reliable, and has been very nice.
Virtual Shifting / Zwift Cog and Click: Via smart use of the smart trainer features, the CORE 2 supports virtual shifting with a single cassette cog. This eliminates wear on more expensive drivetrain parts (cassette), makes it easier to take the bike on and off, and results in a near-perfect chainline so things are simply quiet. While it took me a few rides to get accustomed to virtual shifting, it’s pretty nice and feels similar to actual shifting steps, but without the noise or wear.
Noise: Simply put, the CORE 2 with the Zwift Cog is quiet. Unlike her older CyclOps Hammer, I can’t hear her riding. This might not sound like much, but the Hammer had a steady whine that I could hear throughout the house. It’s pretty much only the rattle of the chain passing over the cogs and noise from the blower fans.
Weight/Balance: Kristen uses her trainer on a KOM Cycling Indoor Rocker Plate RPV1. With the older Hammer it’s heavy, asymmetric design made the whole assembly list to one side unless she put a 15 pound weight on the rocker plate opposite the trainer. The CORE 2 is more symmetric and lighter and simply doesn’t have this problem.
All around, they worked out to be nice upgrades, and we were able to easily sell our older trainers for fair prices. For a bunch of details on these trainers give this DC Rainmaker review a read.
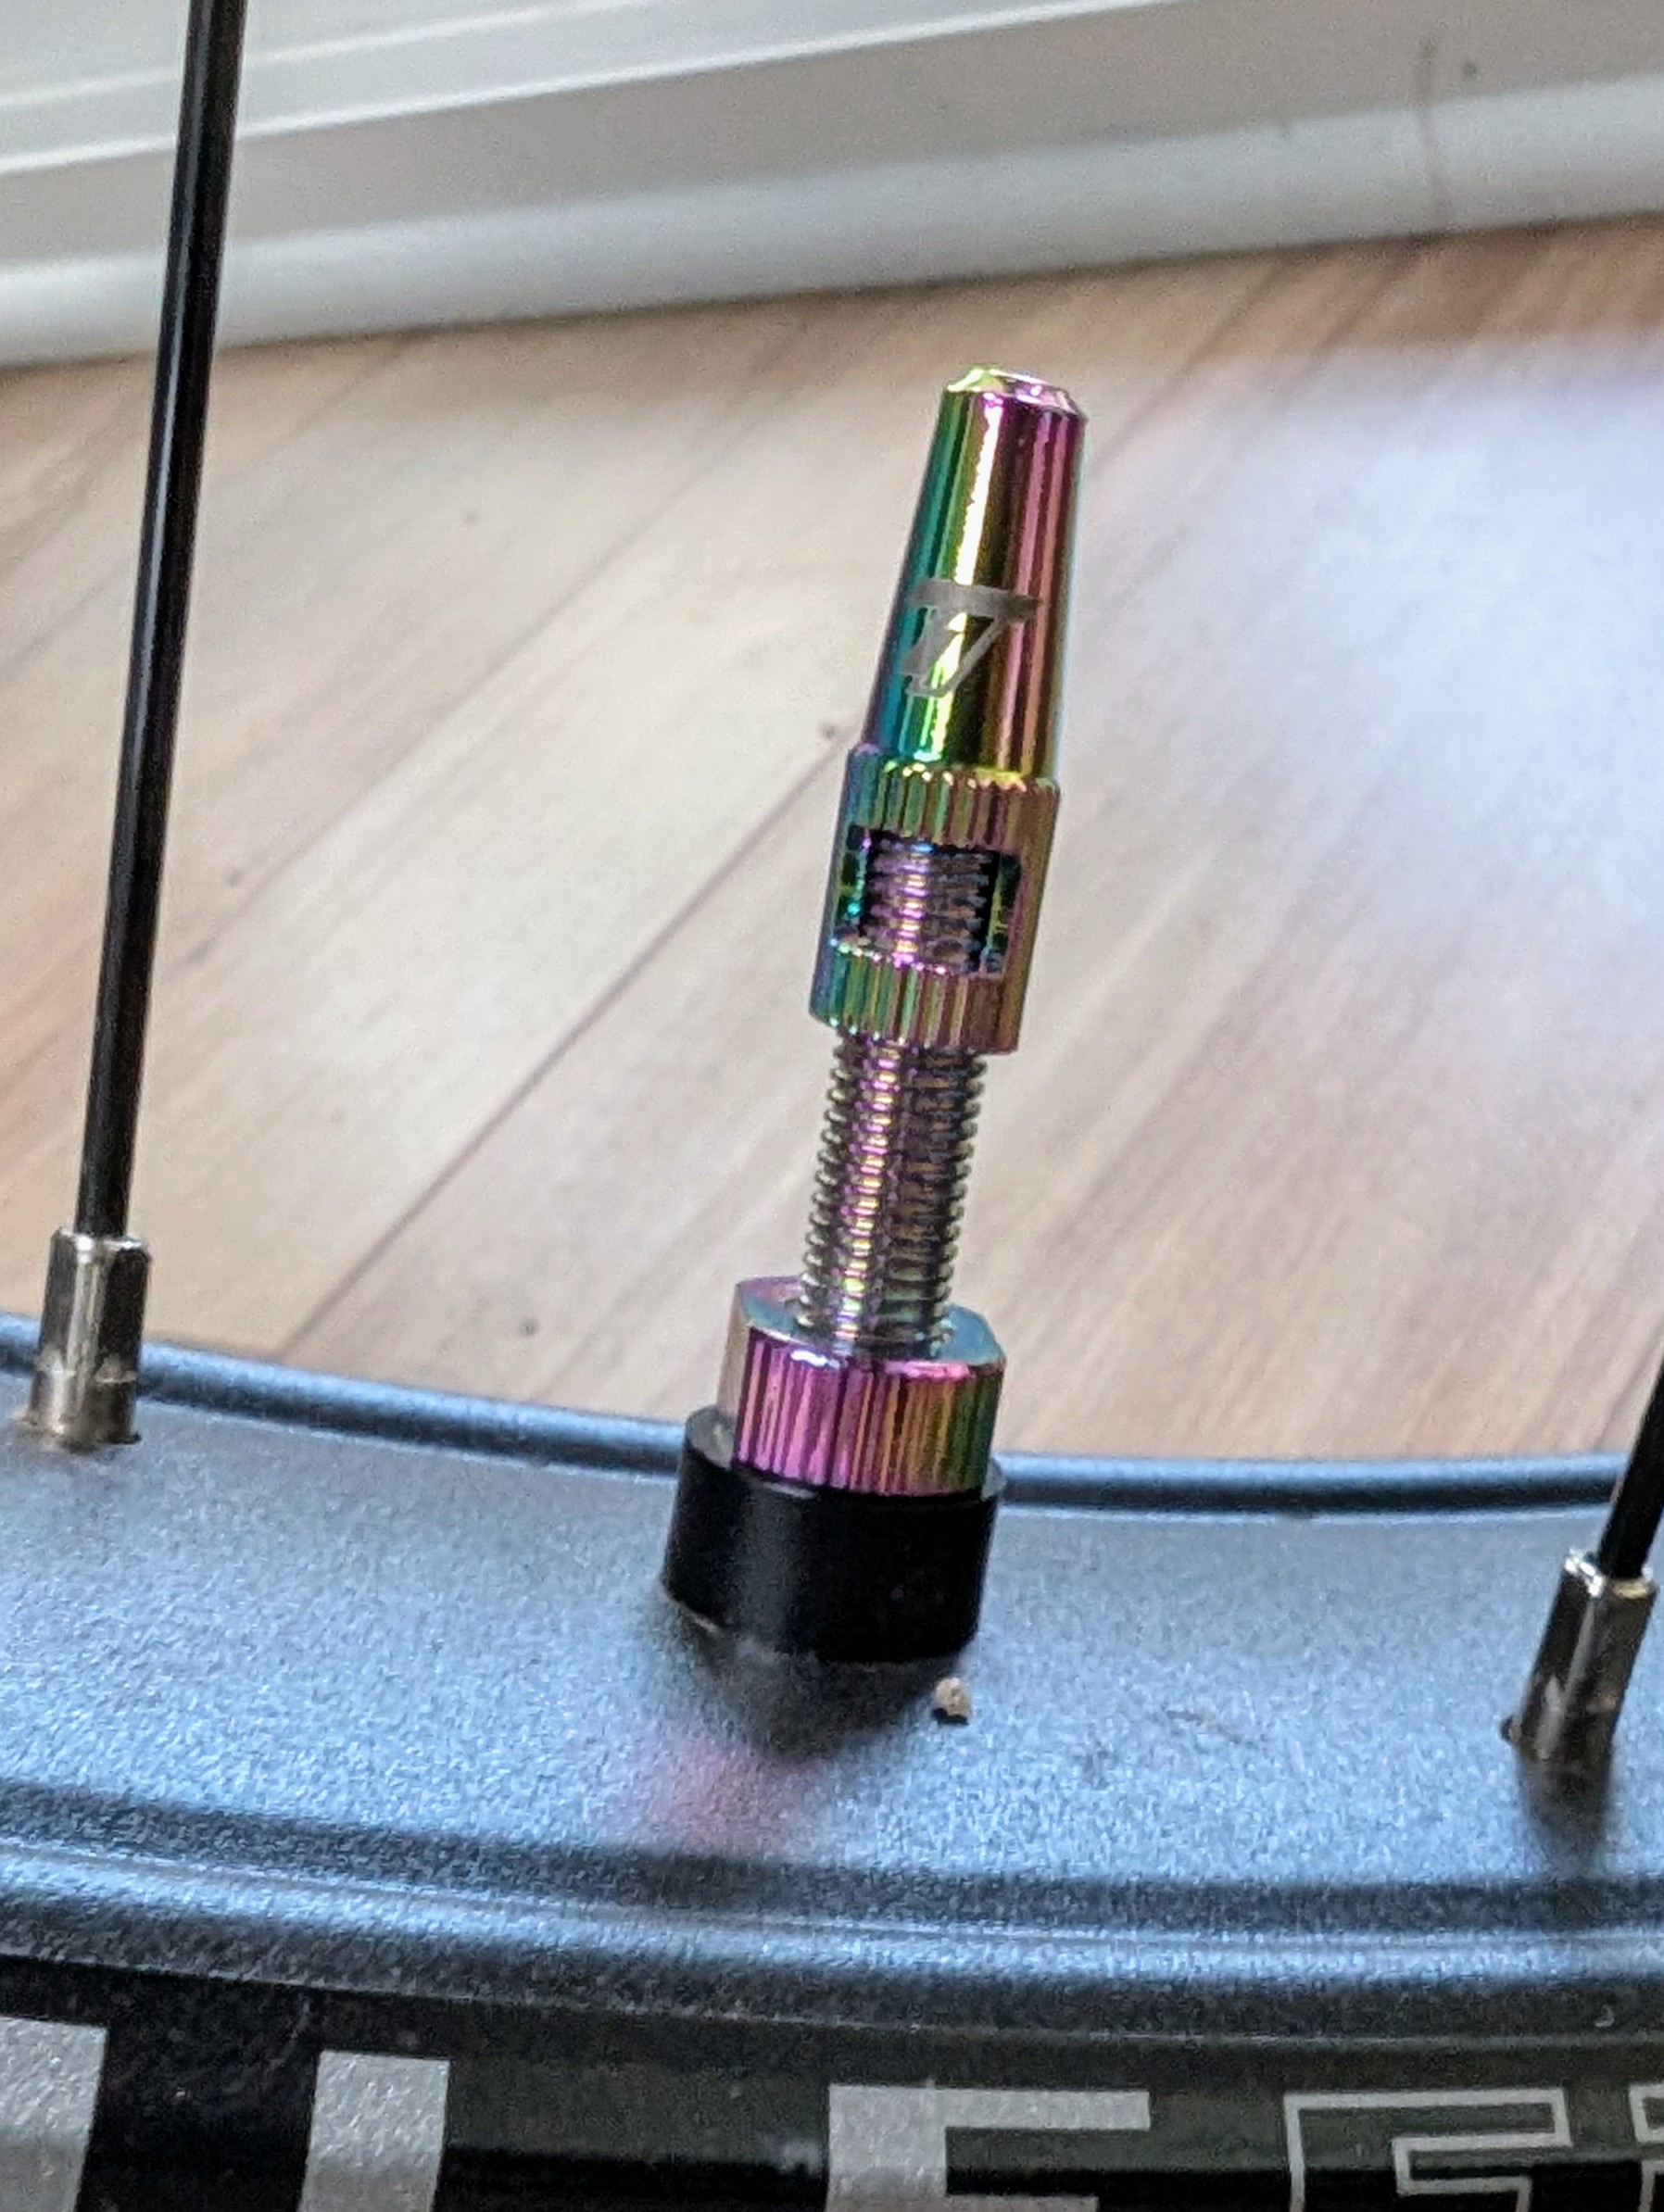
Bored on a rainy June day, and having just figured out a thread size that I can 3D print (FDM) for external threads on Presta valves† I decided to draw up a replacement nut that’ll (hopefully) be another way to solve the problem of leaky valves on single wall rims. These could also be used as normal tubeless Presta nuts that are easier to tighten and remove.
To recap, leaks are caused when the base of the tubeless valve protrudes through a single wall rim, the Presta locknut bottoms out on the base of the valve, resulting in a loose valve with minimal (or no) seal between the valve and the rim. This typically manifests as random/slow leakage on a tubeless fatbike setup. The solution is to use a spacer between the rim wall and locknut, either a nylon washer or something like the Problem Solvers Super P-Nuts, or… perhaps these Peanuts.
Now that I have a 3D printer, some filament appropriate for outdoor use (ASA), and a little bit of modeling experience, I made my own nut which I’m calling the Peanut. This has 5mm of threaded area, a 5mm (tall) x 9mm (wide) conical space for the valve, and 5mm grippy area to allow easy tightening and removal without tools. And yes, a name that’s an homage to Problem Solvers‘ product.
Pair of Peanuts, ready to use.
This is mostly an experiment, as unless one already has a printer and appropriate filament it’s far more cost effective to use nylon spacers + metal nuts or the off-the-shelf Super P-Nuts. It’s also a toss-up weight-wise, with these being 0.2g lighter than my previous spacer + nut setup (1.48g vs. 1.28g). But, I like playing around with making things so I made this and figured I’d share the result.
Printed on a Bambu Lab P1S, in Bambu Lab ASA, using the 0.08 High Quality @BBL X1C profile in OrcaSlicer with 100% concentric infill, 4 wall loops, and concentric top and bottom surface patterns, I’m pretty happy with how they came out. Because of problems I’ve had with ASA and print bed adhesion in the past, I had to do some extra filament purging and then applied glue stick to the print bed to help keep the print in place, and it all came out well.
Time will tell if these last, but they snugged up against the rim on my fatbike and feel solid, so I’m hopeful they are good for long-term use.
† Per… lots of things I found online… External threading on a Presta valve is 6V1 or M6x0.8, but whenever I’d print this it wouldn’t thread on to the valve. This seems likely due to material creep / over-extruding or whatnot.
Peanut being designed in Autodesk Fusion.
Creating a custom thread size in Autodesk Fusion, with a Major ∅ of 6.5mm, Pitch ∅ of 6.0mm, and Minor ∅ of 5.5mm resulted in a threaded hole that printed nicely and fits well on to all the tubeless Presta valves that I have around home. This is arbitrarily a bit larger than spec, but the resulting prints have similar play/slop to the metal nuts that come with valves and it snugs up well. I’m not sure how ideal this is, and could likely be refined, but it’s working for me so I’m going to stick with it.
Adding the following to the M6x0.8 portion of ISOMetricprofile.xml (or creating a similar custom profile as described here) makes this available in Fusion’s Thread tool:
Over at Stony Creek Metropark, during the redevelopment of Shelden Trails (the “mountain bike trails”), the new route for the Roller Coaster took it up over a high point that came to be known as Fibber Mountain. While I originally intended this post to be an in-depth analysis of the knock-on effects of defining this name, that’s… just too much. So I’m going to leave this as a simple history of how the name came to be.
During the redevelopment of the single track, Loop C was to rebuild the Roller Coaster, as can be seen on the official plan (mirror) on pages 11-14 and 21. Part of this involved building trail up to a high point so some rock rolls/drops and a step-up could have a nice, gravity-assisted approach. This high point had some old trails leading to it — desire paths from hikers and some 90s-era fall line MTB routes — but was not in the official single track route and was more an old curiosity.
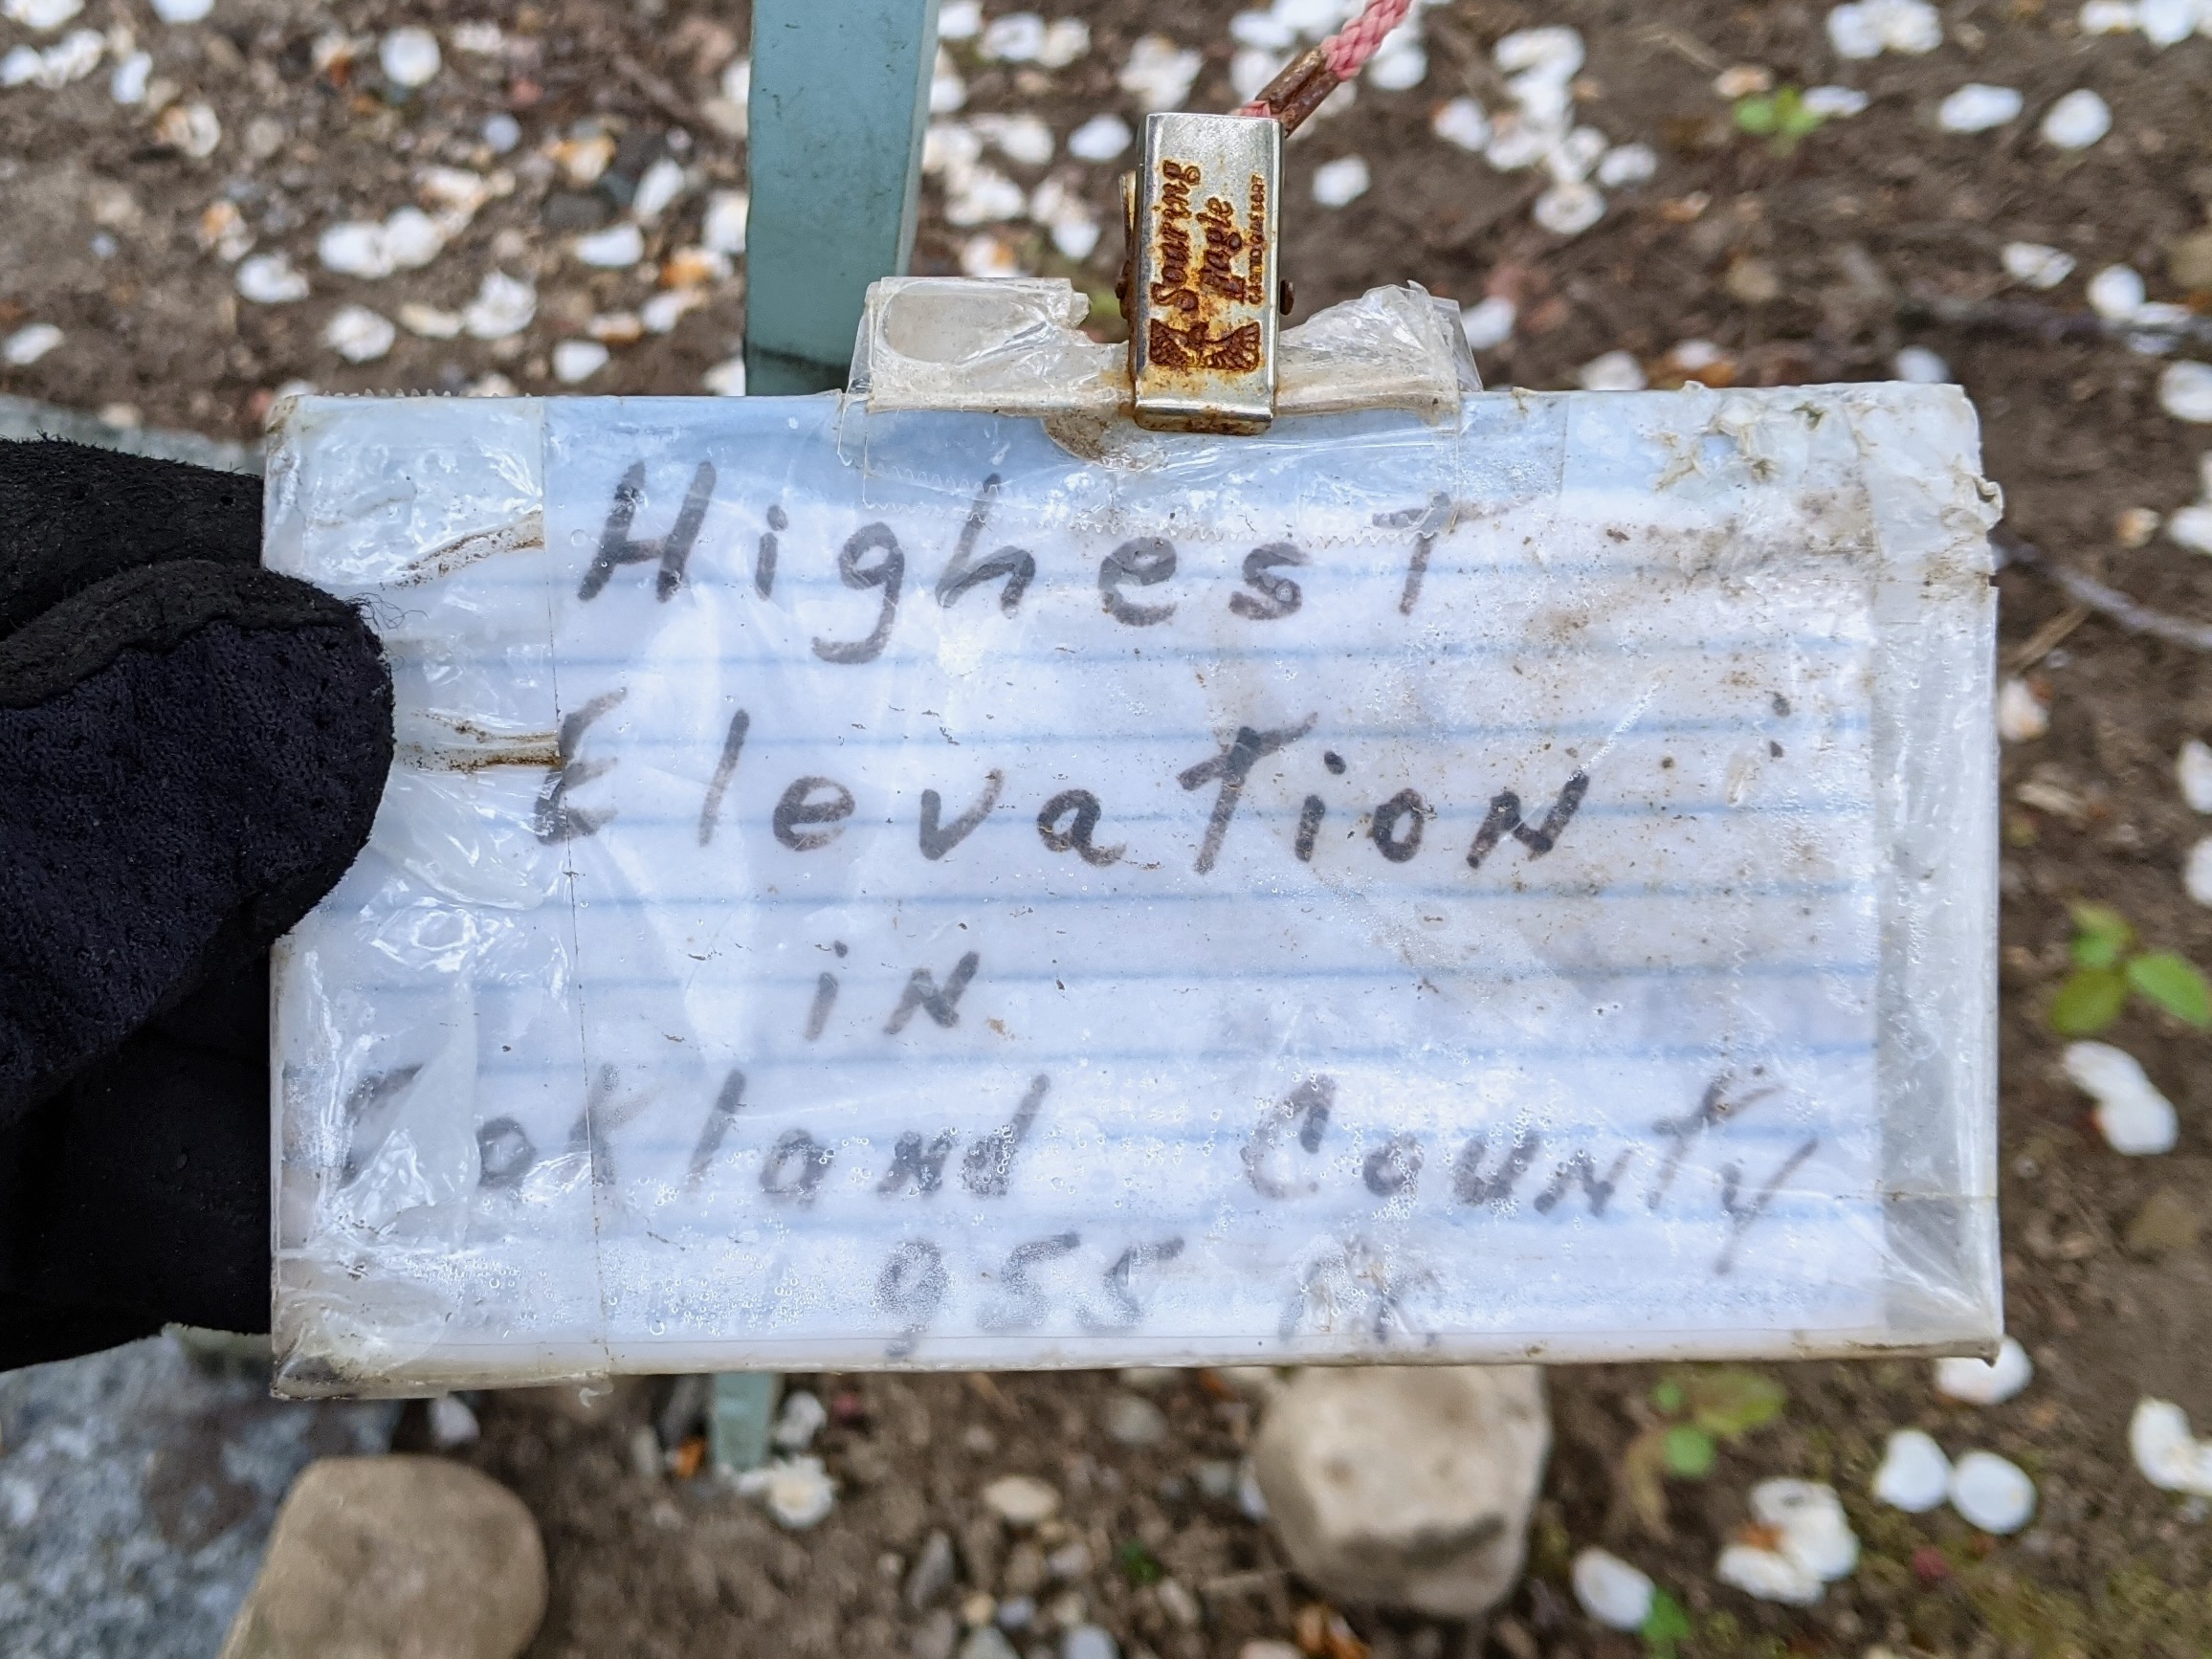
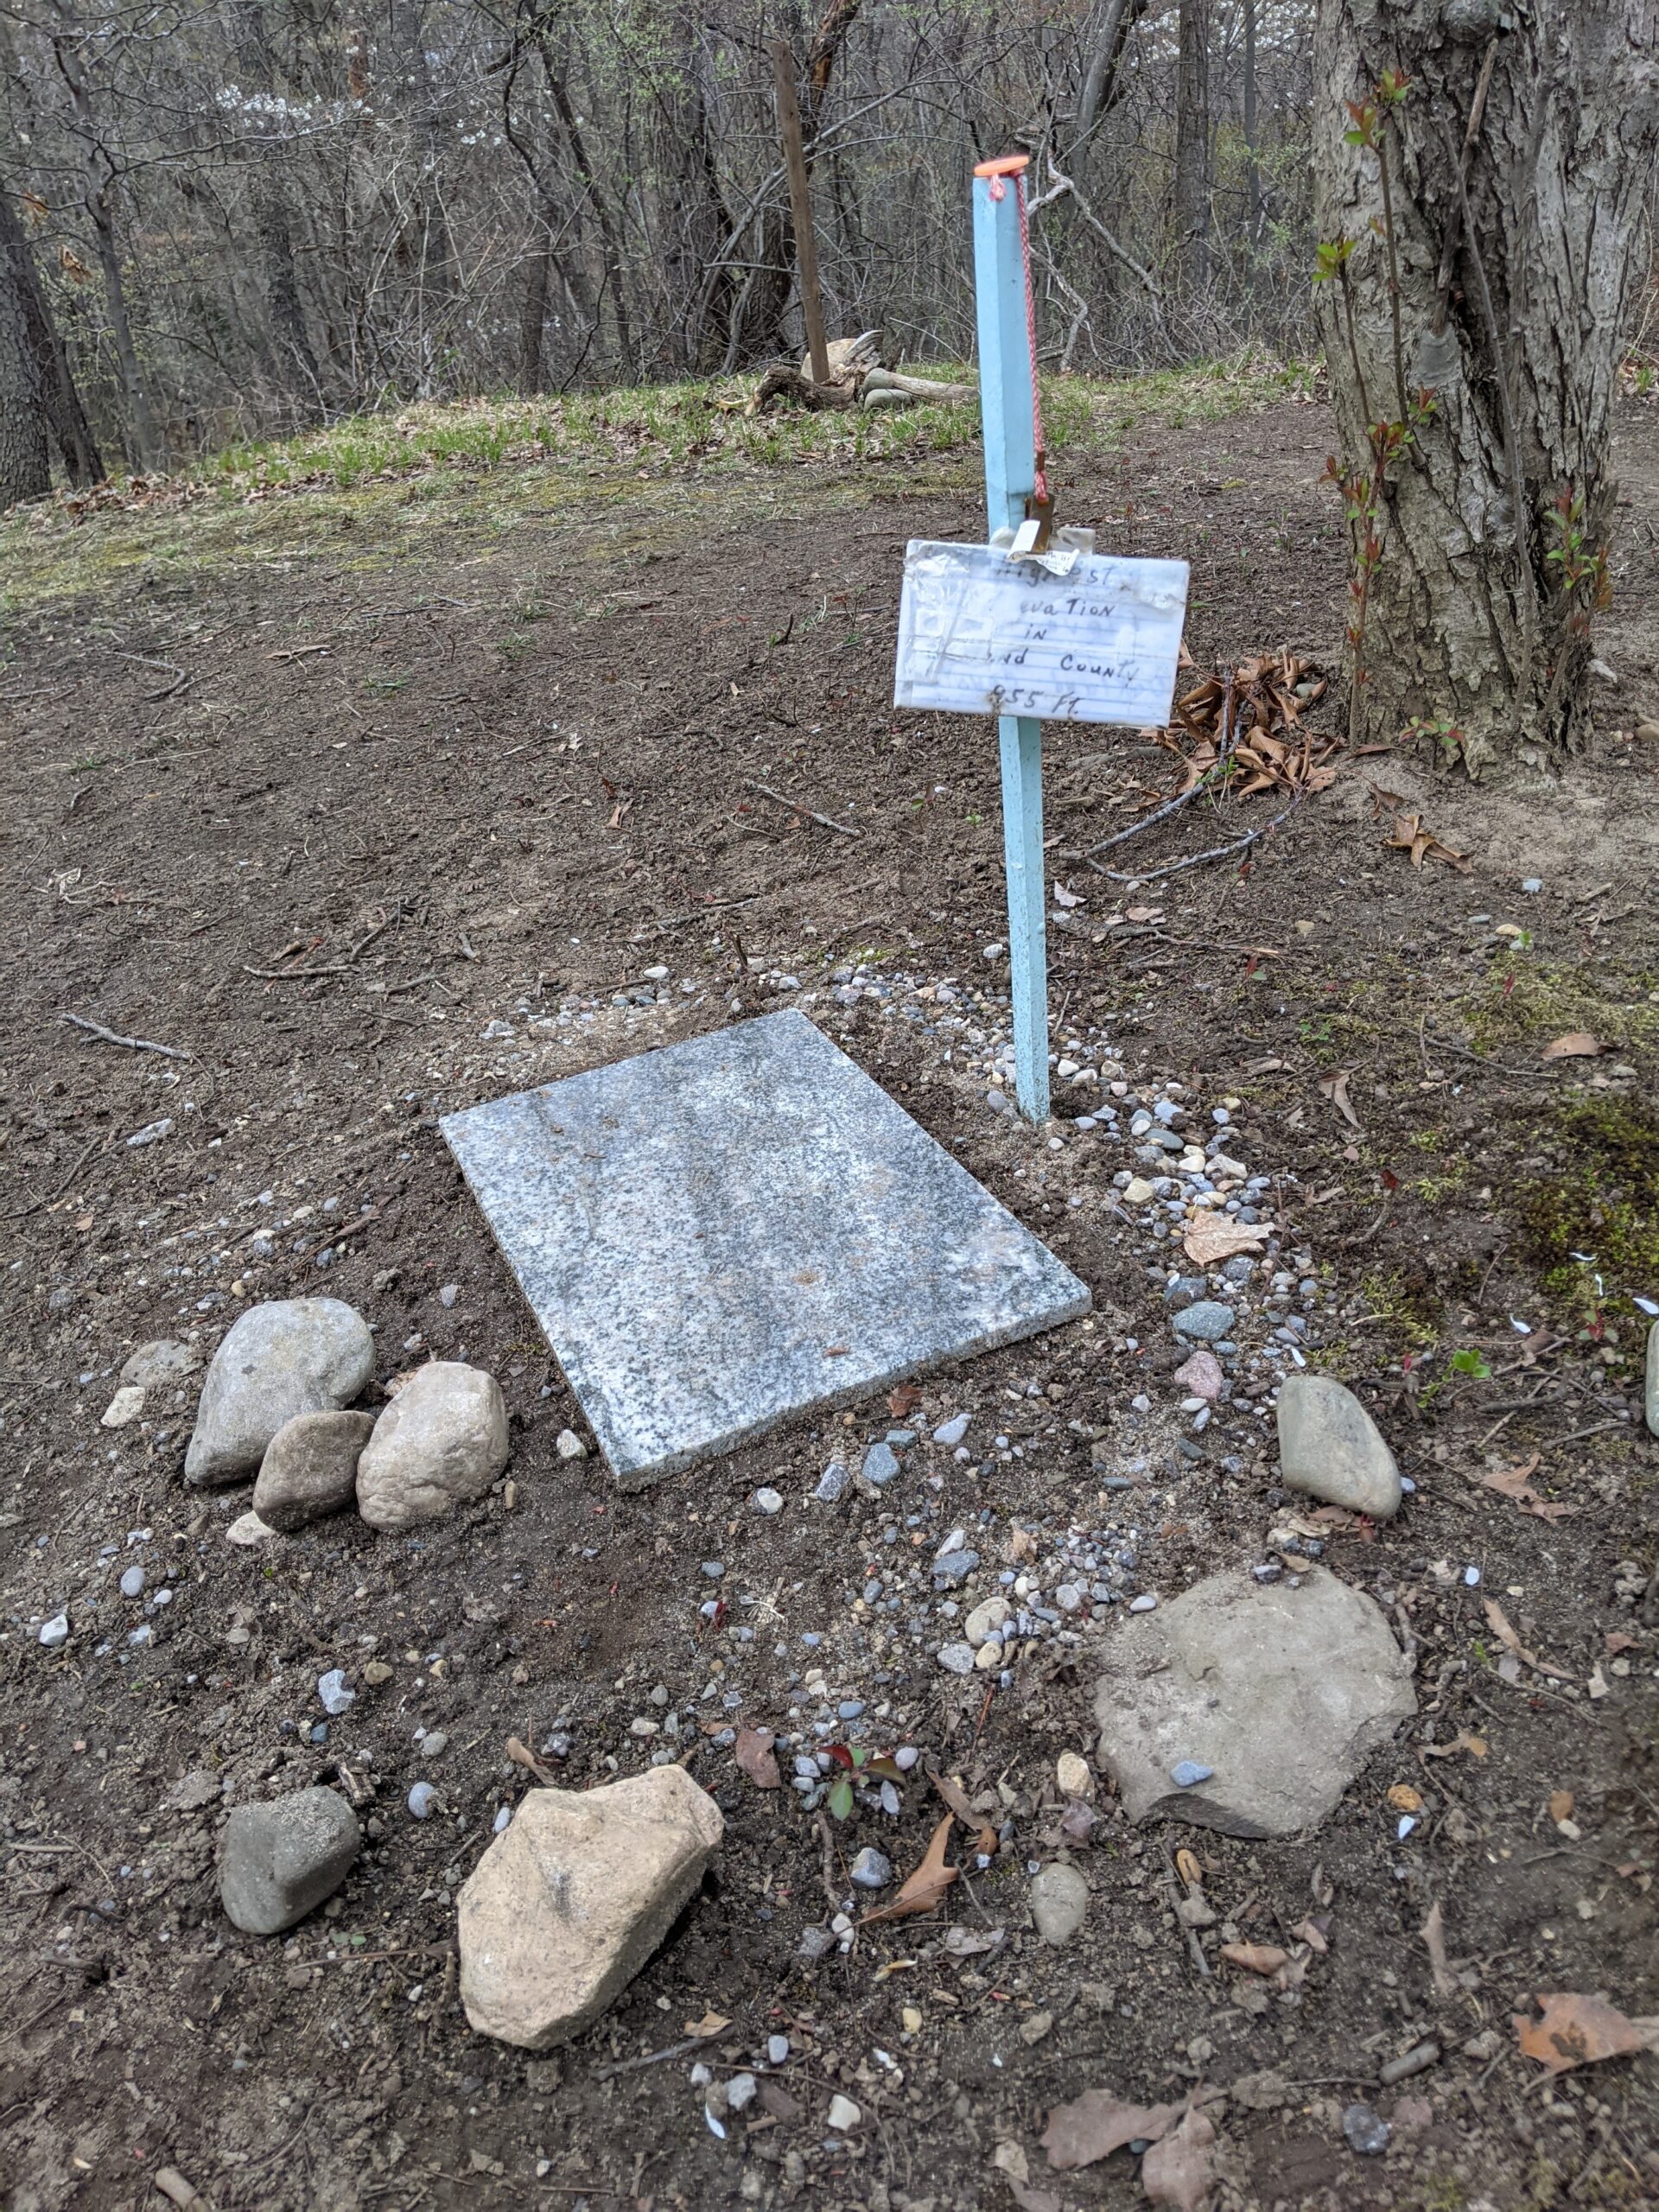
A unique feature it did have, besides the usual invasive growth, bonfire remnants, and empty beer cans, was a hand-made sign claiming that at 955 feet it is the highest point in Oakland County.
It was clear this wasn’t true as areas I regularly ride by, like the intersection of Drahner and Hosner (St. Benedict Monastery) logs at ~1150 feet on my bike computer, are higher and there’s a litany of information online about other high points in Oakland County (eg: 1, 2). But, like lots of little signs and hand-made monuments placed in the woods, it’s a neat bit of kitsch; something that’s best left in place as a trailside curiosity. And anyway, someone put time and care to making this spot special for them. It wasn’t harming anyone nor in the way of the trail, so we let it be.
Being directly adjacent to the single track, already cleared and a bit open, at the top of one of the tougher climbs, and just before some technical features, this location was inevitably going to become another hangout spot, similar to the Rest Area. So, it needed a name, but I didn’t really want anyone thinking this was the actual county high point.
When documenting the system updates in OSM I added this high point (natural=peak) and it became enshrined as node 8988989404. I initially gave it the name Liar’s Peak, but after talking with Kristen and her (very rightful) feeling that name seemed too negative, a couple weeks later I changed it to Fibber Mountain. This name was inspired by the They Might Be Giants song Fibber Island (video), with the goal of illustrating that the claims on the sign at the top were a bit exaggerated, while also being a bit silly.
The name trickled out and it’s now a great reference point. Trail users talk about the bypass for, or the rocks and jump and features after, Fibber Mountain. Widely used reference points like this are useful, and here we are with a new one.
The spread of this name outside the trail user community is what I didn’t expect.
For years there’s a been no end to the websites which scrape OSM and Wikipedia and whatnot to build content farms, but I really didn’t expect those farms to spread Fibber Mountain as far as they did. Now a simple web search for “fibber mountain” will turn up sites like AllTrails, Komoot, and PeakVisor competing to have the best info on “mountains” in Oakland County, the best trails near by, prompting to install their app for more info, etc.
It feels absurd that documenting and naming a local high point results in so much online cruft, but here we are. When originally thinking about this post I was planning to delve into the various Fibber Mountain websites, but the further I looked the more of a rabbit hole that became. And no one needs an analysis of the moving target which is auto-generated content. So I’ll leave it at that and, semi-jokingly, nod towards the Dead Internet Theory.
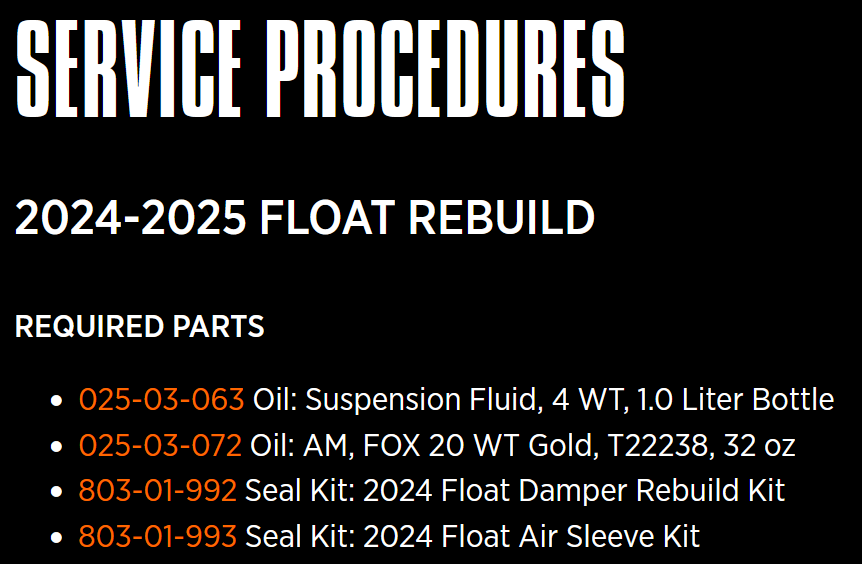
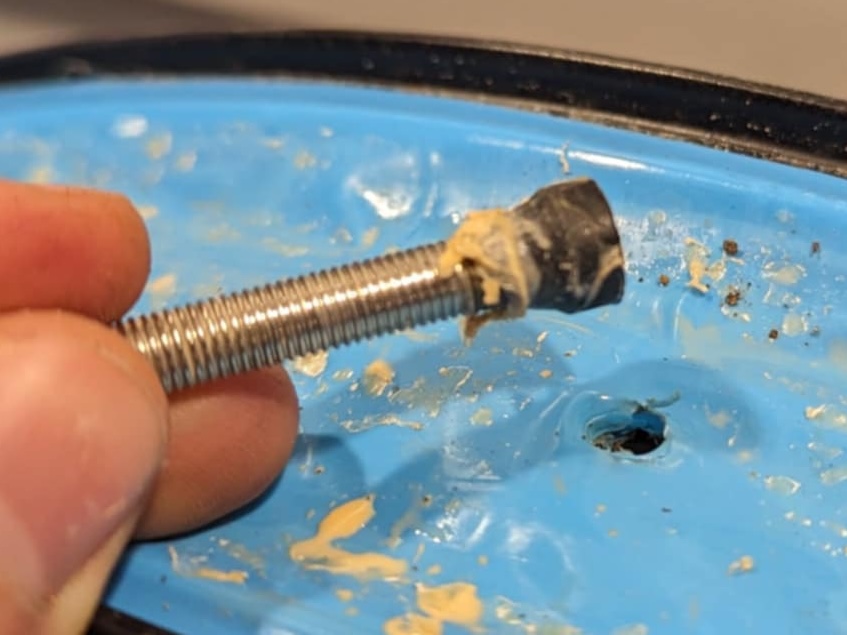
When looking up the serial number for the rear shock on my Pivot Mach 4 SL v3 (Part 972-05-949: 2025_24, FLOAT, F-S, K, 2pos-Adj, Evol LV, Pivot, Mach 4 SL MD-XL, 190, 45, 0.5 Spacer, CM, RM, CMM, No Logo, OE), the specs indicate that part number 803-01-993 is needed for rebuilding the air sleeve. I was having a hard time locating these, and after some digging it turns out that there’s a replacement part number for this, 803-01-727.
Per Fox:
That is the permanent part number moving forward, as both part numbers contained the exact same seals so we consolidated to one PN which was the one I referenced, 803-01-727.
(It seems that some of the entries on Fox’s site still show the old and hard to find model number, so I’m making this post to help others who might be having a hard time finding a seller carrying the originally-spec’d part.)
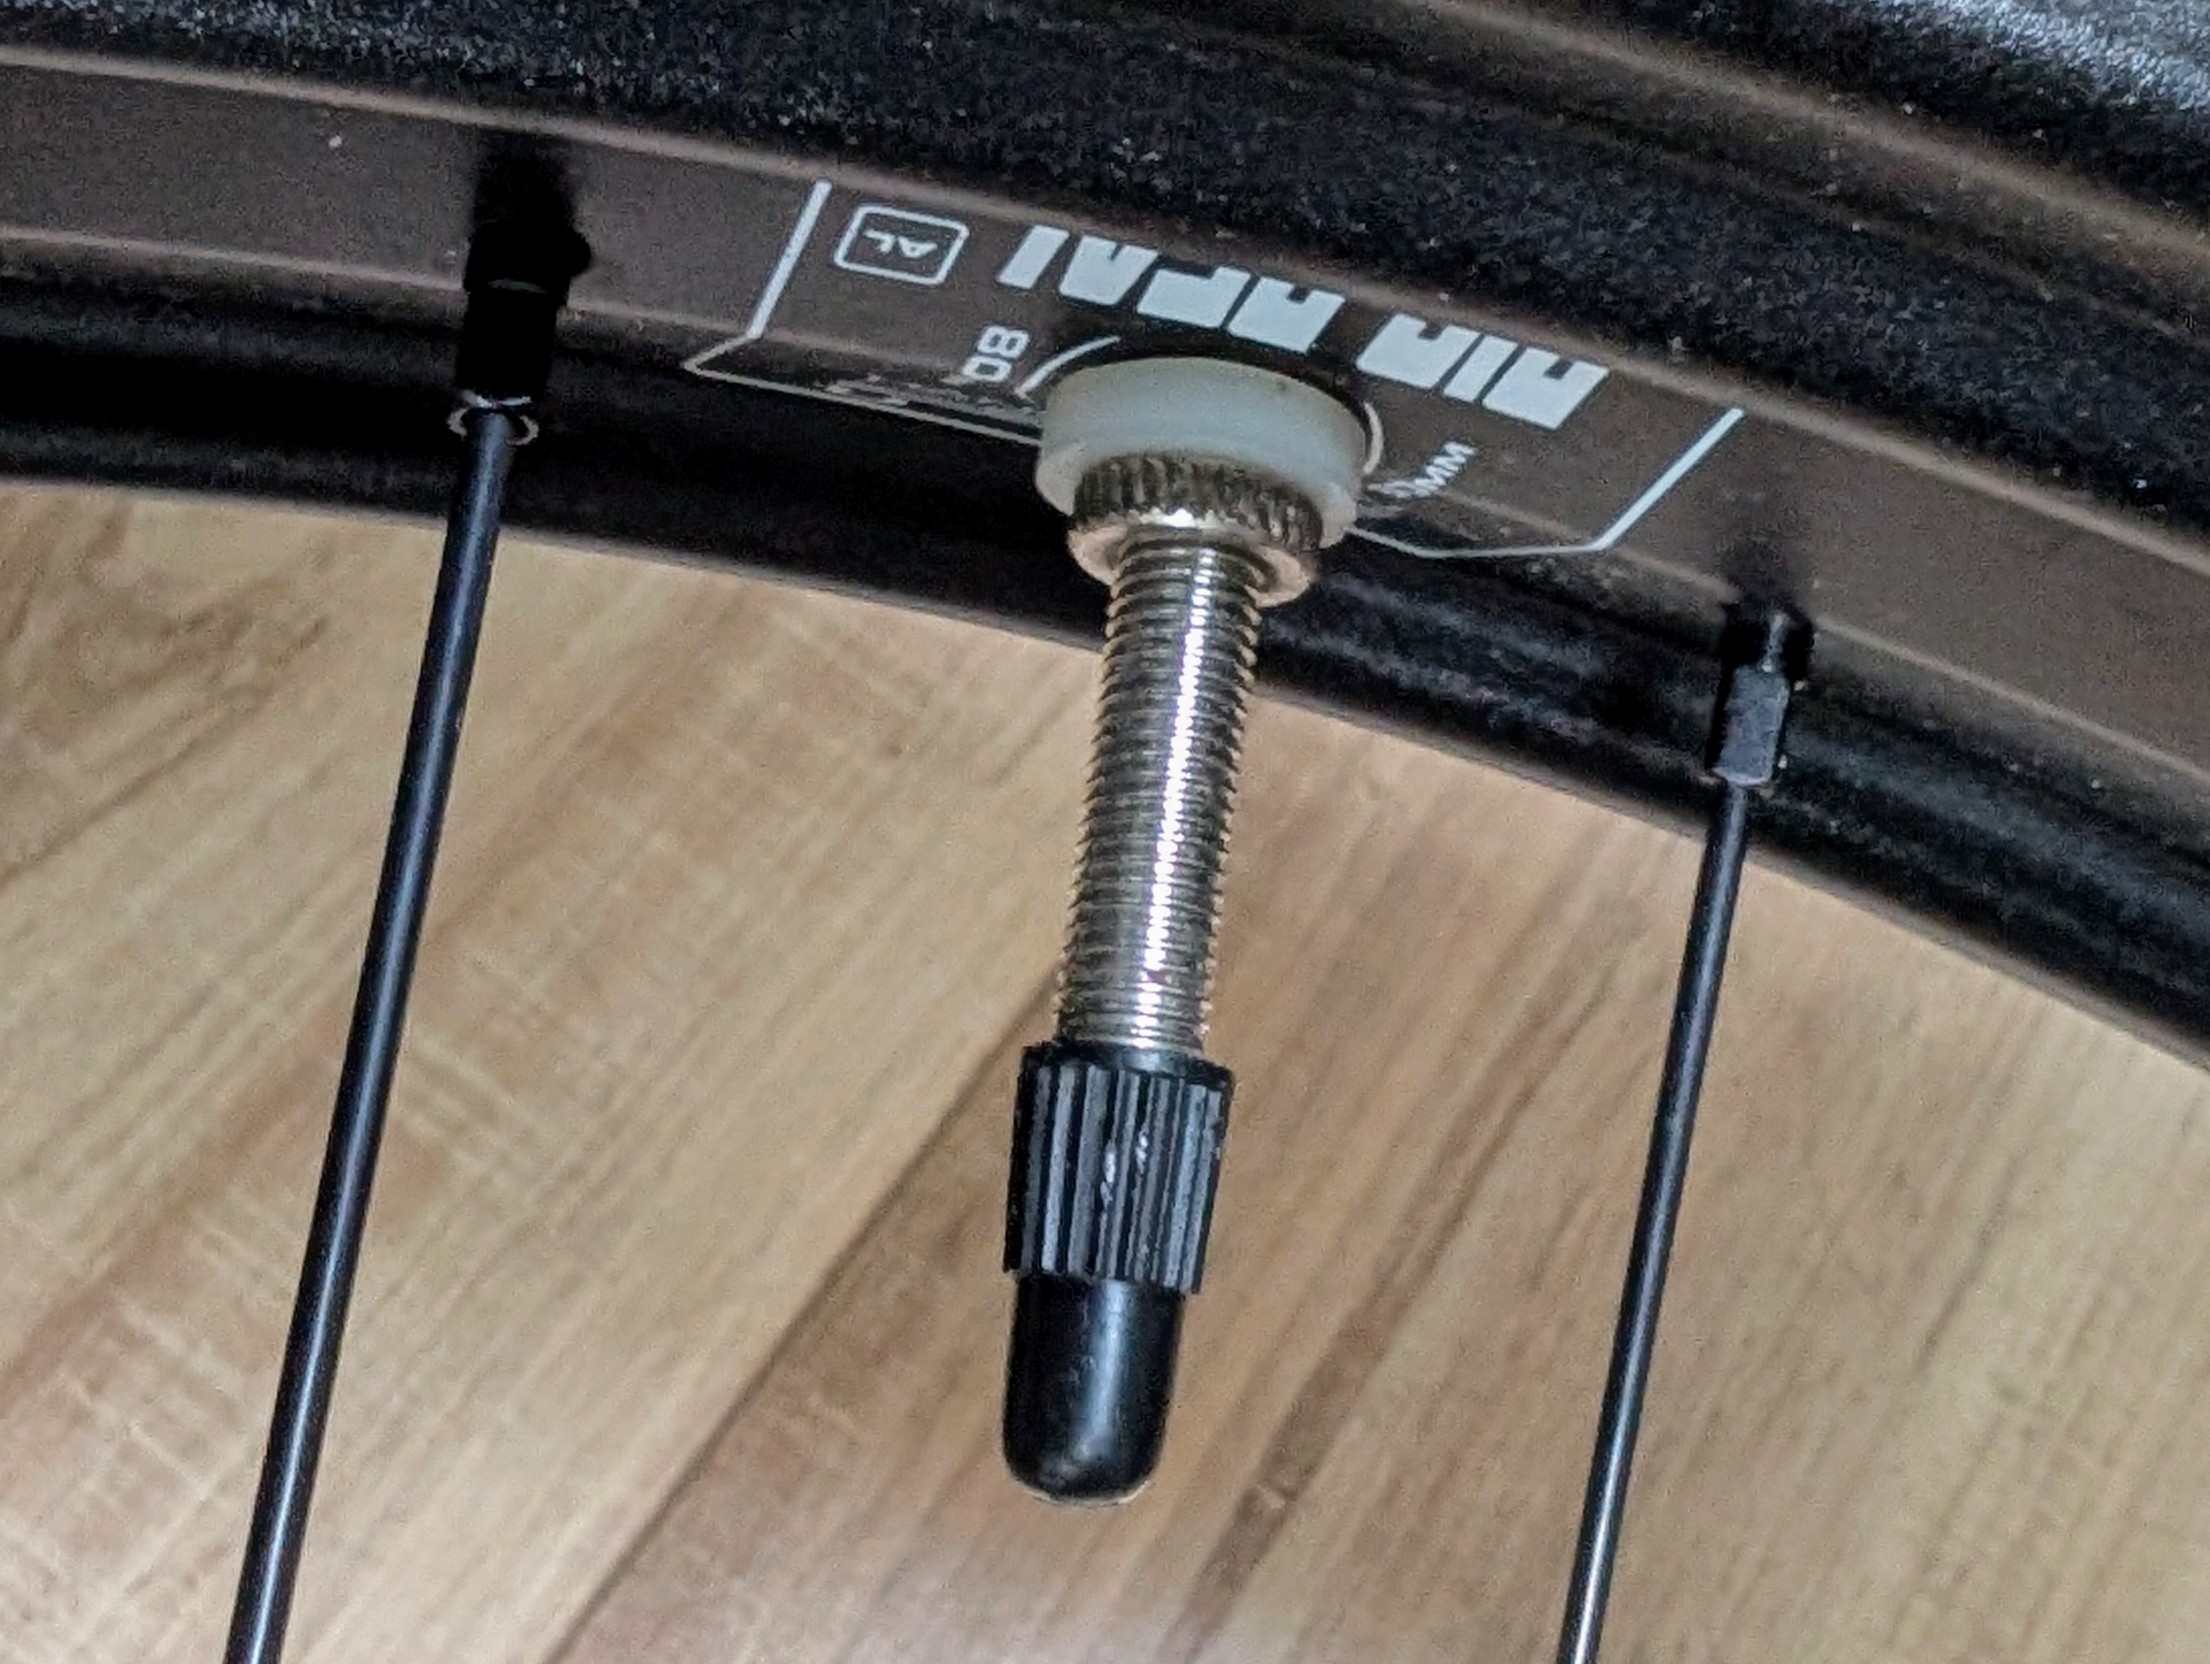
If you have a single wall fatbike rim (eg: SunRingle Mulefüt, PUB Carbon, HED., Specialized Fatboy OE, DT Swiss BR 2250 Classic, etc), you should be using a spacer between the rim wall and valve nut when setting the wheels up tubeless. If not, it’s likely you’ll eventually have problems with leaks around the valves. And these sure aren’t fun when they crop up on a cold day out in the woods.
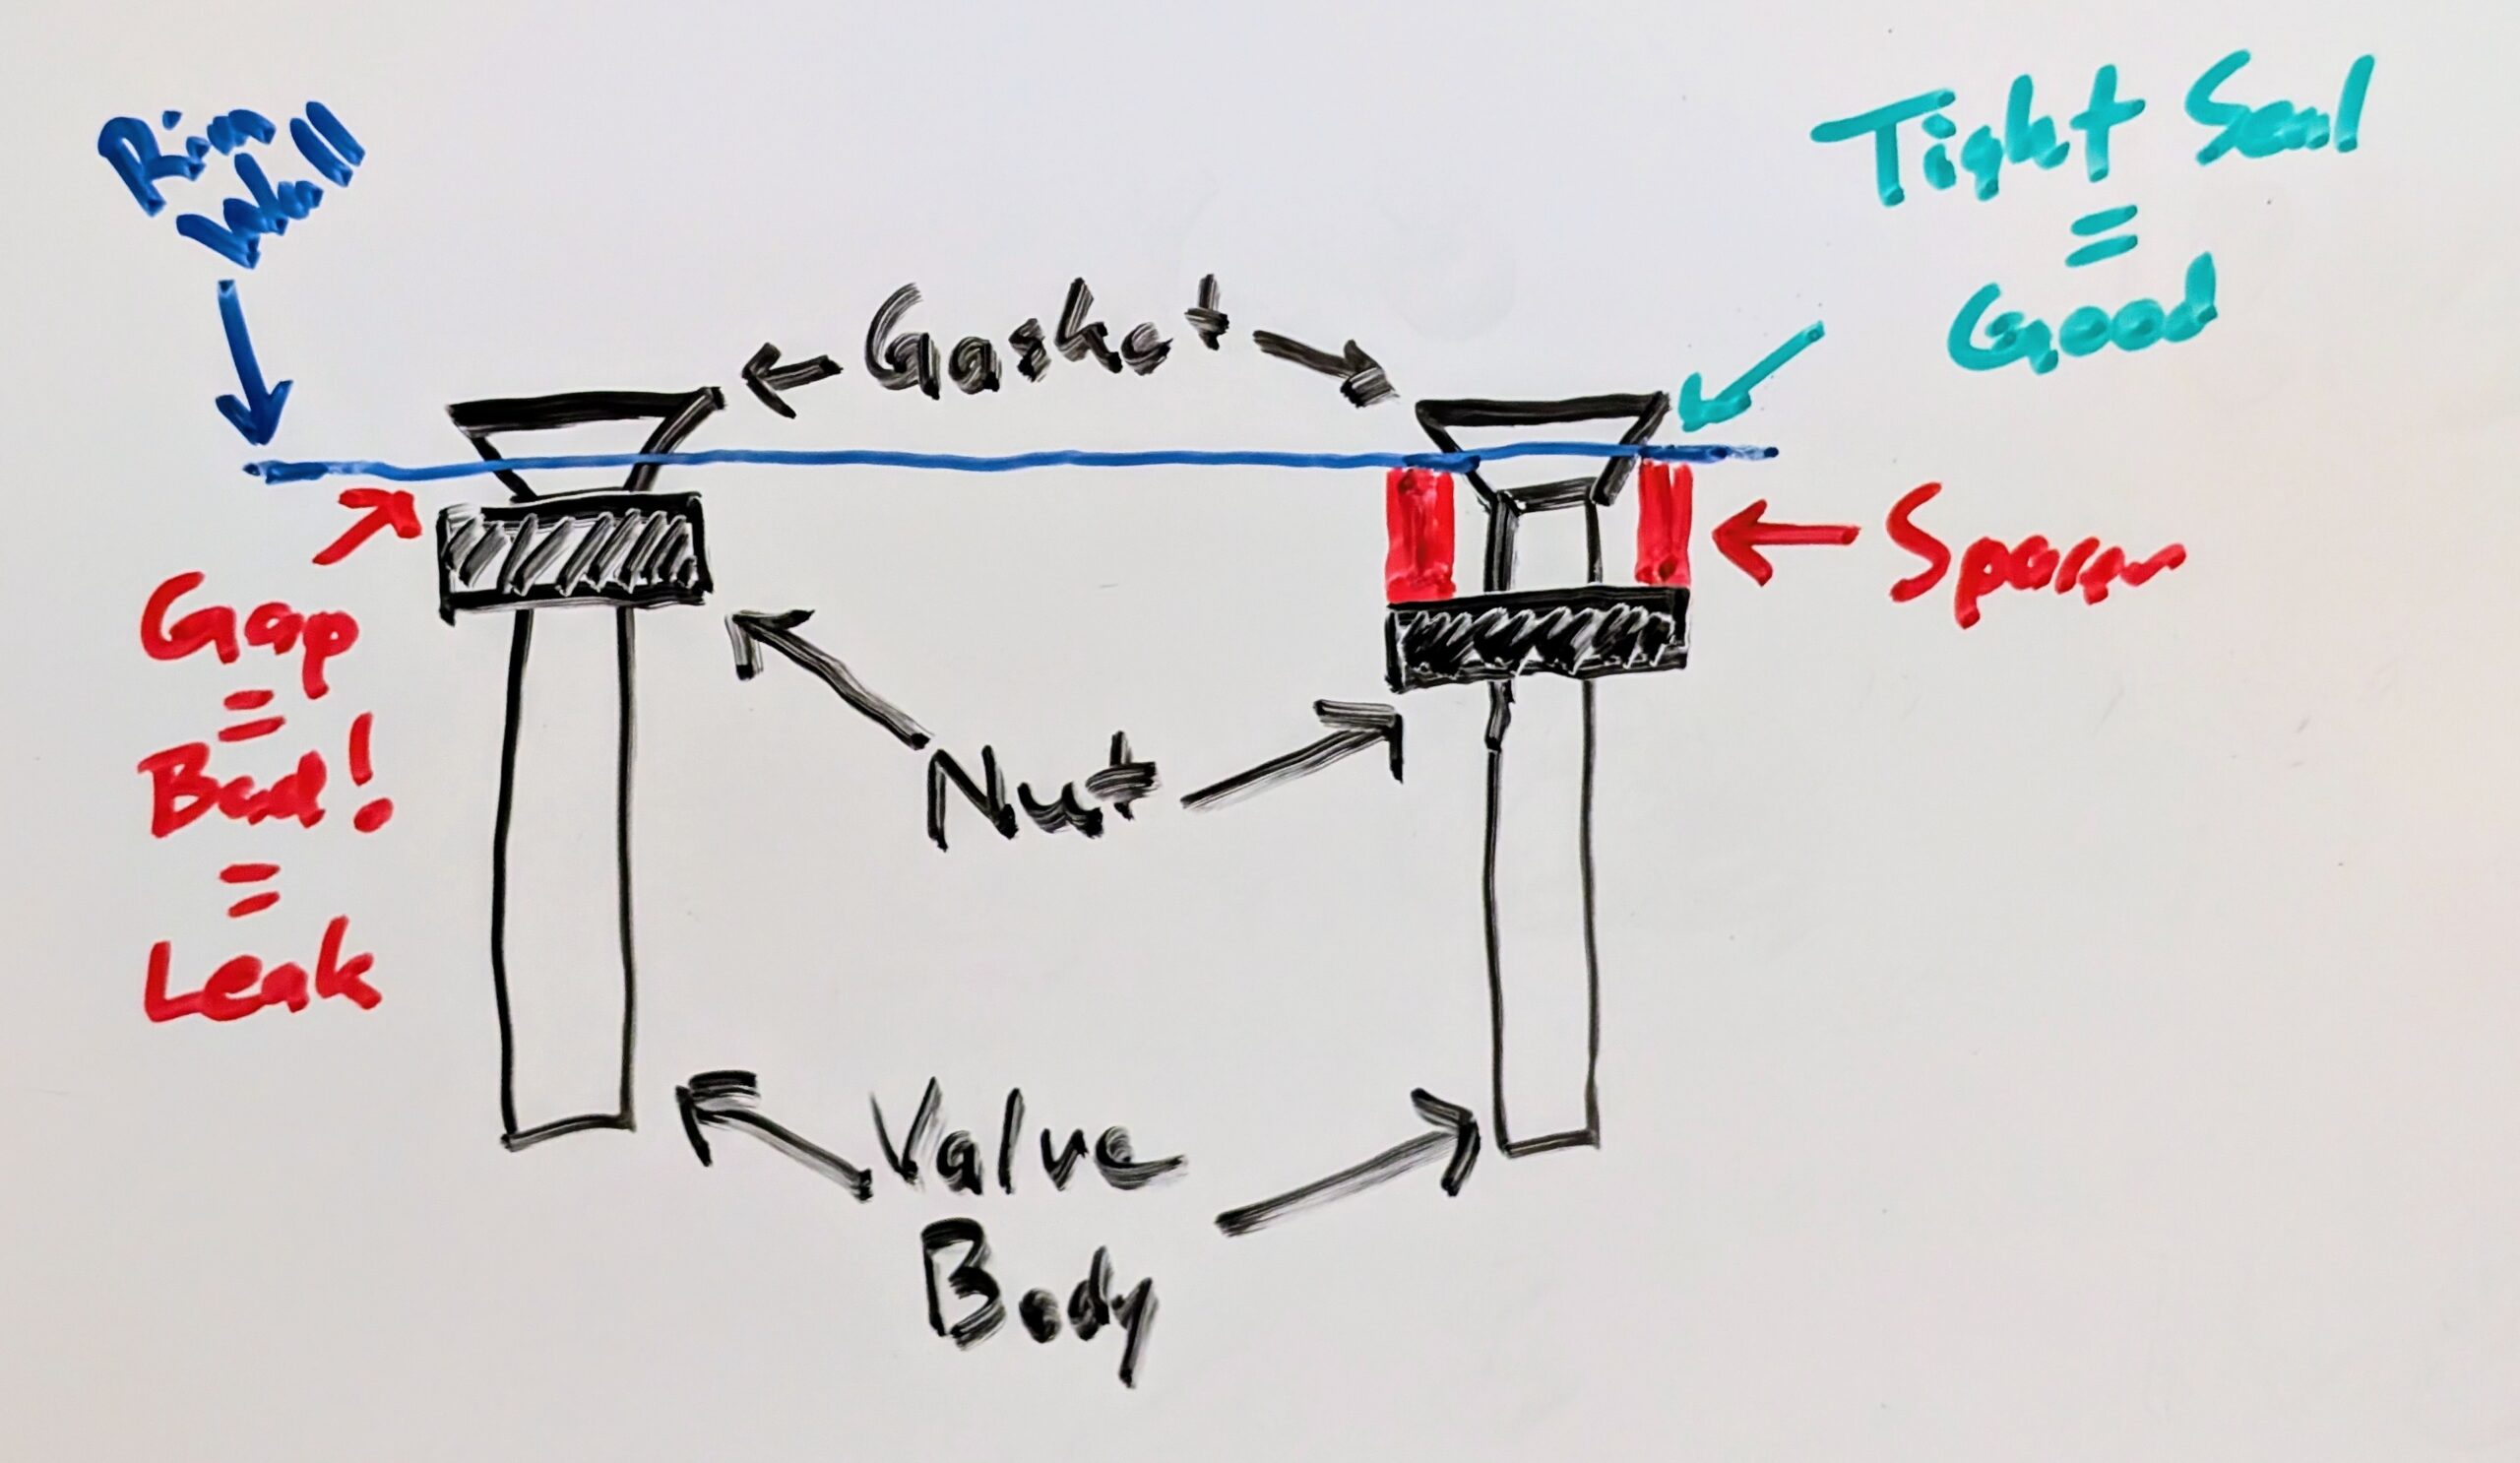
The diagram above shows why: Tubeless valves don’t work well with single wall rims: the base of the valve ends up poking through the rim wall, so when the nut is tightened down, instead of sealing the gasket against the wall, it bottoms out leaving the gasket loose. Sometimes there’s a visible gap, other times it’s just looser than it should be, and it will eventually leak.
Sometimes it’s possible that sealant will build up in the gap and keep the leak at bay for a while, but as the valve gets bumped, the weather turns cold and things contract and harden, leaks will tend to appear.
So what’s the Fix? Fit a spacer between the rim and Presta nut, then tighten up everything snugly. Doing this ensures the gasket can squeeze through the rim, the nut doesn’t bottom out on the base, and everything gets good and tight. (Protip: Press on the valve gasket from the inside of the rim with your thumb while tightening the nut with your fingers. Then when you release pressure on the gasket the nut will end up tighter than you can do with just your fingers. Reversing this process allows the valve to be removed without tools.)
I’ve used a variety of spacers for this, but the most readily available is McMaster-Carr part 90176A155: Nylon Unthreaded Spacers, 1/2″ OD, 1/4″ Long, Black with 25 pieces available for ~$5 (plus shipping). Lowes, Ace, Home Depot, and Menards will all typically have similar spaces in their small-parts sections.
There’s also the Problem Solvers Super P-Nuts which are a replacement Presta nut that has a flared, stepped base, but at ~$7.99 for two I’ll recommend using spacers. (EDIT: Looks like it’s $15.99 for two brass valves and two Super P-Nuts. That’s much better, as a pair of valves typically retails for close to that.)
Even on valves with flat bases this is often a problem because single wall rims tend to be thinner than the unthreaded base of the valves, and this pokes through the rim wall and the nut bottoms out on it. Many of these valves come with O rings to be fitted on the outside of the rim as protection, but this doesn’t solve the issue either as the O ring isn’t thick enough to serve as a spacer.
See the photos below for examples of the issue and photos of spacers used to solve the problem.
Leak around tubeless valve on single wall rim due to insufficient tightening. (Photo from Andrew Freckelton.)Sealant built up around base of tubeless valve, evidence of leaking. (Photo from Andrew Freckelton.)Gap at base of tubeless valve on single wall rim. (Photo from Andrew Freckelton.)Stan’s valve on HED BAD rim with spacer.Trail One Oil Slick valve stem on SUNringle Mulefüt 65 SL with McMaster-Carr 90176A155 spacer.
Comments closed
Turning the clock back to 2012, when volunteering with CRAMBA I worked with my friend Kristi and developed the Ride Dirt Trails, Not Mud Trails signage. Originally hosted on the CRAMBA page (Internet Archive) this has fallen prey to link rot, so I’m re-posting / re-hosting it here.
Back when this was released we very intentionally made it available it under the CC BY-SA 3.0 license along with an Adobe In Design template so anyone else could reuse the work and help spread the message to avoid trails when they are wet enough to be damaged via use.
Since then I’ve seen some variant of this used all across the country, from SE Michigan’s more mult-user friendly Muddy Day? Don’t Play! take to just-logo-swapped signage in Arkansas and Missouri Ohio to the text reused on signs at Knoxville’s flagship Baker Creek Preserve.
I love seeing this reuse because the whole point of the open licensing was to make it so others could build on our work. And here we are, twelve years later, and it’s still going strong.
I never really thought I’d have a fast XC bike again, but, I was wrong. And I’m glad. And impressed at just how capable a “modern” XC race bike is.
For almost three years I’ve had the amazing Pivot Trail 429 (v3) as my main mountain bike. It’s an incredibly capable trail bike that I’ve ridden all over the midwest, from Arkansas to Copper Harbor to Tennessee, and it’s been wonderful. But, being a longer, slacker bike the one place I wasn’t super-keen on it was our standard Lower Peninsula classic XC trails, especially those with fast, tight, twisty sections. It’s fun, but just not ideal for that stuff and felt like I had to dump the front end into the really tight corners.
In late 2022 I unexpectedly found myself buying a used-but-like-new super-well-equipped Pivot LES hardtail from a buddy (price I couldn’t pass up) which once again gave me a taste of a proper XC bike. While I used it for lots of local rides, and both Ore to Shore, and Lumberjack 100 in 2023, it never quite clicked. I had an absolute blast riding it, especially on the smooth sandy trails in the northern LP, but maybe due to the lack of dropper or the 100mm fork or my weird body proportions, it was fun and fast but never quite felt like mine. I liked having it around, and it was fun, but I was routinely eyeing other XC bikes.
When Pivot announced the v3 of the Mach 4 SL in 2023 it looked really appealing, but I couldn’t justify it. I put thoughts of a new bike aside… Until now. After a lot of thinking and basically coinciding with my birthday, a brand new Pivot Mach 4 SL v3, Pro XT/XTR build with carbon wheels, in the eye-catching Seafoam Green, found it’s way home. (And away went the LES, passing on the good deal to a buddy who was looking for a superlight XC race bike.)
Unlike normal for me, the build is almost completely stock. It’s incredibly well equipped as shipped, so outside of contact points (saddle, grips) the only changes I made were for fit, swapping in a shorter crank and a lower-rise bar.
The bike shipped with a really nice Race Face Aeffect crankset and a 34t ring, but had 175mm arms. I’ve been riding 170mm cranks on the Trail 429 for years, rather liking it, and wanted the same on here. Pleasantly surprised to see the frame fitted with a Shimano bottom bracket, I was able to swap in an XT crankset with no extra work. After confirming with Pivot that the bike is spec’d with a 53mm chainline crank I ended up going with the 52mm FC-M8100-1 which Shimano spec’s for both Boost (148mm) and standard (142mm) rear ends. The other option was the Boost-only 55mm FC-M8120-1, but sticking with the narrower chainline improves big-cog performance, so it’s preferable if possible. The narrower FC-M8100-1 fits the Mach 4 SL v3 perfectly, with plenty of clearance around the ring and arms, works wonderfully, and was a great choice.
Shimano XT FC-M8100 crankset with 34t ring fits very nicely with plenty of clearance.
Chainring-wise I wanted to stay with a 34t, but being (weirdly) cheap I opted for the SLX-level SM-CRM75. It’s only ~10 grams more than the XT-level SM-CRM85 but can be found for around half the price ($33 vs. $59). Both have steel teeth and an aluminum carrier, and upgrading to the XT only gets an anodized spider (vs. painted) and carbon fiber (vs. glass fiber) non-load-bearing plastic bits. Thus, performance is effectively identical. Due to series colors the center spider is a little bit of a blueish grey and doesn’t match the other parts, but in the overall scheme of the bike it looks fine, and even the smallest amount of dust obscures the variance.
Where I didn’t go cheap was on the pedals… My go-to pedals are typically XT-level PD-M8100 (regular) or PD-M8120 (trail), but finding XTR PD-M9100 on sale at the price XTs would normally sell for I figured I’d give them a go. They are only marginally lighter (28g/pair), but have a smaller center that should clear dirt and debris better, and a slightly shorter stack height. But mostly, I liked how they looked, wanted to see how they felt, and wanted new pedals for a new bike. Thus far they seem good, and I don’t regret purchasing them.
Grip-wise I put aside the stock Pivot Phoenix Factory Lock-On Grips and fitted ESI Extra Chunky grips in black with generic BMX-ish screw-in bar plugs. The narrow bar plugs are only slightly larger than the bar diameter, meaning they don’t press on my hand when my hand sits at the outer edge of the bar. While the Pivot grips are excellent I prefer foam ESIs on my mountain bikes. Kristen really likes the Pivot grips, so these’ll end up set aside for her.
The stock saddle is a fairly narrow Pivot-branded WTB which just doesn’t work for me, so the 143mm-wide Specialized Power saddle (conveniently with titanium rails) from the LES is now on the Mach 4 SL.
The bike also originally shipped with a 760mm wide, 20mm rise, 5° upsweep, and 9° backsweep bar. I swapped this out for another Pivot-branded bar I’d bought from a friend earlier in the year. After cutting 5mm off of each end it’s now 750mm wide, 6mm of rise, no upsweep, and 9° of backsweep. This is in line with what I have on my trail bike and so far feels good, although I may go down to 740mm or maybe even 730mm after I ride it more.
Fitted with everything including a bell (but no bike computer), the bike is a smidge over 26 pounds. While I wasn’t focused on weight with this build, I did pay attention as this level of bike implies it’ll be fairly light, and this impresses me. While it’s obstensibly an XC bike, and my previous (the LES) was under 21 pounds, this is far more capable: 120mm / 105mm of travel, dw-link suspension, 51t cassette, dropper, etc. Not long ago this would have been called a trail bike, and I think I’d ride it on anything that I personally am willing to do.
My first ride was at Stony Creek and thus far I’m incredibly happy. The redeveloped trails here have everything from lumpy rocks to smooth trails, small drops and wood features to semi-steep rock rolls, perfect for a bike shakedown and demo. The Mach 4 SL felt amazingly fast and comfortable on everything without really trying; just simply composed. It handles the tight/twisty stuff the way I was looking for, yet still feels really good on technical features and small drops. It’s clearly not as burly and squishy as the Trail 429, but that’s the point.
Pedaling firms up the rear end while still absorbing little bumps and keeping the tire in contact with the ground. Rolling over rough spots or dropping off things just feels right. The factory tire choice of a Rekon in the front and Rekon Race in the rear is a good one, as it both rolls nicely yet still has plenty of traction to handle aggressive steering. I also think a 34t ring coupled with the 10-51 cassette will be right. (On the LES I had a 34t, but with the 46t cassette it was a bit too tall for longer climbs. This should be much better.)
I have a bit more suspension setup to do, as in the factory-recommended settings the fork’s damper is a bit noisy and feeling not-quite-right, but dialing that in will just take a bit of time. I may toss the ShockWiz on there as I typically do to try and dial things in further. But, one thing at a time.
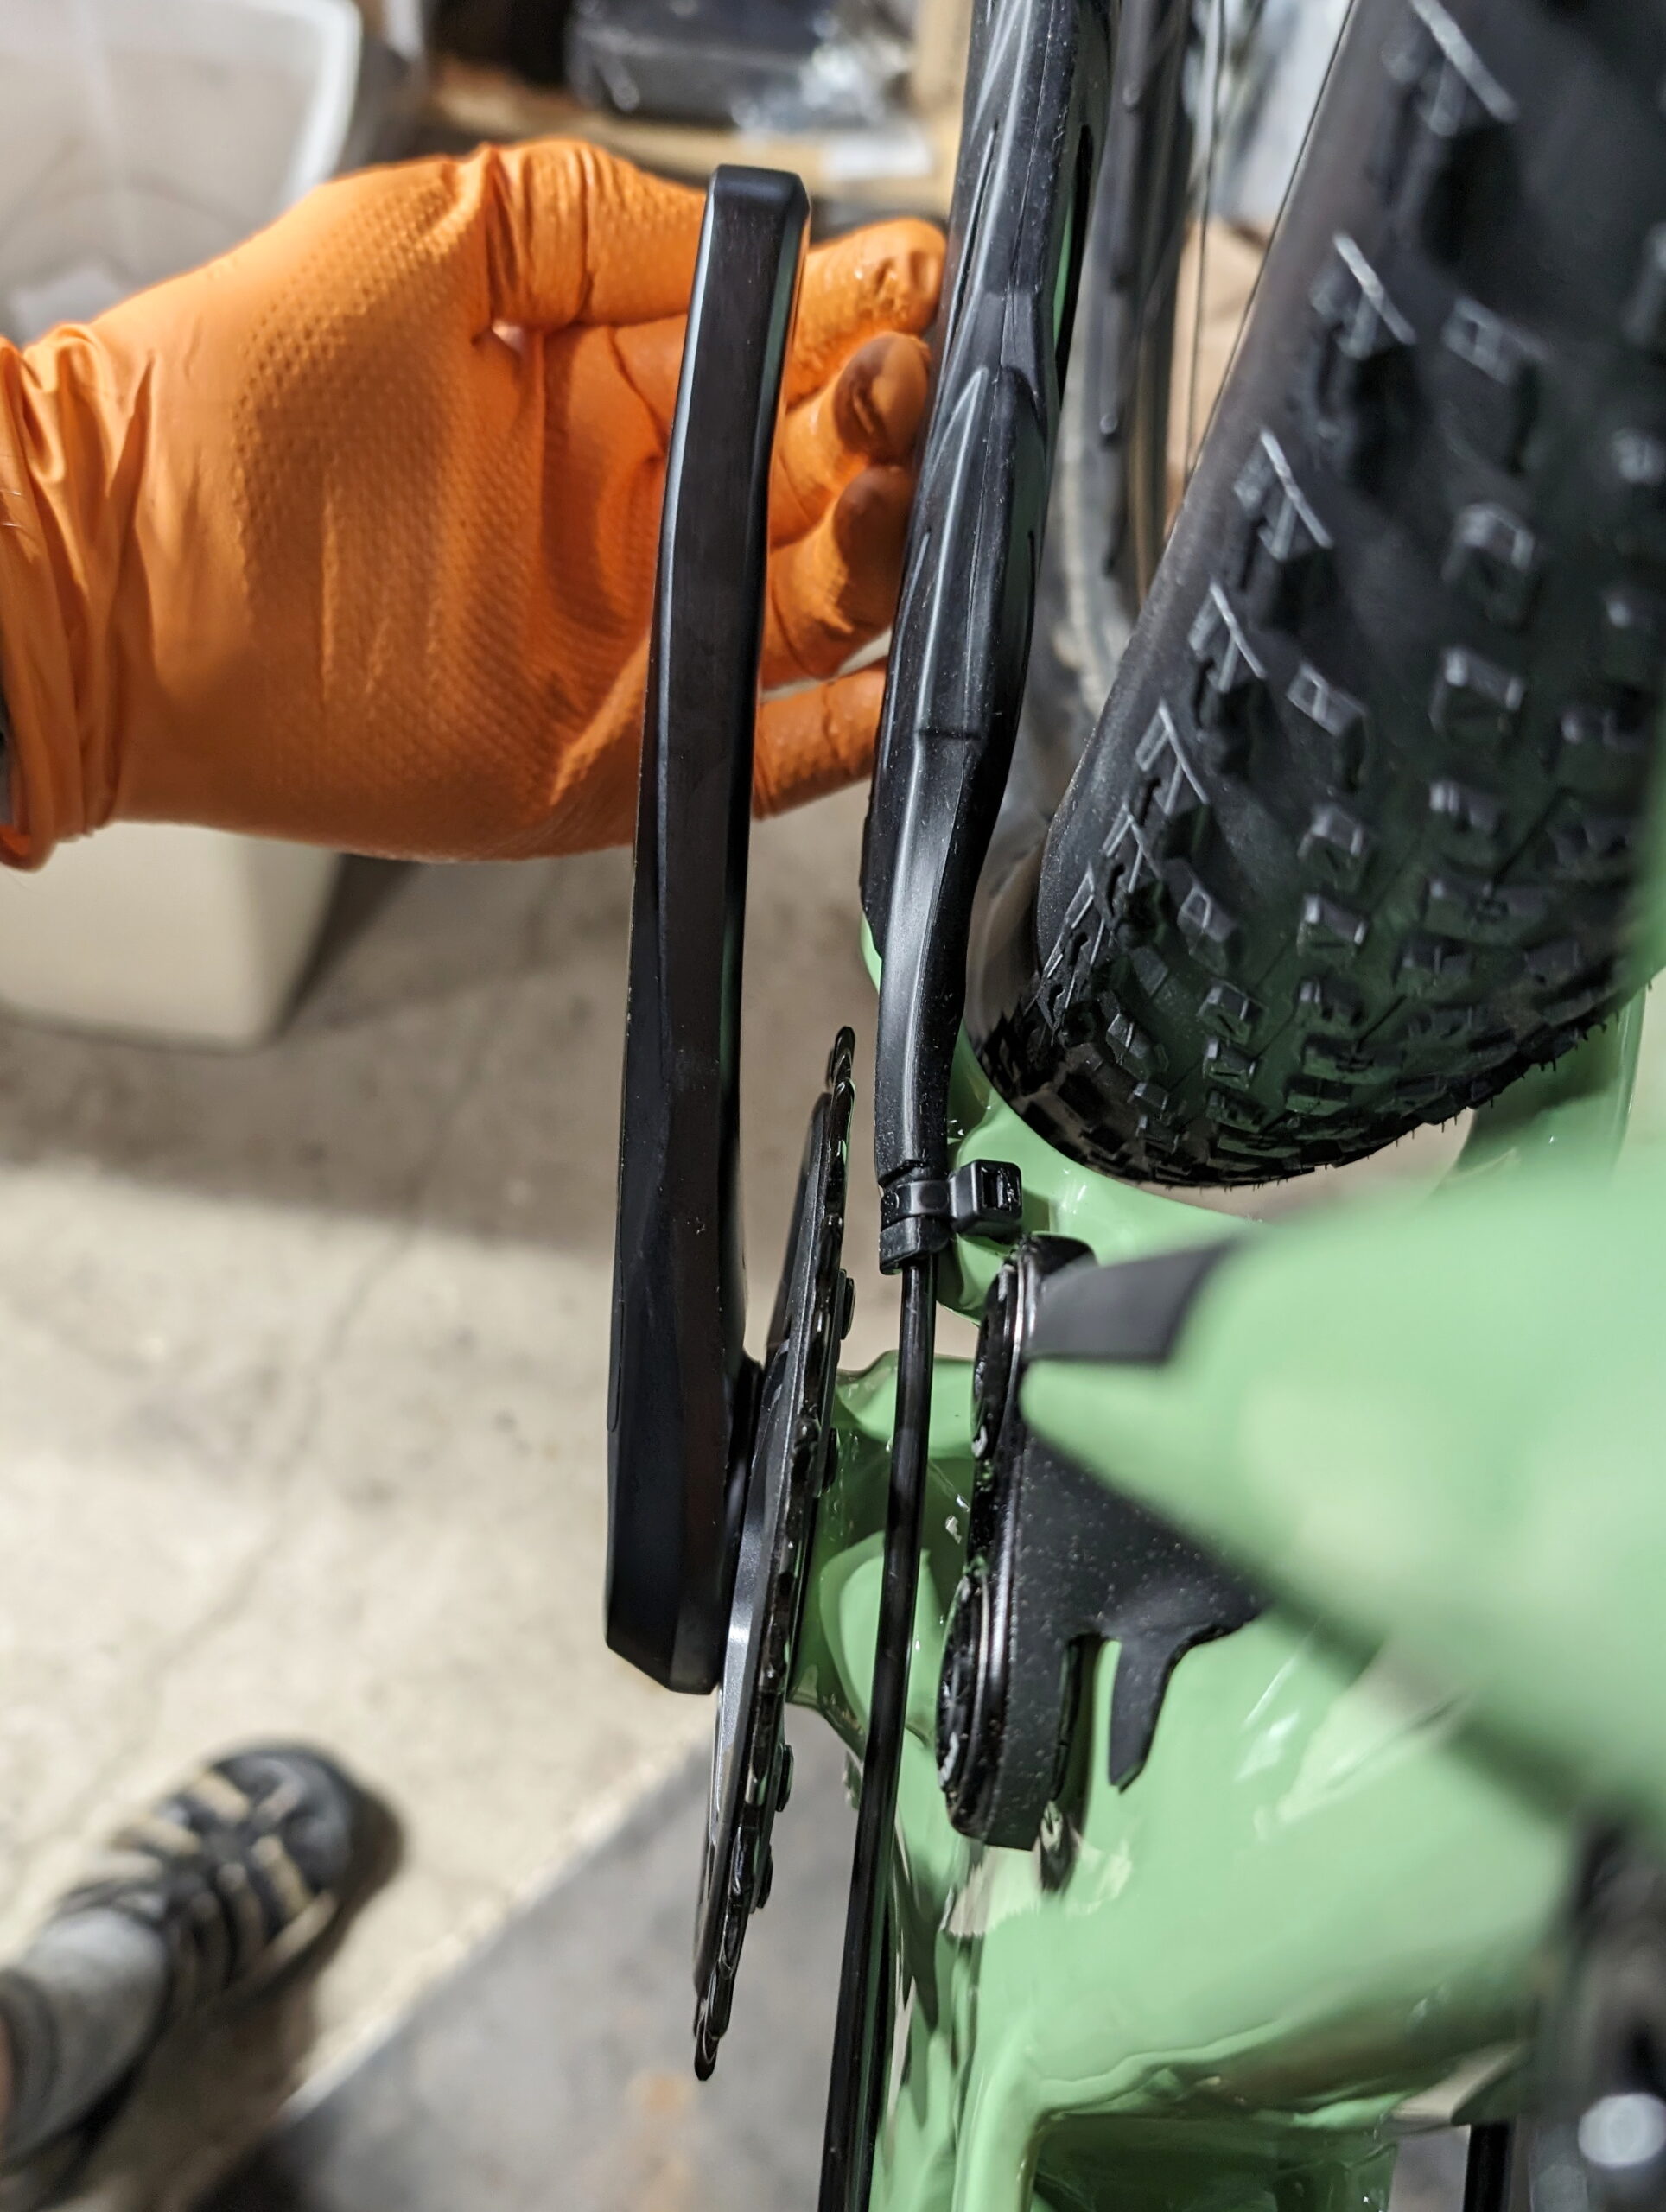
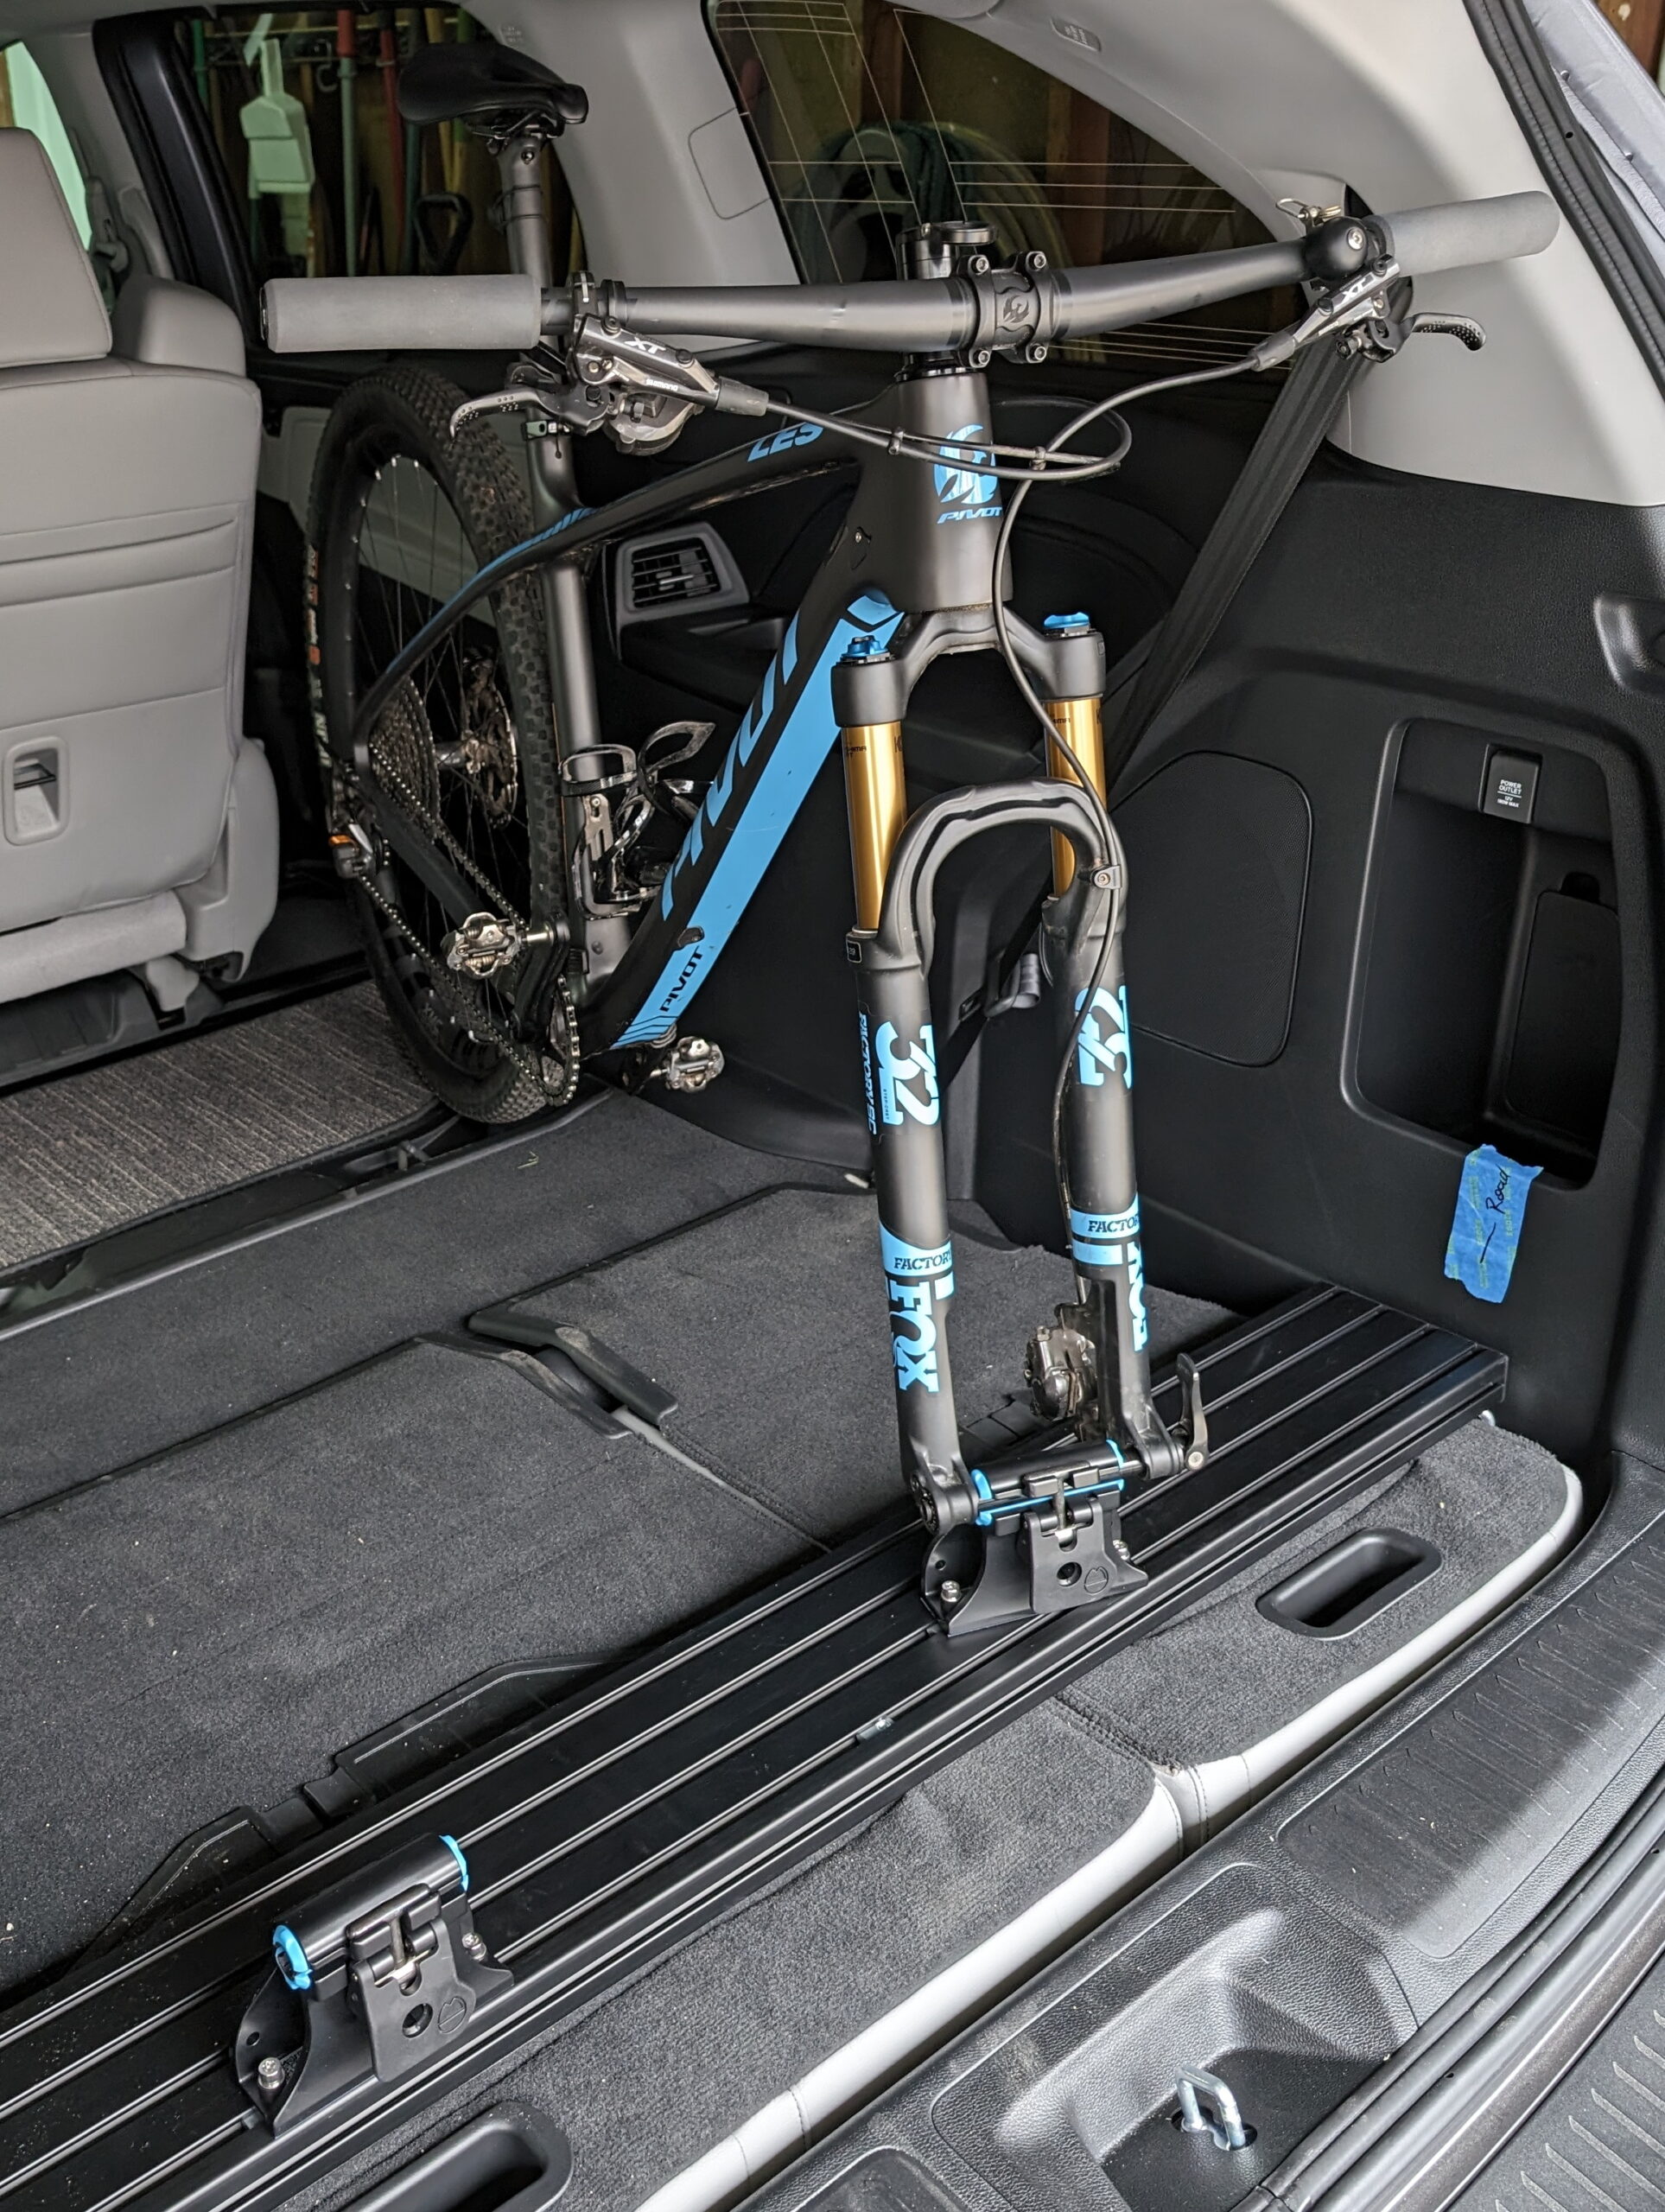
Recently I purchased a Honda Odyssey (2024 EX-L) to replace my aging Subaru Outback and get something a bit better for longer trips. Specifically, I wanted to be able to easily put two (or more) bikes inside, along with dogs and luggage. During winter we’d often drive to trails separately because that was the easiest way to keep both of our bikes clean on trips and this was irritating.
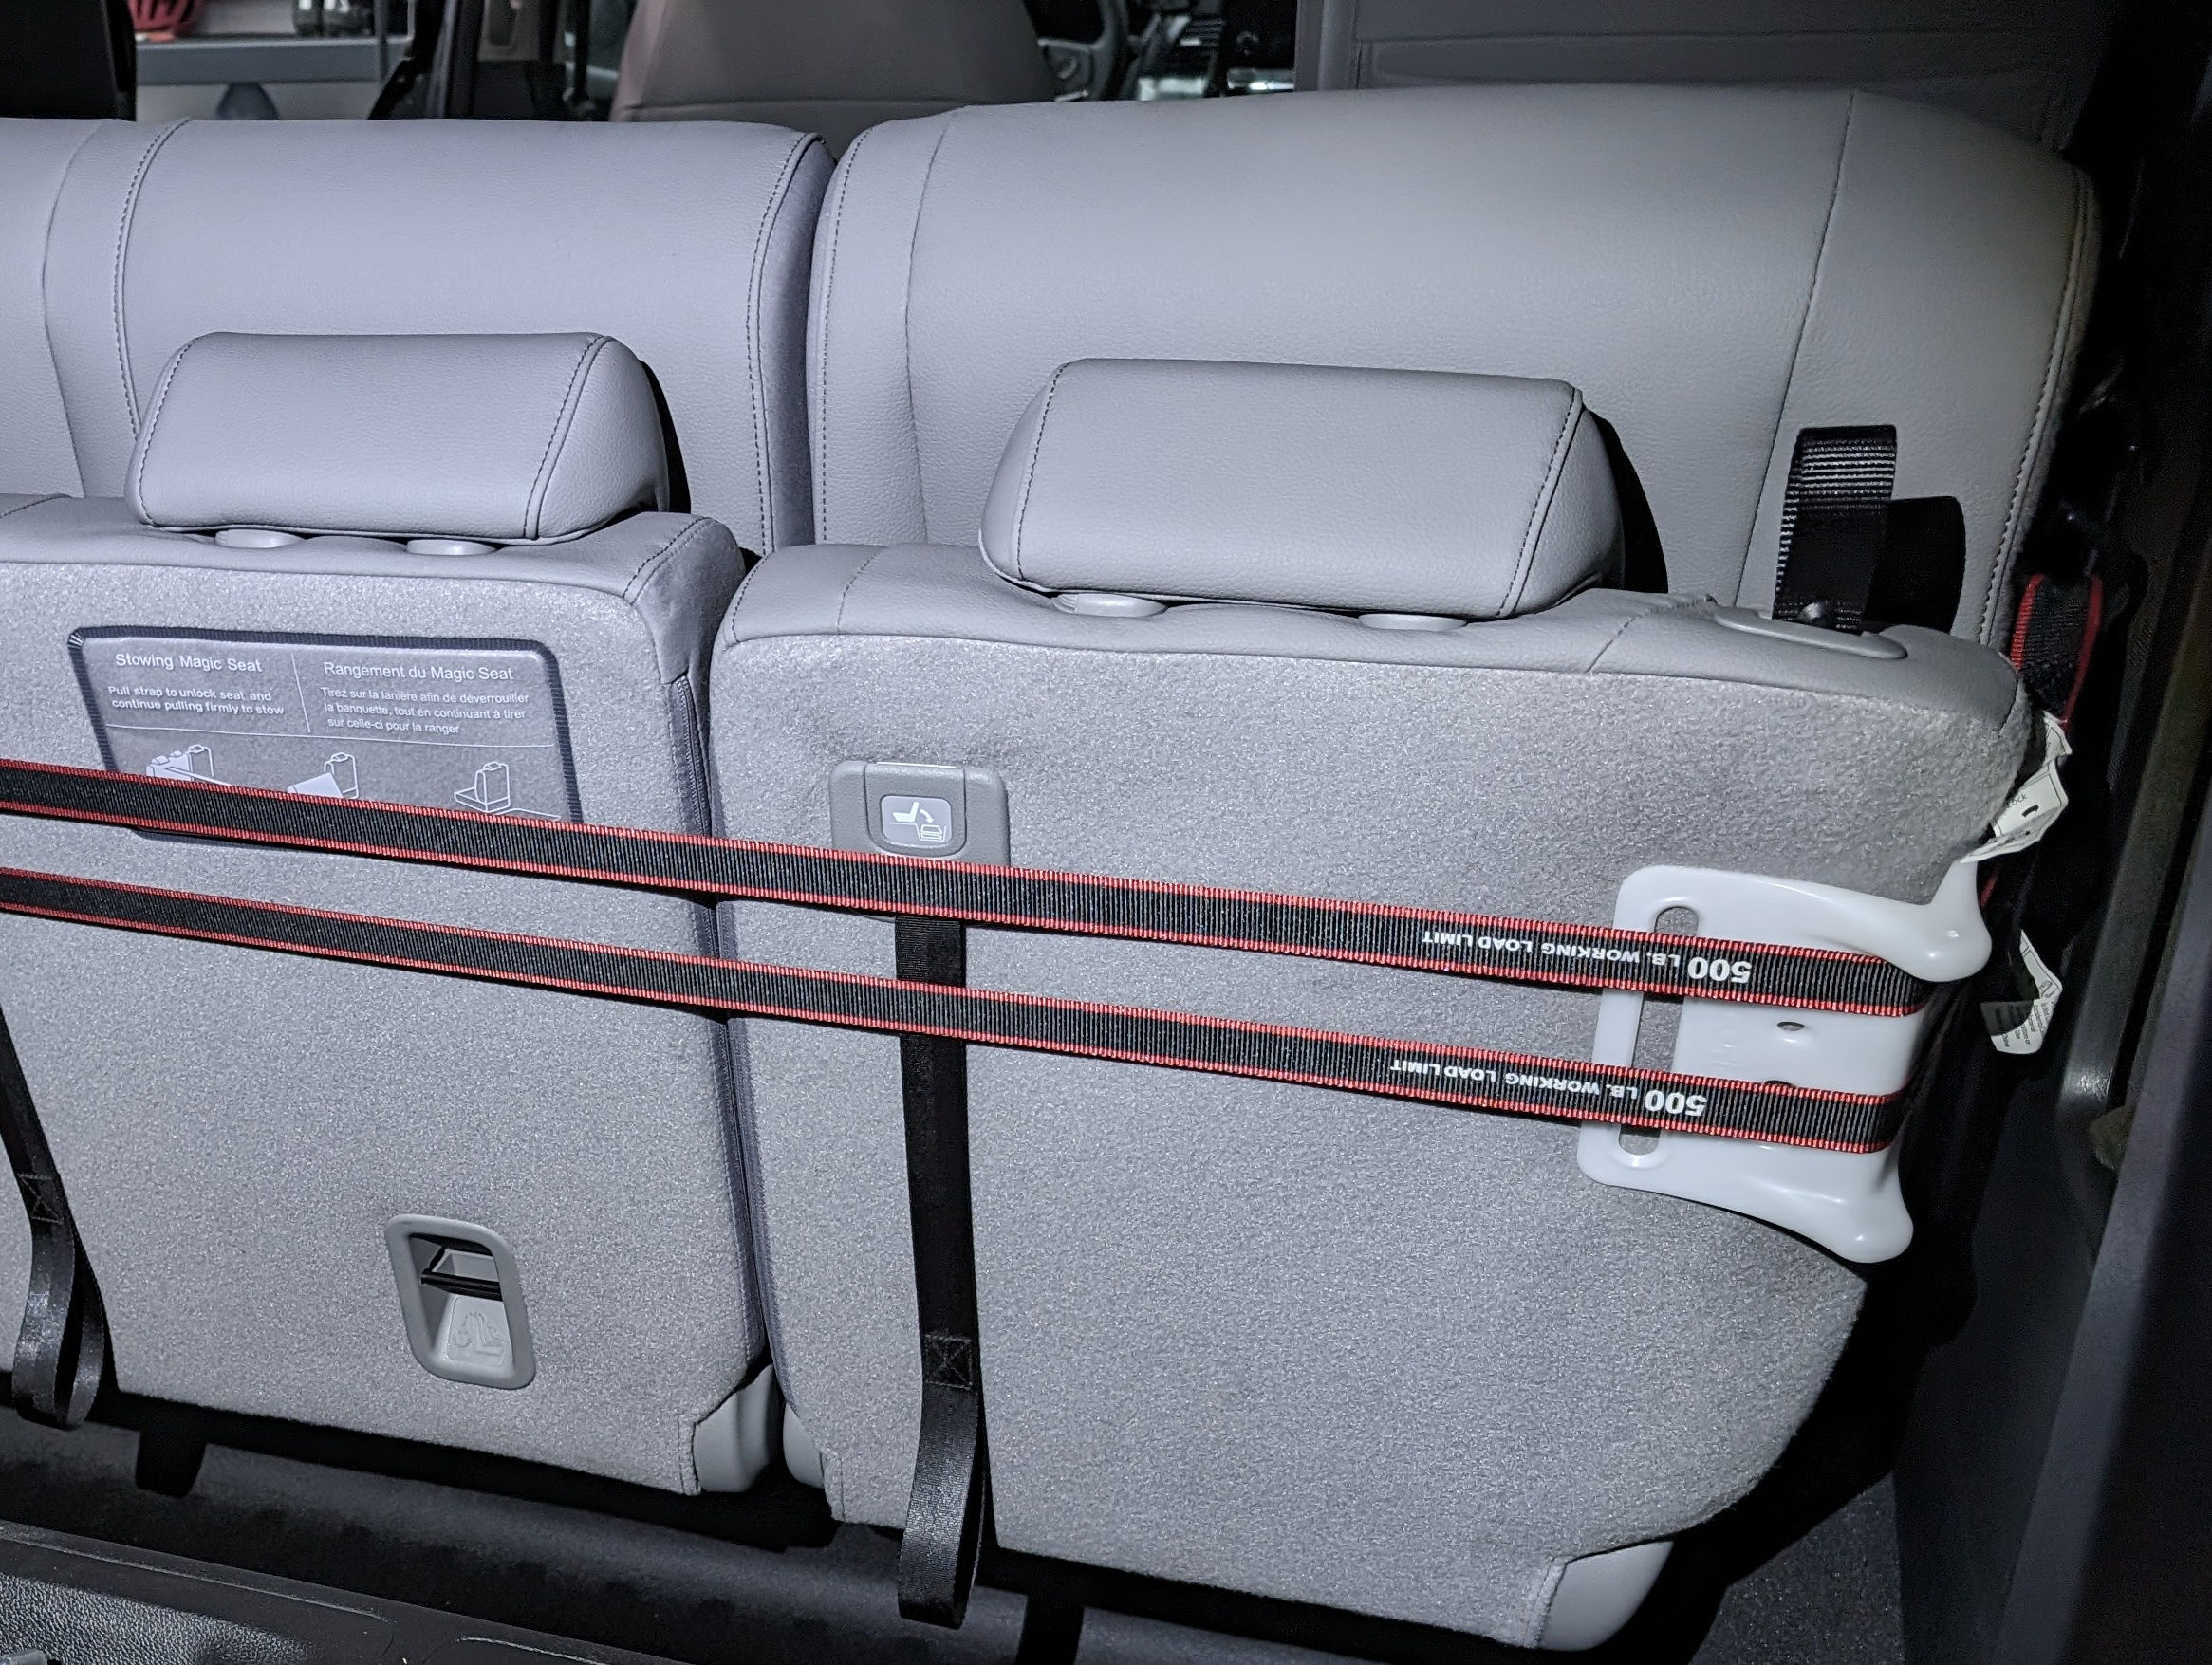
To securely hold the bikes inside I put together an adjustable, expandable rail system that holds bikes by their front through axles and is easy to adjust based on bike type, carrying needs, etc. The rail system is strapped to the rear seats as they sit folded into the floor, which provides solid mounting and easy access through the rear door. Combined with the adjustable, and outright removable, second row seats this works nicely for every bike in the house.
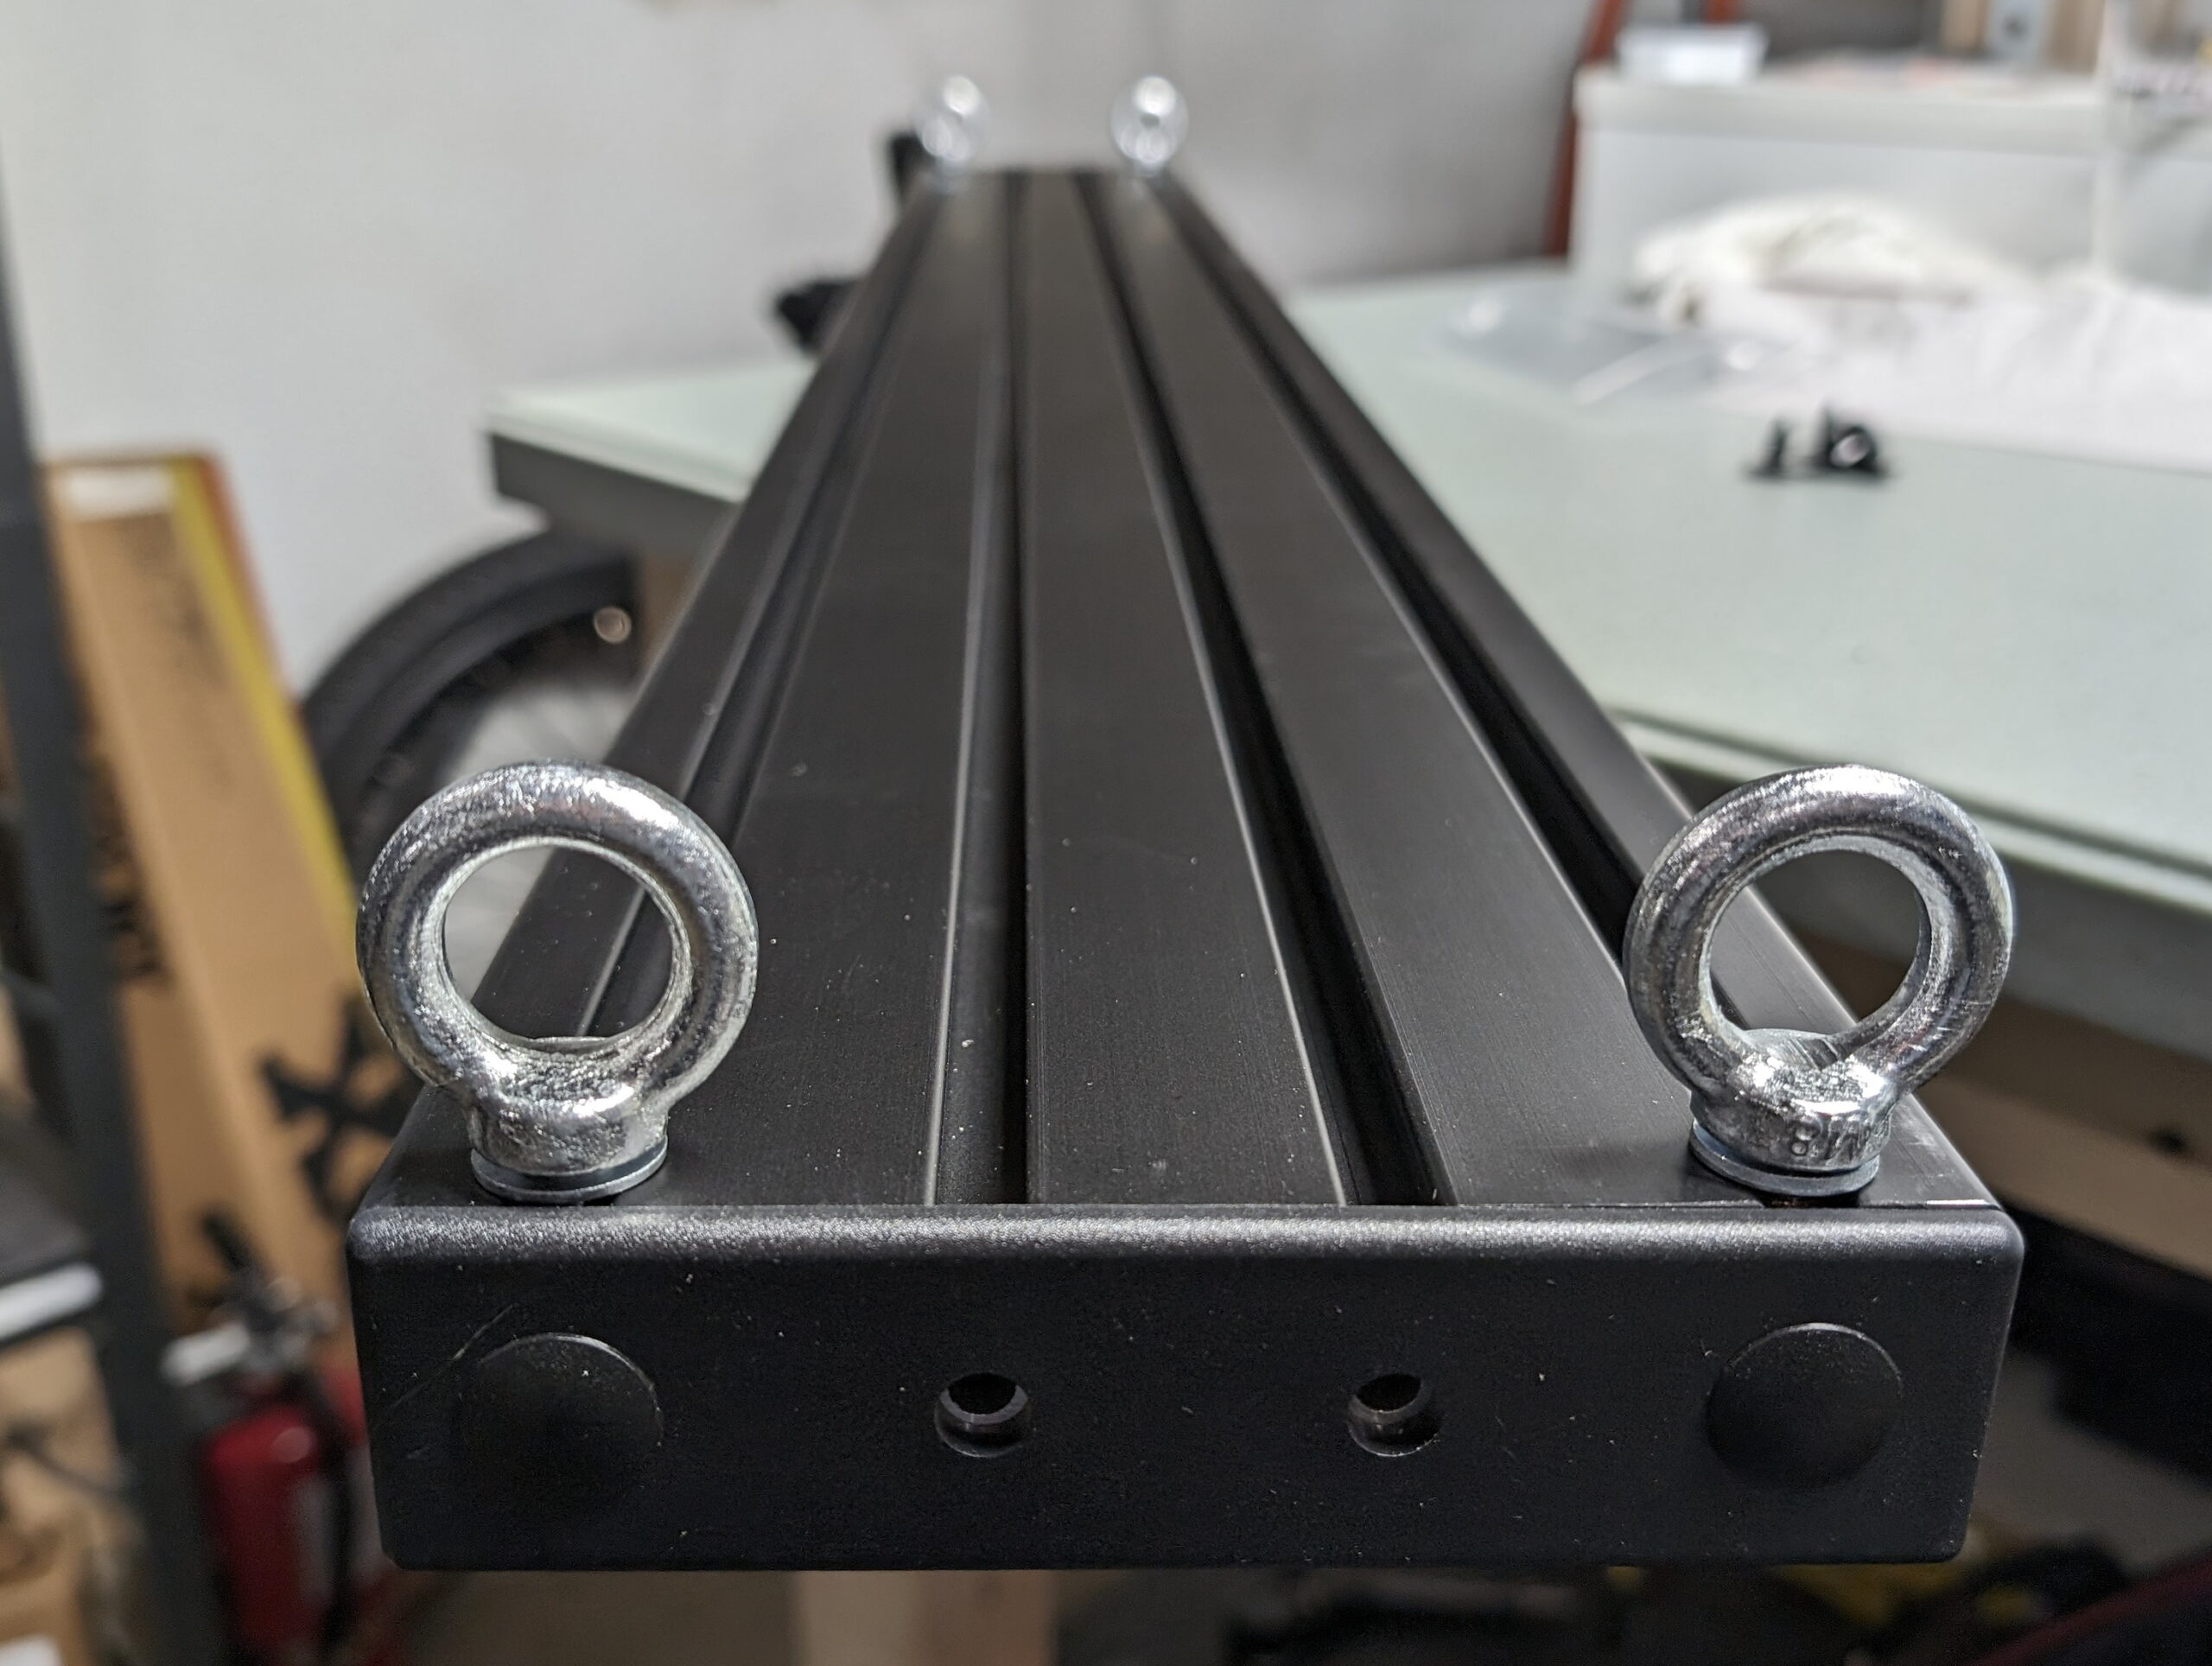
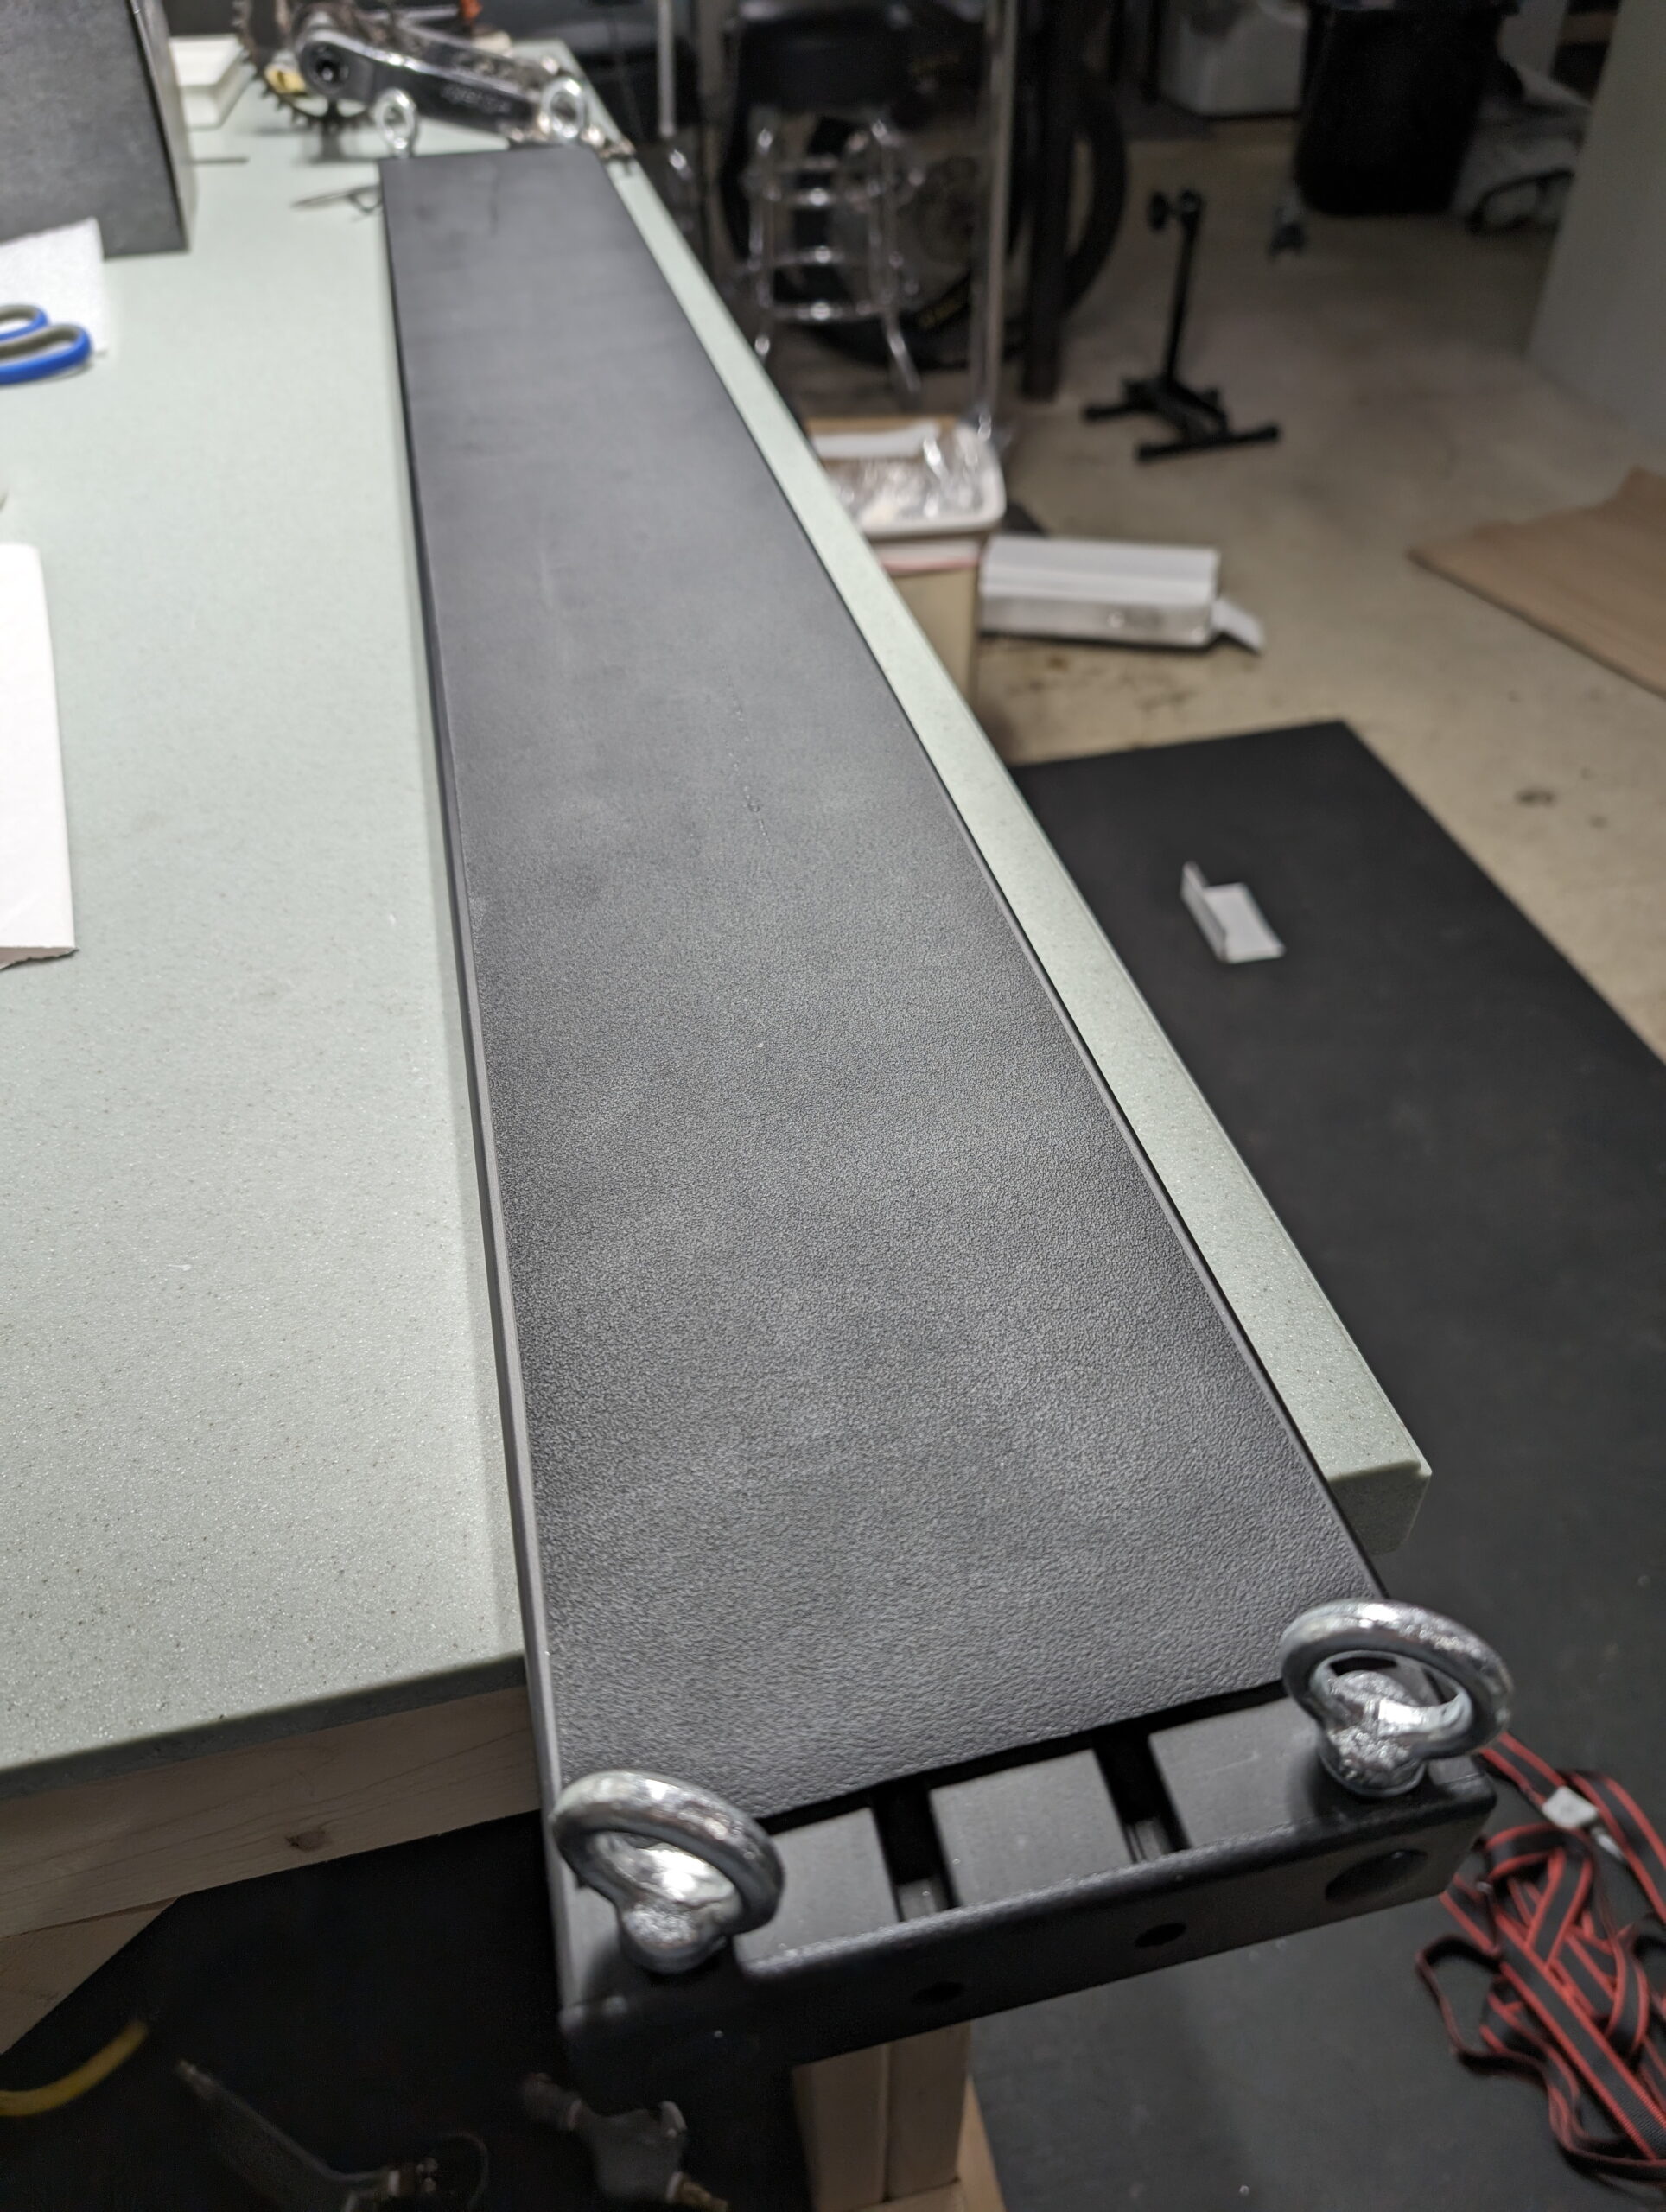
The main, base part of the rack is a 1.5″ x 6″ aluminum extrusion which has four slots on the larger faces. These slots are fitted with drop-in T-nuts to which the fork mounts can be fastened. To support easily repositioning the fork mounts I keep T-nuts in the unused slots, and chose ones with spring ball retention, which keeps them from rattling or sliding around while driving. While this style can be inserted or removed without removing the end caps, I keep spare ones in place because depending on the type of bike being fitted it is sometimes necessary to adjust the mount rotation or move them between slots.
Each end of the extrusion is capped with plastic face plates, and eyelets in slots on the underside are used with ratchet straps to hold the rail to the folded rear seats. A scrap of neoprene was stuck to the underside of the rail with small pieces of 3M VHB tape to help keep it from siding, and plastic corner protectors are used to keep the straps from digging into the seats.
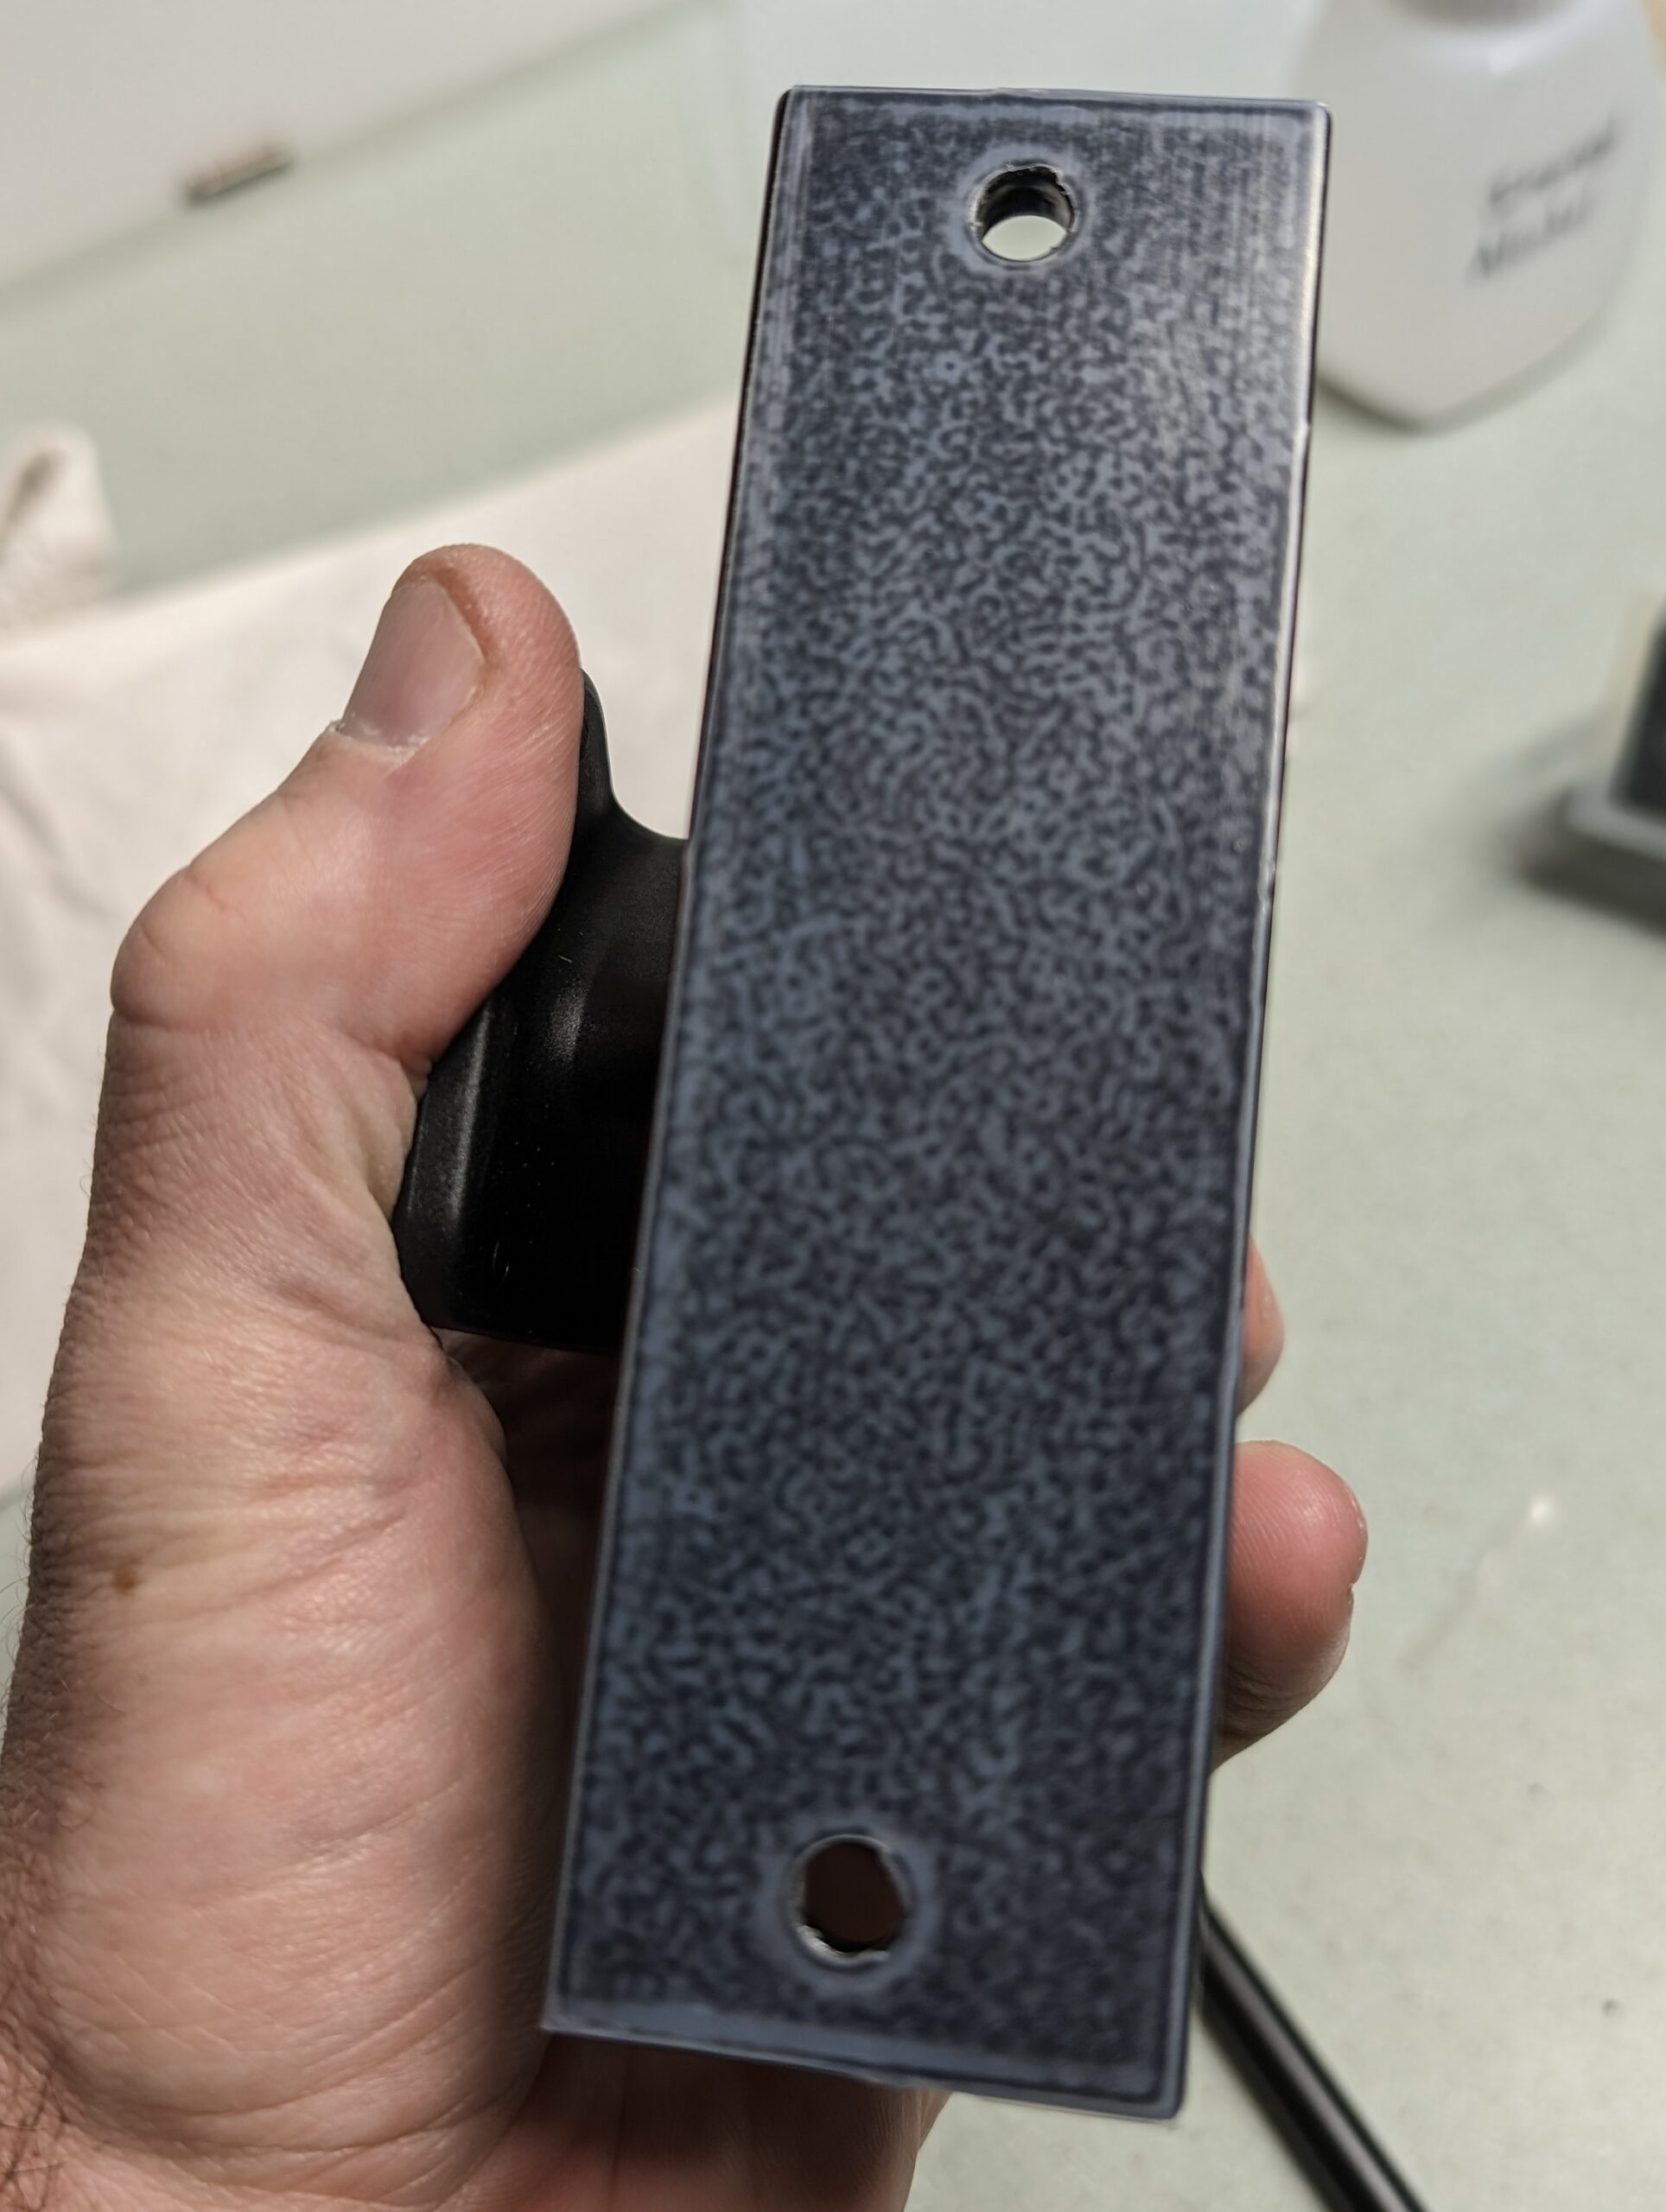
Rocky Mounts DropTop mounts hold the bikes themselves to the rail, and the underside of each mount was covered with UHMW polyethylene tape to make side-to-side adjustment of the mounts smooth and avoid scratching the aluminum. The M6 bolts which came with the mounts were used to attach them to the T-nuts, but they are a bit long and bottomed out on the inside of the rail, so some nylon spacers are used beneath the heads of the nuts. I may eventually get some shorter bolts and avoid the spacers, but I really like the Torx head bolts that came from Rocky Mounts and I’m in no hurry to replace them. By varying the slot used the mounts can be angled at 0°, ~20°, or ~44° and can move forward or backward up to 4.5″. Coupled with easy side-to-side adjustment this makes staggering handlebars and fitting long mountain bike bars easy.
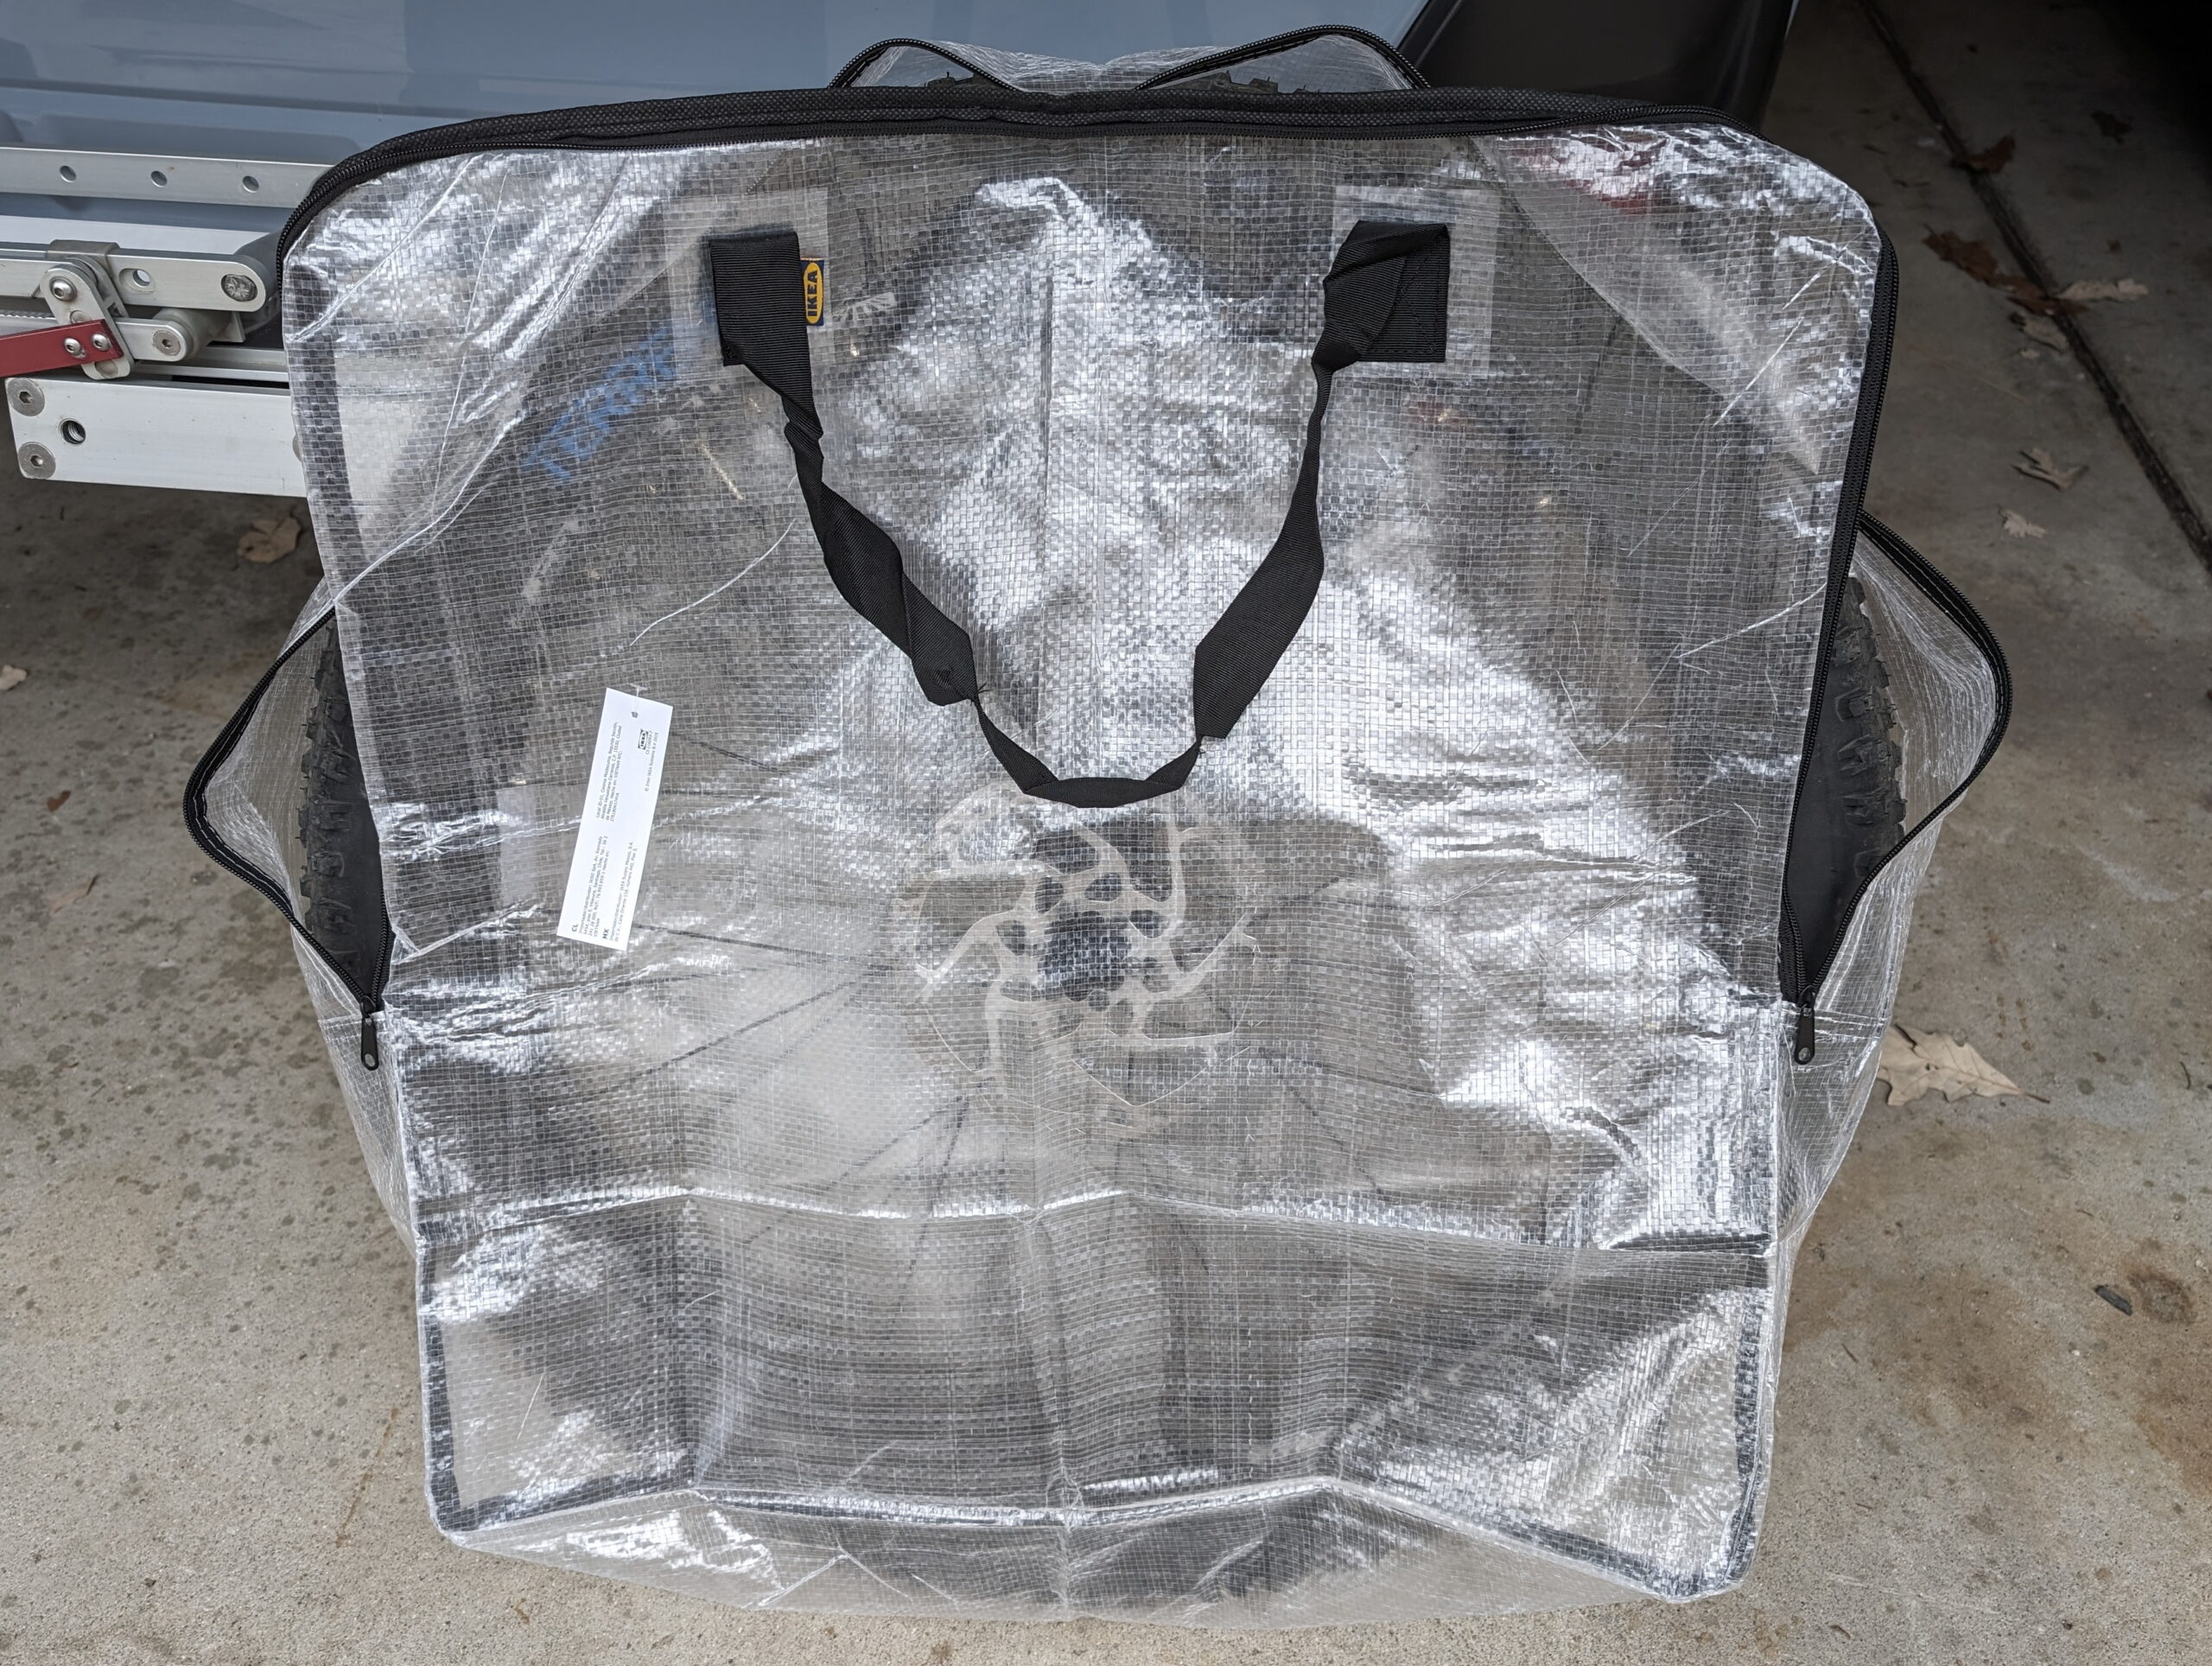
Finally, to hold the front wheels while they are off the bikes, IKEA DIMPA bags are working well. These aren’t always necessary, but with studded or potentially dirty tires and potentially setting them on other luggage, I like being able to drop the wheels into a bag before putting them in the car.
Plastic guards to protect the seats from the nylon ratchet straps.Pivot LES and Mach 4 SLUnderside of extrusion showing eyelets.IKEA DIMPA as Wheel BagNeoprene on the bottom of the rail.UHMW PE tape on the DropTopRocky Mounts DropTop attached to rail.
Comments closed
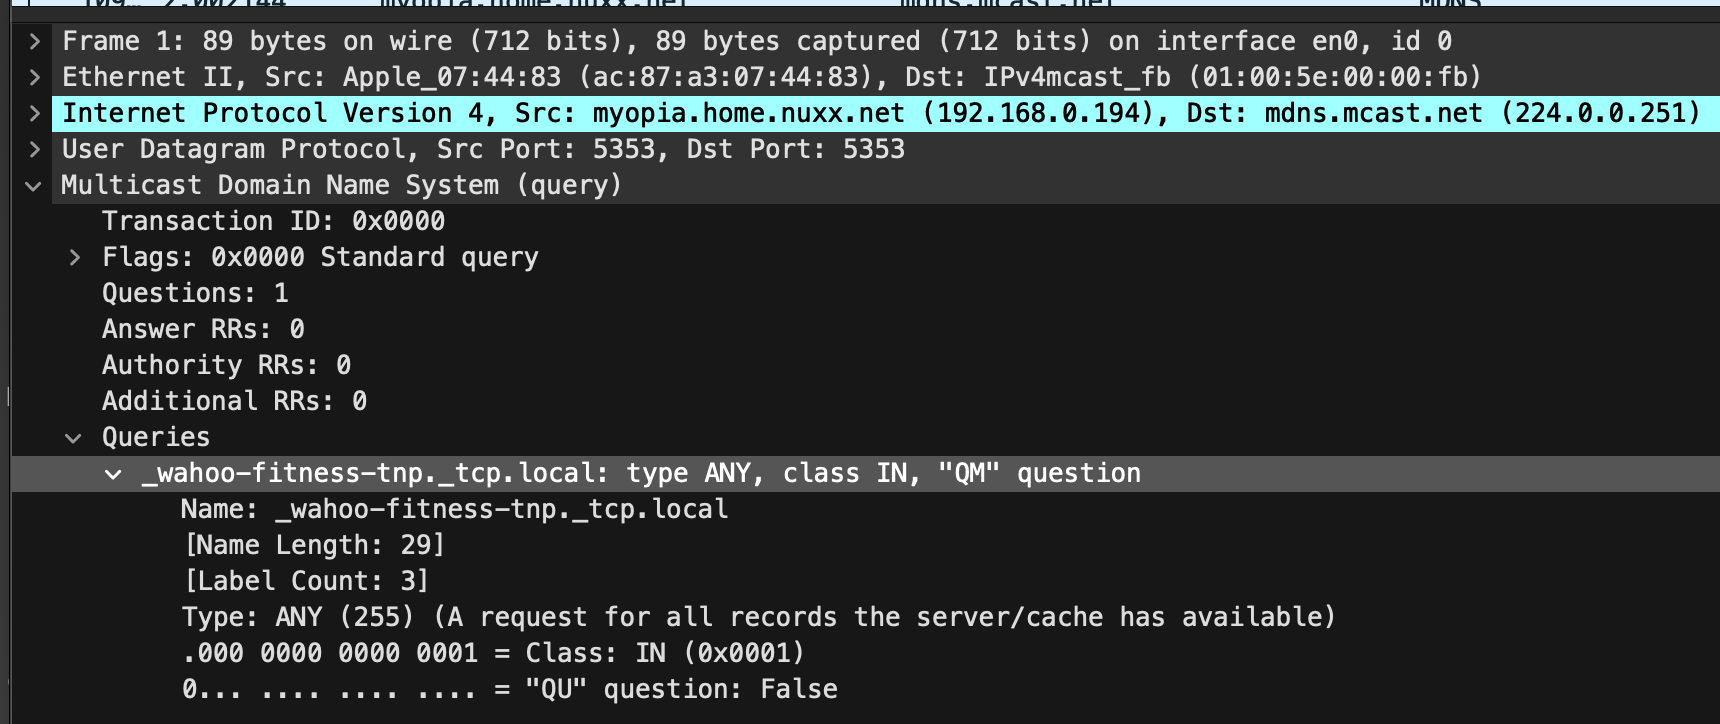
Wahoo smart trainers support network connectivity (instead of just the traditional Bluetooth or ANT+). Since I don’t have one I’d never bothered looking into how it works, but this morning while troubleshooting something with TrainerRoad running in the background I happened to see an mDNS query for _wahoo-fitness-tnp._tcp.local and realized this is how the smart trainers get discovered on the network.
Neat!
Maybe one day I’ll have a smart trainer that can use the network and I can dig further into how this all works.