Rebuilding Shimano SLX (BL-M7000) Brake Levers
Within the past few months I’ve started to notice oil on the main lever pivots of the Shimano SLX (BL-M7000) brakes on my Salsa Mukluk and the brakes have started to feel like they need a bleed. It was recommended that I try rebuilding them — cleaning them out and re-greasing the seals — before replacing.
Using some Danco Silicone Faucet Grease and following a couple of YouTube videos to understand the teardown process I was able to easily get both levers apart and back together, and after my first test ride they seem to be working great. I believe these were getting dirty after a few years of exposure to all sorts of conditions and the seals needed a bit of freshening up. (In this design the end of the piston and thus a thin piece of seal is exposed to the elements.)
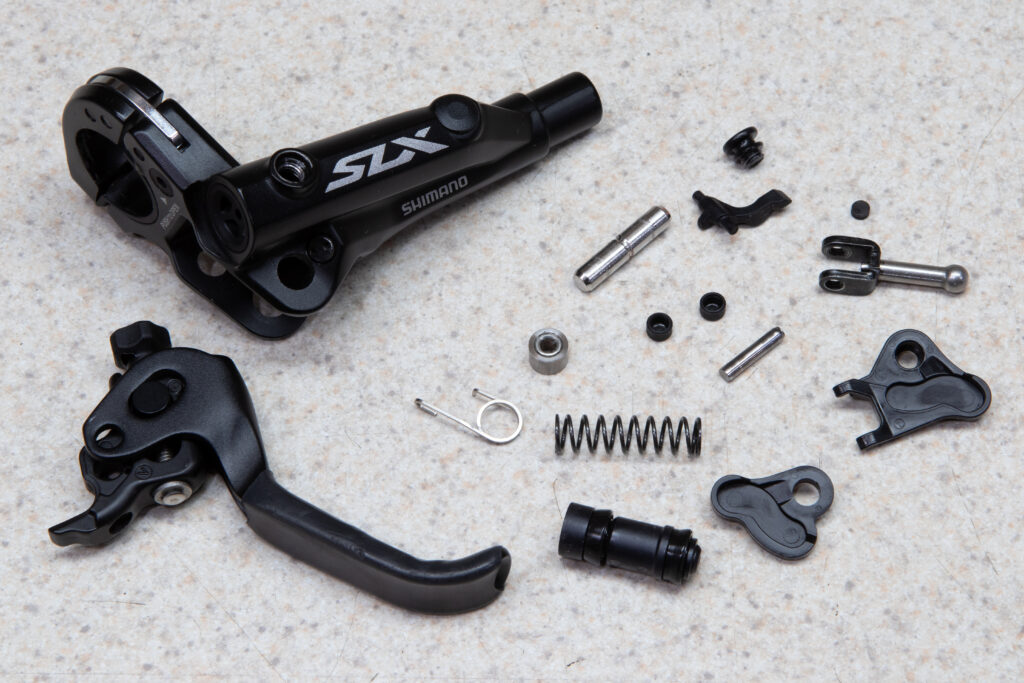
The overall process was quite straightforward, and between these two videos (1, 2) I had no problems figuring out what to do. While the first video is a bit dark, the subtitles helped tremendously. The second is in Tagalog, but shows the process clearly. EV-BL-M7000-3978.pdf, Shimano’s exploded view of the lever, is also somewhat helpful but does not show the details of the piston nor the push rod. If you are reasonably mechanically inclined, and can work with small parts, you’ll have no problem.
Here’s the major steps, along with notes. These steps apply to both the BL-M7000 (SLX) and BL-M8000 (XT) levers and are likely applicable to other similar levers. I recommend that you do levers one at a time, or take photos as you go, to see how the parts fit together. The lever return spring is particularly fiddly to get into place and it’s location is not immediately obvious during reassembly.
Disassembly:
- Disconnect brake hose and remove lever from bar.
- Remove bleed port, squeeze lever a few times to drain excess oil.
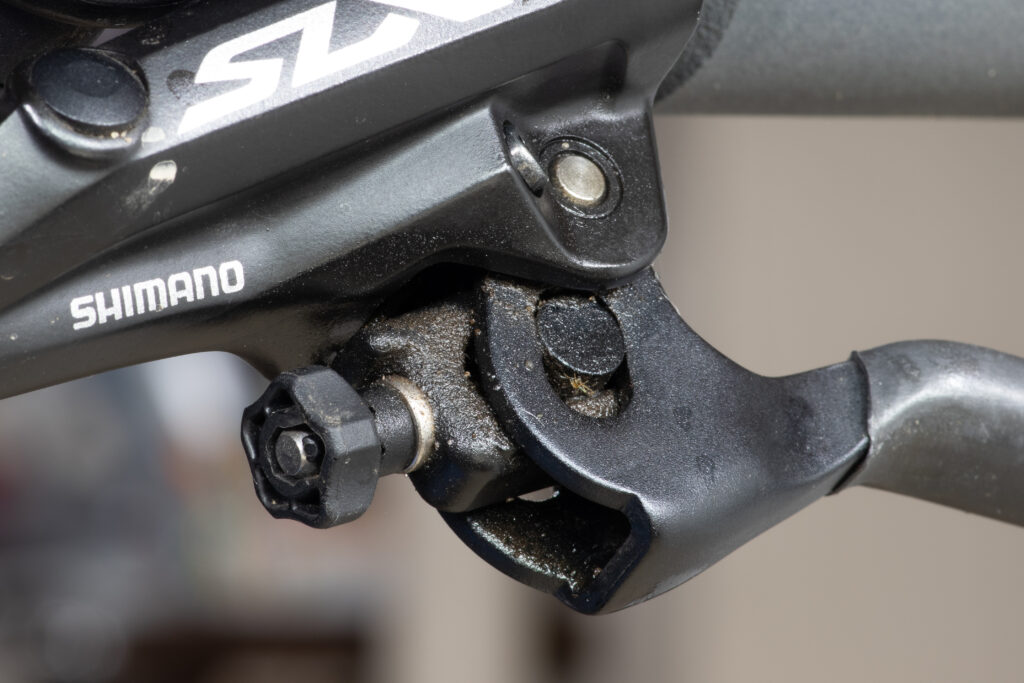
- Remove the small rubber plug which covers the set screw holding the pivot pin (Lever Axle, #5 on EV) in place. Back out but do not remove this set screw (Lever Axle Fixing Bolt and Cap, #4 on EV).
- Press out pivot pin from underside using a 3mm hex wrench or rod to remove the lever. (I had to use a small hammer to loosen it as it was stuck in place.)
- Locate the T-shaped ball-end shaft which presses on the piston. Remove with a twisting motion on the head, snapping it into or out of the plastic guides.
- Locate the plastic pivot plate which has a hooked bottom for the pad contact adjust lever. Remove this; loosen by pushing it out via the holes in the lever body.
- Remove the pad contact adjust lever, which the pad contact adjust screw presses against. (This screw exists on both XT and SLX levers, although it’s externally blanked on SLX.) Depressing the piston with a ball end hex wrench and lifting the lever out with smooth jaw needle nose pliers makes this easier.
- Use a thin rod, such as a 3mm wrench, to push the piston and spring out via the brake hose end. Be careful not to mar the mirror-polished brake piston bore.
- Remove the other plastic pivot plate.
Cleaning:
- Wipe down the brake lever body to remove oil and gunk. Clean out the inside of the bore with a paper towel, being careful not to damage the mirror polish. I do not suggest submerging or using soap or degreaser as it’ll be difficult to clean out the reservoir half of the lever.
- Gently wipe off the piston and spring. Inspect the seals for damage. If they are damaged, you’ll need to find a new piston as these are key to the brake working and not leaking.
- Clean the lever and reach adjustment. (I used dish soap and a paintbush.)
- Clean the lever return spring. Do not bend this.
- Clean the plastic guide plates, being sure to not scratch the them.
- Disassemble and clean the T-shaped ball-end shaft. There are two small plastic caps, a bushing, an axle, and the ball end shaft. Take care of the plastic end caps, these slide in the guide plates to make everything work.
Reassembly:
- Reassemble the T-shaped ball-end shaft putting a bit of silicone grease in and on the bushing, in and on the plastic end caps, and on the ball end.
- Fit the pivot plate without the hooked bottom.
- Drop the spring into the brake lever.
- Apply a very thin film of silicone grease to the piston and drop it into the lever with the concave end facing out.
- Replace the pad contact adjust lever while gently holding the piston in with a tool.
- Fit the other pivot plate, with the hooked bottom, into place with the hooked bottom fitting around the pad contact adjust lever.
- Replace the T-shaped ball end shaft with a twisting motion that allows the end caps to it follows the ramps on the pivot plates.
- Partially insert the pivot pin into the lever.
- Fit the lever return spring between into the lever between the main lever blade and reach adjust.
- Align the pivot pin holes in the lever with the spring, with the lever pressing against the bushing on the T-shaped ball end shaft, and slide the pivot pin into place. (This was easiest when I guided the assembly together with a 3mm hex wrench.)
- Tighten the set screw to hold the pivot pin in place.
- Check that the lever moves and returns smoothly. Assess and fix if not.
- Turn the reach adjust for maximum reach. Reattach hose and bleed system.