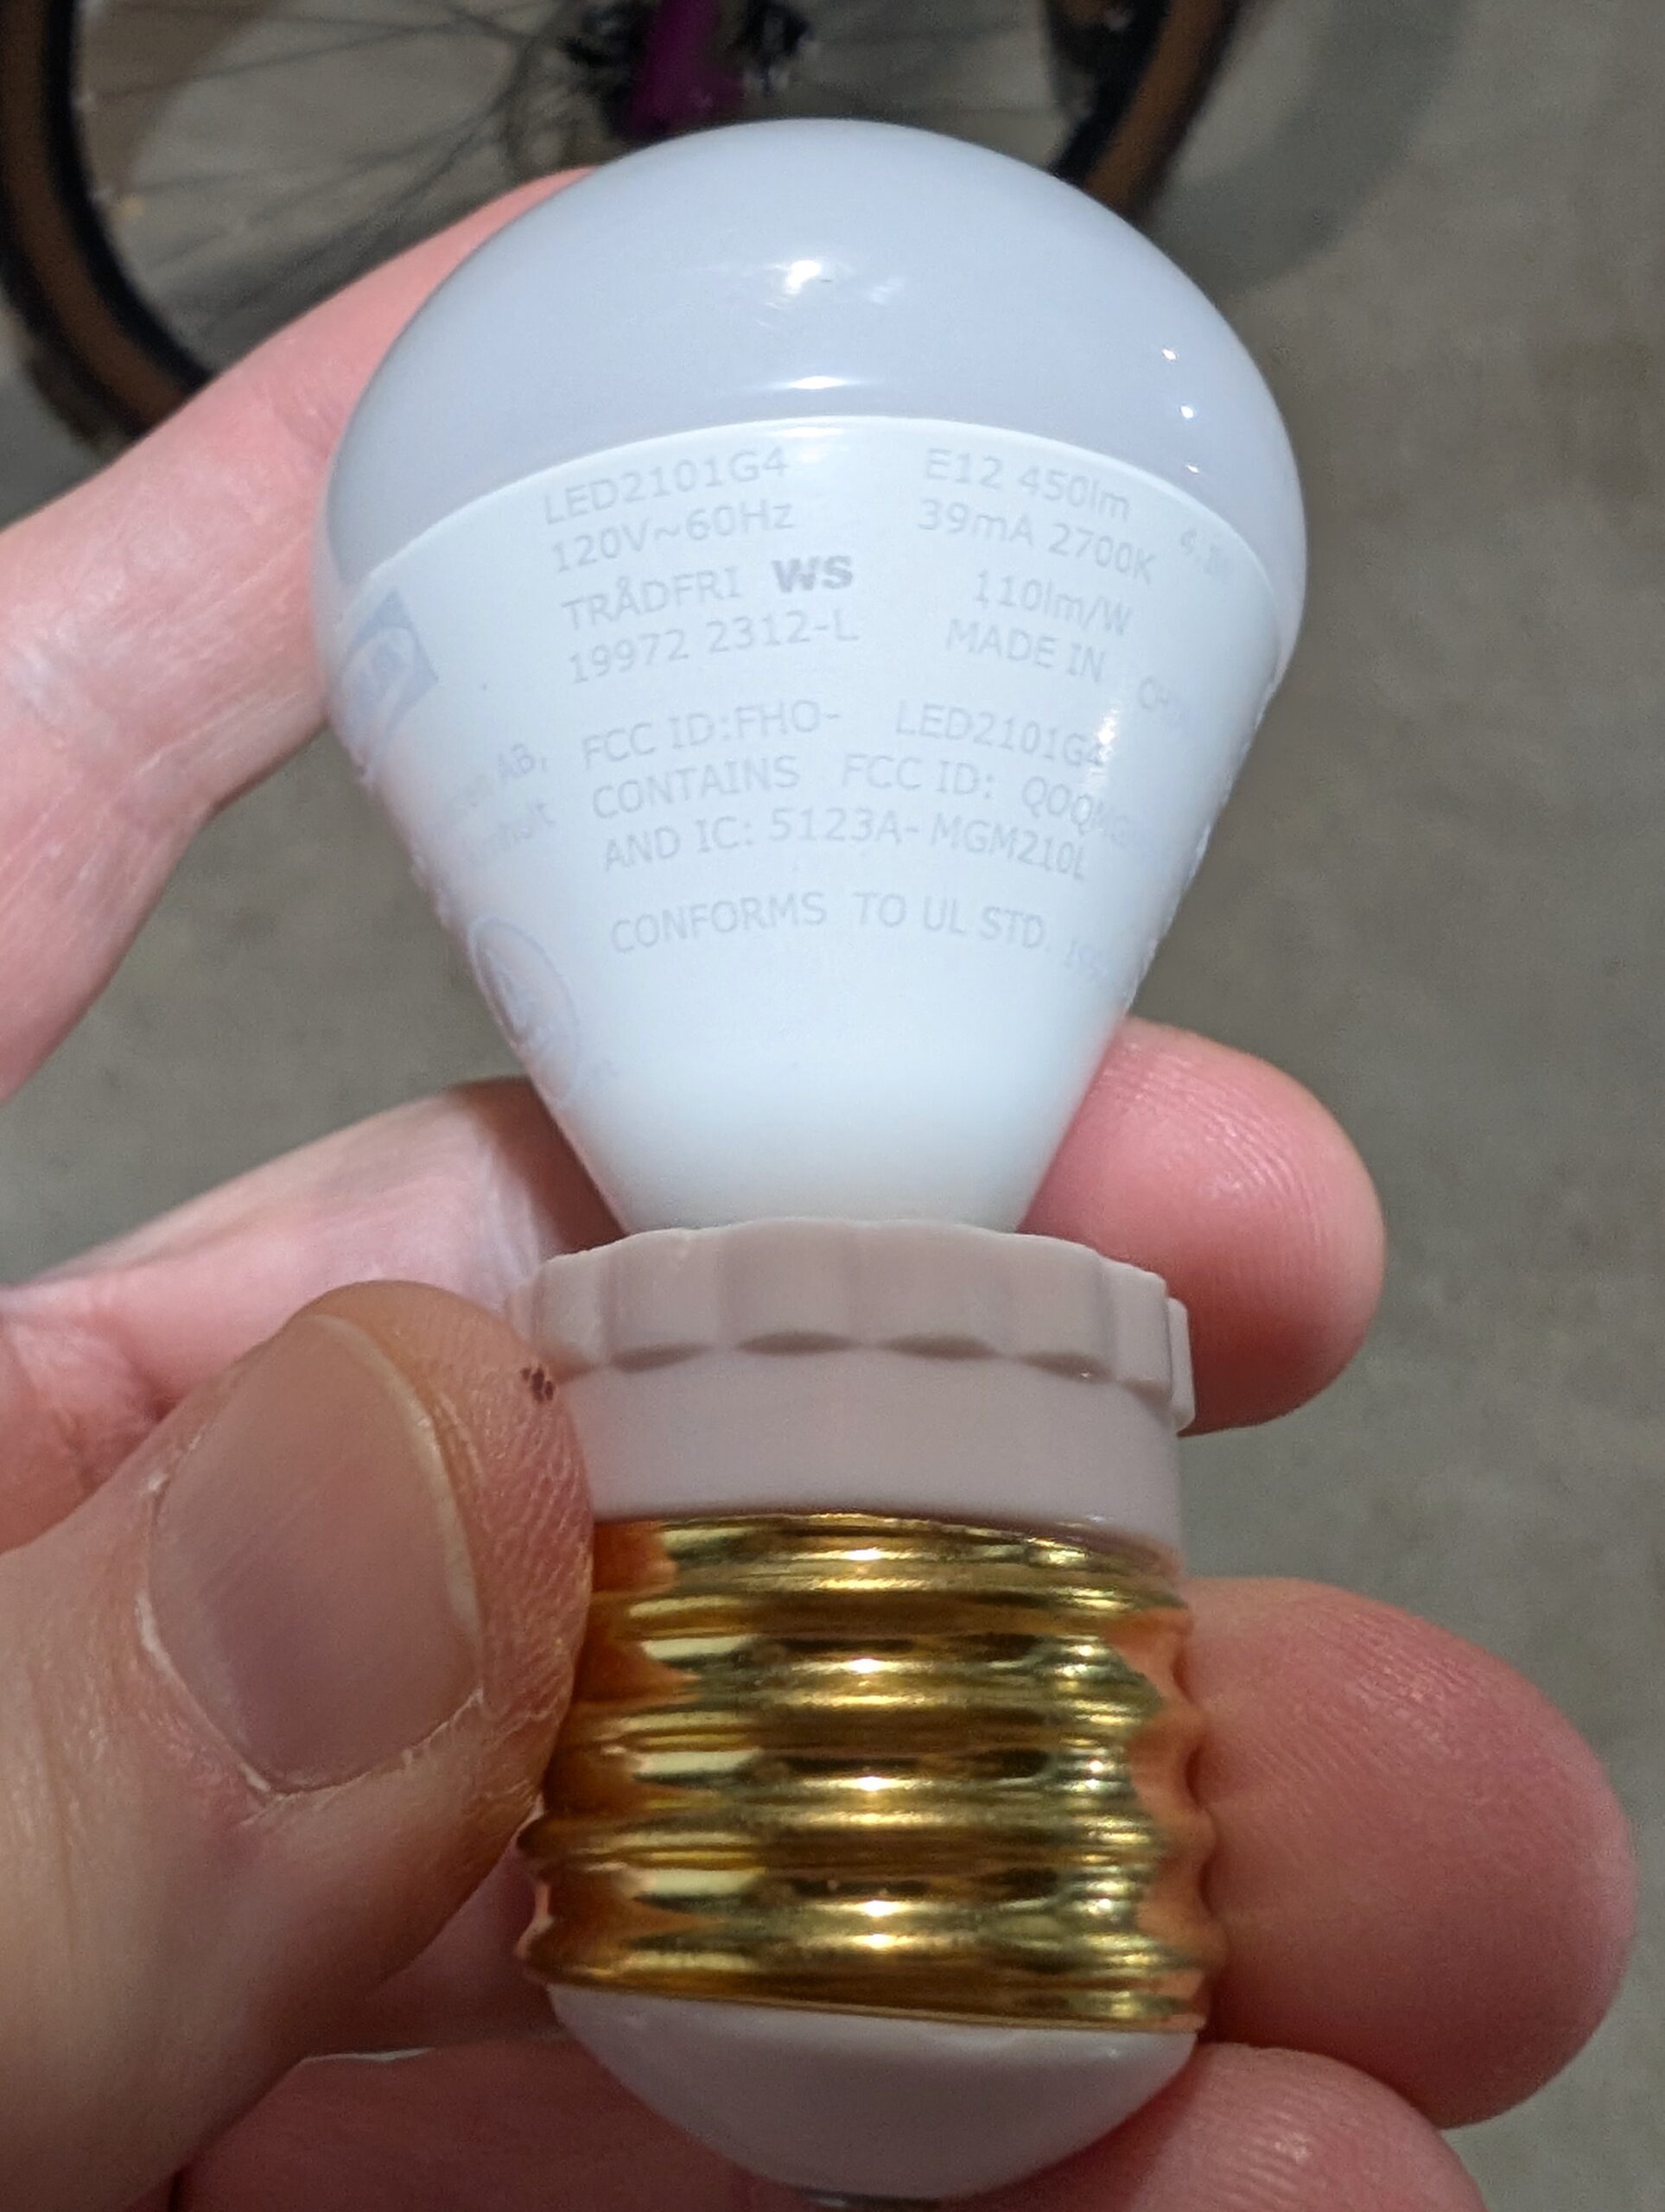
In continuing to optimize things I wanted a bulb that has an even-dimmer and warmer initial brightness than the IKEA TRADFRI LED2101G4 (in an E26 to E12 adapter) I’ve been using. I’ve now settled on Philips Hue White and Ambience 60W A19, as it’s both lower brightness and warmer at initial turn-on and has a brighter high end, making it more usable when working on things around the bedroom.
With the Lighten Up! I had used a halogen bulb, which combined with the dimmer, made the initial brightness so low the filament was barely visible with the naked eye. This made the initial-on not noticeable and didn’t jar me awake. To try and replicate something similar I considered the Shelly Dimmer 2 and putting a halogen bulb back in place, but I wasn’t really wanting to go back to bulbs that give off so much heat and use so much power. And while I find Shelly devices well engineered, I wasn’t very interested in more WiFi IoT devices. (I really prefer Zigbee or Z-Wave for security reasons.)
Thanks to this /r/homeassistant thread I was prompted to try some Hue bulbs, so $76.31 to Amazon later and I had a pair. They easily adopted directly into HA and after a little tweaking (mostly adjusting automations for the new devices), I’m happy with them. The warm/low setting is really quiet dim and yellow-reddish, and at full brightness it’s… nicely bright.
I may tweak the curve used for bringing the brightness up, but thankfully the script I use (Ashley’s Light Fader 2.01) has a whole range of curves available. I’m currently using the default easeInSine, but this morning it seemed to hit the final brightness a bit abruptly, so I may try something like easeInOutSine.
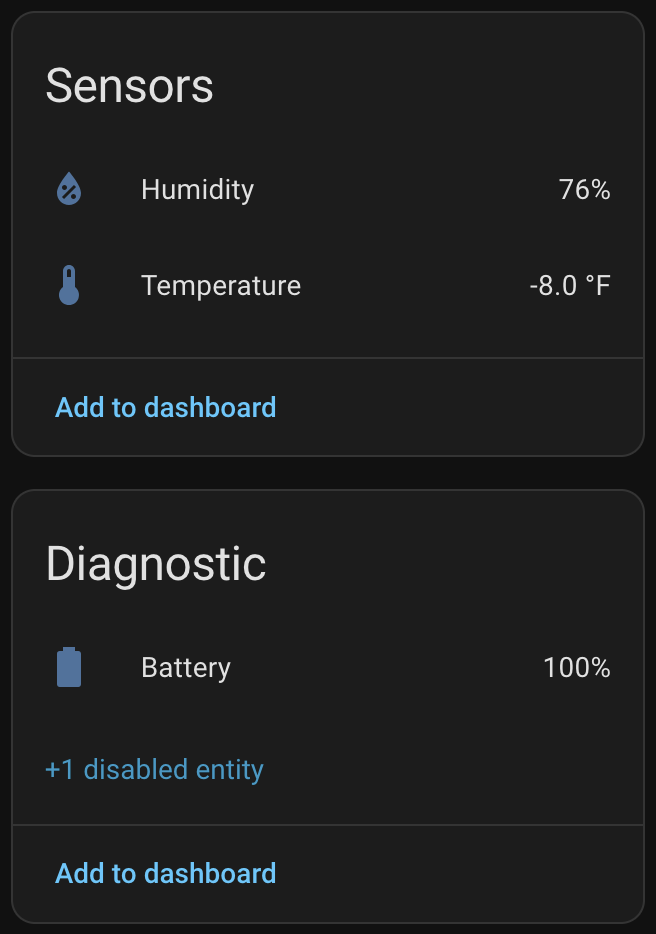
SwitchBot sensor showing well-below-0°F reading and still 100% battery after a month of winter.
At ~US$31 for a three pack (via Amazon) they are 1/3 the price of the ZSE44, take AAA batteries, and are IP65 rated. The specs also claim they work down to -40°C (-40°F) with Lithium batteries. Basically perfect for outdoor spaces including attics, crawl spaces, etc.
I installed this side by side with the ZSE44 with the solar radiation shield on the back fence, and as hoped, it’s reading well below zero and working fine. I also put the other two (from the three pack) in the fridge and freezer to see how they’d do there, and while the freezer doesn’t get as cold as it currently is outside, it was a good preview of data before the temperatures dropped. And all three currently are at 100% battery.
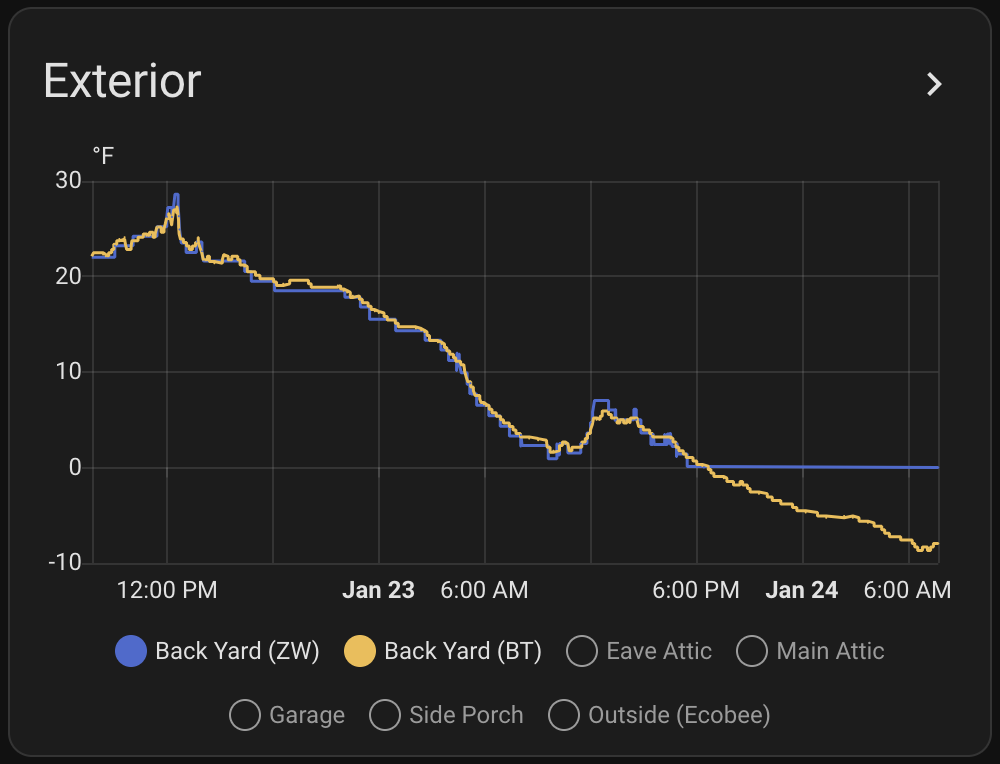
Now that we’ve had our first well below 0°F temperatures of the season I can say that yes, the SwitchBot sensor is working properly, with more frequent updates.
When initially setting up Home Assistant its purpose was to log temperature and humidity at various points around the house. I started with the cheapest sensors available at the time — Aquara Temperature and Humidity Sensor — but after a couple years have passed I’m finding these a bit disappointing. The CR2032 battery life isn’t great (even indoors they last about 8 months), and I’ve had a few of them just die. While they are small, the size benefits don’t outweigh the battery and longevity hassles. The Zigbee connectivity is pretty simple and mostly works, but when the battery or device dies it just kinda… falls off the network and works/rejoins (even after a battery swap) unreliably. I think I’ve disposed of three in the last year.
The biggest downside to these SwitchBot sensors is they use Bluetooth Low Energy (BTLE) for communication. This does not have nearly the range of Z-Wave, which was my original reason for putting the ZSE44 in the back yard.
Thankfully Home Assistant can use Bluetooth Proxies (networked remote BT sensors), and the Shelly 1 — a UL-listed WiFi-controlled smart relay — is one. I already had a few of these around the house to control lights fixtures, so via the proxies I’m able to get enough BTLE coverage to pick up the sensor along the back fence and the ones in the fridge. It’s no Zigbee or Z-Wave or Thread-like self-healing mesh, but so far it’s working well. And really, with the devices’ fixed locations, there’s not a ton of practical difference between setting up a mesh network with well-planned routers (Zigbee) or repeaters (Z-Wave) and deploying BTLE proxies.
I’ve also picked up two of the SwitchBot Meter Plus devices which is a temperature/humidity sensor with an LCD display that runs off of two AAA batteries. It’s not as robust as the Indoor/Outdoor sensors, but is perfect for somewhere I want to see the local temperature visually and log it in Home Assistant; indoor uses. In years past I’d place temperature/humidity displays like this around the house so I could see some data, and these are basically the same, except with logging to Home Assistant.
Long-term, as they fail, I could see myself replacing the remaining Aquara sensors around the house with these. Even the couple of ZSE44 sensors I have may get replaced with these (particularly the one in the back yard). But, for now, I’m just glad to know how far below 0° it really is, and have record of this, because data is nifty.
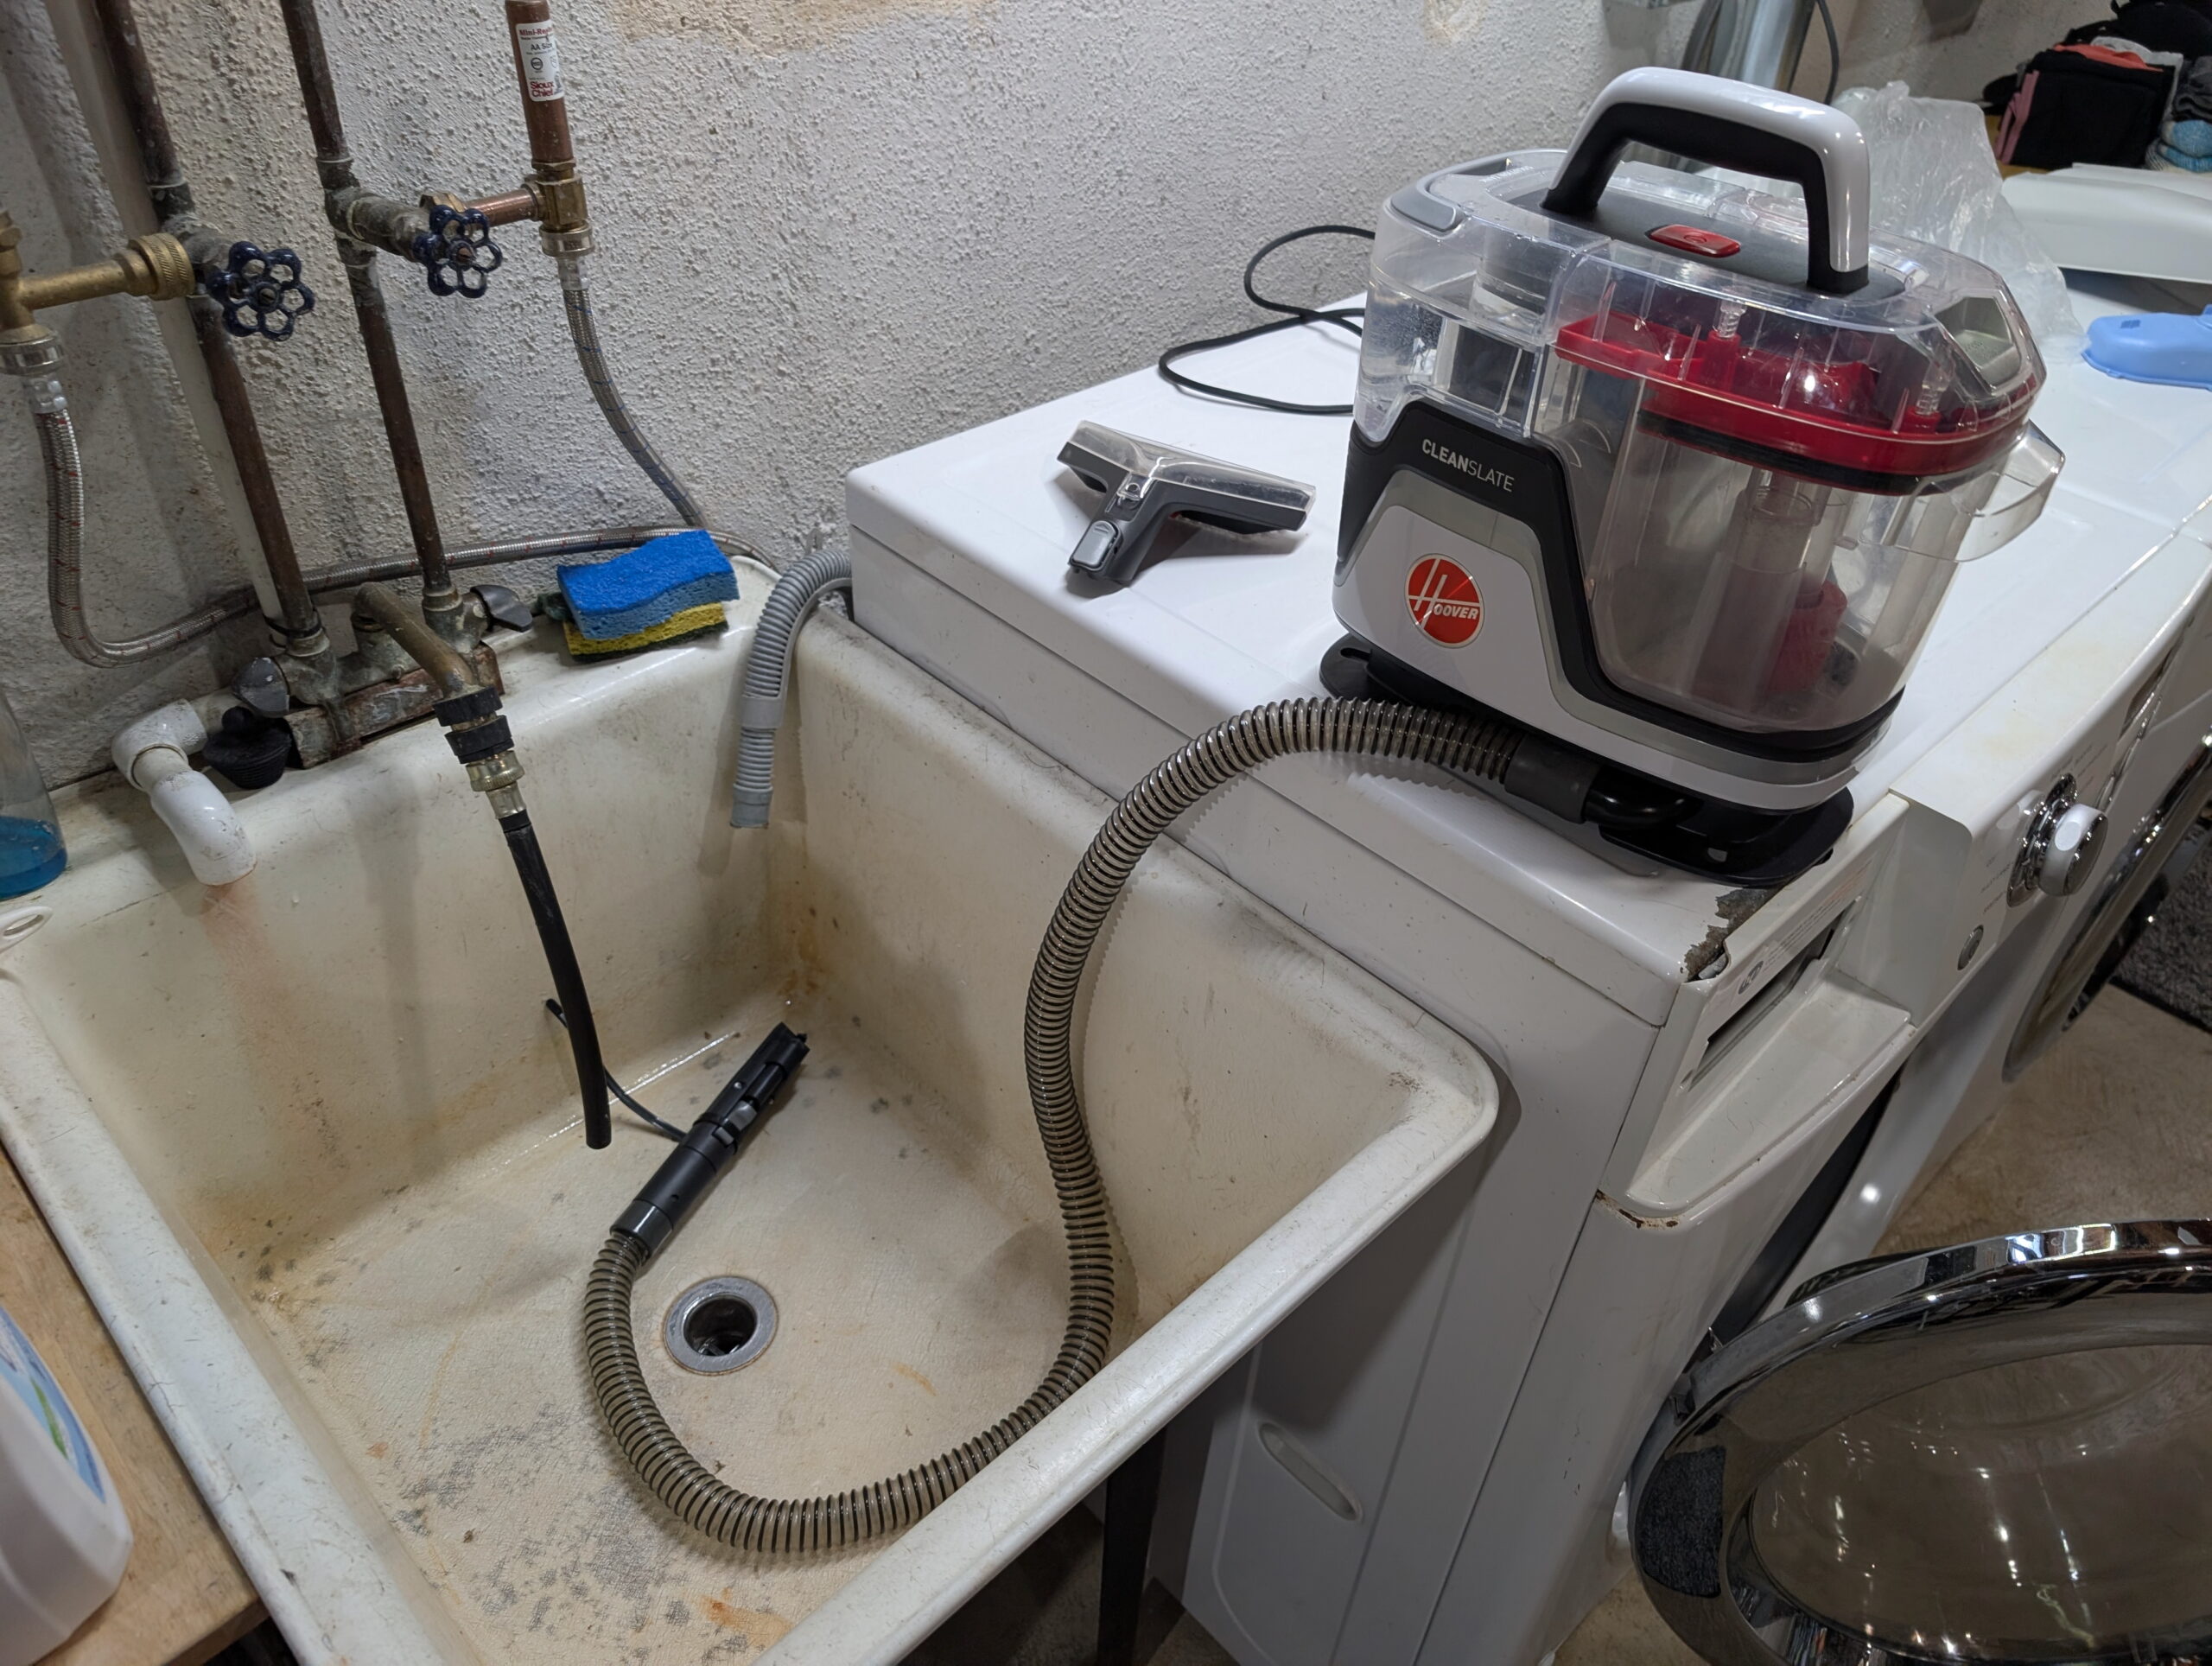
Hoover CleanSlate sprayer being primed after it’d dried out.
We have a Hoover CleanSlate portable vacuum thing and it’s incredibly useful for cleaning up small spills / stains / cat vomit / etc. This morning when I wanted to use it the sprayer was no longer working.
It had worked last time, and I’m judicious about letting it dry out between uses (because I don’t like mold), and it turned out this dried out the pump which in turn meant it needed some time to self-prime before it’d spray.
The solution was simple: put a releasable cable tie around the sprayer handle, put that in the laundry tub, and let the unit run for a few minutes. After this it was spraying fine and all was good. (Yes, you could hold down the trigger, but I’m lazy. And I wanted to make a cup of tea.)
(This is part of my neo-Luddite series where I document things in writing. Because I find a watching a multi-minute YouTube video to access info that can be acquired via a few paragraphs of text to be maddening.)
Ever since getting my new monitor (a Dell U3225QE — a nice IPS LCD after some OLED issues) I’ve been having problems with it not going to sleep. But that’s not usually a monitor problem, especially as I could manually put it to sleep… So what’s keeping macOS from putting it to sleep?
Well, thankfully with pmset one can see what’s going on:
c0nsumer@mini ~ % pmset -g
System-wide power settings:
Currently in use:
standby 0
Sleep On Power Button 1
autorestart 0
powernap 1
networkoversleep 0
disksleep 10
sleep 0 (sleep prevented by backupd-helper, powerd, backupd, coreaudiod, coreaudiod)
ttyskeepawake 1
displaysleep 10 (display sleep prevented by CEPHtmlEngine)
tcpkeepalive 1
powermode 0
womp 1
c0nsumer@mini ~ %
There we go, seems CEPHtmlEngine is preventing the display from sleeping. So what is it?
Really? Illustrator? Huh… I have been working on a new map of Bloomer Park (in anticipation of the forthcoming Clinton River Oaks Park changes) for CRAMBA and leaving it open in the background… I guess that’s it.
And strangely, closing and re-launching Illustrator made the assertion go away. And now the problem is gone.
Oh, Adobe…
At least it’s easy to tell why it was happening.
(This is Adobe Illustrator v29.8.4 on macOS Sequoia 15.7.3.)
When I switched from an iMac to a Mac mini in late 2024 I choose an ASUS ProArt 5K PA27JCV (24″, 60 Hz) for the monitor and while it looked great, it died after 14 months, seemingly with a backlight or power supply problem. ASUS’ warranty support requires shipping the monitor back, potentially waiting 3-4 weeks, and then getting a replacement. And worse, the replacement could have dead pixels, as the ASUS warranty doesn’t consider ≤5 dark pixels a problem.
The old HP ZR2440w that I swapped in as a spare wasn’t cutting it, so with an indeterminate wait ahead of me, potentially receiving something with bad pixels, and my being vaguely interested in something larger and with a faster refresh rate I went looking at new monitors.
Coming to the realization that 4K is probably fine I picked up a Dell 32 Plus 4K QD-OLED Monitor – S3225QC from Costco for $499. It was well reviewed online and looked pretty good when I played with one for about 20 minutes at Micro Center. When I got home and sat in front of it doing my normal things it looked a bit… different… almost as if my glasses weren’t working quite right. But I figured new monitor tech just needed some time for me to get accustomed to. After all, it had a very high contrast ratio and sharp pixels; maybe it’s just that?
After a few days it still didn’t feel right, so I began looking for a solution. Costco has a 90-day return window for computer monitors, so I had some time, but this didn’t look good; I wanted an answer soon.
I was fortunate to be able to borrow a Dell UltraSharp 32 4K USB-C Hub Monitor U3223QE for the weekend, which was perfect as being a being a high end display with the same resolution and panel size as the S3225QC I could compare them side by side. And in the end the LCD just looked better.
Dell S3225QC QD-OLEDDell U3223QE LCD
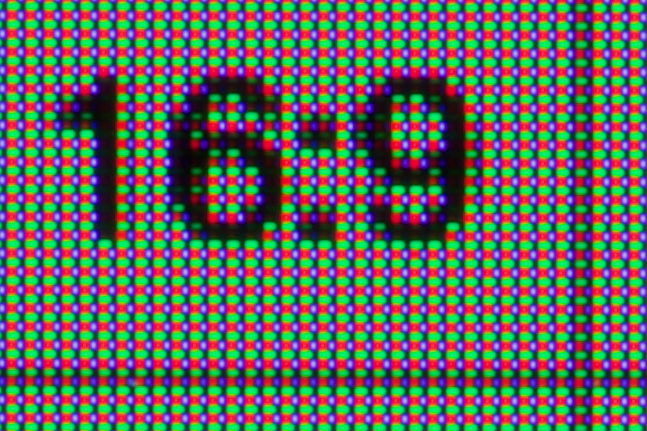
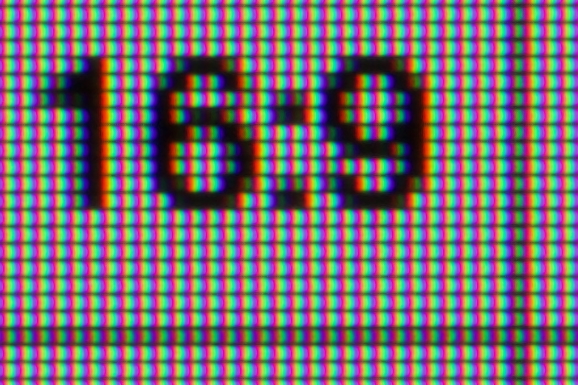
I took some macro photos of both displays and it turns out that what was bothering me was fringing, a problem common to OLEDs. It was hard to point out during normal use other than text-is-a-bit-blurry-and-weird , or like an oversharpened image, or almost like artifacted text in a JPEG image, but with photos it was much easier to see what’s going on. And better, the cause: the arrangement of the subpixels; the little red/blue/green dots that make up a pixel.
As shown above, the subpixles in the Dell S3225QC QD-OLED form a square with green on the top, a larger red pixel in the lower left, and smaller blue in the lower right. The Dell U3223QE, a typical LCD, has three vertical stripes making a square. The result being that high contrast edges look very different on an OLED, often with a strong off-color border — or fringe — along horizontal and vertical lines.
In the photos above, note the vertical part of the 1 which has red and green dots along its right side, and large red dots along the top of the 6 with green along the bottom. These are the strongly colored fringes. (On the LCD they appear white as the three equal size subpixels pixels act equally.)
This meant that things that I tend to do, text or fine lines in maps or CAD-type drawing, are not right at all on the pixel pattern found in this OLED panel. Beyond the pixel pattern, I also suspect that the much crisper pixels (defined points of light) contribute to the fringing having an artifacting-like effect.
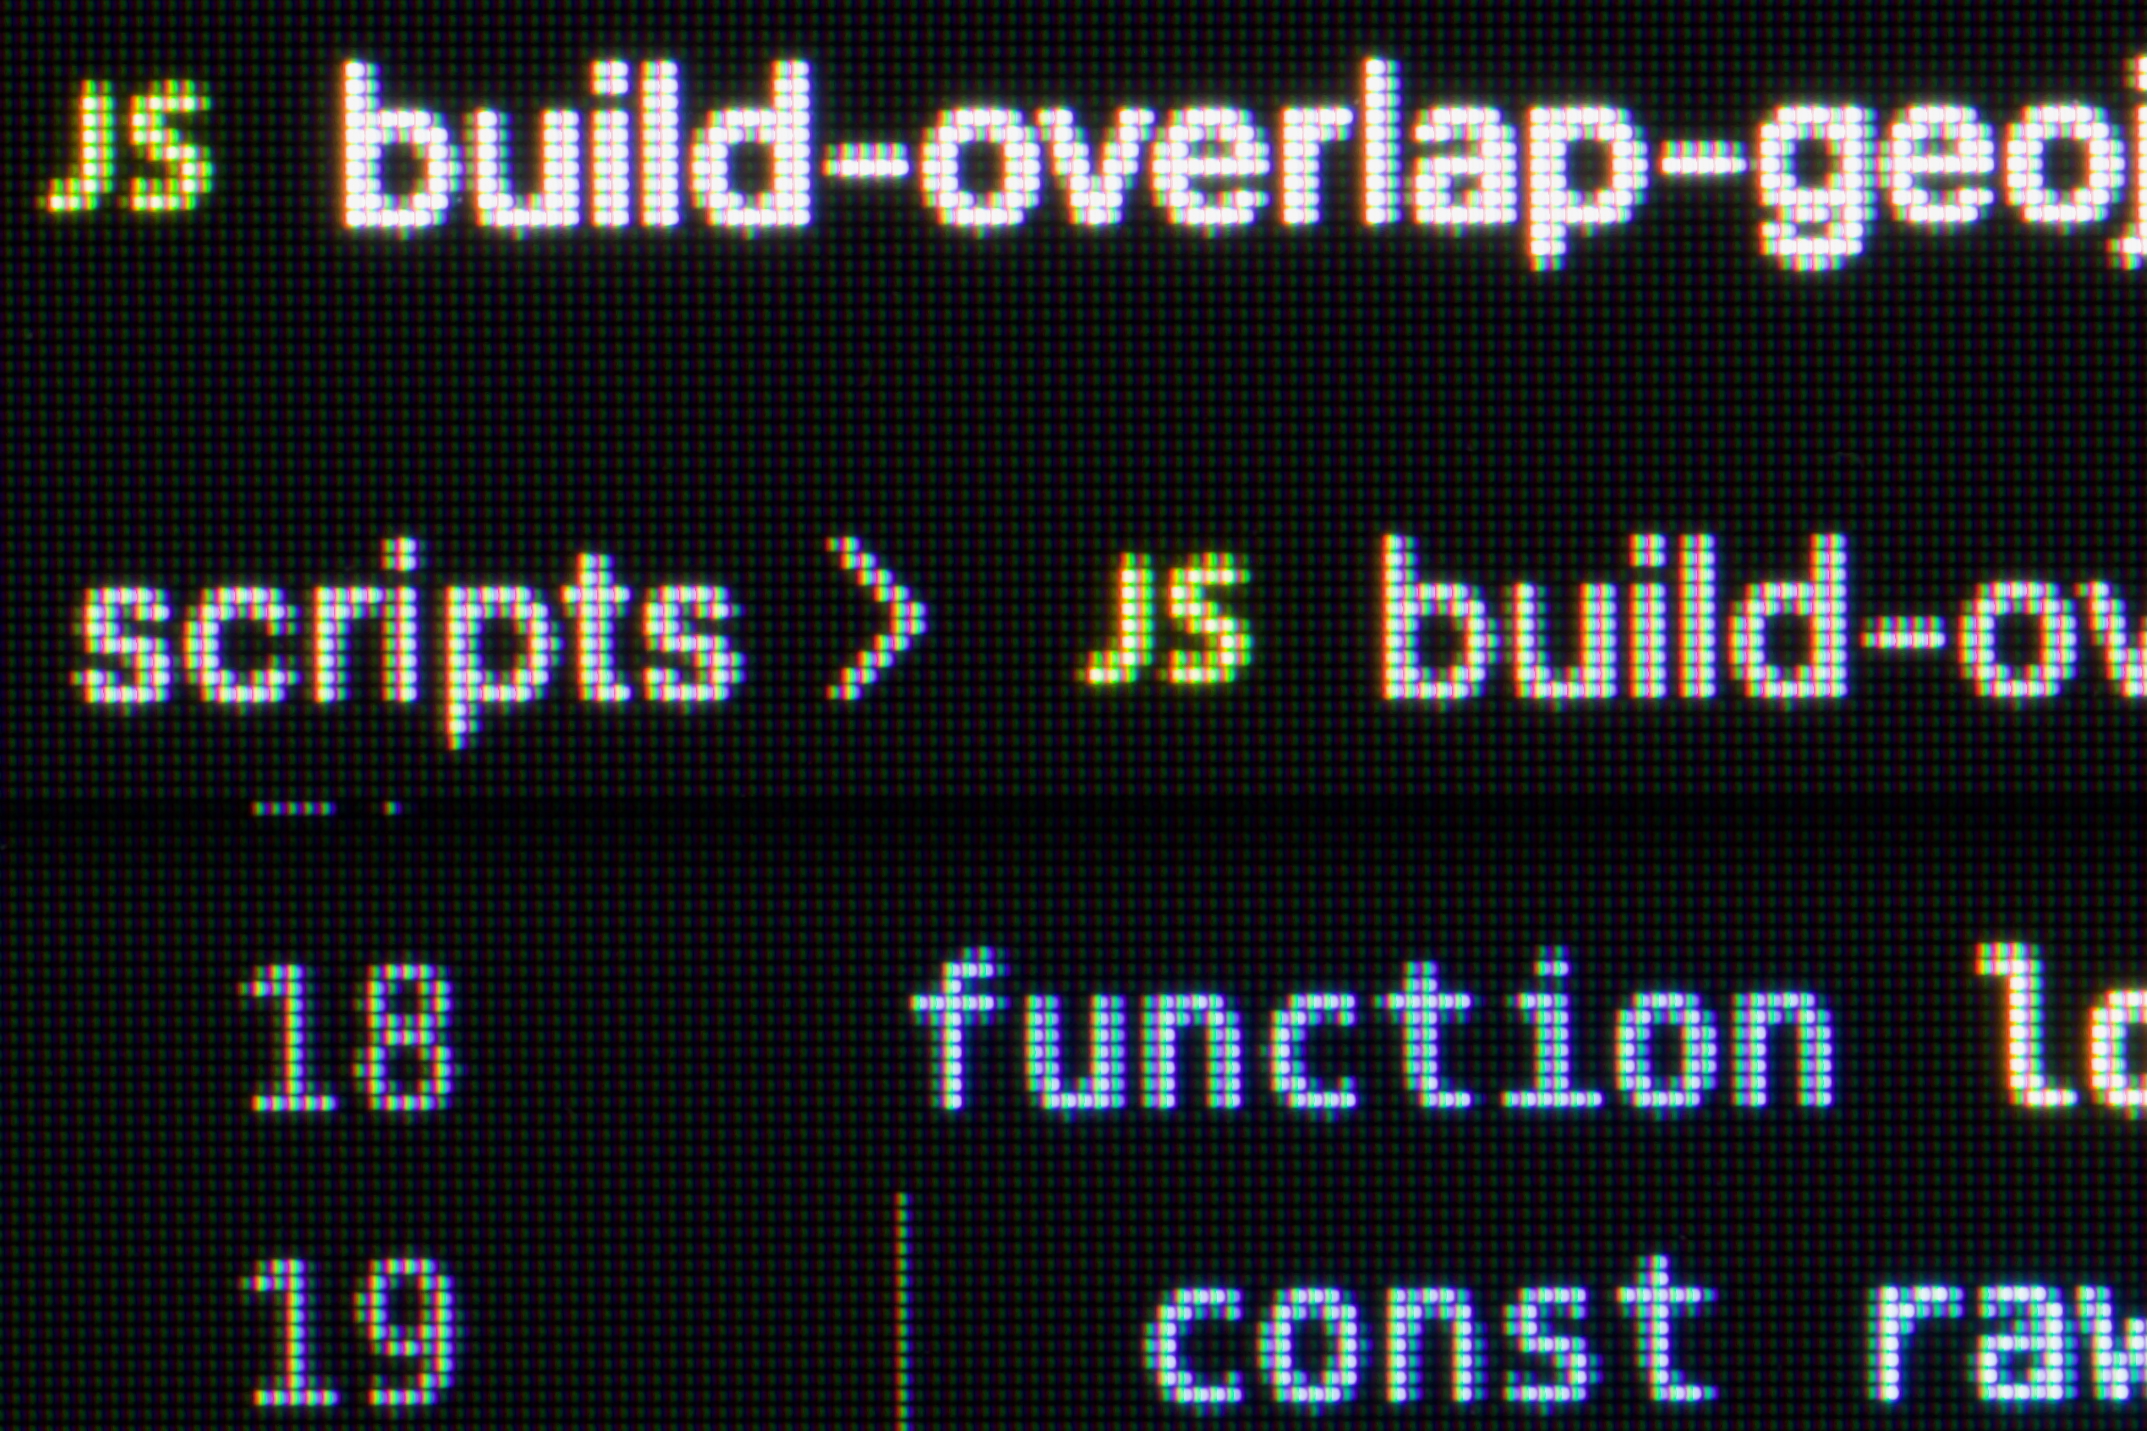
This was much more pronounced when looking at light text on a dark background; the way that I read most websites. Visual Studio Code does a wonderful job demonstrating this problem:
Dell S3225QC QD-OLEDDell U3223QE LCD
This gets at why OLEDs make great TVs and gaming monitors. The contrast is outstanding, color is excellent, and high refresh rates are ideal for moving images and fast-response games. And there’s no noticeable fringing because edges are constantly moving across pixels; almost nothing is still. They also work great on small devices like phones where the pixel density is so high that fringing is too small to see.
But on desktop monitors for still things — text and fine lines — OLEDs currently just aren’t great; I guess that’s why office and productivity type monitors are still LCDs. Even though I don’t like being that person who returns computer stuff just because they don’t like it, I ended up returning the monitor after only four days of using it. The S3225QC and it’s QD-OLED just doesn’t work for me; it made my eyes feel funny to use.
Whether this’ll be buying my own U3223QE, perhaps a Dell U3225QE (adds 120 Hz scanning, an ambient light sensor, and a Thunderbolt dock), or just waiting for an ASUS PA27JCV to come back, I’m not sure… But whatever I end up using will, for now, will be an LCD, not an OLED.

