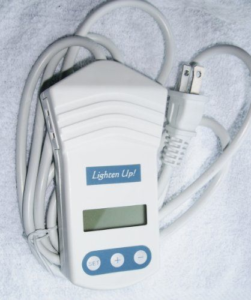
Quite a few years ago I came across Lighten Up!, which was a dawn-simulating alarm clock module that got connected between an incandescent lamp and used gently increasing light instead of noise. Coupled with a halogen bulb (that’d start out very yellow at lowest brightness) I had a wonderful sunrise-like alarm clock and it was much, much nicer than a beeping alarm.
The LCD displays in the Lighten Up! units began failing so I couldn’t change the programming, which was a hassle as the clocks in them drifted by a couple minutes per month. With a combination of COVID-19 remote work eliminating the need for an alarm clock and the devices dying, in the trash they went. (They also didn’t work right with LED bulbs, and now the person making them has closed down the business.)
I’ve been trying to use an alarm to stay on a more regular sleep schedule and while a bunch of other wake-up lights are available, they are dedicated units that are basically alarm clocks with built in lights. I really liked the elegance of the Lighten Up! and how it’d use an existing lamp, and outside of dedicated smart bulbs + an app I couldn’t find anything else like it. For a while I thought about developing my own hardware version that’d also work with LED bulbs, but never got around to it.
This winter I’ve been experimenting with Home Assistant (HA), and it turns out that with a couple cheap Zigbee parts (bulb and pushbutton from IKEA) it allows for a wonderful replacement/upgrade sunrise alarm idea. A next-generation Lighten Up!, if you will.
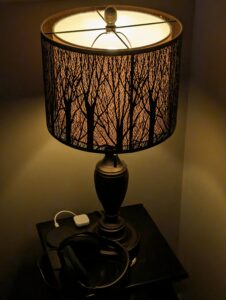
With everything put together the lamp next to my bed will now slowly come up to brightness 15 minutes before the wake-up alarm on my phone, reaching final as the normal alarm triggers. If I change the alarm time on my phone, or shut it off, the light-up alarm in HA will follow suit. Additionally, a physical button on the nightstand turns off the light off while replicating a sunrise alarm, or otherwise toggles the light on and off.
Even better, if I’m not home or if the alarm is set for other than between 3:00 AM and 9:00 AM (times during which I’d likely be in bed and wanting to wake up) the light won’t activate. This allows me to use alarms during the normal day for other things without activating with the light, or while traveling without waking Kristen.
Between this and the gently-increasing volume (and vibration) alarm built into the Android clock which triggers at the end of the sunrise cycle it’s a very nice, gradual wake-up system. And, all of this happens without any cloud services or ongoing subscriptions. My HA instance is local; the phone app communicates directly with it across either my home or the public networks. Communication between the physical controls and lights is a local, private network.
In this post I’ll document the major building blocks of how I did this so that someone else with basic Home Assistant experience (and a functioning HA setup, which is beyond the scope of this writeup) can do the same.
For reference, my Home Assistant hardware setup for this piece is:
- Compute: Raspberry Pi 4 Model B (2GB RAM) w/Adafruit PiRTC
- Operating System: Home Assistant Operating System via Raspberry Pi Imager
- Boot/Root/Storage: Lexar Professional SL600 1TB nVME USB 3.0 SSD
- Zigbee Radio: Phoscon Conbee II
- Light Bulb: IKEA TRÅDFRI 405.187.36 LED E26 1100 Lumen (Dimmable/White Spectrum, 405.187.36)
- Physical Button: IKEA TRÅDFRI Shortcut Button (203.563.82)
With the Home Assistant Companion App for Android running on an Android phone, Home Assistant can get the date and time of the next alarm. After installing the app, go into Settings → Companion app → Manage sensors and enable the Next alarm sensor. My phone is named Pixel 8, so the alarm is now available as entity sensor.pixel_8_next_alarm. Note that this is not available if an iPhone (or other iOS device) is used. (ref: Next Alarm Sensor)
Part of setting up HA configures a Zone (location) called Home. This, combined with the default location information collected by the companion app, allows HA to know if my phone is at Home (or elsewhere), via the the state of entity device_tracker.pixel_8 (eg: home).
Note: While I give YAML of the automations for configuration reference, most of these automations were built using the GUI and involve the (automatically generated) entity and device IDs. If you are setting this up you’ll want to use the GUI and build these out yourself using the code for reference.
To make this all work, three community components are used and must be installed:
Ashley’s Light Fader 2.0: This script takes a light and, over a configured amount of time, fades from the light’s current setting to the defined setting (both brightness and color temperature) using natural feeling curves (easing). It will also cancel the fade if some conditions are met. I use this to have the light fade, over 15 minutes, using a sine function, to 70% brightness and 4000K temperature, and cancel the fade if the light is turned off or brightness changes significantly, the latter of which allows the button next to the bed to cancel the alarm.
To make this happen I turn on the bulb at 1% brightness and 2202K (it’s warmest temperature), then use the script to fade to 70% and 4000K over the course of 15 minutes. This does a decent job of replicating a sunrise or the results of the Lighten Up! with a halogen bulb.
This is configured as an automation I call Bedroom Steve Nightstand: Lighten Up! (Sunrise). Note that it has no trigger because it’ll be called from the next automation:
alias: "Bedroom Steve Nightstand: Lighten Up! (Sunrise)"
description: ""
trigger: []
condition: []
action:
  - condition: state
    entity_id: light.bedroom_test_bulb_light
    state: "off"
  - service: light.turn_on
    metadata: {}
    data:
      brightness_pct: 1
      color_temp: 500
    target:
      entity_id: light.bedroom_test_bulb_light
  - service: script.1705454664908
    data:
      lampBrightnessScale: zeroToTwoFiftyFive
      easingTypeInput: easeInOutSine
      endBrightnessEntityScale: zeroToOneHundred
      autoCancelThreshold: 10
      shouldStopIfTheLampIsTurnedOffDuringTheFade: true
      shouldResetTheStopEntityToOffAtStart: false
      shouldInvertTheValueOfTheStopEntity: false
      minimumStepDelayInMilliseconds: 100
      shouldTryToUseNativeLampTransitionsToo: false
      isDebugMode: false
      light: light.bedroom_test_bulb_light
      transitionTime:
        hours: 0
        minutes: 15
        seconds: 0
      endColorTemperatureKelvin: 4000
      endBrightnessPercent: 70
mode: single
Adjustable Wake-up to Android alarm v2: This blueprint for an Automation takes the time from the next alarm sensor (alarm_source) to trigger an action before the alarm happens. I use this to initiate Ashley’s Light Fader 2.0 at 15 minutes before my alarm, only when my phone is at Home, and and the alarm is between 3:00 AM and 9:00 AM.
Part of configuring this is setting up a Helper or basically a system-wide variable, called Pixel 8 Next Alarm (entity id: input_datetime.pixel_8_next_alarm, type: Date and/or time).
This is configured as an automation called Bedroom Steve Nightstand: Lighten Up at 15 Before Alarm, set to only run if my phone is at Home and it’s between 3:00 AM and 9:00 AM:
alias: "Bedroom Steve Nightstand: Lighten Up at 15 Before Alarm"
description: ""
use_blueprint:
  path: homeassistant/adjustable-wake-up-to-android-alarm.yaml
  input:
    offset: 900
    alarm_source: sensor.pixel_8_next_alarm
    alarm_helper: input_datetime.pixel_8_next_alarm
    conditions:
      - condition: device
        device_id: 1fb6fd197bd2b771249ae819f384cfe2
        domain: device_tracker
        entity_id: e695e05f01a328b349a42bfd7d533ef6
        type: is_home
      - condition: time
        after: "03:00:00"
        before: "09:00:00"
    actions:
      - service: automation.trigger
        metadata: {}
        data:
          skip_condition: true
        target:
          entity_id: automation.lighten_up
I don’t want to get out a phone and dig into an app to manage the light, so next to the bed I have a TRÅDFRI Shortcut Button for controlling the light. If the button is pressed while the light is simulating sunrise, it turns off. If the light is off it turns it on, or visa versa.
Because turning the light off mid-dimming leaves it set at the current color and brightness, I use this instead of the normal Toggle action. In here I check the state of the bulb and either turn it off (if on), or turn it on to 100% brightness and 4000K if it is off:
alias: "Bedroom Steve Nightstand: Light Toggle"
description: >-
  Doesn't use the normal toggle because it needs to set the light color and
  brightness just in case it was left at something else when turned off
  mid-alarm.
trigger:
  - device_id: 12994a6c215ae1d4cfb86e261a2b2f3b
    domain: zha
    platform: device
    type: remote_button_short_press
    subtype: turn_on
condition: []
action:
  - if:
      - condition: device
        type: is_on
        device_id: e3421c7d54269752a371fe8443daf95f
        entity_id: 78599118c4ab8043cf03ce6532546b94
        domain: light
    then:
      - service: light.turn_off
        metadata: {}
        data:
          transition: 0
        target:
          entity_id: light.bedroom_test_bulb_light
      - stop: ""
    alias: On to Off
  - if:
      - condition: device
        type: is_off
        device_id: e3421c7d54269752a371fe8443daf95f
        entity_id: 78599118c4ab8043cf03ce6532546b94
        domain: light
    then:
      - service: light.turn_on
        metadata: {}
        data:
          color_temp: 153
          transition: 0
          brightness_pct: 100
        target:
          entity_id: light.bedroom_test_bulb_light
      - stop: ""
    alias: "Off to On: Full Brightness and 4000K"
mode: single
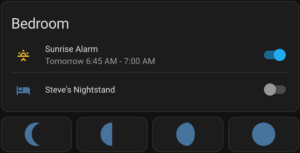
Finally, I also have this all displaying, and controllable, via a card stack in a dashboard. For the next alarm info I started with the template in this post but modified it to simplify one section by using now(), fix a bug in it that occurs with newer versions of HA, and then build it into something that better illustrates the start and end of the simulated sunrise. Because normal entity cards can’t do templating (to dynamically show data) I used TheHolyRoger/lovelace-template-entity-row and some Jinja templating to make it look nice.
This gives me a row which shows the next alarm time (or “No alarm” if none set), nicely formatted, and has a toggle that can enable/disable the Bedroom Steve Nightstand: Lighten Up at 15 Before Alarm automation. Finally, I added a row of buttons to allow easy toggling between 1% / 454 mireds, 33% / 357 mireds, 66% / 294 mireds, and 100% / 250 mireds so I can manually set the light to some nice presets across dawn to full brightness.
Note: There is an older version of this template in HACS, thomasloven/lovelace-template-entity-row in the Home Assistant Community Store (HACS), but it has a bug which keeps the icon from changing color to reflect the state of the automation.
type: vertical-stack
cards:
  - type: entities
    title: Bedroom
    entities:
      - type: custom:template-entity-row
        entity: automation.adjustable_wake_up_to_android_alarm
        name: Sunrise Alarm
        icon: mdi:weather-sunset-up
        active: '{{ states("automation.adjustable_wake_up_to_android_alarm"), "on") }}'
        toggle: true
        tap_action: none
        hold_action: none
        double_tap_action: none
        secondary: >-
          {% set fullformat = '%Y-%m-%d %H:%M' %}
          {% set longformat = '%a %b %-m %-I:%M %p' %}
          {% set timeformat = '%-I:%M %p' %}
          {% if states('sensor.pixel_8_next_alarm') != 'unavailable' %}
            {% set sunrise_start = state_attr('input_datetime.pixel_8_next_alarm', 'timestamp') | int %}
            {% set sunrise_end = (state_attr('sensor.pixel_8_next_alarm', 'Time in Milliseconds') /1000) | int %}
            {% if sunrise_start | timestamp_custom('%Y-%m-%d', true) == (now().timestamp() | timestamp_custom('%Y-%m-%d', true)) %}
              {% set sunrise_start_preamble = 'Today' %}
            {% elif (1+ (sunrise_start - now().timestamp() | int) / 86400) | int == 1 %}
              {% set sunrise_start_preamble = 'Tomorrow' %}
            {% elif (1+ (sunrise_start - now().timestamp() | int) / 86400) | int <= 7 %}
              {% set sunrise_start_preamble = sunrise_start | timestamp_custom('%A',true) %}
            {% else %}
              {% set sunrise_start_preamble = sunrise_start | timestamp_custom('%a %b %-m', true) %}
            {% endif %}
            {% if sunrise_end | timestamp_custom('%Y-%m-%d', true) == (now().timestamp() | timestamp_custom('%Y-%m-%d', true)) %}
              {% set sunrise_end_preamble = 'Today' %}
            {% elif (1+ (sunrise_end - now().timestamp() | int) / 86400) | int == 1 %}
              {% set sunrise_end_preamble = 'Tomorrow' %}
            {% elif (1+ (sunrise_end - now().timestamp() | int) / 86400) | int <= 7 %}
              {% set sunrise_end_preamble = sunrise_end | timestamp_custom('%A',true) %}
            {% else %}
              {% set sunrise_end_preamble = sunrise_end | timestamp_custom('%a %b %-m', true) %}
            {% endif %}
            {% if (sunrise_start_preamble == sunrise_end_preamble) %}
              {% if sunrise_start_preamble == 'None' %}
                {{ sunrise_start | timestamp_custom(longformat, true) }} - {{ sunrise_end | timestamp_custom(timeformat, true) }}
              {% else %}
                {{ sunrise_start_preamble }} {{ sunrise_start | timestamp_custom(timeformat, true) }} - {{ sunrise_end | timestamp_custom(timeformat, true) }}
              {% endif %}
            {% else %}
              {% if sunrise_start_preamble == 'None' %}
                {{ sunrise_start | timestamp_custom(longformat, true) }} - {{ sunrise_end | timestamp_custom(longformat, true) }}
              {% else %}
                {{ sunrise_start_preamble }} {{ sunrise_start | timestamp_custom(timeformat, true) }} - {{ sunrise_end_preamble }} {{ sunrise_end | timestamp_custom(timeformat, true) }}
              {% endif %}
            {% endif %}
          {% else %}
            No alarm set on {{ state_attr('device_tracker.pixel_8', 'friendly_name') }}
          {% endif %}
      - type: divider
      - entity: light.bedroom_test_bulb_light
        name: Steve's Nightstand
        icon: mdi:bed
        entity_data:
          brightness: 255
          color_temp_kelvin: 4000
    show_header_toggle: false
    state_color: true
  - type: grid
    square: false
    cards:
      - show_name: false
        show_icon: true
        show_state: false
        type: button
        tap_action:
          action: call-service
          service: light.turn_on
          data:
            brightness_pct: 1
            color_temp: 454
          target:
            entity_id: light.bedroom_test_bulb_light
        name: 1%
        icon: mdi:moon-waning-crescent
        hold_action:
          action: none
      - show_name: false
        show_icon: true
        show_state: false
        type: button
        tap_action:
          action: call-service
          service: light.turn_on
          data:
            brightness_pct: 33
            color_temp: 357
          target:
            entity_id: light.bedroom_test_bulb_light
        name: 33%
        icon: mdi:moon-last-quarter
        hold_action:
          action: none
      - show_name: false
        show_icon: true
        show_state: false
        type: button
        tap_action:
          action: call-service
          service: light.turn_on
          data:
            brightness_pct: 66
            color_temp: 294
          target:
            entity_id: light.bedroom_test_bulb_light
        name: 66%
        icon: mdi:moon-waning-gibbous
        hold_action:
          action: none
      - show_name: false
        show_icon: true
        show_state: false
        type: button
        tap_action:
          action: call-service
          service: light.turn_on
          data:
            brightness_pct: 100
            color_temp: 250
          target:
            entity_id: light.bedroom_test_bulb_light
        name: 100%
        icon: mdi:moon-full
        hold_action:
          action: none
    columns: 4
The result of all of this is that, if my phone is at home and I have an alarm set between 3:00 AM and 9:00 AM, the light next to the bed will simulate a 15-minute sunrise before the alarm goes off. If the light is simulating a sunrise, pressing the button will turn it off. Otherwise, the button toggles the light on and off at full brightness, for normal lamp-type use. Finally, via the Home Assistant UI I can easily check the status of, or turn off, the sunset alarm if I don’t want to use it.
So far, this is working great. There’s two things I’m looking into changing:
First, the bulb I’m using, 405.187.36, is an 1100 lumen maximum brightness. This is a bit too bright for the final stage of the alarm, and it’s minimum brightness is a bit higher than I’d like and seems a little abrupt. (Ideally the initial turn-on won’t be noticable.)
Since IKEA bulbs are cheap and generally work well, I’ll likely try a few other lower brightness ones and see how they work out. Both 605.187.35 (globe) and 905.187.34 (chandelier) are color temperature adjustable, 450 lumen maximum, cost $8.99, and look like good candidates as I expect their minimum brightness to be lower.
There is also 104.392.55 ($12.99), but it is fixed at 2200K and has a maximum brightness of 250 lumens. I suspect this will be nicely dim for the start, but wouldn’t allow a color transition and might not have enough final brightness to make me feel ready for the day.
I may also try something like 204.391.94 ($17.99), which is adjustable color, as this could allow me to use something like the sunrise color pallete, but this would require moving to a different script for fading. The current script doesn’t support fading between colors (see here for discussion around this), so this would take a lot of work on my part. Probably more than would be beneficial, since varying color temp on white-range bulbs is pretty darn good already.
Second, the TRÅDFRI Shortcut Button (203.563.82) that I’m using has been discontinued. It’s a nice, simple button, and I can trigger on it using short or long press. It’s replacement, SOMRIG Shortcut Button (305.603.54), isn’t in stock at my local IKEA so I don’t have one, but I expect it to be two buttons that can each have short or long presses, and perhaps even double-click on each. If so, I may add something more like dimming the nightstand light to use as a reading light, or perhaps something to leave on for the dogs when we’re gone.
Thinking a bit bigger picture I could even do things like use an in-wall dimmer to have the adjacent closet lights serve as wake-up lights. But as all the quality ones of these are Z-Wave I’d have to get another radio for the Pi and… and…
The possibilities for this stuff are nearly endless, which is neat, because it becomes an engineering problem of what to do that provides sufficient benefit without complexity for complexity’s sake. This, at least, a Home Assistant-based replacement for the old, beloved Lighten Up!, is great.
Note: This post has been updated a few times since original posting to fix grammar, a bug in the Jinga2 template for displaying the next alarm, and to add buttons for setting lamp brightness.
Update on 2025-May-23
With the release of Adjustable Wake-up to Android alarm v4 in January 2025, the helper input_datetime.pixel_8_next_alarm is no longer needed and can be deleted. Accordingly, the line in the card defining sunrise_start needs to be changed to something like this. The -900 is the offset / number of seconds before the alarm that the automation is scheduled to trigger:
{% set sunrise_start = ((state_attr('sensor.pixel_8_next_alarm', 'Time in Milliseconds') /1000) - 900) | int %}


