Press "Enter" to skip to content

Month: July 2020

Simple PAC File Pilot Testing (including WPAD)

In a network that’s isolated from the public internet, such as many enterprise networks, proxy servers are typically used to broker internet access for client computers. Configuring the client computers to use these proxies is often done via a Proxy Auto-Config (PAC) file, code that steers requests so traffic for internal sites stays internal, and public sites go through the proxies.

Commonly these PAC files are made available via Web Proxy Auto-Discovery Protocol (WPAD) as well, because some systems need to automatically discover them. Specifically, in a Windows 10 environment which uses proxies, WPAD is needed because many components of Windows (including the Microsoft Store and Azure Device Registration) will not use the browser’s PAC file settings; it’s dependent on WPAD to find a path to the internet.

WPAD is typically configured via DNS, with a hostname of wpad.companydomain.com (or anything in the DNS Search Suffix List) resolving to the IP of a webserver [1]. This server must then answer an HTTP request for http://x.x.x.x/wpad.dat (where x.x.x.x is the server’s IP) or http://wpad.company.com/wpad.dat with a PAC file, with a Content-Type of x-ns-proxy-autoconfig [2].

Because WPAD requires DNS, something which can’t easily be changed for a subset of users, putting together a mechanism to perform a pilot deployment of a new PAC file can be a bit complicated. When attempting to perform a pilot deployment engineers will often send out a test PAC file URL to be manually configured, but this misses WPAD and does not result in a complete system test.

In order to satisfy WPAD, one can set up a simple webserver to host the new PAC file and a DNS server to answer the WPAD queries. This DNS server forwards all requests except for those for the PAC file to the enterprise DNS, so everything else works as normal. Testing users then only need to change their DNS to receive the pilot PAC file and everything else will work the same; a true pilot deployment.

Below I’ll detail how I use simplified configurations of Unbound and nginx to pilot a PAC file deployment. This can be done from any Windows machine, or with very minor config changes from something as simple as a Raspberry Pi running Linux.

[1] WPAD can be configured via DHCP, but this is only supported by a handful of Microsoft applications. DNS-based WPAD works across all modern OS’.

[2] Some WPAD clients put the server’s IP in the Host: field of the HTTP request.

DNS via Unbound

Unbound is a DNS server that’s straightforward to run and is available on all modern platforms. It’s perfect for our situation where we need to forward all DNS queries to the production infrastructure, modifying only the WPAD/PAC related queries to point to our web server. While it’s quite robust and has a lot of DNSSEC validation options, we don’t need any of that.

This simple configuration forwards all requests to corporate Active Directory-based DNS’ (10.0.1.2 and 10.0.2.2) for everything except the PAC file servers. For these, pacserver.example.com and wpad.example.com, it’ll intercept the request and return our webserver’s address of 10.0.3.25.

server:
interface: 0.0.0.0
access-control: 0.0.0.0/0 allow
module-config: "iterator"

local-zone: "wpad.example.com." static
local-data: "wpad.example.com. IN A 10.0.3.25"

local-zone: "pacserver.example.com." static
local-data: "pacserver.example.com. IN A 10.0.3.25"

stub-zone:
name: "."
stub-addr: 10.0.1.2
stub-addr: 10.0.2.2

This configuration allows recursive queries from any hosts, but by specifying one or more subnets using access-control clauses to you can restrict from where it is usable. The stub-zone clause to send all requests up to two DNS’. If these upstream DNS’ handle recursion for the client, the forward-zone clause can be used instead.

PAC File via nginx

For serving up the PAC file, both for direct queries and those from WPAD, we’ll use nginx, a powerful but easy to use web server to which we can give a minimal config.

Put a copy of your PAC file at …/html/wpad.dat under nginx’s install directory so the server can find it. (There is great information on writing PAC files at FindProxyForUrl.com.)

This simple configuration will set up a web server which serves all files as MIME type application/x-ns-proxy-autoconfig, offering up the wpad.dat file by default (eg: http://pacserver.example.com) or when directly referenced (eg: http://10.0.3.25/wpad.dat or http://wpad.example.com/wpad.dat), satisfying both standard PAC file and WPAD requests.

events {
worker_connections 1024;
}

http {
default_type application/x-ns-proxy-autoconfig;
sendfile on;
keepalive_timeout 65;

server {
listen 80;
server_name localhost;

location / {
root html;
index wpad.dat;
}
}
}

Putting It All Together

With all the files in place and unbound and nginx running, you’re ready to go. Instruct pilot users to manually configure the new DNS, or push this setting out via Group Policy, VPN settings, or some other means. These users will then get the special DNS response for your PAC and WPAD servers, get the pilot PAC file from your web server, and be able to test.

Comments closed

Salsa Timberjack: Fixing a Mistake

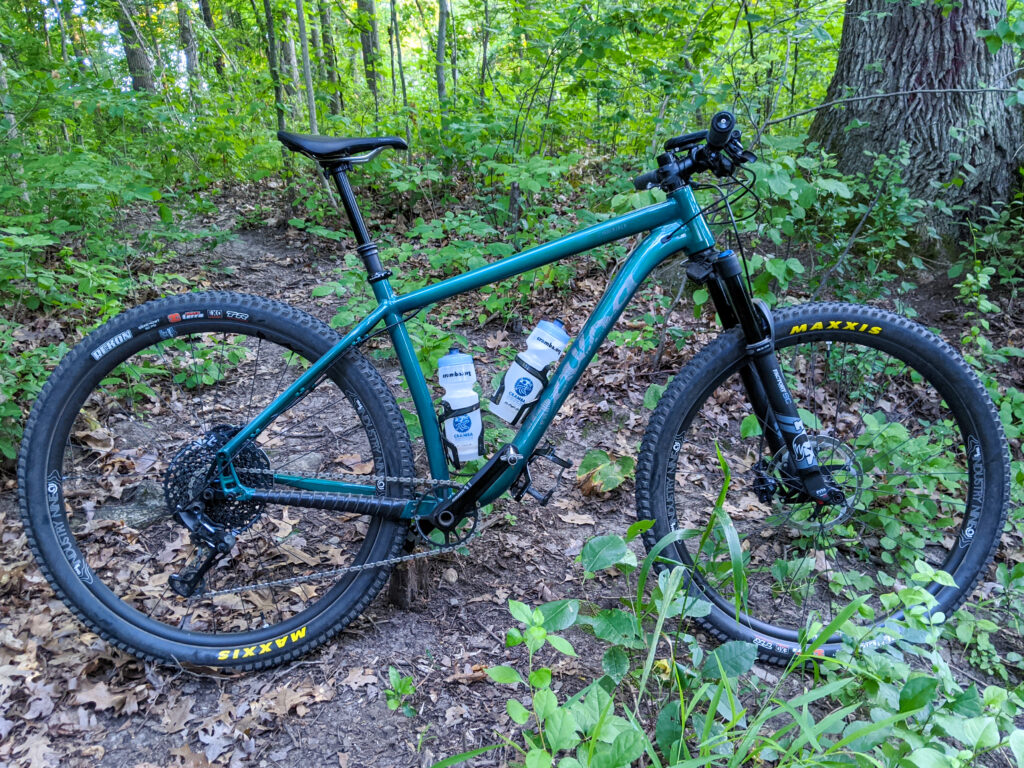
After building up the All-City Electric Queen and riding it a handful of times, it just didn’t feel… right. Standing and handling the bike was fine, but seated pedaling — especially when climbing or just after sitting back down — felt quite off. Turns out the problem was the 71° seat tube angle on the frame coupled with my shorter femurs; I simply can’t get the saddle far enough forward on one of these frames.

Unfortunately, the only good solution was to get a different frame. The Salsa Timberjack was my original choice for this hard tail trail bike build, but I got excited by the idea of a steel bike, loved the paint on the Electric Queen, and glossed over the seat tube angle. By the time I realized I needed a new frame the stand-alone black frames were no longer available. Fortunately, over at the excellent Sports Rack Marquette, Evan had some new frames from complete bikes available, and I was able to get a beautiful gloss teal frame from a 2019 Timberjack Deore 27.5+ from them.

Besides matching my wants geometry-wise, the frame is a great choice because all parts except for the headset swapped over, and the frame came with a headset. While the stock Cane Creek 10 is a lower end part, which lacks sealing on the top bearing cover and has a plastic compression rings and crown races and black oxide bearings, it works and will be fine for a while. The fork was already fitted with a higher end matching crown race, and I have a Cane Creek Hellbender 70 headset ready swap in once the bearings and compression ring start to go.

One downside to the Timberjack vs. Electric Queen is that I’ll no longer have a rigid fork for the bike, but if I really want one the Firestarter 110 Deluxe is a perfect match. The top tube on this bike is also a little bit tall, as it’s also designed for bikepacking and fitting a top tube bag, but it’s plenty comfortable to ride and I love all the bottle cage options.

To round out the build and get the colors nice I ordered some new fork decals from Slik Graphics. Unfortunately, I screwed up and ordered the decals for the Factory-series forks, so while it looks good, I technically have the wrong upper logo on the fork lowers. I’ve since ordered another set with the proper Performance decals for the upper, and am waiting for them to arrive. Since this order was placed Slik became involved in a dispute with Fox, so I’m hoping to receive the updated decals. Even if they don’t arrive, at least the colors are right on the fork. I could even remove the upper decals and have it still look good.

When finishing up the build I ran into a significant problem with the brakes: squealing and vibration. Due to part availability I’d purchased the calipers and levers as a non-retail / meant-for-complete-bikes / likely grey market set from a well-known eBay seller, ronde-cycling. I was never able to get them bedded in properly, and after a few rides they began squealing horridly and shuddering under hard braking. This seller offers different pads options with the brakes, and I began to suspect they handle the pads with each brake set sale, did so poorly, and contaminated the pads before they got to me.

I tried the normal recommendations of cleaning everything, sanding the pads and rotors, and even baking the pads in the oven, but on each bed-in procedure they’d begin squealing again. Resolution a set of new J04C pads and a bed-in and now the brakes are working great. At ~$50 for a new set of pads this really added to the cost of the brakes, but at least they are now working.

Final build, with water bottle cages, pedals, and computer came out to right around 27 pounds. And, it fits! Since building it I’ve put over 180 miles and nearly 16 hours on the bike, haven’t touched the geometry, and I’m really happy with the result. It’s exactly what I wanted; a high quality hard tail trail bike.

Full details below:

Frame: Salsa Timberjack (Large, Teal, 2019)
Fork: Fox 34 Step-Cast (Performance, FIT4 damper, Black Upper Tube Finish, 120mm, 51mm offset, 15QR)
Fork Decals: Slik Graphics Fox 34 Step-Cast Factory Style Decal Kit / Fox 34 Step Cast Performance Elite Decal Kit (Color 1: Medium Grey, Color 2: Dark Grey, Finish: Matte)
Headset: Cane Creek 10 (Black, ZS44/ZS56)
Crankset: SRAM X1 1400 GXP
Bottom Bracket: SRAM GXP (Black)
Chainring: SRAM X-SYNC 2 (32t, steel, Direct Mount, 3mm / Boost)
Derailleur: SRAM GX Eagle
Shifter: SRAM GX Eagle
Shift Cables / Housing: Shimano Bulk
Cassette: SRAM XG-1275
Brakes: Shimano SLX M7100 (Levers: BL-M7100, Calipers: BR-7100)
Brake Pads: Shimano J04C (Finned, Metal)
Front Rotor: SM-RT86-L (203mm)
Rear Rotor: SM-RT86-M (180mm)
Front Brake Adapter: SM-MA-F203P/P (160mm Post to 203mm Post)
Rear Brake Adapter: Shimano SM-MA-R180P/S (IS to 180mm Post)
Stem: Salsa Guide (+6°, 60mm)
Bar: Salsa Salt Flat (750mm)
Wheels: Industry Nine Trail S Hydra 28H (29″)†
Tires: Maxxis Rekon (29 x 2.4″, 3C/EXO/TR)
Seatpost: Fox Transfer Performance Elite (2020, Black, 125mm, 30.9mm, Internal)
Dropper Lever: Wolf Tooth ReMote Light Action (Black, 22.2mm Clamp)
Seatpost Collar: Salsa Lip-Lock (Black, 35.0 mm)
Saddle: Specialized Power Expert (143mm)
Pedals: Crank Brothers Eggbeater 3 (Green, from Blackborow)
Grips: ESI Extra Chunky (Black)
Bottle Cages: Specialized Zee Cage II (Black Gloss, 1x Left, 2x Right)
Computer: Garmin Edge 530, Garmin Speed and Cadence Sensors (v1), Best Tek Garmin Stem Mount
Bell: Mirracycle Original Incredibell (Black)
Derailleur Hanger: QBP FS1373
Frame Protection Tape: 3M 2228, McMaster-Carr UHMW PE
Cable Rattle Prevention: Frost King EPDM Weatherseal (V25A, slipped over dropper housing)

Comments closed

CRAMBA Trails Outline Poster from OSM Data

Finding myself a little bored, I put together a poster (11″ x 17″) showing outlines of the CRAMBA-supported trails on one overview. (Link)

This ended up being more popular than I expected, with a handful of people wanting to know how I did it, so I’ll detail the steps here:

  1. Ensure that all the trail routes are in OpenStreetMap.
  2. Using JOSM load each trail area one at a time and make an OSM XML file with just the data you want outlined:
    1. Select the ways which comprise the trail you want shown.
    2. Create a new data layer (Command-N).
    3. Make the original data layer active.
    4. Copy the selected data from the first layer to your new layer with EditMerge Selection (Shift-Command-M).
    5. Hide the original data layer.
    6. Review the new layer to be sure it has everything you want.
    7. Select all nodes and ways (Command-A) and remove all tags to make later processing easier.
    8. Look good? Is everything you want in the new layer? Save it to a .osm file and do the next trail.
  3. Once you have an OSM file for each trail, convert them to Adobe Illustrator format using this version of osm2ai.pl.
    1. Get osm2ai.pl working on your computer. I run this on macOS, and it works fine on Linux as well. Since it’s a Perl script there are probably some dependencies; likely resolved by installing a few modules.
    2. Process each OSM file with: osm2ai.pl --input infilename.osm --projection mercator --output outfilename.ai
  4. Open each file in Illustrator, combine them into a larger document, make it look the way you want, etc.
  5. Done!

Comments closed

Archiving Gallery 2 with HTTrack

Along with the static copy of the MediaWiki, I’ve been wanting to make a static, archival copy of the Gallery 2 install that I’ve been using to share photos, for 15+ years, at nuxx.net/gallery. Using HTTrack I was able to do so, after a bit of work, resulting in a copy at the same URL and with images accessed using the same paths, from static files.

The result is that I no longer need to run the aging Gallery 2 software, yet links and embedded images that point to my photo gallery did not break.

In the last few years I’ve both seen the traffic drop off, I haven’t posted many new things there, and it seems like the old Internet of pointing people to a personal photo gallery is nearly dead. I believe that blog posts, such as this, with links to specific photos, are where effort should be put. While there is 18+ years of personal history in digital images in my gallery, it doesn’t get used the same way it was 10 years ago.

On the technical side, the relatively-ancient (circa 2008) Gallery 2 has and the ~90GB of data in it has occasionally been a burden. I had to maintain an old copy of PHP just for this app, and this made updating things a pain. While there is a recent project, Gallery the Revival, which aims to update Gallery to newer versions of PHP, this is based around Gallery 3 and a migration to that brings about its own problems, including breaking static links.

I’m still not sure if I want to keep the gallery online but static as it is now, put the web app back up, completely take it off the internet and host it privately at home, or what… but figuring out how to create an archive has given me options.

What follows are my notes on how I used HTTrack, a package specifically designed to mirror websites, to archive nuxx.net’s Photo Gallery. I encountered a few bumps along the way, so this details each and how it was overcome, resulting in the current static copy. To find each of these I’d start HTTrack, let it run for a while, see if it got any errors, fix them, then try again. Eventually I got it to archive cleanly with zero errors:

Gallery Bug 83873

During initial runs, HTTrack finished after ~96MB (out of ~90GB of images) saved, reporting that it was complete. The main portions of the site looked good, but many sub-albums or original-resolution images were zero-byte HTML files on disk and displayed blank in the browser. This was caused by Gallery bug 83873, triggered by using HTTPS on the site. It seems to be fixed by adding the following line just before line 780 in .../modules/core/classes/GallerySession.class:

GalleryCoreApi::requireOnce('modules/core/classes/GalleryTranslator.class');

This error was found by via the following in Apache’s error log:

AH01071: Got error 'PHP message: PHP Fatal error: Class 'GalleryTranslator' not found in /var/www/vhosts/nuxx.net/gallery/modules/core/classes/GallerySession.class on line 780\n', referer: http://nuxx.net/gallery/

Minimize External Links / Footers

To clean things up further, minimizing external links, and make the static copy of the site as simple as possible, I also removed external links in footer by commenting out the external Gallery links and version from the footer, via .../themes/themename/templates/local/theme.tpl and .../themes/themename/templates/local/error.tpl:

<div id="gsFooter">
{*
{g->logoButton type="validation"}
*{g->logoButton type="gallery2"}
*{g->logoButton type="gallery2-version"}
*{g->logoButton type="donate"}
*}
</div>

Remove Details from EXIF/IPTC Plugin

The EXIF/IPTC Plugin for Gallery is excellent because it shows embedded metadata from the original photo, including things like date/time, camera model, location. This presents as a simple Summary view and a lengthier Details view. Unfortunately, when being indexed by HTTrack, selecting of the Details view — done via JavaScript — returns a server error. This shows up in the HTTrack UI as an increasing error count, and server errors as some pages are queried.

To not have a broken link on every page I modified the plugin to remove the Summary and Details view selector so it’d only display Summary, and used the plugin configuration to ensure that every field I wanted was shown in the summary.

To make this change copy .../modules/exif/templates/blocks/ExifInfo.tpl to .../modules/exif/templates/blocks/local/ExifInfo.tpl (to create a local copy, per the Editing Templates doc). Then edit the local copy and comment out lines 43 through 60 so that only the Summary view is displayed:

{* {if ($exif.mode == 'summary')}
* {g->text text="summary"}
* {else}
* <a href="{g->url arg1="controller=exif.SwitchDetailMode"
* arg2="mode=summary" arg3="return=true"}" onclick="return exifSwitchDetailMode({$exif.blockNum},{$item.id},'summary')">
* {g->text text="summary"}
* </a>
* {/if}
* &nbsp;&nbsp;
* {if ($exif.mode == 'detailed')}
* {g->text text="details"}
* {else}
* <a href="{g->url arg1="controller=exif.SwitchDetailMode"
* arg2="mode=detailed" arg3="return=true"}" onclick="return exifSwitchDetailMode({$exif.blockNum},{$item.id},'detailed')">
* {g->text text="details"}
* </a>
* {/if}
*}

Disable Extra Plugins

Finally, I disabled a bunch of plugins which both wouldn’t be useful in a static copy of the site, and cause a number of interconnected links which would make a mirror of the site overly complicated:

  • Search: Can’t search a static site.
  • Google Map Module: Requires a maps API key, which I don’t want to mess with.
  • New Items: There’s nothing new getting posted to a static site.
  • Slideshow: Not needed.

Fix Missing Files

My custom theme, which was based on matrix, linked to some images in the matrix directory which were no longer present in newer versions of the themes, so HTTrack would get 404 errors on these. I copied these files from my custom theme to the .../themes/matrix/images directory to fix this.

Clear Template / Page Cache

After making changes to templates it’s a good idea to clear all the template caches so all pages are rendering with the above changes. While all these steps may be overkill, I do this by going into Site Admin → Performance and setting Guest Users and Registered Users to No acceleration. I then uncheck Enable template caching and click Save. I then click Clear Saved Pages to clear any cached pages, then re-enable template caching and Full acceleration for Guest Users (which HTTrack will be working as).

PANIC! : Too many URLs : >99999

If your Gallery has a lot of images, HTTrack could quit with the error PANIC! : Too many URLs : >99999. Mine did, so I had to run it with the -#L1000000 argument so that it’ll then be limited to 1,000,000 URLs instead of the default 99,999.

Run HTTrack

After all of this, I ran the httrack binary with the security (bandwidth, etc) limits disabled (--disable-security-limits) and used its wizard mode to set up the mirror. The URL to be archived was https://nuxx.net/gallery/, stored in an appropriately named project directory, with no other settings.

CAUTION: Do not disable security limits if you don’t have good controls around the site you are mirroring and the bandwidth between the two. HTTrack has very sane defaults for rate limiting when mirroring that keep its behavior polite, it’s not wise to override these defaults unless you have good control of the source and destination site.

When httrack begins it shows no progress on screen, so I quit with Ctrl-C, switched to the project directory, and ran httrack --continue to allow the mirror to continue and show status info on the screen (the screenshot above). The argument --continue can be used to restart an interrupted mirror, and --update can be used to freshen up a complete mirror.

Alternately, the following command puts this all together, without the wizard:

httrack https://nuxx.net/gallery/ -W -O "/home/username/websites/nuxx.net Photo Gallery" -%v --disable-security-limits -#L1000000

As HTTrack spiders the site it comes across external links and needs to know what to do with them. Because I didn’t specify an action for external links on the command line, it prompts with the question “A link, [linkurl], is located beyond this mirror scope.”. Since I’m not interested in mirroring any external sites (mostly links to recipes or company websites) I answer * which is “Ignore all further links and do not ask any more questions” (text in httrack.c). (I was unable to figure out how to suppress this via a command line option before getting a complete mirror, although it’s likely possible.)

Running from a Dedicated VM

I ran this mirror task from a Linode VM, located in the same region as the VM hosting nuxx.net. This results in all traffic flowing over the Private network, avoiding bandwidth charge.

Because of the ~90GB of images, I set up a Linode 8GB, which has 160GB of disk, 8GB of RAM, and 4 CPUs. This should provide plenty of space for the mirror, with enough resources to allow the tool to work. This VM costs $40/mo (or $0.06/hr), which I find plenty affordable for getting this project done. The mirror took N days to complete, after which I tar’d it up and copied it a few places before deleting the VM.

By having a separate VM I was able to not worry about any dependencies or package problems and delete it after the work is done. All I needed to do on this VM was create a user, put it in the sudoers file, install screen (sudo apt-get install screen) and httrack (sudo apt-get install httrack), and get things running.

Wrapping It All Up

After the mirror was complete I replaced my .../gallery directory with the .../gallery directory from the HTTrack output directory and all was good.

Comments closed