Trashwall
About
Around 2002 I began experimenting with a machine running OpenBSD and pf as a home firewall, finding that it is a very robust, useful setup. Despite this, for sake of simplifying my home network I replaced an old Gateway machine which had been running running OpenBSD 3.4 with an Apple AirPort Extreme. While the AirPort works great, I've been missing some of the features of pf, particularly the ability to adjust the priorities of certain types of traffic and have fine grained control over the interfaces, DHCP, and DNS configuration.
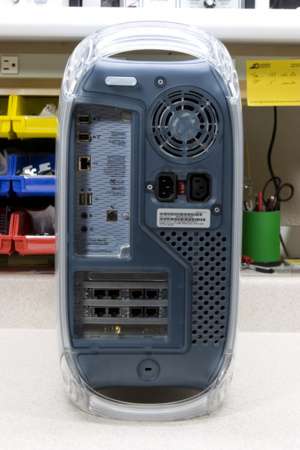
On 24-Jan-2008 I came into possession of a friend's old 400MHz Power Mac G4 AGP. She had purchased a new Mac mini, and after transfering the data she no longer needed the old machine. She gave it to me and a few days later I and began to fit it with old parts to build what has become known as the Trashwall, a new firewall / NAT device / public wireless access point / 8 port switch for my house built out of as many discarded, unneeded, and unwanted parts as possible.
Almost a year later, on 06-Jan-2009 some rather substantial changes were made to Trashwall's interface layout and NAT configuration to incorporate new internet access provided by Wide Open West and this article has been updated to reflect them.
Everything in the Trashwall was spare or scrap parts from around my house, with exception of six parts: the two Compaq NC3134 / NC3135 four-port NICs (new), the D-Link DWL-520, the G4Port (used), the compact flash to IDE adapter (new), and the RP-SMA to Male N pigtail (new), all of which were acquired via eBay. The total out of pocket cost for this entire project was US$111.55.
I intend this document to cover both the hardware and software configuration of the Trashwall in its current state, running OpenBSD 4.4/macppc, particularly addressing the small bits of configuration which took me the longest to nail down. If there are any questions or comments about it, please don't hesitate to email me directly.
More photos of the Trashwall can be seen in the Trashwall section of my photo gallery.
Hardware
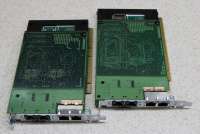
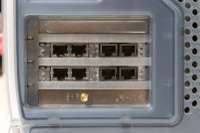
Network Interfaces
The Trashwall contains a total of ten network interfaces:
These interfaces are named fxp0-7, gem0, and wi0.
fxp0 and fxp1 are the public interfaces, connected via a Dell PowerConnect 2016 switch to a WebSTAR DPC2100 cable modem receiving service via Wide Open West (WOW!). fxp2-fxp7 and gem0 are the internal interfaces, with fxp2-fxp7 bridged together acting as a switch. gem0 is left unconfigured, to be used as a span port whenever needed. wi0 is running in wi(4)'s hostap mode and providing free wireless access for anyone near my house.
Both NC3134 / NC3135 sets were purchased via eBay auctions 120213687536 (seller wolfmaster1) and 120221067279 (seller tandyj), with both costing US$24 (US$15 + US$9 postage) each.
The Linksys DWL-520 Rev.A2 was purchased via eBay auction 120220172352 from seller brimal for US$10 (US$5 + US$5 postage).
Network Cabling
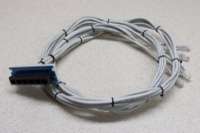
The implementation of the Trashwall at my house requires that all wired Ethernet devices plug directly into the two NC3134/NC3135 NICs. Not all of the devices on my network support Auto-MDIX, meaning that in some cases crossover cables would be required to connect. In order to have a number of pre-wired crossover ports, I pulled a six RJ-45 port 110-block from an old 48-port panel I was given a few years back, and wired them as crossovers. The pieces of CAT5 used have TIA/EIA-568-B-wired RJ-45 plugs on one end, and the other end is punched down according to TIA/EIA-568-A at the 110-block.
The RJ-45 plugs are then plugged into the back of the Trashwall and the six-port panel is mounted to the top of the shelving holding the Trashwall, allowing the rest of the structured wiring in the house to be connected.
Compact Flash
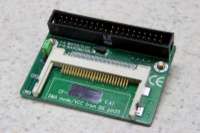
In the past I have used compact flash in place of hard disk on machines such as the MAME Cabinet, where disk utilization is very low and swap isn't needed. With the Trashwall also needing to be lower power and low noise, compact flash is an ideal mass storage device. I have a spare 2GB Micro Center CF card left over from some other experimentation, so I decided to use it in. It seems to support DMA Mode 2, so coupled with a CF to IDE adapter supporting DMA transfers, the card should be able to reach around 16MB/sec transfers.
I came across eBay auction 200193986599 from seller wholesaleoffer for AU$7.99 (AU$1.00 + AU$6.99 postage) which offered a CF to IDE adapter with a female connector, so it could be plugged directly into the motherboard. At such low cost I found it to be acceptable to buy this one new part for the Trashwall. I had other old Compact Flash to IDE adapters I could have used, purchased in the same lot as those in my MAME Cabinet, they have a few flaws. In particular, these older adapters both require a cable for connecting to the motherboard making wiring messy, and they do not support DMA transfers, making disk access slow. However, when the part arrived I found that I had received the style of adapter I didn't want, a male, end of cable adapter (manual scan). The seller didn't reply to email I sent asking about a replacement so I went ahead and used this adapter. It supports DMA transfers and thusly still works, but the mounting style just isn't what I had originally intended.
Needing to mount the CF adapter inside of the case I screwed two old motherboard standoffs through the mounting holes in the PCB, then screwed that into one of the drive trays. This has worked out pretty well, although it is a bit difficult to remove the CF card as it has to be pulled towards the inside of the case.

G4Port
When the Power Mac G4 was introduced, many users were still in need of serial ports. To meet this need Griffin Technology released the G4Port, which is a small level shifter which replaces the modem inside of the G4. To install the G4Port one simply removes the modem (and it's cable and external jack), plugs the G4Port into the motherboard, and attaches its external jack in place of the modem's jack. This works very well, allowing the G4 to talk with RS-422 (LocalTalk) and RS-232 devices.
With the addition of a console cable and some minor Open Firmware changes it became possible to run the Power Mac G4 completely headless.
I purchased the G4Port via eBay auction #140202615199 from seller macdealz for US$25.74 (US$16.99 + US$8.75 postage).
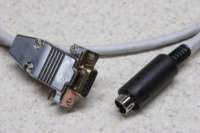
Console Cable
In order to connect a console to the serial port on the back of the G4, a null modem cable was needed. As older serial ports on Macs (such as this one, thanks to the G4Port) typically have Mini-DIN 8 RS-422 serial ports, an adapter to DB9 is needed. I came across a site entitled PIN-OUT: Macintosh to PC Null Modem which shows the direct pinout for a Mini-DIN 8 to DB9 null modem cable.
I used a spare male Mini-DIN 8 connector from HMLiberator work, a piece of CAT5, a spare female DB9, and an old DB9 shell to make up a five foot (or so) null modem cable allowing any old laptop or terminal to be hung off the serial port.
For reference, I've also put the pinout here:
| RS-422 Signal | Mini-DIN 8 Pin | DB9 Pin | RS-232 Signal |
|---|---|---|---|
| HSKO (Output Handshake) | 1 | 8, 6, 1 | CTS, DSR, DCD |
| HSKI (Input Handshake) | 2 | 7 | RTS |
| TXD- (Transmit Data -) | 3 | 2 | RXD |
| GND (Signal Ground) | 4 | 5 | SGND |
| RxD- (Receive Data -) | 5 | 3 | TXD |
| TXD+ (Transmit Data +) | 6 | - | - |
| GPI (General Purpose Input) | 7 | 4 | DTR |
| RXD+ (Receive Data +) | 8 | 5 | SGND |
RAM
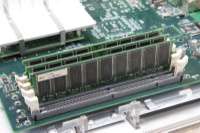
When I first received the Power Mac G4 AGP used as the Trashwall from my friend, it contained a mismatched set of DIMMs, totaling 896MB of RAM. During initial testing, I found that the OS would occasionally lock hard, and be completely unrecoverable or drop into ddb(4). To see which piece may be bad, I pulled it and tested it in all possible combinations in a Abit BH6 motherboard running both Memtest86 and Memtest86+.
After a week of testing none of the DIMMs tested bad, so I decided to try the old RAM from the BH6 in the Mac. The three matched 128MB DIMMs, which had proved amazingly stable in the BH6 back when it first was run in my personal computer and then bornslippy.nuxx.net.
Since installing this RAM in the Trashwall it has proven extremely stable, so it has been left in.
Cooling Modifications
As the original fan in the Power Mac G4's power supply was noisy (either due to age or original design) I replaced it with a Papst 12dBi fan from an old AMD Athlon XP 1800+. I simply unplugged the old fan from the power supply, unscrewed it, and replaced it with the new one. The Papst fan has a RPM sensor on the fan which the power supply doesn't support, so this pin was simply left disconnected.
I also unplugged the large case fan inside of the Power Mac G4 AGP's chassis. As the machine runs diskless and GPU-less, it doesn't produce very much heat and this fan isn't necessary.
With only the power supply fan running, the machine is barely audible above the hum of the fluorescent light above my workbench.
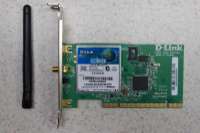
Prism Firmware Upgrade
When I first received the D-Link DWL-520 Rev.A2 in the mail, it was labeled as having firmware 1.3.4. Looking at the card itself showed that it had primary firmware 1.0.7 and station firmware 1.3.5. Before even trying the card on OpenBSD, I decided to upgrade the firmware to the latest available version.
After reading Jun Sun's mini-HOWTO on flashing Intersil Prism chipsets and chris friedhoff's MA311 page I set up a quick Ubuntu install on my MAME Cabinet (the only Windows box I have with PCI slots) to check the firmware versions and confirm the NIC ID. After confirming the version and the NIC ID (0x8103) I acquired primary firmware 1.1.1 and station firmware 1.8.2. As Linux kernels need some particular and non-default options set in order to enable firmware updating, I booted the MAME Cabinet back into Windows 2000 and used the Intersil utility WinUpdate to upgrade the firmware.
The firmware upgrade completed successfully, but after placing the card in the Trashwall I began experiencing odd, occasional full-system pauses in OpenBSD and errors regarding communication with the NIC when attempting to change the NIC's settings via ifconfig(8). Some of these errors are listed here, taken from /var/log/messages:
- wi0: init failed
- wi0: failed to allocate 1594 bytes on NIC
- wi0: tx buffer allocation failed
- wi0: failed to allocate 1594 bytes on NIC
- wi0: mgmt. buffer allocation failed
After these problems, I decided to revert the card to an older firmware version. After playing around with some other firmware versions which OpenBSD 4.2/macppc was unable to activate in hostap mode, I settled on primary firmware 1.1.0 and station firmware 1.4.9. With this version of the firmware I have no problems manipulating the card's settings, transmission seems to work as it should, and hostap mode works great.
Wireless Antenna
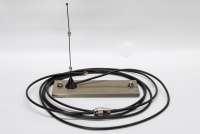
In 2002 I spent a while playing with Kismet and wardriving, making up a few plots of found wireless networks. In order to have a greater range from my car, I purchased a Maxrad BMM24005ML195NF antenna, which is a nice magnetic mount, 5dBi gain 2400-2484 MHz antenna with a female N connector. Using a short MC to male N adapter cable (also known as a pigtail), I was able to connect the antenna to an Orinoco Gold card and use it with any laptop.
After purchasing an RP-SMA to male N cable (via eBay auction 110224216959, from seller bluedotsupply, for US$9.95 + $4.32 postage), I am able to connect the Maxrad antenna to the Linksys DWL-520, greatly increasing the range beyond that of the OEM antenna.
Because the Trashwall is located in my basement, using the built-on antenna would mostly limit the range of the network to my house. With the 12' cable on the Maxrad antenna I am able to place the antenna above ground level and currently it is located in a basement window, oriented vertically to have greatest coverage around my neighborhood.
Power Consumption
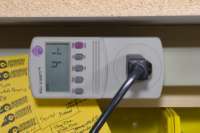
Currently the Trashwall consumes 38 watts of power (measured with a Kill A Watt) when a few clients are connected and one is saturating the downstream link on gem0.
The most recent electrical bill at my house showed a rate of $0.11 per kilowatt-hour (kWh). This works out so that a device consuming one watt of power will cost $0.9636 per year per watt.
If the Trashwall continues to consume its average of 38 watts, it will cost $36.62 per year to power. For comparison, my Apple Airport Extreme consumes 6 watts when in a steady state as a 802.11g bridge using WPA2 with two idle clients. The Airport Extreme will cost $5.78 per year.
Open Firmware
On a PPC Mac, the macppc CD distribution of OpenBSD can be booted by either holding the C key during POST or issuing the following command in Open Firmware (OF):
- boot cd:,ofwboot 4.4/macppc/bsd.rd
After installing OpenBSD, the following commands will set the machine to always boot OpenBSD by default:
- setenv auto-boot? true
- setenv boot-device hd:,ofwboot
- reset-all
In order to make the first serial port on the machine be the console, input-device and output-device must be set to scca. OpenBSD's macppc boot loader will then use this info to display itself and the boot output to the appropriate place. This terminal runs at 57600 8N1. These environment variables can be set using the following commands:
- setenv input-device scca
- setenv output-device scca
- reset-all
To set the machine back to using the normal monitor and keyboard for the console, input-device must be set to keyboard and output-device to screen:
- setenv input-device keyboard
- setenv output-device screen
- reset-all
To set the machine back to it's default boot device, use:
- setenv boot-device hd:,\\:tbxi
- reset-all
Open Firmware may be entered on a PowerPC-based Mac by holding the keys Command + Option + O + F during startup. When at OpenBSD's boot> prompt, the reboot command will also drop back to Open Firmware, although some commands issued after this appear to crash Open Firmware.
Operating System
Because the Power Mac G4 AGP is a PowerPC-based machine, the Trashwall runs the macppc version of OpenBSD 4.4. The installation is beyond the scope of this document and is well covered in both the OpenBSD/macppc page and the OpenBSD/macppc 4.4 installation instructions INSTALL.macppc. However, there are a few extra things which aren't covered in the manual which I should note:
First, during the installation a partition named i with an fstype of MSDOS is created by default. I was originally unsure of the purpose of this partition and deleted it during the initial two installs, leaving me a bit confused as to why OpenBSD wouldn't boot. After taking the time to properly RTFM I learned that this is the partition where the ofwboot file resides, waiting to be read by Open Firmware as part of boot process.
This is the MSDOS filesystem noted in INSTALL.macppc and should be left alone:
- For dedicated disks, macppc port boots off a boot program in an MSDOS filesystem. This is set up by the install program and no special setup is required.
Problem Report #5732
When Trashwall was first put together with OpenBSD 4.2, it was discovered that the OpenBSD/macppc had a problem with the serial console after installation. Thankfully this was been fixed in OpenBSD 4.3 and beyond. This was reported as Problem Report #5732 and krw / Kenneth R. Westerback fixed it.
For historical purposes, here is the information I had previously put together about working around this issue on OpenBSD release versions before 4.3:
If the installation of OpenBSD versions 4.2 and earlier is done via serial console, /mnt/etc/ttys will need to be edited after the installation script completes to point OpenBSD's console to the serial port, else one won't see a login prompt on the serial port after booting. One can work around this by editing the ttya line to be as follows:
ttya "/usr/libexec/getty std.57600" vt220 on secure
Since ed(1) is the only editor available during installation, this edit can be most easily performed using the following commands, with [TAB] and [ENTER] meaning the Tab and Enter keys on the keyboard. Remember that this must be done after the installation script but before booting for the first time:
- ed /mnt/etc/ttys[ENTER]
- 7s/9600/57600/[ENTER]
- 7s/unknown\[TAB]off/vt220\[TAB]on/[ENTER]
- w[ENTER]
- q[ENTER]
As long as Open Firmware has scca as the input-device and output-device, Open Firmware, boot messages, and the main console will become available via serial port at 57600 8N1 with VT220 terminal emulation.

Network
What follows here are a number of configuration files used for setting up the Trashwall. The meaning of these config files is beyond the scope of this document, but the contents are hopefully useful.
As can be seen in the network diagram, the Trashwall connects five networks:
- Public Internet
- Private Wireless: Internal, WPA-protected 802.11b/g/n via an Apple Airport Extreme connected to one of the fxp ports. Airport Expresses are connected as clients for outputting audio in the basement and living room.
- Public Wireless: wi0, one of the interfaces on the Trashwall, running in hostap mode, segmented off via pf.conf so that machines on it may only communicate with the public internet.
- Private Wired: Standard, internal wired Ethernet connections.
- Monitor / Capture: Dedicated port / network (typically gem0) for monitoring any of the interfaces. Used for diagnostics, experimentation, or just playing.
Additionally, the Trashwall is designed to take advantage of the three IP addresses that WOW! provides with their service. These addresses are assigned via DHCP, and one of them (the one assigned to fxp0) used to provide general internet service via NAT to all of the network, except one single IP address which uses binat, or bidirectional NAT on fxp1. This is done so that the one device, an Xbox 360, has a 1:1 mapping between its internal address and an external address. This is just like when a device is configured as a DMZ host on a home routing (NAT) device.
Per OpenBSD's documentation on binat:
- A binat rule establishes a one to one mapping between an internal IP address and an external address. This can be useful, for example, to provide a web server on the internal network with its own external IP address. Connections from the Internet to the external address will be translated to the internal address and connections from the web server (such as DNS requests) will be translated to the external address. TCP and UDP ports are never modified with binat rules as they are with nat rules.
This works well, but requires the static-port pool option on the nat rule for the Xbox 360 so that cone NAT is used. Without this OpenBSD's pf does static NAT, which causes the Xbox 360 network connection test to report a warning about a 'strict' NAT type. See pf.conf in the Firewalling / NAT section for more information.
Wired Interface Config
The following configuration files are used to set up the wired interfaces:
/etc/hostname.fxp0 and /etc/hostname.fxp1, to grab network settings for the public interfaces via DHCP from the ISP:
dhcp NONE NONE NONE
/etc/hostname.fxp2, to set up the internal interface:
inet 192.168.0.1 255.255.255.0 NONE
/etc/hostname.fxp3 through /etc/hostname.fxp7 and /etc/hostname.gem0, which simply bring the interfaces up:
up
/etc/bridgename.bridge0, which sets up the bridge, comprised of fxp[2-7], with a 30 second timeout for the address cache on each port:
add fxp2
add fxp3
add fxp4
add fxp5
add fxp6
add fxp7
timeout 30
up
Wireless Interface Config
As with the wired interfaces, a single file is used to configure the interface. In this case /etc/hostname.wi0 is used to to set up the built-in wireless interface as an access point on channel 1, with an SSID of FreePublicWireless:
inet 192.168.1.1 255.255.255.0 NONE mediaopt hostap chan 1 nwid FreePublicWireless
Basic Name Resolution
/etc/resolv.conf is used to tell the Trashwall what the local domain is, what nameserver to use (itself), and what order to handle name lookups in (via DNS first, then via /etc/hosts). Unfortunately, dhclient(8) occasionally calls dhclient-script(8) which, by default, overwrites /etc/resolv.conf. By changing dhclient.conf(5) to supersede domain-name and domain-name-servers with the local settings we want, dhclient-script(8) will write the /etc/resolv.conf that is needed. This is done by having /etc/dhclient.conf as follows:
initial-interval 1;

interface "fxp0" {
  supersede domain-name "home.nuxx.net";
  supersede domain-name-servers 127.0.0.1;
}

interface "fxp1" {
  supersede domain-name "home.nuxx.net";
  supersede domain-name-servers 127.0.0.1;
}
The /etc/resolv.conf which results is as follows:
domain home.nuxx.net
nameserver 127.0.0.1
/etc/myname is used to set the symbolic name of the Trashwall itself:
trashwall.home.nuxx.net
The /etc/hosts file contains basic name to IP mappings. Since the Trashwall is a DNS, it only contains basic loopback information:
::1 localhost.home.nuxx.net. localhost
127.0.0.1 localhost.home.nuxx.net. localhost
::1 trashwall.home.nuxx.net. trashwall
127.0.0.1 trashwall.home.nuxx.net. trashwall
NTP
The Trashwall is set up to use NTP for synchronizing local time by setting three server lines in /etc/ntpd.conf to three of the NTP Pool Project servers:
server 0.pool.ntp.org
server 1.pool.ntp.org
server 2.pool.ntp.org
The ntpd_flags line in /etc/rc.conf should be set to "" to enable ntpd(8):
ntpd_flags="" # for normal use: ""
DNS
nuxx.net has been configured to resolve home.nuxx.net and trashwall.home.nuxx.net to Trashwall. Internally BIND is used to resolve these two names to Trashwall's internal address while internally providing DNS caching and local name resolution.
This is configured using the following config files:
/var/named/etc/named.conf, the main BIND config file:
////////////////////////////////////////
// named.conf for trashwall.home.nuxx.net
////////////////////////////////////////

acl private {
	192.168.0.0/24;
	localhost;
};

acl public {
	192.168.1.0/24;
};

options {
	version "";     // remove this to allow version queries
	listen-on    { any; };
	listen-on-v6 { any; };
	allow-transfer { none; };
//	allow-recursion { private; public; };
};

////////////////////////////////////////
// Private
//  - Here's the stuff for the server itself and clients on the
//    local network.
////////////////////////////////////////
view "private" {
	match-clients { private; };
	recursion yes;

zone "." {
	type hint;
	file "standard/root.hint";
};

zone "localhost" {
	type master;
	file "standard/localhost";
	allow-transfer { localhost; };
};

zone "127.in-addr.arpa" {
	type master;
	file "standard/loopback";
	allow-transfer { localhost; };
};

zone "0.0.0.0.0.0.0.0.0.0.0.0.0.0.0.0.0.0.0.0.0.0.0.0.0.0.0.0.0.0.0.ip6.arpa" {
type master;
	file "standard/loopback6.arpa";
	allow-transfer { localhost; };
};

zone "home.nuxx.net" {
	type master;
	file "master/home.nuxx.net";
};

zone "0.168.192.in-addr.arpa" {
	type master;
	file "master/0.168.192.in-addr.arpa";
};

};
////////////////////////////////////////
// End Private
////////////////////////////////////////

////////////////////////////////////////
// Public
//  - This allows recursion for clients using FreePublicWireless.
////////////////////////////////////////
view "public" {
	match-clients { public; };
	recursion yes;

zone "." {
	type hint;
	file "standard/root.hint";
};

zone "localhost" {
	type master;
	file "standard/localhost";
	allow-transfer { localhost; };
};

zone "127.in-addr.arpa" {
	type master;
	file "standard/loopback";
	allow-transfer { localhost; };
};

zone "0.0.0.0.0.0.0.0.0.0.0.0.0.0.0.0.0.0.0.0.0.0.0.0.0.0.0.0.0.0.0.ip6.arpa" {
type master;
	file "standard/loopback6.arpa";
	allow-transfer { localhost; };
};

};
////////////////////////////////////////
// End Public
////////////////////////////////////////
/var/named/master/home.nuxx.net: the internal zone file defines statically named machines, with all DHCP pool addresses getting a name generated by a $GENERATE directive:
$TTL 300
@       IN      SOA     home.nuxx.net.  admin.nuxx.net. (
                        20090106        ; Serial YYYYMMDD
                        8H              ; Refresh
                        2H              ; Retry
                        4H              ; Expiration
                        1D )            ; Minimum in Seconds

                        NS      home.nuxx.net.

home.nuxx.net.  IN      A       192.168.0.1
trashwall       IN      A       192.168.0.1

core-ap         IN      A       192.168.0.2
basement-ax     IN      A       192.168.0.3
livingroom-ax   IN      A       192.168.0.4
phaser6130      IN      A       192.168.0.5
tivo            IN      A       192.168.0.6
xbox360         IN      A       192.168.0.7
wii             IN      A       192.168.0.8
e51             IN      A       192.168.0.9

reason          IN      A       192.168.0.10
raccoon         IN      A       192.168.0.11
XXX-wireless    IN      A       192.168.0.12
XXX-wired       IN      A       192.168.0.13

$GENERATE 20-254 dhcp$  A       192.168.0.$
/var/named/master/0.168.192.in-addr.arpa used to provide reverse DNS internally:
$TTL 300
$ORIGIN 0.168.192.in-addr.arpa.
@       3600    IN      SOA     home.nuxx.net.  admin.nuxx.net. (
                        20090106        ; Serial YYYYMMDD
                        8H              ; Refresh
                        2H              ; Retry
                        4H              ; Expiration
                        1D )            ; Minimum in Seconds

                        NS      home.nuxx.net.

1               IN      PTR     trashwall.home.nuxx.net.
2               IN      PTR     core-ap.home.nuxx.net.
3               IN      PTR     basement-ax.home.nuxx.net.
4               IN      PTR     livingroom-ax.home.nuxx.net.
5               IN      PTR     phaser6130.home.nuxx.net.
6               IN      PTR     tivo.home.nuxx.net.
7               IN      PTR     xbox360.home.nuxx.net.
8               IN      PTR     wii.home.nuxx.net.
9               IN      PTR     e51.home.nuxx.net.

10              IN      PTR     reason.home.nuxx.net.
11              IN      PTR     raccoon.home.nuxx.net.
12              IN      PTR     XXX-wireless.home.nuxx.net.
13              IN      PTR     XXX-wired.home.nuxx.net.

$GENERATE 20-254 $      PTR     dhcp$.home.nuxx.net.
The named_flags line in /etc/rc.conf should be set to "" to enable named(8):
named_flags="" # for normal use: ""
DHCP
dhcpd_flags in /etc/rc.conf must be populated with the interfaces on which we would like to listen for DHCP requests:
dhcpd_flags="fxp2 wi0"
The configuration file /etc/dhcpd.conf controls how DHCP addresses are distributed:
shared-network PRIVATE {
        option domain-name "home.nuxx.net";
        option domain-name-servers 192.168.0.1;
        option time-servers pool.ntp.org;
        subnet 192.168.0.0 netmask 255.255.255.0 {
                option routers 192.168.0.1;

                range 192.168.0.20 192.168.0.254;
        }

        host core-ap {
        hardware ethernet 00:16:CB:C5:16:2F;
                fixed-address 192.168.0.2;
        }

        host basement-ax {
                hardware ethernet 00:11:24:05:7D:53;
                fixed-address 192.168.0.3;
        }

        host livingroom-ax {
                hardware ethernet 00:11:24:0A:91:6D;
                fixed-address 192.168.0.4;
        }

        host phaser6130 {
                hardware ethernet  00:00:AA:A6:89:E0;
                fixed-address 192.168.0.5;
        }

        host tivo {
                hardware ethernet 00:11:D9:16:54:43;
                fixed-address 192.168.0.6;
        }

        host xbox360 {
                hardware ethernet 00:17:FA:6C:8D:01;
                fixed-address 192.168.0.7;
        }

#       host wii {
#               hardware ethernet ;
#               fixed-address 192.168.0.8;
#       }

        host e51 {
                hardware ethernet 00:1F:DF:0A:D4:1E;
                fixed-address 192.168.0.9;
        }

        host reason {
                hardware ethernet 00:17:F2:09:81:C6;
                fixed-address 192.168.0.10;
        }

        host raccoon {
                hardware ethernet 00:1C:B3:B5:1B:77;
                fixed-address 192.168.0.11;
        }

        host XXX-wireless {
                hardware ethernet 00:1B:77:68:AB:04;
                fixed-address 192.168.0.12;
        }

        host XXX-wired {
                hardware ethernet 00:1C:23:00:FE:6D;
                fixed-address 192.168.0.13;
        }

}

shared-network PUBLIC {
        option domain-name-servers 192.168.1.1;
        option time-servers pool.ntp.org;
        subnet 192.168.1.0 netmask 255.255.255.0 {
                option routers 192.168.1.1;
                range 192.168.1.2 192.168.1.254;
        }

}
The dhcpd_flags line in /etc/rc.conf should be set to "" to enable dhcpd(8):
dhcpd_flags="" # for normal use: ""
Firewalling / NAT
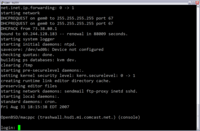
The net.inet.ip.forwarding sysctl must be turned on for NAT to work. This is turned on manually via sysctl(8) using the following command:
- sysctl net.inet.ip.forwarding=1
In normal use this is done automatically at each boot by uncommenting the following line in /etc/sysctl.conf:
net.inet.ip.forwarding=1 # 1=Permit forwarding (routing) of IPv4 packets
The file /etc/pf.conf controls PF, the OpenBSD packet filter:
##############################
## Macros
##############################
ext_if0 = "fxp0"
ext_if1 = "fxp1"
private_if = "fxp2"
public_if = "wi0"

xbox360 = "192.168.0.7"
reason = "192.168.0.10"
w2szc3nt01_wireless = "192.168.0.12"
w2szc3nt01_wired = "192.168.0.13"


##############################
## Traffic Normalization
##############################
# Clean everything up.
scrub in all


##############################
## Queueing
##############################


##############################
## NAT
##############################
# Main Tube Access
binat on $ext_if1 from $xbox360 to any -> $ext_if1
nat on $ext_if0 from $xbox360 to any -> $ext_if1 static-port
nat on $ext_if0 from $private_if:network to any -> ($ext_if0)
nat on $ext_if0 from $public_if:network to any -> ($ext_if0)

# For ftp-proxy
nat-anchor "ftp-proxy/*"


##############################
## Redirects
##############################
# ssh from rowla.nuxx.net to reason for backups
rdr pass on $ext_if0 proto tcp to port 220 -> $reason port 22

# For ftp-proxy
rdr-anchor "ftp-proxy/*"
rdr on $private_if proto tcp from any to any port 21 -> 127.0.0.1 port 8021
rdr on $public_if proto tcp from any to any port 21 -> 127.0.0.1 port 8021


##############################
## $ext_if0 Inbound Filtering
##############################
# Block everything to start with
block in on $ext_if0 all

# Allow backups from rowla.nuxx.net
pass in on $ext_if0 inet proto tcp from 208.83.71.138 to ($ext_if0) port 220 \
	keep state

# Allow ssh
pass in on $ext_if0 inet proto tcp from any to ($ext_if0) port 22 keep state

# Allow ICMP
pass in on $ext_if0 inet proto icmp from any to ($ext_if0) icmp-type echoreq \
	keep state

# Allow discard
pass in on $ext_if0 inet proto tcp from any to ($ext_if0) port 9 keep state


##############################
## $ext_if0 Outbound Filtering
##############################
pass out on $ext_if0 all keep state


##############################
## $ext_if1 Inbound Filtering
##############################
pass in on $ext_if1 all


##############################
## $ext_if1 Outbound Filtering
##############################
pass out on $ext_if1 all keep state


##############################
## Between Networks
##############################
block return on $private_if from $private_if:network to $public_if:network
block return on $public_if from $public_if:network to $private_if:network
The pf line in /etc/rc.conf should be set to YES to enable pf(4):
pf=YES # Packet filter / NAT
FTP Proxy
As described in the OpenBSD FAQ Page PF: Issues with FTP, the use of NAT breaks FTP. To work around this, OpenBSD includes ftp-proxy(8) which handles proxying FTP connections.
ftp-proxy(8) is set up by first adding an anchor for it to /etc/pf.conf so that it may add its own rules, along with redirecting outbound FTP requests to localhost:8021 on the NAT device Trashwall:
rdr-anchor "ftp-proxy/*"
rdr on $private_if proto tcp from any to any port 21 -> 127.0.0.1 port 8021
rdr on $public_if proto tcp from any to any port 21 -> 127.0.0.1 port 8021
Then the ftp-proxy(8) daemon is enabled by editing /etc/rc.conf. On Trashwall it is running with the -r flag which enables the use of both active and passive connections. This is done by setting the ftpproxy_flags line in /etc/rc.conf as follows:
ftpproxy_flags="-r" # for normal use: ""
External Links
- Apple document 58418 on differentiating between Power Mac G4 models.
- Power Mac G4 AGP Technical Specifications
- PIN-OUT: Macintosh to PC Null Modem: Mini-DIN 8 to DB9 null modem cable pinouts.
- OpenBSD Main Page
- OpenBSD/macppc
- OpenBSD Wikipedia Article