MAME Cabinet

Background
One day while sitting at work in early 2000, a coworker and friend of mine Brian Hartley offhandedly mentioned a desire to build a MAME Cabinet. I first found this idea to be a bit far reaching, thinking about the amount of work which would be involved in making such a project a reality.
Looking into the project a bit further, I found the idea of building a dedicated PC solely to run an arcade game emulator, MAME tantalizing. After a good bit of research and some planning, Brian came over to my parents house (where I was living at the time) and with some help from my Dad we got to work building some MAME cabinets.
While Brian acquired a gutted Robocop / Bad Dudes vs. Dragon Ninja-era Data East cabinet, I was going to build mine from scratch. Having Brian's cabinet available for measurement, I decided to build a clone of the curved-marquee Data East design. The difference with my version was an additional four inches of depth in order to accommodate the deep 17" monitor I used for a display.
Through out the process of building my MAME cabinet the Build Your Own Arcade Controls FAQ was fairly useful, and the message boards were a both a source of amusement, information, and conflict. It still appears to be a rather helpful resource and is probably a good place to start for anyone looking to build their own MAME Cabinet.
While I built my MAME cabinet in 2000 and a few memories of the construction have been lost to time, I hope to document here as many details as possible.
Beyond what is found here, I welcome you to look through my photo gallery for the MAME Cabinet project. There are photos of the completed cabinet, the new photos taken in 2006 and 2007, and the original 320x200 photos taken in 2000 with an Intel Webcam USB 2.0.
Control Panel
Design
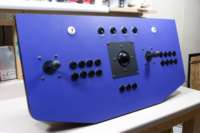
The first task I tackled when building my MAME Cabinet was designing the control panel. I built the control panel so that it could be wholly independent of the cabinet itself, which both aided in its testing and allowed it to be used separately, if desired. Due to its width, making the control panel removable was a very smart idea. The cabinet itself is about 26" wide, but with the control panel measuring 37" wide, it won't fit through most doorways.
After looking at a number of other designs online, I settled on a two player configuration with a single eight-way joystick and eight buttons per player, as this allows for maximum flexibility during game play. In the center of the panel I placed a Happ 3" Trackball in the center of the panel, with three buttons below it. These three buttons function as mouse left, middle, and right buttons.
Above the player control groups are start buttons for the respective Player One and Player Two sides, and four buttons configured as MAME controls Pause, Exit, Menu, and OSD (On-Screen Display).
This design was laid out full-size in Adobe Pagemaker and then printed on a plotter. This full-size template was then used mark the blank control panel for accurately cutting and drilling the top panel. These templates are available PDF or Adobe Pagemaker 6.5 formats. Additionally, on the request of a member of the BYOAC Message Boards I also made a six button version available in Adobe Pagemaker 6.5 format.
Enclosure
The enclosure for the Control Panel was made out of a few different kinds of wood. I first used MDF covered with Wilsonart-brand purple laminate for the main control panel surface. The sides of the enclosure are made out of 1x4 pine, and the rear panel is 1/4" plywood, supported with a solid pine brace. The enclosure is screwed closed with drywall screws.
To allow the joysticks to extend an appropriate length above the surface of the control panel, space was routed away into which they would sit. Before adding the laminate all of the screwholes were filled with drywall compound to make a more even surface.
The edge of the control panel was slotted and plastic T-molding was fitted to provide a finished, durable edge. Most of the enclosure was brush painted with black latex paint. Unfortunately this brush texture doesn't match the rolled-on finish of the rest of the cabinet, but it still looks pretty good.
While most of the buttons are configurable (such as the player buttons) or self-explanatory (the start buttons), the four buttons along the top have plastic tags labeled with rub-on letters denoting their function.
Physical Controls
One of the simplest, and most important details of building a MAME Cabinet which feels like a real arcade game is the controls. Without proper arcade-style joysticks and buttons, the whole system will feel like a cheap knock-off. In my cabinet I used Happ brand Pushbuttons with Horizontal Microswitch for all pushbuttons on the control panel, and Super Joysticks in both the player one and player two groupings.
The Super Joystick is selectable as either an 8-way or 4-way joystick. While some games fail to register input properly when used with an 8-way joystick (eg: Pacman) the majority of the games I wish to play are newer and require such a stick. Thusly I have both of the joysticks set up as 8-way. (This is selectable on the Super Joystick by flipping over the plastic piece which makes contact with the microswitches.)
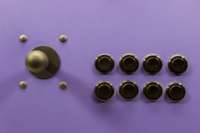
Wanting to properly play games such as Missile Command and The Irritating Maze properly I needed a trackball in my control panel. After some research I settled on the Happ 3" Trackball, which is sized similarly to that found in Millipede. For a nice finish this was mounted to the surface of the control panel with the Happ Mounting Plate, making for a nice finish.
Three additional buttons are located along the left rear side of the panel to serve as Game Reset and Coin Deposit buttons. These are simple black push buttons from a local Radio Shack mounted on a piece of aluminum which has been painted black and screwed to the inside of the enclosure.
Keyboard Encoder
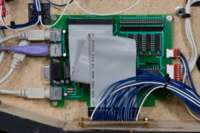
In order to connect the control panel to the computer a device is needed to translate the button presses into something which the computer can understand. As MAME generally expects such input to come from a keyboard, I looked to what is known as a keyboard encoder to handle this task. After a bit of research I settled on the Hagstrom Electronics KE72-T. Although it provides twice as many inputs as I need, it also handles the task of converting trackball input to PS/2 mouse output.
Since I built this MAME Cabinet in 2000 there have been a number of other input adapters released which are both lower cost and a better fit than the KE72 for such projects. One such adapter now available is the Hagstrom Electronics KE-USB36, which converts 36 button inputs and a trackball input into USB keyboard and mouse input. There are also the I-PAC and Opti-PAC adapters from Ultimarc, which provide even more trackball / spinner / switch inputs.
In my control panel I mounted the KE72-T inside the control panel, connecting it to the rest of the wiring with a salvaged 40-pin ribbon cable.
Wireless Keyboard
A Logitech wireless keyboard receiver was fitted inside the control panel so that a wireless keyboard can be used for management and administration of the machine. This is connected to the keyboard input of the keyboard encoder and passed through to the computer along with the keystrokes generated by button presses.
While not used very often, this keyboard is instrumental during setup and upgrade of the cabinet. Without it I would have to regularly plug and unplug
Wiring
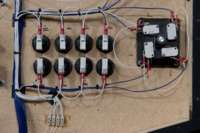
Microswitches as found on pushbuttons and joysticks in arcade games typically have .187" terminals. As I wanted all microswitches in the control panel to be replaceable, I terminated all wiring connections to switches with crimp-on, slip-on terminals. The other end of wires to switches are connected to a custom made adapter which converts the loose wires to a standard 40-pin (2x20) .100" header. From here a salvaged cable fitted with 40-pin IDC connectors connects the adapter board to the keyboard encoder.
Ground (common) wires are connected to bus strips to concentrate wiring and then tied to the adapter board. All switch wiring is done with XX gauge wire. Wire with white insulation is used for ground / common wires, while blue insulated wire is used for discreet switch connections.
Beyond switch wiring, MiniDIN 5-pin cables are run from the keyboard encoder to the rear panel of the control panel to provide externally exposed Keyboard In, Keyboard Out, and Mouse Out connections.
Overall the wiring ended up being rather complex, but trunking of the wires into bundles and logical labeling made the job much easier. A few additional photos are available showing the wiring inside the panel:
- Overview of inside of the control panel.
- Player One grouping showing eight buttons and the 8-way Happ Super Joystick.
- Detail of eight buttins in the control panel.
- Angled view of the inside of the control panel, showing the side buttons at the far end.
- Trackball as seen from inside the control panel, wired to the KE72-T.

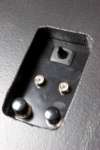
External Connections
On the rear of the control panel are three MiniDIN 5 connections which are connected to the Hagstrom KE72-T keyboard encoder to make the Keyboard In, Keyboard Out, and Mouse Out connections available. The Keyboard In connection is currently disabled, as the receiver for the Logitech Wireless Keyboard is connected in its place. This connection was included for completeness sake.
To the right of the keyboard and mouse connections is a four-pin Molex-type connector. These are connected to two inputs on the keyboard encoder and allow the Player One and Player Two coin deposit switches in the coin door to trigger keystrokes, signaling coin deposits in MAME.
All of these connectors are mounted to a painted aluminum panel screwed to the inside of the enclosure.
Mounting
To mount the control panel to the cabinet itself, small metal angle brackets are installed inside cabinet and butt against the rear of the control panel. Four thumbscrews are then fastened through the brackets into tee nuts in the control panel, firmly bolting the control panel to the cabinet itself.

Main Cabinet
As I was building my cabinet to be a clone of an original Data East cabinet, I wanted it to be as exact as possible. Fortunately Brian's salvaged cabinet was there and I was able to measure much of it and trace other pieces as needed. My cabinet was built from 3/4" MDF, just as the top of the control panel was. The panels for the different sides were joined with 1" square pieces of pine, which were first tacked in place with Liquid Nails and then screwed together with drywall screws. All screws were counter-sunk, and then the heads of the screws (and countersink holes) filled with drywall compound prior to priming and painting.
After cutting the side panels, a special bit designed for cutting slots in edges of materials (literally, a slot cutter) was used to cut a slot in the edge of the two vertical sides of the cabinet, just as was done with the control panel. After painting, black plastic T-moulding was then hammered into the slot with a rubber mallet, nicely finishing the edges of the cabinet.
Painting was generally done with Behr black latex paint, although some black spray paint was used for areas inside the cabinet which simply needed to be darkened. Both the primer and final paint rolled on with either a 3" or 6" roller, with all edges and corners brush painted.
Marquee and Side Art
Wanting my MAME Cabinet to look as much like a "real" arcade game as possible I wanted authentic looking artwork on it. With the cabinet being a clone of a Data East curved marquee model I was able to purchase an original (albeit slightly scuffed) Bad Dudes vs. Dragon Ninja marquee and fit it to the cabinet. The marquee is held in with two curved, painted aluminum strips screwed in place. Lighting the rear of the marquee is a cheap single-tube fluorescent light fixture switched by a small switch on the top of the cabinet.
NOS (New, Old Stock) Data East side art was purchased from eBay and applied to the sides of the cabinet.
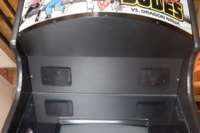
Speakers
In order to provide decent quality sound while playing games, I needed to find a decent quality set of speakers. Having recently come into possession of a number of Compaq amplified desktop speakers which were being thrown out, I set to work modifying a set of them for my needs. First I disassembled the speakers, removing the grill and speaker elements and the amplifier. The amplifier was mounted to the inside of the cabinet by drilling a hole in the heat sink and bolting it to a piece of wood mounted inside the cabinet. This positioning allows the controls to be adjusted from the rear of the cabinet.
Next the face of each speaker cabinet was ground flat on a disc sander, and the cabinets were fit into a panel which fit above the display. Content with the fit of the cabinets, I reassembled them, mounting the grill on the outside of the cabinet. The resulting effect is that the speakers are square OEM pieces, designed to fit in an arcade cabinet. I'm quite happy with this result and the sound quality is as good as any standard arcade game. Sure, a subwoofer and better amplifier may sound better, but I don't think it is needed for typical arcade games.
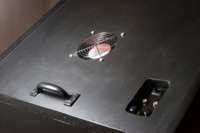
Exhaust Fan
With a large, old 17" monitor and PC inside of the MAME cabinet, I expected it to become rather warm after running for a few hours. To cool the cabinet I installed a large mains-powered exhaust fan in the top of the cabinet. Because I didn't want the fan to be running all the time, I used a spare mechanical thermostat my dad had laying around. Capable of switching much more power than needed to run my small exhaust fan this thermostat is probably overkill, but as it was free I'm not going to complain.
This fan is set to come on at ~80°F, and does so with a resounding thunk. The fan itself is rather noisy, transmitting a good bit of vibration to the case, generally audible over whichever game is playing. In the future I may choose to remove the fan, leaving only the protective grill in place for ventilation. It likely won't be needed if a cooler running computer and power supply are installed.
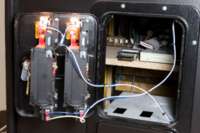
Coin Door
One feature missing from many other MAME cabinets I have seen built is a coin door. This rather expensive (~$100) piece of equipment is wholly unnecessary for most MAME use, but I find it to be one of nicest finishing touches on the entire cabinet. I also tend to put all the quarters I acquire as pocket change into the cabinet, almost as a sort of bank. In doing this I have repeatedly saved up a few hundred dollars without thinking. It's a nice treat to decide to empty the cabinet, only to find $160 that had essentially been forgotten.
The coin door I chose for my MAME Cabinet is the Happ Over/Under Mini Door System fitted with two coin mechanisms for accepting quarters. The portion of the coin door which actually holds money isn't as large as would normally be found in arcade games, but it fits my cabinet just right. I feel that the full height door wouldn't have worked as well, coming up too high under the control panel and making coin insertion difficult. The coin door and computer board have been positioned so that when one opens the coin door, direct access to the onboard removable media is available. This allows me to change the CF card or boot from a floppy disk without needing to pull out the cabinet and open it.
Microswitches located beneath each of the two coin mechanisms signal when coins have successfully been inserted into the machine. These two microswitches are connected via a cable to the rear of the control panel where the KE72-T translates them into keypresses. Players One and Two send keystrokes 5 and 6, respectively, the MAME defaults for coin insertions.
Moving Hardware
In order to make the MAME Cabinet easier to move around, a few pieces of specialized hardware were installed on it. First, there are cabinet wheels installed on the back of the cabinet. Using one of the attached handles the cabinet can be tipped back on to the wheels and rolled around. Leveling legs have been installed on the front bottom of the cabinet so that it can be firmly leveled on the floor, helping to prevent the cabinet from wobbling or moving around during aggressive play. Metal corner protectors have also been installed on all bottom corners of the cabinet to keep it from being damaged either when moving it around, or when someone rests a foot against it while playing.
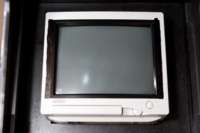
Monitor
At the time of building my MAME Cabinet the best monitor I had available was my few year old CTX 1765GM so I chose to use it as the display. Conveniently the back side of the bezel around the monitor is perfectly flat, so I was able to make a rectangular hole in a piece of wood to serve drop-in mount for it, requiring no modification of the monitor itself.
Keeping with not wanting to modify the monitor itself, I had originally blacked out the edges of the monitor with electrical. In 2006/2007 while upgrading the cabinet I chose to remove the now-peeling tape and paint the monitor. After cleaning up the paint which inadvertently ended up on the monitor glass I found that I hadn't painted the strips on the monitor wide enough. A few minutes with a paint pen filled in the sides of the monitor with enough black coloring to make the monitor appear completely black once the bezel is fitted.
In the future I may replace the CTX 1765GM with a 27" multisync arcade game-type monitor. When I first built the cabinet the only arcade game monitors generally available were fixed-frequency models. As computer video cards generally run at a variety of frequencies, either a specially modified video card or a rather pricey adapter would have been required in order to use a proper arcade game monitor. Happ Controls now sells a Vision Pro 27" multisync monitor which can run at 60Hz or 75Hz, at resolutions of up to 800x600. This monitor will easily fit into my cabinet, and I may eventually replace my existing monitor with one.

Bezel and Glass
In order to polish off the appearance of the front of the monitor a bezel made from hardboard and painted black was fit around the visible part of the monitor. The bezel rests on four small hardboard blocks fit around the monitor. These hardboard blocks also serve as mounting points for the Velcro used to secure the plastic monitor cover (glass) in place.
The "glass" is a sheet of Hyzod polycarbonate cut to the size of the monitor opening with pieces of Velcro near each corner. The pieces of Velcro are attached to the mating fasteners on the standoff blocks of hardboard in order to finish the monitor housing. I have run into a problem with the glass slipping down over time, and the Velcro's adhesive sliding along the surface. The end result is that eventually the bottom of the glass has extended out from where it was originally fixed, and the Velcro at the top has slipped a few inches. Removing the Velcro, cleaning the Hyzod with isopropyl alcohol, and reapplying it fixes the problem for a few years.
While a commercial monitor would use glass for scratch resistance, I wanted something easily removable which wouldn't break into fine pieces of inadvertently struck. The appearance of the finished monitor area of the cabinet is satisfactory to me, but it may change in the future, especially if I end up replacing the existing monitor with a proper arcade game type monitor. If (or when?) I replace the CTX 1765GM with an arcade monitor I will likely switch to using a plastic monitor bezel cut to fit with either Hyzod or tempered glass better secured over it. The slipping glass isn't much of a problem, but I would prefer to have a more professional solution in place.
Other Controls
On the top rear of is another black aluminum panel, similar to the ones found on the control panel. This panel holds a switch for the marquee light which directly switches the mains line feeding it. There are also two buttons and two LEDs which are wired to the computer's motherboard and serve as Power and Reset switches. Blue LEDs in panel mount holders serve as power and hard disk activity indicators.
The connections to the motherboard for handled via a piece of CAT5 networking cable, broken out into a Molex connector. This connector fits into its mate on the computer board, providing an easy way to disconnect the top panel when from the computer when it has to be removed from the cabinet.
These controls provide easy access to power the machine on and off, and reset it if need be. The blue LEDs are bright enough to shine on the wall behind the cabinet, providing visual indication of the power status of the machine. I have considered removing the LEDs and reset switch as they are generally not used, however I haven't done this yet since there isn't a compelling reason to do so.
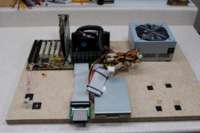
Computer
My MAME Cabinet currently uses the following components:
- Abit BH-6 Motherboard
- Intel Pentium II 450MHz CPU (Development Sample) running at 500MHz
- 384MB of RAM
- Floppy Drive
- Compact Flash to IDE Adapter
- Microcenter-brand 1GB Compact Flash Card
- Ensoniq AudioPCI 1370
- nVidia Video Card
All of these components are mounted to a piece of MDF which mounts horizontally inside of the cabinet on wood strips. In order to keep the board from shifting while moving the cabinet, it is held in place with Velcro. All of the components are mounted so that they are easily accessible while in the cabinet, and easily connected. The compact flash reader and floppy drive are positioned as to be accessible simply by opening the coin door. This allows updates to all installed software without opening the back of the cabinet.
The computer parts are physically mounted to the board with a combination of Velcro (for the power supply and floppy drive) and standoffs (for the motherboard and CF adapter). Four additional Velcro squares are located on the board leftover from past mounting of a hard disk. These may be used in the future, should the machine ever return to using a hard disk for data storage.
A cable fitted with a nine-pin Molex connector is used to connect the buttons and LEDs on top of the cabinet to the motherboard.
In 2000 the cabinet was originally fitted with a Shuttle-brand motherboard holding a K6-2 300Mhz processor and 64MB of RAM. MAME and the OS were installed on a hard disk allowing all currently supported ROMs to be made available to the player. With the move to a 1GB Compact Flash (CF) card (intended to reduce noise) I have had to pare down the number of available ROMs. This is not much of a problem, however, as having too many ROMs installed proved to be overwhelming to players attempting to select a game. I may move to a 2GB or 4GB CF in the future in order to add a few more games, although this probably won't happen until the cabinet is upgraded again.
Software
The MAME Cabinet currently runs the shipping i686-optimized binary of MAME 0.69 for DOS on MS-DOS v6.22. ArcadeOS is automatically started on boot and used as a launcher for all games. This makes for a very user friendly system which individuals inexperienced with MAME can easily use. An ACPI power tool for DOS called PowerOff.exe is used to shut down the machine upon exiting from ArcadeOS.
I would like to try a newer version of MAME, but the most recent DOS version I tried (0.100) ran far, far slower than 0.69 and was practically unplayable. AdvanceMAME wasn't any faster, and both versions seemed to cause almost constant disk activity. Moving from CF back to a hard disk as a test the slowdown did not improve, so at this point I can only assume that a considerably faster machine is needed to run newer versions of MAME.
In addition to the OS and MAME-based applications the Compact Flash disk also contains DOS drivers for the Ensoniq AudioPCI 1370, a mouse driver, the programming utility for the KE72, a scancode tool to display which keys are pressed. PKZIP v2.04g is also installed, although this will likely be removed once the machine is stabilized.
A copy of my MAME configuration (with the official MAME 0.69 Pentium Pro binary) for this cabinet is available here: nuxx_cab_mame069.zip. To use this just install DOS on your Compact Flash card or hard disk, unzip it to the root of the drive, add ROMs, artwork and samples, as desired, then boot off the disk. ArcadeOS should start automatically and allow you to select games. Editing the AUTOEXEC.BAT and uncommenting the last line will cause an ACPI motherboard to power off after exiting ArcadeOS. The utility for editing the KE72's configuration can also be found in the image. Please be aware that these files are configured for an i686 machine with an Ensoniq AudioPCI 1370-based sound card. Using it in other machines may require a bit more configuration.
When I first built the MAME Cabinet in 2000 it ran Windows 98 with MAME 0.34 and a complete set of ROMs. There were two ways to boot the machine, as determined by a CONFIG.SYS-based menu. The first was to simply launch ArcadeOS under DOS (and thusly MAME), and the second was to boot into Windows 98. Windows 98 was only booted to manage ROMs and connect to the internet to obtain updates. In practice Windows 98 was almost never booted, so it was not included when the other software was upgraded.
In the future I may change the machine to a simple Linux distribution which boots directly into AdvanceMENU in order to run AdvanceMAME. This will require a significant amount of effort and likely faster hardware.
Future Changes
There are a few changes which I may eventually make to my MAME Cabinet. In no particular order, they include:
- Relocating the hardware volume control to a position accessible from the front of the enclosure.
- Making a better fitting, more secure rear panel.
- Installing a true arcade monitor, such as the Vision Pro 27".
- Removing the exhaust fan and thermostat.
- Upgrading the computer to something faster which consumes less power.
- Changing the OS install to a simple, stripped down Linux installation running AdvanceMAME and AdvanceMENU.
- Possibly moving from Compact Flash to a 2.5" (or smaller) hard disk to allow storage of all supported games.
Related Links
- Build Your Own Arcade Controls FAQ - In 2000 this was a useful site for basic MAME Cabinet construction info. It hasn't changed much since then, but it is a good jumping off point.
- ArcadeOS The DOS GUI MAME front end which I use to launch MAME using only the built-in game controls.
- Happ - probably the country's foremost arcade game parts supplier.
- MAME - Multiple Arcade Machine Emulator
- MAMEDev - The official site of the MAME development team.
- AdvanceMAME - Another MAME port, offering more advanced graphics features.