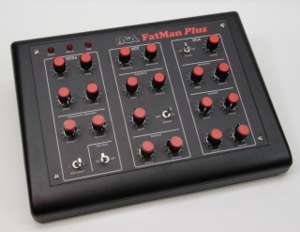
PAiA FatMan Plus
Background
The PAiA FatMan is an analog monosynth sold as a kit by PAiA, a fairly well-known audio and electronic musical instrument kit manufacturer from Oklahoma.
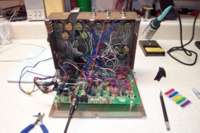
A couple of years ago I was given an old, tattered, mis-built PAiA FatMan by a friend who was moving away. It was housed in a rusted metal box, was missing some parts, and had a rather damaged PCB. The tuning trimmers (which handle octave offset) had also been moved to the outside of the enclosure for some reason.
In 2004, just before being given the damaged FatMan, I assembled a PAiA FatMan from scratch using the kit enclosure. This was originally to be for a friend of mine, but after I completed assembly he reneged and I was stuck with a US$225 (plus my time) synth. Having no use for it at the time I sold it on eBay for around US$175 to an artist in NYC. Hopefully he was able to put it to good use.
Fast forward to the spring of 2006 and my new-found interest in building electronic musical instruments and I decided that I would finally rebuild the FatMan which I had been given.
Repairs
I had to perform the following repairs to get the FatMan back in working order:
- Jumpered around a few scratched-off traces.
- Replaced all on-board trimmers which had been used for tuning.
- Fixed seating of a few capicators which had been installed with almost 1.5" of lead above the board.
- Cleaned the board to remove flux, dust, and grime.
- Replaced all pots, switches, and LEDs.
Modifications
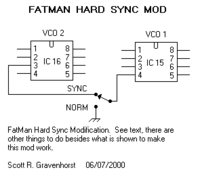
Hard Sync
Scott Gravenhorst's Hard Sync Mod was added to optionally force the two VCOs to fall into sync with each other. Hard Sync can be turned on or off via a toggle switch in the lower left of the control panel.
As Scott states:
- The sound obtained from oscillator sync is essentially a harmonic enrichment. This new version of the mod uses the 555 pin 3 output to reset the other oscillator via its reset input. Doing it this way guarantees a reset no matter where the synched oscillator is in it's cycle.
- My circuit shows VCO2 syncing VCO1. VCO2 Pin 3 in normally high. This holds VCO1's pin 4 (reset input) high most of the time and lets VCO1 run free until a low pulse comes from pin 3 of VCO2. At that time, VCO1 is forced to reset no matter where it is in it's sawtooth cycle. Because of the way the offset control works, the effect only becomes audible after offset is set more clockwise than half way. After that, crazy harmonic changes start. I got clarinetish, bassoonish, metallic, buzzy and just plain bizarro synth sounds.
This modification is amazingly simple to install and changes the sound of the FatMan to a surprising degree.

Subharmonic Generator
The other Scott Gravenhorst mod which I incorporated in the PAiA FatMan Plus is the CMOS version of the Subharmonic Generator. With regards to the older version of the mod, Scott states:
- The SubHarmonic Generator produces a square wave signal, pitch locked to VCO 2 and one octave below it. A simple RC lowpass filter is provided to roll off harmonics as desired. By using both the subharmonic lowpass filter in combination with the VCF, a near sine waveform is possible. A level pot is provided to allow controlling the mix of the subharmonic and the output of the 1/2 vco mix control.
- As fat as the FatMan is, right out of the box, it is even fatter and thicker with the subharmonic generator. This mod has a rather profound effect on the harmonic structures available. It's almost like having a third VCO. The subharmonic generator also allows the FatMan to produce tones down to (approximately) 32 Hz!
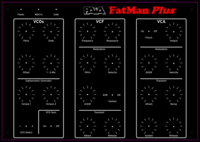
With the newer version there is also a selector switch so one can select whether the Subharmonic Generator oscillates with VCO 1 or VCO 2. This VCO selection along with levels of generated octaves 1 and 2 are controlled via a toggle switch and two potentiometers in the lower left of the control panel. Obviously the VCO selection is moot if Hard Sync is enabled. Turning the levels to zero essentially turns off the mod.
In order to add this I laid out a very simple PCB to hold the required parts and interconnections. This board is mounted in the very front of the enclosure and connected via a few solder points on the back of the board.
555 Timer Replacement
Synthaholic's FatMan Site strongly suggests replacing the factory 555 timers with CMOS-based 7555 parts. The end result is that the VCOs are far less likely to unintentionally fall into sync.
I replaced the 555's with a pair of ST T555CN's, Mouser part 511-TS555CN.
Enclosure
In order to replace the aged metal box which the FatMan had been housed in, I used the PacTec PT-10, which is the same enclosure that the x0xb0x uses. I like the look, feel, and build of this enclosure, and at US$19.82 each from Mouser (part number 616-82404-510-000) it is reasonably priced. The front and rear metal panels were drilled as needed, and a piece of polycarbonate was mounted inside to provide the required height and spacing of mounting points for the FatMan PCB.
Artwork
With the new case and front panel, the PAiA FatMan Plus, as I now called it, needed some attractive artwork to detail what each control did. While most of the pots still controlled the same things, there were a few add-ons. Based on the required controls, I designed some new artwork which, I feel, clearly communicated how each control, including the new modifications, worked together to shape the sound.
After talking with Robert Lowell of Lowell Sign Designs in Ypsilanti, MI via ladyada's tea party about the x0xb0x artwork I designed, he offered to print up some one-off artwork for me. Since the price was reasonable I decided to let him give it a try. This artwork was professionally inkjet printed on white vinyl, on top of which was layered some self-adhesive textured Lexan.
The end result was good, although not quite of the quality as the rear-printed Lexan pieces from MaverickLabel.com. Over time the label layers have also begun to separate, but it still looks really good, and the price was especially reasonable for a one-off.
Both a top panel piece and a rear panel piece were printed. These were applied directly to the cleaned metal panels and the holes were cut out.

Finished
In the end I am very happy with the final result. Even with the FatMan I initially received for free, the total cost was around 60% of a new PAiA FatMan kit, with enclosure. Most of this new cost was tied up in replacement pots, knobs, and the (very worthwhile) new enclosure and artwork.
External Links
- PAiA FatMan - PAiA's FatMan site.
- Synthaholic's FatMan Site - PAiA FatMan Mods and Addons. Source of much of the info used for making modifications and add-ons which comprised the PAiA FatMan Plus.