iSight Tripod Adapter
About
At one point I found myself wanting an easy way to mount an Apple iSight camera on a tripod in order to do some timelapse video. The only mounting ideas I could find involved using the somewhat short FireWire cable which comes with the iSight. A commercially available mount is available from Kaidan, but it is a prohibitively expensive plastic adapter block, and it too still uses the original Apple FireWire cable.
For some of the things I wanted to use the iSight for, having a short cable on it would be rather difficult. For example, if the tripod is extended to it's maximum height, with the Apple FireWire cable the laptop wouldn't even be able to set on the floor beneath it. Clearly another solution was needed.
Using a spare 5m FireWire cable and some PVC pipe parts which were laying around the basement I set to work building an appropriate adapter. This came to be known as the Old, or Original version. Unhappy with the look of the original version and realizing that other people may be interested in such a device as well, I rebuit the adapter a bit more elegantly. I also took photos of many of the steps of construction so that others could duplicate the work. These photos were posted here.
This page is a continuation of the original photographic how-to. Additionally, I have a few of the iSight Tripod Adapters available for sale]].
Make Magazine
After making the original album of photographic how-to I emailed a link to it to the editor of Make Magazine. I thought that it might be interesting enough to be posted in the Make Blog, but the reply I received offered me payment to write a 500 word article. So, I did.
The resulting article, a rather nifty drawing (which I didn't do), and some of my photographs were published in the DIY: Imaging section on pages 131-132 of Volume 05: Science, Weather, and Outdoors.
Buy One
Friends of mine were wanting some of these adapters for their own uses, so I made up a run of them to both give away as gifts and sell.
If you want an iSight Tripod Adapter and don't have the time or facilities to make one for yourself, email me at c0nsumer@nuxx.net to buy one. I still have a few left. The price for one is US$20, shipped anywhere within the US. If you live outside of the US the price will likely be a few dollars more because of the increased postage costs.
Make One
Want to build your own iSight Tripod Adapter?
Materials Needed
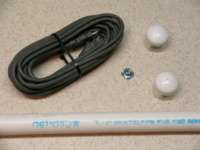
The following materials are needed to build an iSight Tripod Adapter:
- 5m (~15') 6-pin to 6-pin FireWire (IEEE1394a) Cable
- Around 3" of 3/4" PVC Pipe
- Two Domed 3/4" PVC End Caps
- 1/4-20 Tee Nut (With Barbs)
- Hot Melt Glue
- PVC Primer and Cement
Tools Used
To make the iSight Tripod Adapters I used the following tools. Of course, you may wish to use some other tools in order to better fit what you have and/or your style of work:
- 5/16" and 3/32" Drill Bits
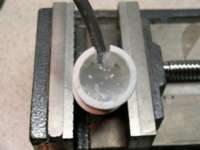
- Drill Press Vise
- Drill Press
- Dremel
- Dental, or other very fine bit for the Dremel.
- Hacksaw
- Hot Melt Glue Gun
- Small Files
- Small Razor Blade Knife
- Hacksaw
Steps
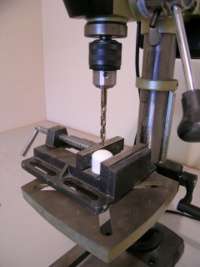 |
To get started, drill a 5/16" hole in the center of one end cap. |
 |
There. A (mostly) centered hole drilled in the end cap. |
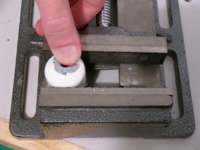 |
Press the tee nut into the hole, points-down, in order to leave four marks in the end cap. |
 |
Mark the guide marks which the tee nut's points left in the end cap so that they are easier to see. |
 |
Drill out the markings with a 3/32" bit. |
 |
Ahh. A total of five holes in the end cap. |
 |
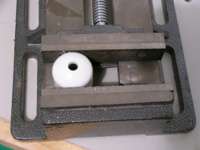
Check the holes with the tee nut to ensure it settles into all five. If not, re-drill the holes or trim. |
 |
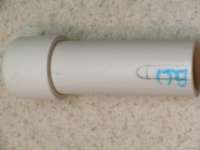
Cut a length of PVC pipe to serve as the body of the iSight Capsule. The piece I used was around 3" long. |
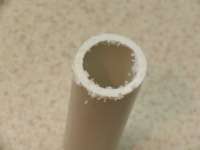 |
After cutting the pipe there are usually some burrs left. Clean these up with your fingers, a file, a razor blade, or whatever is handy. |
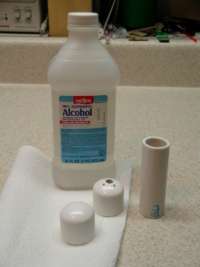 |
Clean all parts with isopropyl alcohol in order to remove labels, gunk, etc. |
 |
Make a mark on the pipe for the cutout for the cable. This should be the depth of a pipe cap plus the space for the cable. Note that the other cap isn't attached yet, I just slipped it on to keep the pipe from rolling when I took the picture. |
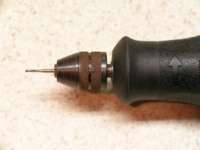 |
In order to cut the PVC I used a Dremel fitted with a used dental bit. It's too dull for teeth, but plenty sharp for my needs. And yes, it has been properly sterilized. |
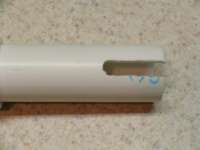 |
The pipe with the slot now cut out of it. |
 |
See how the cable, end cap, and pipe will all fit together? Test this fit and trim if needed. |
 |
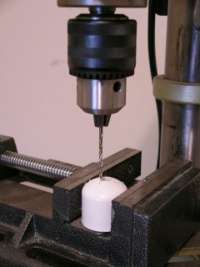
Next we have to cut a hole in the other end cap for the FireWire connector. |
 |
Mark the pipe with a rectangle into which the FireWire connector will snugly fit. |
 |
Cut a out the markings in the end cap with the Dremel. File smooth. |
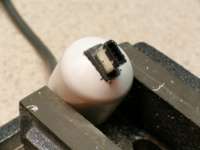 |
The FireWire cable should snugly fit into the hole. Test fit and trim as needed. |
 |
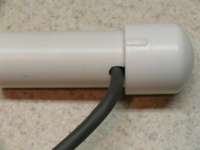
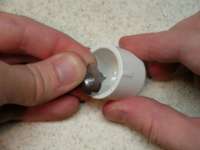
Using PVC cement, attach the end cap to the tube. Then slip the FireWire cable in, fitting the connector through the hole. Position the keyed side of the FireWire connector facing away from the cut slot so that the FireWire cable will run out the back side of the iSight Tripod Adapter. |
 |
Adjust the fit of the connector so that it sticks out far enough that the iSight will be able to pivot up and down. |
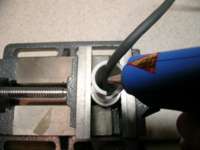 |
After the connector is seated snugly and centered, fill the area around the connector with hot melt glue. As you fill the body of the iSight Capsule, tuck the cable through the slot in the tube. Be sure not to dislodge the connector in the end cap. |
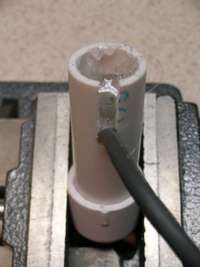 |
Here's the body of my iSight Capsule full of still-liquid hot melt glue, with the cable routed out the side. Set this aside to cool, and don't worry about the glue threads until everything is hardened. I used around four full sticks of glue. |
 |
Be careful when working with hot melt glue. While it isn't nearly as hot as solder, it still sticks nicely to skin and burns until it is cooled. |
 |
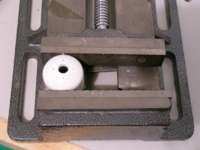
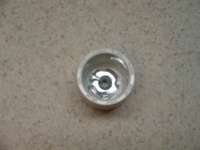
Insert the tee nut in the end cap with the barbs pointing downward so they fit through the holes from the inside out. |
 |
Press down on the tee nut in order to secure it snugly in the cap. |
 |
Look at the underside of the end cap to ensure that the tee nut is seated in the cap. |
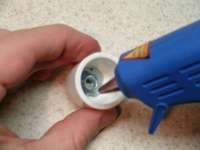 |
Use some more hot melt glue to secure the tee nut. A large quantity of glue is not required, as there won't really be any force on the tee nut pushing it out of place. |
 |
Once the hot melt glue has been applied, set the end cap and tee nut assembly aside to cool. If you drip glue on the threads (as I did), wait until after it cools to remove it. |
 |
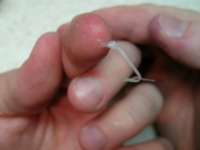
As the hot melt glue cools it turns a translucent white-ish clear color. Now is a good time to remove all the loose glue threads. The threads of glue can be picked off with one's fingers or trimmed off with a razor blade. |
 |
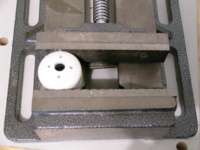
After all the hot melt glue has cooled, glue the tee nut / end cap assembly on to the body of the iSight Capsule using PVC cement. |
 |
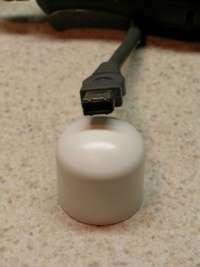
There. One complete iSight Capsule, ready to mount your iSight to a standard 1/4-20 screw on a tripod. Be sure to wipe the entire assembly down with isopropyl alcohol after assembly to remove any lingering dirt, oils, adhesive, etc. |
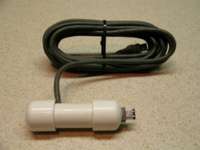
Done
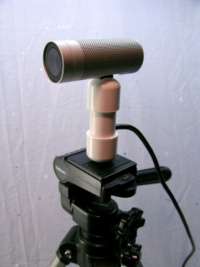
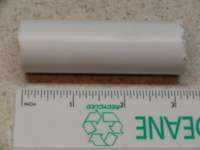
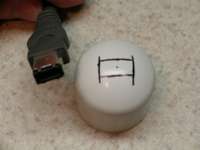
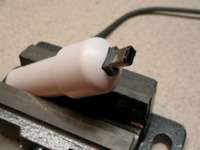
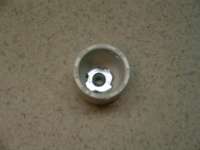
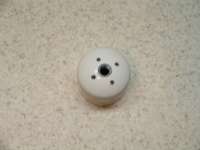
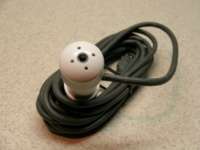
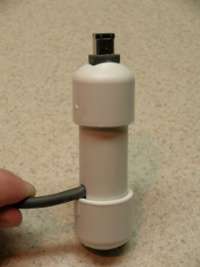 A Finished iSight Tripod Adapter |
 Bottom, showing the tripod-compatible 1/4-20 Tee Nut |
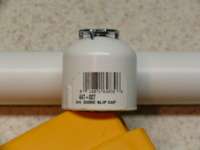
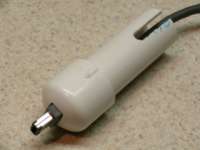
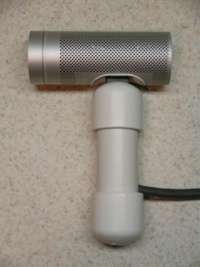 Finished iSight Tripod Adapter with an iSight Attached |
External Links
- Steve Cooley's DIY iSight Tripod Mount - Uses a wooden adapter and the original FireWire cable.
- Elise's iSight Tripod - Uses some washers, a nut, and binder clips to hold the original iSight mount to a small tripod. Also uses the original FireWire cable.