Sequentix P3

About
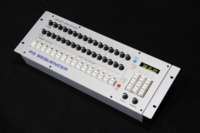
The Sequentix P3 is a step sequencer with analog pots for entering notes and other data. It was originally sold both as a kit and assembled, but recently (most likely due to RoHS legislation) it is now only available wholly assembled.
The About P3 section of the Sequentix site states begins:
- The P3 Sequencer is an 8 track, hardware MIDI sequencer, with a user interface comprised of knobs, keys and LEDs. A sixteen character by two line PLED display provides confirmation of pattern data and access to advanced features and configuration options.
- P3 allows real-time control of track mutes and simple pattern or pattern chain selection across multiple tracks, plus analogue-style editing of patterns. Each of its 384 patterns has independent values for note, velocity, tie, gate, length, gate delay, and a combination of up to four MIDI controllers, extra notes, or 'auxiliary events', per step.
I've never really cared for sequencing music by clicking around in a computer so I figured that a hardware sequencer would be especially useful for me. With my recent building of (all too) many MIDI-controlled synthesizers I was also needing something other than a keyboard for triggering them, so when I had the unexpected chance to purchase the parts for a P3 and built it myself, I jumped at the chance. In the end it cost a bit more than I'd originally planned, but it seems worthwhile thus far.
P3 End of Life
On September 5th, 2006 Colin Fraser posted a message on the Sequentix Music Systems News Release page stating that the P3 will soon be out of production. The release states:
- It's been just over a year since the P3 Sequencer was launched as a production unit.
- We have sold well over 100 units in that time, and the response from users has been excellent.
- However, due to a number of factors, we have decided to cease production of P3 after the current run is sold out.
- The main reason for this is that a thorough review of the numbers shows P3 is simply too expensive to produce.
- All units built so far have been assembled in-house.
- The amount of effort this requires has meant we have been unable concentrate on developing future products.
- Fully out-sourcing production of P3 in its current form would mean a significant increase in the final price - it just wasn't designed to be cheap to manufacture, with a large number of separate circuit boards, internal wiring, and a complex case design.
- Ceasing production will give us the opportunity to take the lessons learned from P3 and develop a replacement product that can be made and sold at a viable price.
- In the meantime, we expect the remaining stocks of P3 to move quickly.
- They will be available until stocks are exhausted, direct from Sequentix, from our US dealer Analogue Haven, and our German dealer Schneiders Buero.
Later, on September 7th a new post was made stating:
- All remaining units are now spoken for.
- There is a reserve list in case anyone decides not to follow through on an order, so there is a small chance if you are quick...
So, it sounds as if they are all gone.
According to a recent posting by Colin Fraser on the analogue-sequencer Yahoo! Group, after the final Sequentix P3 is shipped there will have been 137 production units made. An additional 24 pre-production P3s were made and there were a total of 86 kits sold. Assuming that all kits were assembled, there are only 247 (at most) P3s in the world. So not only is this an interesting, fairly unique sequencer, it's somewhat rare, too.
Kit
Around April 2006 a few remaining sets of P3 PCBs surfaced and were made available for purchase through analoguehanven for US$249. I purchased one of these and let it sit in my basement for a few months.
After directly contacting Colin Fraser, the creator of the P3, I was able to purchase one of the pre-made enclosures for the P3 from him. This enclosure kit also included Cherry keyswitches and keycaps which were custom-labeled for the P3. While the price of US$339.55 plus $77.62 postage (after exchange from GBP) seemed a bit high at first, when I took into account the time it would take to design my own enclosure, locating the switches, and the cost of having a custom front panel made, and the price seemed pretty reasonable.
With another US$200 or so in parts from Mouser, Digi-Key, and Jameco I had everything needed to assemble the P3.
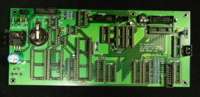
Assembly went very smoothly, and except for an issue with the clearance of the top pot board (which turned out to be a known assembly issue) there weren't any problems. The PCBs are fairly simple and assembly was easy with the most difficult part being the making of jigs for the keyswitches on the step board and keypad board. This is definitely one of the easier kits I've assembled.
There are various photos of the construction of my P3 available, all of which can be seen in the Gallery album entitled Sequentix P3. Specifically, there are separate albums showing some of the parts used, various photos of the assembly in progress, and a few of the completed Sequentix P3.
On November 15th, 2006 the wooden end cheeks for the Sequentix P3 arrived. These took a few minutes to install and have really polished off the look of the P3. Images of the completed Sequentix P3 have been added to the latter half of the completed Sequentix P3 photos. While the rackmount version is nice, I greatly prefer the smooth, finished look when the wooden end cheeks are fitted.
Bill of Materials
This bill of materials details all parts which I purchased from US suppliers and used for the assembly of my P3 with the v1.6 PCB set. As of the time when I started this project there was no coheasive BOM for the v1.6 of the P3 PCB set, so hopefully others will find this useful. This was initially based on the v1.52 BOM posted to the Sequentix P3 Yahoo! Group by Colin, but since many of the parts are no longer available I'd made some changes.
Most parts are from Mouser. Digi-Key was used for a few harder to find ICs and the switching slim wall wart-type power supply was purchased from Jameco. The PLED display is from Crystalfontz. Listed part numbers link to the product pages at the various vendor's sites.
Note that not all parts are RoHS compliant, so anyone ordering components from the EU may want to pay attention to what is being ordered.
In my assembly I did not have the proper length LED standoffs available to me when assembling the Function Switch Board, so I stacked two shorter standoffs. The specified .32" standoffs should be the appropriate length, but it is suggested that you order a few similar sizes and see what fits best.
When doing the final assembly on my P3, I found that the case wouldn't close. It turned out that the top Main Pot Board hit the back of the case, keeping it from closing. I found that if one bends the top board back against the housings and makes the connecting cable a slight bit longer (maybe another 5mm) everything fits great. In some email sent with a great degree of synchronicity, Colin confirmed that this needs to be done on some P3s, depending on which pots are used. Keep this in mind when building a P3. In order to make connecting cables easier, you may also wish to mount the 16 Pin header on the opposite side of the PCB.
Main Board
| Part Name on PCB | Value | Part Number | Quantity |
|---|---|---|---|
| C1, C2 | 33pF | 81-RPE5C1H330J2P1Z03 | 2 |
| C4 | 150pF | 81-RPE5C1H151J2P1A03 | 1 |
| C6, C8-C12, C14 | 100nF | 80-C322C104K5R | 7 |
| C5 | 10nF | 140-PF2A103G | 1 |
| C3, C7, C15 | 10uF | 140-L16V10-RC | 3 |
| C13 | 1000uF | 140-XRL25V1000-RC | 1 |
| VR1 | 10KΩ | 531-PT10V-10K | 1 |
| R10-R13 | 100Ω | 271-100-RC | 4 |
| R18, R21, R25, R26 | 10KΩ | 271-10K-RC | 4 |
| R19, R27 | 10Ω | 271-10-RC | 2 |
| R-9 | 150Ω | 271-150-RC | 4 |
| R1, R32-R36 | 220Ω | 271-220-RC | 6 |
| R23,R24 | 22Ω | 271-22-RC | 2 |
| R14-R17 | 4.7KΩ | 271-4.7K-RC | 4 |
| R2 | 510Ω | 271-510-RC | 1 |
| D1 | 5.6V Zener | 512-1N5232B | 1 |
| D2 | 1N4148 | 512-1N4148 | 1 |
| D6 | 1N4001 | 512-1N4001 | 1 |
| U1 | AT89C51ED2 | Ships w/ PCBs | 1 |
| U2, U3 | 62256 | 428-1782-ND | 2 |
| U4 | 74HC573 | 512-MM74HC573N_Q | 1 |
| U5,U8 | 74HC138 | 512-MM74HC138N | 2 |
| U6 | DS1210+ | DS1210+-ND | 1 |
| U7, U10, U11, U15 | 74HC574 | 595-SN74HC574N | 4 |
| U9 | 74HC245 | 595-SN74HC245N | 1 |
| U12,U13 | 74HC241 | 296-8271-5-ND | 2 |
| U14 | ADC0804 | ADC0804LCN-ND | 1 |
| U16 | 4051B | 595-CD4051BE | 1 |
| U17 | 6N139 | 512-6N139 | 1 |
| U18 | 7805 | 511-L7805ACV | 1 |
| U19 | PIC 12F629 | Ships w/ PCBs | 1 |
| U20 | 74HC04 | 511-M74HC04 | 1 |
| Q2 | BC547B | 512-BC547BTAR | 1 |
| F1 | 500ma FUSE | 652-MFR050-LF | 1 |
| J1 | 3 Pin Vertical Header | 538-70543-0002 | 1 |
| J6 | 4 Pin Vertical Header | 538-70543-0003 | 2 |
| J2-J5 | 16 Pin Box Header | 517-30316-6002 | 4 |
| XTAL1 | 24 MHZ | 520-HCU2400-S | 1 |
| VB | CR2032 | 525-E-CR2032BP | 1 |
| VB | PCB Cell Holder | 534-103 | 1 |
| L1, L2 | Ferrite | 81-BL01RN1A1D2B | 2 |
| U6, U17, U19 | 8 Pin DIP Socket | 575-193308 | 3 |
| U20 | 14 Pin DIP Socket | 575-193314 | 1 |
| U5, U8, U16 | 16 Pin DIP Socket | 575-193316 | 3 |
| U4, U7, U9-U15 | 20 Pin DIP Socket | 575-193320 | 9 |
| U2, U3 | 28 Pin DIP Socket | 575-193628 | 2 |
| U1 | 40 Pin DIP Socket | 575-193640 | 1 |
| U18 | TO220 Heatsink | 532-504102B00 | 1 |
| U18 | TO220 Mounting Kit | 532-4880 | 1 |
Step Board
| Part Name on PCB | Value | Part Number | Quantity |
|---|---|---|---|
| D1-D16 | 1N4148 | 512-1N4148 | 16 |
| D17-D32 | Dual-Color LED | 604-WP59EGW | 16 |
| D17-D32 | LED Standoff | 593-STD250B | 16 |
| J1 | 16 Pin Box Header | 517-30316-6002 | 1 |
| S1-S9 | Keyswitch | Ships w/ Enclosure | 9 |
| S1-S9 | Keycap | Ships w/ Enclosure | 9 |
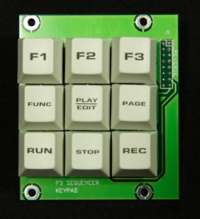
Keypad Board
| Part Name on PCB | Value | Part Number | Quantity |
|---|---|---|---|
| D1-D9 | 1N4148 | 512-1N4148 | 9 |
| J1 | 16 Pin Box Header | 517-30316-6002 | 1 |
| S1-S9 | Keyswitch | Ships w/ Enclosure | 9 |
| S1-S9 | Keycap | Ships w/ Enclosure | 9 |
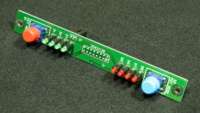
Function Switch Board
NOTE: Square pad on LED pads is anode. This is commonly the longer lead on the non-flat side of an LED.
| Part Name on PCB | Value | Part Number | Quantity |
|---|---|---|---|
| D1-D4 | Green LED | 604-WP7104PGD | 4 |
| D5-D8 | Red LED | 604-WP7104ID | 4 |
| D9,D10 | 1N4148 | 512-1N4148 | 2 |
| S1, S2 | Keyswitch | Ships w/ Enclosure | 2 |
| S1, S2 | Keycap | Ships w/ Enclosure | 2 |
| J1 | 16 Pin Box Header | 517-30316-6002 | 1 |
| J2 | 2 Vertical Header | 538-70543-0001 | 1 |
| D1-D8 | LED Standoff | 593-ST320B | 8 |

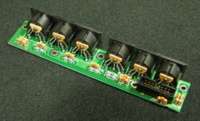
Main Pot Board
NOTE: There are two Pot Boards, Upper and Lower. Part names are duplicated on each.
| Part Name on PCB | Value | Part Number | Quantity |
|---|---|---|---|
| VR1-VR16 | 10K Linear | 31CA401F | 32 |
| C1, C2 | 100nF | 80-C322C104K5R | 4 |
| U1, U2 | 4051B | 595-CD4051BE | 4 |
| U1, U2 | 16 Pin DIP Socket | 575-193316 | 4 |
| J1 | 16 Pin Box Header | 517-30316-6002 | 2 |
| VR1-VR4, VR9-VR12 | White Knob | 550-67005 | 16 |
| VR5-VR8, VR13-VR16 | Gray Knob | 550-67003 | 16 |
I/O Board
| Part Name on PCB | Value | Part Number | Quantity |
|---|---|---|---|
| MIDI IN, OUT 1-4, SYNC | 5 PIN DIN Socket | 161-0504 | 6 |
| J1 | 16 Pin Box Header | 517-30316-6002 | 1 |
| R1-R5 | 220R | 271-220-RC | 5 |
| F1-F10 | RFI Filter | 81-DSS306Y5S102M100 | 10 |
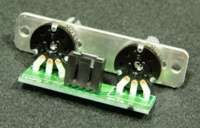
Data / Tempo Pot Board
| Part Name on PCB | Value | Part Number | Quantity |
|---|---|---|---|
| TEMPO, DATA | 10K Linear Pot | 31CA401F | 2 |
| DATA | White Knob | 550-67005 | 1 |
| TEMPO | Gray Knob | 550-67003 | 1 |
Display
| Part Name on PCB | Value | Part Number | Quantity |
|---|---|---|---|
| PLED Module | CFAP1602A-Y-JCV | 1 | |
| A1 | 16 Pin R/A Box Header | 517-30316-5002 | 1 |
| A2 | PCB Header | 517-6111TG | 1 |
Power Input
| Value | Part Number | Quantity |
|---|---|---|
| Power Switch | 103-R13-112A-02 | 1 |
| 2.1 mm Power Socket | 163-4302-EX | 1 |
| 9VDC Power Supply | 252751 | 1 |
Cabling
| Value | Part Number | Quantity |
|---|---|---|
| 16 Pin IDC Plug | 517-8916 | 11 |
| Crimp Terminal | 538-16-02-0097 | 17 |
| 16 Place Ribbon Cable | 517-3365/16FT | 2 |
| 2 Pin Single Row Plug | 538-50-57-9402 | 1 |
| 3 Pin Single Row Plug | 538-50-57-9403 | 1 |
| 4 Pin Single Row Plug | 538-50-57-9404 | 3 |
External Links
- Sequentix Music Systems - Maker of the P3 Sequencer.
- analogue-sequencer Yahoo! Group - Yahoo! Group for the Sequentix P3, containing lots of related files including firmware, BOMs, pictures of users' P3s, etc.