PlayStation as CD Player

Overview
In late 2006 I came across a few articles at sites such as MSBNC and ars technica describing how one of Sony's original PlayStation consoles, the SCPH-1001 (US model) contains a particularly nice DAC, helping to make it a particularly good sounding CD player.
While I'm generally doubtful of many audiophile claims, having just finished building a Millett Hybrid Maxed headphone amplifier I decided to pick up a SCPH-1001 and give it a listen. I first stopped at a local chain game store looking for an SCPH-1001, and one of the employees there directed me to store called Gamequest, over at 21 Mile and Gratiot in Chesterfield Township.
I found that the employees of Gamequest were really friendly and were happy to dig up a SCPH-1001 and sell it to me. Total cost for the console with one OEM controller (SCPH-1080), power cord, and AV out cord was US$10. This is very good price, and in line with what one would expect to pay on eBay. I've since returned and picked up a second SCPH-1001 for parts.
The biggest downside I saw to using the SCPH-1001 as a CD player was the need to use a game controller for selecting tracks. So, I decided to add front panel controls. As a warning, this fits into the category of awful hack. It's not as elegantly done as it could be, but my goal for this project was a combination of easy, cheap, and possible with readily available items.
The complete series of photos taken for this project can be found here.
CD Player Controls
The Sony PlayStation has a built-in CD player with on-TV display of track info, time, etc. Thankfully Sony designed the PlayStation's interface so that this display isn't required for playing CD, with the basic functions of the CD player (Play/Pause, Stop, Next, Prev, FF, RW) are available directly from the controller.
This easy control lead me to think that I could easily add CD player controls to the PlayStation's housing, eliminating the need for a remote hanging off the front panel for CD playing. While I don't normally like the sort of hack I used (cutting up a PCB and using flying wires to connect to the buttons' traces), it was the lowest cost, easiest to implement solution.
This PCB was then mounted inside of the PlayStation's housing and wired into the rear of the Player 2 controller socket. This provided a nice finish to the enclosure, and the Player 1 socket remains available, should I desire to ever use the PlayStation to play games.
Buttons and Holes
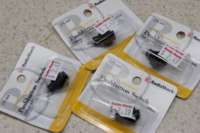
Right after acquiring the SCPH-1001 and finishing the MAX I found I wanted the CD player controls right on the PCB. Normally I would order buttons from Mouser, but since I wanted to start on this right away I ended up visiting a local Radio Shack and picking up some black pushbuttons, part number 275-644. These buttons aren't ideal, but they are pretty good and were available the same day. Even though they were US$2.49/each (a bit high) the total cost for all the buttons was under US$20. This was satisfactory to get me started on the project that day.
These buttons were mounted by first creating a template with circles the same diameter as the retaining nut (the widest part of the button assembly), arraying them 6mm apart, then sticking the template inside the enclosure. The points for drilling were centerpunched, the outside of the housing was covered with tape for protection, the holes were piloted and then finally drilled with a 1/2" spiral bit at 1390 RPM.
Despite both the template and protective tape being rather torn up, the drilled holes came out nice and clean, and required no filing. The buttons fit cleaning in the holes without hitting the parts beneath, leaving plenty of room to work.

Controller PCB
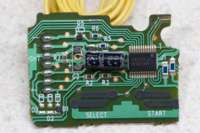
The hack employed to make the buttons perform the remote control connections was done in the simplest, and cheapest, way I could think of. That is, I removed the PCB from a Sony SCPH-1080 controller (the original non-Dual Shock PlayStation one), cut it down to size, relocated some on-board components, and used flying wires to connect my buttons to test pads and traces on the PCB.
I first moved the large smoothing capacitor to the top of the board, desoldered the controller cable, and cleaned up any lingering flux. Then I tinned the test pads which I could use as solder points, or carefully exposed parts of traces and tinned those. The following chart shows which pins on the IC in the SCPH-1080 are used for the CD player related functions:
| Pin on IC | Button on Controller | Function |
|---|---|---|
| 3 | R2 | Fast Forward |
| 4 | R1 | Next Track |
| 6 | L2 | Rewind |
| 17 | L1 | Previous Track |
| 18 | Select | Stop |
| 19 | Start | Play/Pause |
Wires running from one side of each individual button were connected to the appropriate lines on the PCB. A common ground then connected from the switches to Vcc (GND, -) on the PCB. The PCB was then mounted in the enclosure above the buttons, and both the PCB and some of the wires were tacked in place with hot melt glue.
I had initially thought of some third-party PlayStation controllers I picked up. The first was an EA Sports branded controller which had its IC completely potted, and had a PCB which was too large to be easily used. The second was an ASCIIWARE controller, but its PCB was also too large. I considered lifting the IC from the ACSIIWARE controller and making my own board, but it was much faster (and cheaper) to just use the SCPH-1080 I already had.
Wiring
To make wiring easier a bare copper ground bus, I first wound a piece of bare copper wire between one set of terminals on the buttons, soldered it in place, and then attached a normal piece of insulated wire for connecting ground to the PCB.
The other half of each button was connected to the PCB using a piece of stranded wire between the switch and solder pad on the PCB. The connection at the switch side of this wiring was insulated with 3mm 3:1 heatshrink tubing.
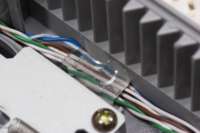
The PCB was then connected to the rear of the Player 2 controller socket with some solid wire from a piece of CAT5 cable. These wires were routed around the button to open the drive cover, through an RF shield, and directly to the solder pads on the rear of the socket.
As with the PCB, wires were secured in place using hot melt glue to tack the wires down against the enclosure.
Left Over Parts
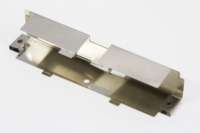
Because of the additional bits of wire now behind the Player 2 controller socket, the RF shield which is normally found on the socket did not fit well. I left it off, and I have not noticed any ill effects. All other parts fit back inside the enclosure as expected.
Button Functions
In the end, the buttons on the top of the SCPH-1001, arrayed as shown below, have the following functions:
| Play/Pause | Stop |
| Previous Track | Next Track |
| Rewind | Fast Forward |
I may eventually add some labeling to the top of the PlayStation housing, but with the fairly intuitive button layout I don't think there is a need. I also like the smooth look without extra text.
Total Cost
The total cost of this project was, after tax, US$39.14, plus some of my time, the cost of a bit of solder, and a few inches of heatshrink tubing (trivial). This breaks down as US$10 per PlayStation bundle (I bought two bundles each containing SCPH-1001, SCPH-1080, AV MULTI OUT cable, power cable), US$0.99 per third-party controller, US$2.49 per overpriced 275-644 button from Radio Shack, and Michigan's 6% sales tax.
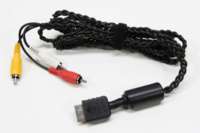
Cable
Having purchased a total of two SCPH-1001 PlayStations I ended up with two of the AV MULTI OUT cables. The first cable I tried seems to have an intermittent problem problem with the left channel, so I've begin using the second cable. As the original owner of the second cable had split the wires into separate audio and video sections, I chose to braid the cable. This served to both bundle it up and shorten the cable, while retaining its flexibility.
Sound Quality
As I mentioned in my Millett Hybrid Maxed write up, I'm not an audiophile, but I can say that this player, stock, sounds pretty good. The DAC seems quieter than that of the couple other CD players I tried the MAX with. I'm certain that a better CD player such as a Naim Audio or whatnot would sound better, but for $10 this is pretty good.
There are a number of modifications to the output circuitry which have been documented by Mick Feuerbacher and people over at the diyAudio Forums. I haven't tried any of these yet, but if / when I do, this page will be updated to reflect it. I suspect that a few of these modifications may greatly improve the audio.
External Links
- Mick Feuerbacher's Modifications and repairs on a Sony Playstation SCPH1002
- diyAudio Forums - Playstation as CD-player
- Hydrogenaudio Forums > Turn your Playstation into an audiophile CD player
- MSNBC: A second life for your first PlayStation
- Need a high-end CD player? Why not use your old PlayStation?