MIDIbox SID-NUXX - Enclosure
Overview
In order to make the MIDIbox SID-NUXX attractive and easy to use, a proper enclosure needed to be designed. The MIDIbox SID-NUXX's Mainboard was designed to fit inside of a Hammond 1455T1601-series, which is approximately the size of a 5.25" drive enclosure. This enclosure was chosen because of it's look, high quality construction, ready availability, and size. There is enough airspace inside of it that the components can breath, and the rear panel is wide enough to allow all the required connections to be located roughly on the same plane.
In order to provide a more polished look to the enclosure, custom end panels were designed. The enclosure was (by almost a factor of three) the most expensive part of the entire synth. However, I feel that having a nice, proper, rugged, finished instrument is considerably nicer than simply squeezing everything in whatever project box is available.
Cost
All prices are in US Dollars and were calculated on 05-Sep-2006 with rough postage costs.
- PCB: $15
- Chassis: $24.84
- Front and Rear Panels: $107.92
- Pushbuttons: $1.86
- Rotary Encoder: $2.79
- LEDs: $0.42
- Cables: $8.34
- Display: $34.98
- Fasteners: $1.39
- Total: $197.54
Components
PCB
In order to securely hold the LEDs and tactile switches a PCB was designed and sent to PCBFABEXPRESS for production. This too was designed in CADsoft EAGLE. The cost for each manufactured PCB from PCBFABEXPRESS is US$15.00 (including postal costs) each when ordered in the typical minimum quantity of five.
After receiving the PCBs I milled out the center of each with a vertically mounted rotary cutting tool. Then the inside of each milled opening was filed smooth and the board was washed with plain water before fitting the parts.
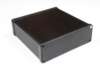
Chassis
The Hammond 1455T1601-series was chosen to house the synth because of it's solid construction, appropriate size, and ready availability. It is available from Mouser as part number 546-1455T1601BK for US$24.84.
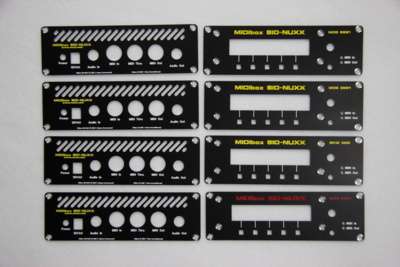
Front and Rear Panels
Custom front and rear panels were designed in black, yellow, and white to fit the Hammond 1455T1601 enclosure. Panels were designed using Front Panel Designer for manufacture by Front Panel Express. While there is a location on the PCB for a 'Power' LED, this was left off because the illuminated display indicates whether or not the MIDIbox SID-NUXX is powered on or off.
The .FPD files for use in Front Panel Express for the MIDIbox SID-NUXX may be downloaded here: mb_sid-nuxx_panels.zip. These panels cost an average of US$53.96 each to have manufactured in their current design.
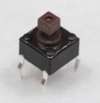
Pushbuttons
To allow specific menu items to be selected, the Mountain Switch tactile switches available from Mouser as part number 101-0661-EV were selected. On top of the tactile switches five square yellow (P/N 101-0104-EV) and one round black (P/N 101-0200-EV) were used. At US$0.11 per keycap and US$0.20 per tactile switch, the total cost six buttons is US$1.86.
Rotary Encoder
In order to scroll through menus and change parameters on the MIDIbox SID-NUXX, a rotary encoder is used. For this a 12mm ALPS encoder, Mouser part 688-EC12E24204A8 was selected. To this a plain black plastic knob (P/N 5164-1900) is attached. One rotary encoder and one knob costs US$2.79.
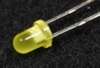
LEDs
To match the PLED / OLED display, 3mm round top yellow LEDs (Mouser part 638-204YD) were chosen. These are attached to the PCB with .20" LED standoffs (P/N 593-STD200B) to provide proper spacing. Note that resistors R12-R14 on the Mainboard can be changed to vary the brightness of the LEDs. The listed value of 470Ω is appropriate for use with these LEDs, but if a different model is used, the values of R12-R14 may need to be adjusted. The cost for two LEDs and two standoffs is US$0.42.
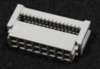
Cables
To make data cables for connecting the Mainboard and front panel, 16-pin connectors (P/N 517-89116-0001) and strain reliefs (P/N 517-3448-89116), 10-pin connectors 517-89110-0001 and strain reliefs 517-3448-89110 are used. For the connections for LEDs, six-pin connectors (P/N 538-22-55-2061) and appropriate pins 538-16-02-0103) are used. Spare hard drive cable was stripped down for making the cables themselves, although any fine-gauge wire could be used. The cost for these connectors and pins (cabling isn't taken into account) is US$8.34.
The LED and switch cables are cabled 1:1, but the display cable is not. For the display cable's pinout please look at the MIDIbox SID-NUXX - Display Cable page.
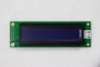
Display
After experimenting with a few displays, I eventually settled on the Crystalfontz CFAP2002A-Y-ECS PLED / OLED. It has amazing contrast and a lower power consumption than the eqivilently sized LCD. Truely a beautiful display.
Unfortunately, due to some slight sizing changes between it and the Crystalfontz CFAH2002A-RMI-JP LCD for which the enclosure was originally designed, when the CFAP2002A-Y-ECS PLED / OLED is used, there is a slight gap between the front panel and the display itself. Additionally, the buttons are slightly shifted (~1.5mm) from the center of the characters which they are to be centered below. In practice this is not noticable.
The Crystalfontz CFAP2002A-Y-ECS costs $US$30.98 each, plus a fairly steep shipping cost.
Fasteners
A number of fasteners from McMaster-Carr are used in the assembly of the enclosure.
In order to secure the front and rear panels to the enclosure, eight 3/8" flat-head black screws (P/N 96640A115 - $0.057/ea) are used.
Additionally, four each of unthreaded nylon spacers (P/N 93657A002 - $0.93/ea), threaded aluminum round spacers (P/N 93330A441 - $0.31/ea), 1/4" flat-head black screws (P/N 96640A110 - $0.052/ea), nylon washers (No P/N, from Lowe's - ~$0.10/ea), and pan head screws with toothed washers (P/N 95345A464 - $0.091/ea) are used to hold the front panel together.
Assembly
Front Panel
After mounting the on-board components to the PCB, the front panel is assembled in layers. From the outside in:
- Four 1/4" screws.
- Front Panel
- Thin nylon washers
- Threaded aluminum spacers
- Main PCB
- Round nylon spacers
- Display Module (PLED / OLED or LCD)
- Pan Head Screws
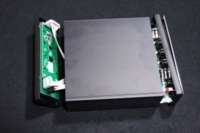
Rear Panel
The Mainboard is secured to the rear panel with the threaded fasteners which are part of the 1/4" TRS jacks. Be sure the power connector and power switch fit nicely through the rear panel.
Enclosure
Along with the plastic bezels the front and rear metal panels are fastened into the ends of the enclosure using the 3/8" black flat-headed screws. The rubber feet are stuck to the bottom of the enclosure, and the device is considered complete.