Atari 800XL Disk Archiving
Overview
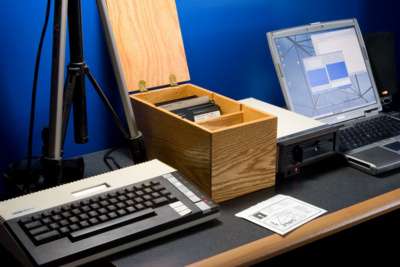
When I was much younger my parents acquired our first home computer, an Atari 800XL, which was part of Atari's 8-Bit computing family. While I never explored programming this machine (something I rather regret) I spent countless hours playing games, poking around with applications, and generally having fun with this machine. Most likely because I was too young to really grok the machine and that I was capable of programming I stuck with simply using it, before I moved on to other PCs.
One evening when moving the big old box of Atari stuff to a different part of my basement I realized that I should probably archive the contents of the floppy disks before they became too old to read. So, I did. What follows here is a bit of information about how I archived the disks, tools used, and images of most of the disks themselves.
Additionally, the photo album containing images relating to my Atari 800XL can be found here.
Tools Used
Atari 1050
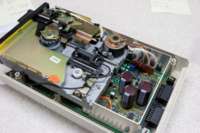
With the purchase of the Atari 800XL my parents also acquired an Atari 1050, which is a 5.25" single-sided dual-density floppy drive. As this drive was the only one ever used with our set of floppy disks it was perfect for imaging the floppy disks. Unfortunately, when I tried to power it up as a test, it wouldn't turn on.
A bit of digging into the problem (and my smelling some rather warm components) led me to find a short between ground and the +5VDC rail and ground and the +12VDC rail. However, there wasn't a short between +5VDC and +12VDC. After a bit of thinking I'd narrowed the problem down to the main PCB in the 1050. Thanks to Stephen on YakYak I was able to get an Atari 1050 schematic and get everything working. As I had first expected, the problem was in some of the electrolytic capacitors. Specifically, the problem was with C69 and either C42 or C43, which had failed and become conductive, shorting the 5VDC and 12VDC rails to ground.
After identifying parts which would fit, I ordered ~$10 worth of electrolytic capacitors from Mouser and replaced all of them. As this type of capacitor will occasionally fail with age, I wanted to extend the life of the drive the best I could, so I replaced them all. Except for making a mistake and accidentally lifting a trace on the board (which was easily remedied) the capacitor replacement went great and afterwards the drive was working like new.
The following components were used as replacements:
| Part Name on PCB | Value | Part Number | Quantity | Catalog Description |
|---|---|---|---|---|
| C67, C68, C71 | 6800μF | 661-KMH35VN682MT2 | 3 | Snap Mount Aluminum Electrolytic Capacitors 6800uF 35V† |
| C21, C41 | 4.7μF | 140-HTRL50V4.7-RC | 2 | Hi-Temp Radial Electrolytic Capacitors 50V 4.7uF 105C |
| C42, C43, C69, C70 | 47μF | 140-HTRL50V47-RC | 4 | Hi-Temp Radial Electrolytic Capacitors 50V 47uF 105C |
| C44 | 2.2μF | 140-HTRL50V2.2-RC | 1 | Hi-Temp Radial Electrolytic Capacitors 50V 2.2uF 105C |
| C51 | 1.0μF | 140-HTRL50V1.0-RC | 1 | Hi-Temp Radial Electrolytic Capacitors 50V 1.0uF 105C |
† The snap-in terminals on the 6800μF capacitors were too large to fit in the holes on the Atari 1050's PCB. To make them fit I ground the terminals thinner using a Dremel and a small grinding stone. The terminals are fairly thick to begin with, so this is easy to do.
Universal SIO2PC/ProSystem Interface
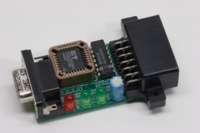
In order to connect the floppy drive (or any other SIO peripheral) to a PC a number of devices, commonly known as SIO2PC adapters, have been designed. I chose to use Atarimax's Universal SIO2PC/ProSystem Interface which allowed my Atari 1050 to connect directly to my PC.
Other SIO2PC interfaces are available, but the Atarimax's Universal SIO2PC/ProSystem Interface seems to work with all SIO2PC software and ProSystem without reconfiguration, which made things very easy for me. After removing the retainer nuts from the DB9 connector I was able to plug it directly into the back of my laptop, cutting down on cable clutter.
Using Atarimax's ProSystem I could then image each floppy directly to an image file. These image files can then be used with emulators, peripheral emulators (such as APE), or written back to floppies. They are also ideal for my purposes, which is archiving the images to prevent them from being lost as the magnetic media they were stored on ages.
The SIO2PC adapter is powered from 5V of the SIO bus. Because the neither the 1050 nor the SIO2PC (via serial port) provide this power, I used the Atari 800XL as a power injector. To do this I connected the 800XL to one port of the 1050, then the SIO2PC to the other port of the 1050. The 800XL was powered on and allowed to boot to BASIC. Then the floppy drive was powered on, and whatever software was used on the PC (in this case ProSystem) was started and used. As long as the 800XL remained unused no additional data was transmitted on the SIO bus and the disk images were available intact.

ProSystem
Another Atarimax product is called ProSystem, which is available as shareware in a bundle with APE. Using APE and/or ProSystem it is trivial to copy Atari floppy disks to images, in both .ATR and .PRO formats. I used the shareware version for copying these disks, but I expect to register it soon if I find myself using APE directly with the 800XL as a replacement for the floppy drive.
Copying the disks was as simple as inserting the disk into the drive, indicating the destination filename, and clicking start. The resulting files could then either be presented to an 800XL via APE or booted in an emulator.
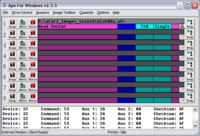
APE
APE, the Atari Peripheral Emulator, can add a checksum to ATR files using built-in ATR Authentication. I've signed and sealed all ATR images created with ProSystem in APE, hopefully ensuring that I don't use corrupt versions of the images.

Problems Encountered
Unfortunately, some of these images do have a few bad sectors, but thanks to ProSystem's logging these are all known. One side of two disks couldn't be read, with one of the disks causing the drive to constantly attempt to read until it was powered off. ProSystem would report an error and cease imaging. This disk (8, side A) had physical damage to its surface and it is suspected that this damage caused the drive to hang.
According to the labeling of disk 16, side B it contained data, but ProSystem reported only bad blocks on this disk. In my experience this seems indicative of a blank, unformatted disk.
When attempting to use the composite input of my Dell 2005FPW as a display for the Atari 800XL there seems to be sync problems which cause the display to be overly compressed vertically. I also observed this problem when attempting to connect a NES to the display, so the problem is likely with the display itself. However, it keeps me from easily using the Atari 800XL in my office.
Using Images
APE
APE, the Atari Peripheral Emulator's core usage is to allow a PC to emulate various Atari devices, such as cassette players, floppy drives, printers, and plotters. This is especially useful for me, as it lets me boot the 800XL directly from the archived images stored on the PC instead of having to find media, write it, and maintain the aging mechanics of the floppy drive.
Atari810
Another Atari floppy emulator, Atari810, presents a floppy drive to Atari hardware via SIO2PC in a manner similar to APE, but only one drive at a time. It is also GPL'd. A mirror of v1.4d is available here.
Atari 800XL Emulators
While nothing beats booting the disk images on an actual Atari 800XL, it's not always very practical to pull out all the old hardware, connect it to a monitor / television, and use it all. Sometimes it's more practical to use an emulator. I've found two emulators based on the Atari800 project which seem to work rather well. Unfortunately, some programs which work great on the actual 800XL hardware fail under emulation, but these seem to be the exception rather than the norm.
These are the two emulators I've found myself using most often:
- Atari800Win PLus - A Polish Atari 800 emulator for Windows. (v4.0 Mirror)
- Atari800MacX - Mac OS X (Universal Binary) port of Atari800 (v3.6.0 Mirror)
Download Images
Since old / archived software benefits very few people as it sits locked away, I intend to share the floppy disk images I recovered. After I have finished determining which disks contain personal information (and thusly won't be shared), information about each image and a link to where it can be downloaded from will be posted here.