
Overview
I've had a camera for most of my life, and in this time I ended up documenting a good many things. Some of these are trivial (my bedroom), others are fairly once-in-a-lifetime (attempting to move to Alaska). While film is a nice long-term storage medium, it isn't especially flexible. It is easily damaged, and by it's very nature it's difficult to view.
With a book of negatives sitting around and with my recent acquisition of 566 of my parents slides from the late 1970s and early 1980s, I have been wanting to finally digitize these negatives both to ease reprinting, for presentation online, and for archival purposes. So, I set to work scanning the photos. After trying the first scanner, a flatbed Epson Perfection 3170 PHOTO, I ended up going with a Nikon Coolscan V ED, a scanner designed for this kind of work.
In this write-up I will attempt to detail the problems faced by the need to scan these films, both in the form of 110 slides and 35mm negatives, the tools I used to work around these problems, and the workflow which works best for me.
Media
110 Slides
In the late 1970s and early 1980s my parents used Kodak 110 slide film to take many of their photos. At once point I came into possession of five trays of these slides, holding a total of around 566 slides. As slides require a projector to properly view, and 110 projectors being difficult to come by, my parents had been unable to view these images for almost fifteen years, and I wanted to scan them both for preservation and so that they would be able to view them again.
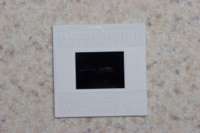
110's small image size of 13mm x 17mm makes the image on them fairly low resolution, but with a proper scanner it is still possible to recover a good bit of detail. However, with a slide frame size of 40mm x 40mm, these slides don't fit into any standard scanners.
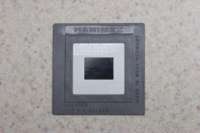
In order to adapt the slides to a standard size I purchased a box of 50 plastic slide adapters via eBay. These adapters then allowed the slides to be loaded into any device designed to hold 2" x 2" slides, albeit with a considerably smaller image in the center. After fitting the slides into these adapters they could then be loaded into either the slide tray of the Epson Perfection 3170 PHOTO or the slide loader of the Nikon Coolscan V ED.
All of the 110 slides scanned were either Kodachrome or Ektachrome film. Kodachrome slides seem to be of a higher quality, with a more durable plastic frame in which the films tended to be perfectly aligned. The Ektachrome slides tended to have problems with alignment in the plastic frames, and some sets of slides appeared to have been damaged by the processor, as there were many water spots and scratches on the slides.
35mm Negatives
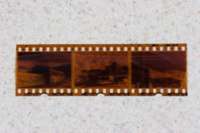
The 35mm negatives, which are technically 135 film, are considerably easier to scan than the 110 slides. Both the Epson Perfection 3170 PHOTO and Nikon Coolscan V ED have facilities for holding these directly. I only ran into two major problems with the negatives. The first is an issue with slightly curled negatives, which causes a slight distortion during scanning.
The second problem was caused by the facility developing the negatives. It seems that some places are a bit careless in their trimming of negatives, and a few of the original negatives are cut off, with the lost bit of image likely lost to some landfill years ago.
Scratches, Dust, Dirt, etc.
One of the biggest problems with archiving digital images is damage done to the source media. Problems I had with the films during scanning were mostly dust and scratches, with a few bits of dirt, fingerprints, and water spots on some of the images.
Dust
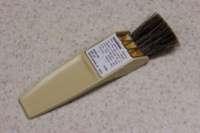
Being easy to clean off, I remove dust from slides with a bulb-type blower, a Staticmaster Ionizing Brush, or a combination of both. Stubborn pieces of dust could be dislodged by gently touching them with a cotton swab, then using the brush or blower to clear them from the film.
Dirt, Fingerprints, and Water spots
I've had good luck removing dirt, fingerprints, and water spots with 99% isopropyl alcohol and/or distilled water, and soft cotton swabs. One needs to be very careful not to scratch the emulsion while cleaning negatives. After cleaning the film with liquid I would then dry it with the bulb-type blower. I never, ever use canned air-type products on film or camera equipment as it can leave residue.
Scratches
Since scratches (obviously) can't be cleaned off of the media, I used the Digital ICE4 feature of the Nikon Coolscan V ED to remove them. Digital ICE4 works by capturing an infrared scan of the slide in order to detect dust and scratches, then correcting for them.
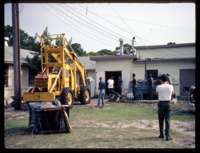
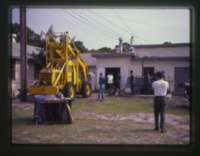
As an example, this scan of a 35mm negative was made with Digital ICE4 scratch removal turned off. Note the dust in the lower right, the scratches around and above the house on the right, and a few pinhole marks all over the image. This scan of the same negative, this time with Digital ICE4 scratch removal turned on, shows a marked reduction in the amount of dust, scratches, and other such marks on the slides.
When scanning the 110 slides I found that Digital ICE4 would produce rather strange results. Compare this slide without ICE to this one with ICE enabled. There is a noticeable halo effect on the scans of 110 slides where ICE was enabled. I've read that this is because of some incompatibilities with Kodachrome film, which most of the slides are. This may be because there is visible depth to the emulsion of Kodachrome, especially at the points in the image where there are great changes in brightness.
Scanners
 Nikon Coolscan V ED 110 Slide Scan Example |
 Epson Perfection 3170 PHOTO 110 Slide Scan Example |
Epson Perfection 3170 PHOTO
A few years ago I purchased an Epson Perfection 3170 PHOTO flatbed scanner. While it works very well for documents and photographs, it didn't meet my expectations when it came to scanning of transparancies.
While the Epson Perfection 3170 PHOTO has a partial transparency hood and some trays for holding 2" x 2" slides, 35mm films, and 120 films. Loading of the films into the scanner is fairly straightforward, but uneven illumination, inconsistent software, no real good holder to keep negatives flat, and a lack of resolution caused me to use a different scanner for scanning the 110 slides and 35mm negatives.
The two scans to the right can be used to compare the quality of a raw scan from the Epson Perfection 3170 PHOTO and Nikon Coolscan V ED. When using the Epson flatbed there is also a slight glow visible around the edge of the scanned slide, which appears to be a slight reflection from the plastic frame of the slide. As can be seen, the Nikon Coolscan V ED is clearly the better scanner of the two.
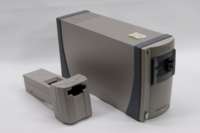
Nikon Coolscan V ED
In November, 2006 I finally purchased a Nikon Coolscan V ED. These scanners typically are priced at around US$550 new and US$480 used (via eBay). With the minimal price difference between new and used models and wanting for a new, dust-free scanner to work with, I decided to purchase a new one. Once I have finished scanning films I expect to sell the scanner on eBay. I take rather good care of electronics, so it shouldn't be a problem to sell it.
This scanner is capable of handling strips of 35mm film (via an autoloader) or 2" x 2" slides (and more, with the purchase of various accessories) it handles all formats I have a need to scan. The LED illumination lights up immediately, and the scans are fairly quick. With Digital ICE4 35mm negatives take 2-3 minutes each, and 110 slides with ICE disabled take around one minute.
Just as a note, occasionally while scanning an image all USB devices on my Mac (first generation PowerMac G5 Dual 2.0Ghz running OS X 10.4.8) would hang. This included external disks, HID devices (mouse/keyboard), scanner, etc. After around fifteen seconds everything would continue operating as normal. Such pauses did not affect scanning and were simply an irritation. It also happened whether the Nikon Coolscan V ED was connected to a USB hub or it's own root port.
Software
Epson Scan
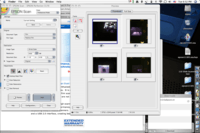
Epson Scan software comes bundled with most Epson scanners, including the Epson Perfection 3170 PHOTO and can be run either stand-alone or as a Photoshop plugin. It seems to be very good for scanning of documents, photographic prints, and fairly transparent slides and negatives. However, when using it with 110 slides in adapters I ran into some issues where the software would automatically crop the image strangely, making the whole of the image unselectable.
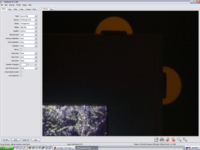
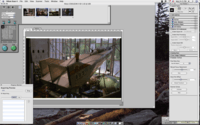
This screenshot of Epson Scan previewing some 110 slides in carriers illustrates the problem. Because of this it was nearly impossible to scan 110 slides with it. Additionally, as this scanned image from a 35mm negative illustrates, the software would also automatically trim away completely dark areas automatically, making them unselectable. This caused problems with 35mm negatives as well, as many of the images I have were taken outdoors at night.
Epson Scan does have a very nice batch mode, which handles the typical auto-incrementing of filenames, and automatic acquisition of multiple files when using a film adapter. It's unfortunate that it has issues detecting black areas, otherwise I would say this would be a good, one-item solution for basic film scanning.
VueScan
Before abandoning the Epson Perfection 3170 PHOTO I decided to try some third-party software which is compatible with it. Having heard good things about VueScan, I downloaded it and gave it a go. The software seemed to crash / hang quite a bit when used under OS X, so I instead ran it from my work-provided Dell D610 laptop.
Initially the software seemed to perform well with the scanner, so I purchased a copy and began using it to scan 110 slides. However, within the first tray of slides I realized that I was having a problem where some areas of the slide wouldn't really have resolved and that the images looked a bit washed out. It was at this point that I realized the best route for me would be to purchase a proper, dedicated film scanner, so I ordered the Nikon Coolscan V ED.
As the software only cost US$39 its disuse isn't a huge loss, and it may very well come in handy with the Epson Perfection 3170 PHOTO sometime in the future. For now, though, it just sits unused.
Nikon Scan
The Nikon Coolscan V ED ships with a software package called Nikon Scan, which is intended to operate all features of Nikon's supported scanners. I used version 4.0.2 for my scanning and only ran into a few problems with it. First, it would crash occasionally. This wasn't consistent and as restarting the scanner and software allows one to continue working it also isn't a huge problem. When doing large batch scans every day, I would average perhaps one crash per day.
Nikon Scan also doesn't seem to save settings for Digital ICE4, color depth, and other such settings between filmstrip loads. While I would only end up loading a strip of four or five negatives every 20 minutes or so, it was still frustrating to have to change these settings each time.
Additionally, while Nikon Scan will automatically increment a filename in batch scanning mode, there are no provisions for doing so when making individual scans. As the scanner doesn't ship with an automatic slide loader (and I didn't purchase one) I had to manually name each scanned slide. This too wasn't a huge problem, just a bit of an irritation.
Nikon Scan has the ability to output a number of file formats, including a RAW format. Unfortunately none of the RAW converters I use, such as Lightroom or dcraw support these RAW files. It is possible to feed them back into Nikon Scan for re-processing, but I didn't find this useful. For my needs I outputted the files at the native 4000dpi, with 14-bit (per channel) color.
I've have read that Nikon Scan is not currently compatible with Intel-based Apple computers. As I have a PowerPC-based G5 this isn't an issue for me, but I imagine it is keeping anyone with one of the newer (and wonderful) Mac Pros, MacBooks, iMacs, and such from using the scanner. That's a real shame as it works very well. For those individuals using an Intel-based Apple, VueScan is likely the best option.
All in all, I'm fairly happy with the results of Nikon Scan when used with the Nikon Coolscan V ED. I'd definitely recommend this scanner and software combination to many people for initial image aquisition.
Canon Digital Photo Professional
Canon's Digital Photo Professional (DPP) is a RAW conversion and image cropping software package which ships with many of Canon's higher end digital cameras. It has basic facilities for correcting blemishes in images (mostly caused by dust on the CCD in a camera) but, unfortunately, does not support incremental rotation. I received a copy with my EOS 20D and used it for a while as my workflow's RAW converter, until I moved on to Lightroom.
While I prefer to process images in Lightroom, it does not (yet) support cropping images to specific dimensions, only aspect ratios. As DPP allows one to easily crop an set of images to a particular physical size, I would open the TIFFs outputted from Nikon Scan in DPP, trim them to size, then export them for use in Lightroom. Once Lightroom supports cropping to specific dimensions DPP will no longer be needed.
Adobe Photoshop Lightroom
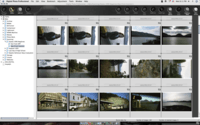
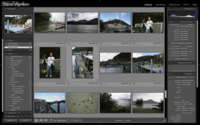
Adobe Photoshop Lightroom is currently a new product from Adobe which seems to be designed for processing of RAW photos. I've been quite happy with it for normal RAW photos and I am currently using it as my standard library manager / RAW converter. I also use it for cataloging and archiving scanned slides, as I find it very easy to use and wonderful for cataloging large numbers of images.
After exporting images from DPP I import them into Lightroom for cataloging, color correction, and exporting as JPEGs. If I have a need to crop the images further, it is done here in Lightroom. I prefer not to do this, but sometimes it is useful to crop images to a particular aspect ratio before having them printed, so that the results from the printer are as expected.
Images from Lightroom are exported to JPEG for digital distribution, including uploading to my my photo gallery.
Workflow
110 Slides
- Slide loaded into 2" x 2" holder.
- Slide inserted into Nikon Coolscan V ED.
- After automatic preview is displayed in Nikon Scan, initial rough cropping of image is confirmed.
- Scan button is clicked, and the next filename in the series is used to save the file.
- TIFF from Nikon Scan is imported into Canon Digital Photo Professional (DPP).
- Image is cropped in DPP to desired height / width. In my case, 2450 x 1850.
- Image is exported from DPP to full-resolution 16-bit TIFF.
- TIFF from DPP is imported into Adobe Photoshop Lightroom for cataloging.
- Any needed cropping and / or color correction is performed as needed.
- Images are exported from Lightroom in whatever format is desired.
35mm Negatives
- Strip of negatives is inserted into scanner.
- Initiate preview of images to be scanned in Nikon Scan.
- After automatic preview is displayed in Nikon Scan, each frame is set to be scanned at 14 bit color, with Digital ICE4 enabled.
- Scan is initiated, confirming to continue using the currently auto-incrementing naming sequence.
- TIFF from Nikon Scan is imported into Canon Digital Photo Professional (DPP).
- Image is cropped in DPP to desired height / width. In my case, 5650 x 3700.
- Image is exported from DPP to full-resolution 16-bit TIFF.
- TIFF from DPP is imported into Adobe Photoshop Lightroom for cataloging.
- Any needed cropping and / or color correction is performed as needed.
- Images are exported from Lightroom in whatever format is desired.
Printing
After scanning the 110 slides for my parents, they requested a print of every single image. To make this affordable I cropped all images to 4x6 in Adobe Photoshop Lightroom, exported them to high quality JPEGs, burned these images to a DVD, and then took them to Costco for printing. At US$0.14 per 4" x 6" print from a Noritsu photo printer (which prints on actual photo paper) the cost was just under US$75 to have all images printed.
I personally strongly recommend Costco for photo printing. The finished prints are generally available within 45 minutes of submission, the quality of the prints is very high quality for the price, and ICC profiles for printers at most Costco locations are available from Dry Creek Photo.
Results
In the end I am rather happy with how this process worked out. I was able to essentially bulk-scan a large number of 110 slides and 35mm negatives, making their content available in an easy to view, fairly good looking digital format. As the scans were done in bulk I didn't take the time to color correct individual images. If there is a need for an very good quality copy of one of the images, be they from 110 slide or 35mm negative, I can either use the archived TIFF in Lightroom and clean it up as needed, or rescan the whole image with settings appropriate for that particular image.
Cleaning of images is generally performed in Adobe Photoshop, or possibly using external applications such as Noise Ninja. While I have not used it much yet, Noise Ninja is very good at removing both digital noise and film grain from scanned images.
Hardware Platforms
Most of the applications I've listed here are shown (and explained) as used with Apple's Mac OS X. However, each of the applications are available for both Windows and OS X. All the hardware is also compatible with both platforms, so this article applies to both platforms. The machines used for this testing and scanning are as follows:
PowerMac G5
- Dual 2.0 GHz PowerPC G5, First Generation
- 3.5GB RAM
- 2x 320GB Hard Disk
- OS X 10.4.8
Dell Latitude D610
- Single Pentium M 1.73 GHz
- 1GB RAM
- 60GB Hard DIsk
- Windows XP SP2
External Links
- B&H - My favorite online photography shop. Great prices, excellent customer service, and very reliable.
- Nikon Coolscan V ED - The film scanner I used for slides and negatives.
- Adobe Photoshop Lightroom - My preferred image library / RAW converter application.
- Canon's Digital Photo Professional - The RAW converter which came with my camera, works fairly well.
- VueScan - Third-party scanning software for OS X, Windows, and Linux. Supports many scanners.
- Noise Ninja - Amazing software for reducing grain in film and noise in digital photographs.